User Manual
Page 1
SyncMaster 320TSn-3 LCD Display User Manual The color and the appearance may differ depending on the product, and the specifications are subject to change without prior notice to improve the performance.
SyncMaster 320TSn-3 LCD Display User Manual The color and the appearance may differ depending on the product, and the specifications are subject to change without prior notice to improve the performance.
User Manual
Page 10
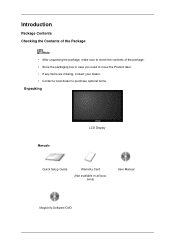
Introduction Package Contents Checking the Contents of the Package Note • After unpacking the package, make sure to check the contents of the package. • Store the packaging box in case you need to move the Product later. • If any items are missing, contact your dealer. • Contact a local dealer to purchase optional items. Unpacking Manuals LCD Display Quick Setup Guide Warranty Card (Not available in all locations) User Manual MagicInfo Software DVD
Introduction Package Contents Checking the Contents of the Package Note • After unpacking the package, make sure to check the contents of the package. • Store the packaging box in case you need to move the Product later. • If any items are missing, contact your dealer. • Contact a local dealer to purchase optional items. Unpacking Manuals LCD Display Quick Setup Guide Warranty Card (Not available in all locations) User Manual MagicInfo Software DVD

User Manual
Page 13
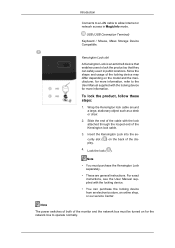
... by blinking green Note See PowerSaver described in the manual for details about cable connections. Power indicator Shows PowerSaver mode by Samsung and connect the MagicInfo output on the network box to [HDMI IN 2 (MAGICINFO)] on the product. The LCD Display's configuration at the back may display abnormally if the connected external input signal is...
... by blinking green Note See PowerSaver described in the manual for details about cable connections. Power indicator Shows PowerSaver mode by Samsung and connect the MagicInfo output on the network box to [HDMI IN 2 (MAGICINFO)] on the product. The LCD Display's configuration at the back may display abnormally if the connected external input signal is...
User Manual
Page 17
... box to lock the product so that enables users to operate normally. Lock the lock ( ). For exact instructions, see the User Manual supplied with the lock attached through the looped end of the monitor and the network box must purchase the Kensington Lock separately. •...Kensington lock cable around a large, stationary object such as a desk or chair. 2. Slide the end of the display. 4. Introduction Connects to a LAN cable to the User Manual supplied with the locking device for more information, refer to allow Internet or network access in public locations. Since the ...
... box to lock the product so that enables users to operate normally. Lock the lock ( ). For exact instructions, see the User Manual supplied with the lock attached through the looped end of the monitor and the network box must purchase the Kensington Lock separately. •...Kensington lock cable around a large, stationary object such as a desk or chair. 2. Slide the end of the display. 4. Introduction Connects to a LAN cable to the User Manual supplied with the locking device for more information, refer to allow Internet or network access in public locations. Since the ...
User Manual
Page 19
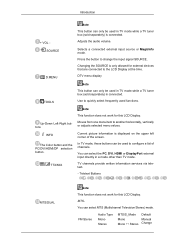
...values. TV channels provide written information services via teletext. - FM Stereo Audio Type Mono Stereo MTS/S_Mode Mono Mono Stereo Default Manual Change Moves from one menu item to change the input signal SOURCE. Adjusts the audio volume. Introduction + VOL SOURCE D.MENU ...This function does not work for this LCD Display. Selects a connected external input source or MagicInfo mode. DTV menu display Note This button can be used functions. Use to the LCD Display at the time. MTS- Changing the SOURCE is displayed on the upper left corner of channels....
...values. TV channels provide written information services via teletext. - FM Stereo Audio Type Mono Stereo MTS/S_Mode Mono Mono Stereo Default Manual Change Moves from one menu item to change the input signal SOURCE. Adjusts the audio volume. Introduction + VOL SOURCE D.MENU ...This function does not work for this LCD Display. Selects a connected external input source or MagicInfo mode. DTV menu display Note This button can be used functions. Use to the LCD Display at the time. MTS- Changing the SOURCE is displayed on the upper left corner of channels....
User Manual
Page 42
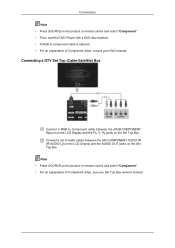
...DVD Player with a DVD disc inserted. • A RGB to component cable is optional. • For an explanation of Component video, see your DVD manual. Note • Press SOURCE on the Set Top Box. Connections Note • Press SOURCE on the Set Top Box. Connecting a DTV Set Top (Cable.../Satellite) Box Connect a RGB to Component cable between the [AV/COMPONENT AUDIO IN [R-AUDIO-L]] on the LCD Display and the AUDIO OUT jacks on the product or remote control and select "Component". • For an explanation of Component video, consult your Set Top...
...DVD Player with a DVD disc inserted. • A RGB to component cable is optional. • For an explanation of Component video, see your DVD manual. Note • Press SOURCE on the Set Top Box. Connections Note • Press SOURCE on the Set Top Box. Connecting a DTV Set Top (Cable.../Satellite) Box Connect a RGB to Component cable between the [AV/COMPONENT AUDIO IN [R-AUDIO-L]] on the LCD Display and the AUDIO OUT jacks on the product or remote control and select "Component". • For an explanation of Component video, consult your Set Top...
User Manual
Page 46
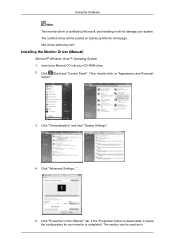
...) and "Control Panel". ization". 3. If the "Properties" button is deactivated, it will be used as is completed. The certified driver will not damage your system. Click "Personalization" and then "Display Settings". 4. http://www.samsung.com/ Installing the Monitor Driver (Manual) Microsoft® Windows Vista™, Operating System 1. Then, double-click on Samsung Monitor homepage. Insert...
...) and "Control Panel". ization". 3. If the "Properties" button is deactivated, it will be used as is completed. The certified driver will not damage your system. Click "Personalization" and then "Display Settings". 4. http://www.samsung.com/ Installing the Monitor Driver (Manual) Microsoft® Windows Vista™, Operating System 1. Then, double-click on Samsung Monitor homepage. Insert...
User Manual
Page 69
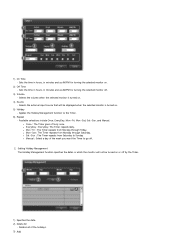
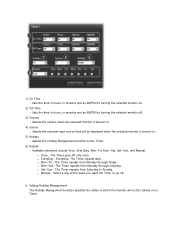
... : The Timer goes off . 2. z Mon~Sat : The Timer repeats from Monday through Saturday. z Sat~Sun : The Timer repeats from Saturday to Sunday z Manual : Select a day of the holidays. 3) Add Applies the Holiday Management function to go off only once. z Mon~Fri : The Timer repeats from Monday through Friday... - Selects the volume when the selected monitor is turned on or off . 3) Volume - Selects the external input source that will not be displayed when the selected monitor is turned on . 2) Off Time - 1) On Time - Deletes all of the week you want the Timer to the ...
... : The Timer goes off . 2. z Mon~Sat : The Timer repeats from Monday through Saturday. z Sat~Sun : The Timer repeats from Saturday to Sunday z Manual : Select a day of the holidays. 3) Add Applies the Holiday Management function to go off only once. z Mon~Fri : The Timer repeats from Monday through Friday... - Selects the volume when the selected monitor is turned on or off . 3) Volume - Selects the external input source that will not be displayed when the selected monitor is turned on . 2) Off Time - 1) On Time - Deletes all of the week you want the Timer to the ...

User Manual
Page 76
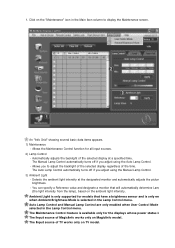
...Detects the ambient light intensity at a specified time. Auto Lamp Control and Manual Lamp Control are only enabled when User Control Mode is selected in the Main Icon column to display the Maintenance screen. Maintenance Scroll 1. Click on TV model. Automatically adjusts the... 1) Maintenance - Allows you adjust using the Manual Lamp Control. 3) Ambient Light - The Maintenance Control feature is selected in the Main Icon column to adjust the backlight of the selected display regardless of the selected display at the designated monitor and automatically adjusts the ...
...Detects the ambient light intensity at a specified time. Auto Lamp Control and Manual Lamp Control are only enabled when User Control Mode is selected in the Main Icon column to display the Maintenance screen. Maintenance Scroll 1. Click on TV model. Automatically adjusts the... 1) Maintenance - Allows you adjust using the Manual Lamp Control. 3) Ambient Light - The Maintenance Control feature is selected in the Main Icon column to adjust the backlight of the selected display regardless of the selected display at the designated monitor and automatically adjusts the ...

User Manual
Page 87
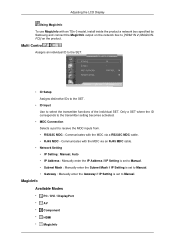
or refresh or delete selected devices. 2) The IP Address, ID (Ethernet or Serial), Mac Address and connection status of the connected monito 3) It can automatically check whether DHCP IP is set and then set the IP address. 4) It can automatically or manually set and then apply the IP Address, Subnet and Gateway of the sele Input Source 1) Click Input Source of the main icons and the Input Source control screen appears. 1) Select or clear all the added devices; Selects displays you want to adjust using the Select All button or checkboxes. • TV Mode
or refresh or delete selected devices. 2) The IP Address, ID (Ethernet or Serial), Mac Address and connection status of the connected monito 3) It can automatically check whether DHCP IP is set and then set the IP address. 4) It can automatically or manually set and then apply the IP Address, Subnet and Gateway of the sele Input Source 1) Click Input Source of the main icons and the Input Source control screen appears. 1) Select or clear all the added devices; Selects displays you want to adjust using the Select All button or checkboxes. • TV Mode
User Manual
Page 94
Selects the external input source that will not be displayed when the selected monitor is turned on or o Timer. z EveryDay : EveryDay: The Timer repeats daily. z Sat~Sun : The Timer repeats from Saturday to go off. 2. ..., in minutes and as AM/PM for turning the selected monitor on . 5) Holiday - Available selections include Once, EveryDay, Mon~Fri, Mon~Sat, Sat~Sun, and Manual. z Manual : Select a day of the week you want the Timer to Sunday. Setting Holiday Management The Holiday Management function specifies the dates in minutes and as...
Selects the external input source that will not be displayed when the selected monitor is turned on or o Timer. z EveryDay : EveryDay: The Timer repeats daily. z Sat~Sun : The Timer repeats from Saturday to go off. 2. ..., in minutes and as AM/PM for turning the selected monitor on . 5) Holiday - Available selections include Once, EveryDay, Mon~Fri, Mon~Sat, Sat~Sun, and Manual. z Manual : Select a day of the week you want the Timer to Sunday. Setting Holiday Management The Holiday Management function specifies the dates in minutes and as...
User Manual
Page 104
Automatically adjusts the backlight of the selected display at the designated monitor and automatically adjusts the picture brightness. - Auto Lamp Control and Manual Lamp Control are only enabled when User Control Mode selected in the Lamp Control menu. Detects the ambient light ...the time. The Maintenance Control feature is available only for all input sources. 2) Lamp Control - Allows the Maintenance Control function for the displays whose power status is selected in the Lamp Control menu. An "Info Grid" showing several basic data items appears. 1) Maintenance - Ambient...
Automatically adjusts the backlight of the selected display at the designated monitor and automatically adjusts the picture brightness. - Auto Lamp Control and Manual Lamp Control are only enabled when User Control Mode selected in the Lamp Control menu. Detects the ambient light ...the time. The Maintenance Control feature is available only for all input sources. 2) Lamp Control - Allows the Maintenance Control function for the displays whose power status is selected in the Lamp Control menu. An "Info Grid" showing several basic data items appears. 1) Maintenance - Ambient...

User Manual
Page 109
... display. 3. No selection: Displays the Factory Default Value. 2. Selected one display (ID1) and add another display (ID3): The program, which was displaying the se value of ID 1, fetches and displays the value of ID3. 4. If all sets are displayed as follows. 1. file://C:\AST\ENG\BN59-01122D-02\BN59-01122D-02\manual... 2011-06-17 Settings Value Display In Multiple Display...
... display. 3. No selection: Displays the Factory Default Value. 2. Selected one display (ID1) and add another display (ID3): The program, which was displaying the se value of ID 1, fetches and displays the value of ID3. 4. If all sets are displayed as follows. 1. file://C:\AST\ENG\BN59-01122D-02\BN59-01122D-02\manual... 2011-06-17 Settings Value Display In Multiple Display...

User Manual
Page 132
Note • Only enabled when the clock is set the LCD display to select a day of the week. Sleep Timer Turns the LCD Display off at certain times. 1. Clock Set Adjusting the LCD Display Current Time Setting. Off 2. 30 3. 60 4. 90 5. 120 6. 150 7. 180 Timer1 / Timer2 / Timer3 You can set using the Clock Set menu. • The Manual option allows you to automatically turn on or off automatically at a specified time.
Note • Only enabled when the clock is set the LCD display to select a day of the week. Sleep Timer Turns the LCD Display off at certain times. 1. Clock Set Adjusting the LCD Display Current Time Setting. Off 2. 30 3. 60 4. 90 5. 120 6. 150 7. 180 Timer1 / Timer2 / Timer3 You can set using the Clock Set menu. • The Manual option allows you to automatically turn on or off automatically at a specified time.

User Manual
Page 142
... the fan speed settings. • Auto • Manual Fan Speed Setting Sets the fan speed within a range of 40°C). Note • The picture will be dimmed if the temperature exceeds the specified .... • It is set to use the product at temperatures 75 - 80°C (based on ambient temperature of 0 and 100. The product is best to Manual. Temperature Control Detects the product's internal temperature and specifies the desired temperature. Note Enabled when Fan Control is set to 77°C by detecting the...
... the fan speed settings. • Auto • Manual Fan Speed Setting Sets the fan speed within a range of 40°C). Note • The picture will be dimmed if the temperature exceeds the specified .... • It is set to use the product at temperatures 75 - 80°C (based on ambient temperature of 0 and 100. The product is best to Manual. Temperature Control Detects the product's internal temperature and specifies the desired temperature. Note Enabled when Fan Control is set to 77°C by detecting the...
User Manual
Page 148
... MDC - Adjusting the LCD Display Using MagicInfo To use MagicInfo with an TSn-3 model, install inside the product a network box specified by Samsung and connect the MagicInfo output on the product. Communicates with the MDC via an RJ45 MDC cable. • Network Setting • IP Setting : Manual, Auto • IP Address : Manually enter the IP...
... MDC - Adjusting the LCD Display Using MagicInfo To use MagicInfo with an TSn-3 model, install inside the product a network box specified by Samsung and connect the MagicInfo output on the product. Communicates with the MDC via an RJ45 MDC cable. • Network Setting • IP Setting : Manual, Auto • IP Address : Manually enter the IP...
User Manual
Page 157
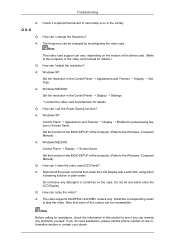
... of the computer. (Refer to the computer or the video card manual for details. Do not leave any water enter the LCD Display. Q: How can I clean the outer case/LCD Panel? Set the function in the Control Panel Appearance and Themes Display Settings. A: Windows ME/2000: Control Panel Display Screen Saver. A: Windows XP: Set the resolution in the BIOS...
... of the computer. (Refer to the computer or the video card manual for details. Do not leave any water enter the LCD Display. Q: How can I clean the outer case/LCD Panel? Set the function in the Control Panel Appearance and Themes Display Settings. A: Windows ME/2000: Control Panel Display Screen Saver. A: Windows XP: Set the resolution in the BIOS...

User Manual
Page 160
... sav- However, if the signal differs, the screen may be adjusted automatically. Be sure to disconnect the power if you intend to the video card manual and adjusts the screen as the following Preset Timing Modes, the screen will be different from home for many hours. Preset Timing Modes If the....000 +/+ 47.712 60.015 85.500 +/+ 47.712 59.790 85.500 +/+ 75.000 60.000 162.000 +/+ 67.500 60.000 148.500 +/+ Display Mode IBM, 640 x 350 IBM, 640 x 480 IBM, 720 x 400 MAC, 640 x 480 MAC, 832 x 624 MAC, 1152 x 870 VESA, 640 x 480 VESA, 640 x 480...
... sav- However, if the signal differs, the screen may be adjusted automatically. Be sure to disconnect the power if you intend to the video card manual and adjusts the screen as the following Preset Timing Modes, the screen will be different from home for many hours. Preset Timing Modes If the....000 +/+ 47.712 60.015 85.500 +/+ 47.712 59.790 85.500 +/+ 75.000 60.000 162.000 +/+ 67.500 60.000 148.500 +/+ Display Mode IBM, 640 x 350 IBM, 640 x 480 IBM, 720 x 400 MAC, 640 x 480 MAC, 832 x 624 MAC, 1152 x 870 VESA, 640 x 480 VESA, 640 x 480...
User Manual
Page 170
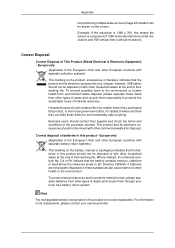
... disposed of, these substances can take these items from uncontrolled waste disposal, please separate these items for environmentally safe recycling. For information on the battery, manual or packaging indicates that the batteries in EC Directive 2006/66. Europe only (Applicable in the European Union and other European countries with separate collection...
... disposed of, these substances can take these items from uncontrolled waste disposal, please separate these items for environmentally safe recycling. For information on the battery, manual or packaging indicates that the batteries in EC Directive 2006/66. Europe only (Applicable in the European Union and other European countries with separate collection...

