User Manual
Page 1
SyncMaster 320TSn-3 LCD Display User Manual The color and the appearance may differ depending on the product, and the specifications are subject to change without prior notice to improve the performance.
SyncMaster 320TSn-3 LCD Display User Manual The color and the appearance may differ depending on the product, and the specifications are subject to change without prior notice to improve the performance.

User Manual
Page 12
... item to improve the performance. Adjust buttons (Left-Right buttons) / Volume buttons Moves from the menu. Introduction Your LCD Display The color and the appearance may differ depending on the product, and the specifications are subject to change without prior notice to another vertically or adjusts selected menu values. Front MENU button [MENU...
... item to improve the performance. Adjust buttons (Left-Right buttons) / Volume buttons Moves from the menu. Introduction Your LCD Display The color and the appearance may differ depending on the product, and the specifications are subject to change without prior notice to another vertically or adjusts selected menu values. Front MENU button [MENU...
User Manual
Page 51
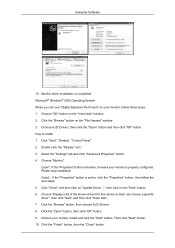
Microsoft® Windows® 2000 Operating System When you can choose a specific driver", then click "Next" and then click "Have disk". 7. Select the "Settings" tab and click "Advanced Properties" button. 4. Choose "Display a list of the known drivers for this device so that I can see "Digital ...then click on your monitor, follow the next steps. 5. Click the "Open" button, then click "OK" button. 9. Click "Start", "Setting", "Control Panel". 2. Then click "Next" button. 10. Click the "Finish" button, then the "Close" button. Click the "Browse" button on the "Insert disk" ...
Microsoft® Windows® 2000 Operating System When you can choose a specific driver", then click "Next" and then click "Have disk". 7. Select the "Settings" tab and click "Advanced Properties" button. 4. Choose "Display a list of the known drivers for this device so that I can see "Digital ...then click on your monitor, follow the next steps. 5. Click the "Open" button, then click "OK" button. 9. Click "Start", "Setting", "Control Panel". 2. Then click "Next" button. 10. Click the "Finish" button, then the "Close" button. Click the "Browse" button on the "Insert disk" ...
User Manual
Page 52
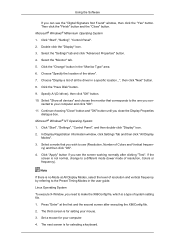
... and the "Close" button. Click the "Change" button in a specific location...", then click "Next" button. 8. Choose "Specify the location of resolution, Colors or frequency). Click "Start", "Settings", "Control Panel", and then double-click "Display" icon. 2. cy) and then click "OK". 4. Press "Enter" at All Display Modes, select the level of resolution and vertical frequency...
... and the "Close" button. Click the "Change" button in a specific location...", then click "Next" button. 8. Choose "Specify the location of resolution, Colors or frequency). Click "Start", "Settings", "Control Panel", and then double-click "Display" icon. 2. cy) and then click "OK". 4. Press "Enter" at All Display Modes, select the level of resolution and vertical frequency...
User Manual
Page 59
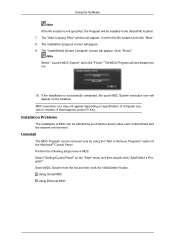
... Using the Software Note If the file location is successfully completed, the quick MDC System execution icon will appear on specification of the Windows® Control Panel. The installation progress screen will appear. If the installation is not specified, the Program will be run. 10. ...in the default file location. 7. Confirm the file location and click "Next." 8. Click "Finish." The MDC Program will appear. Select "Setting/Control Panel" on the "Start" menu and then double-click "Add/Delete a Program". Note Select " Launch MDC System" and click "Finish." If that...
... Using the Software Note If the file location is successfully completed, the quick MDC System execution icon will appear on specification of the Windows® Control Panel. The installation progress screen will appear. If the installation is not specified, the Program will be run. 10. ...in the default file location. 7. Confirm the file location and click "Next." 8. Click "Finish." The MDC Program will appear. Select "Setting/Control Panel" on the "Start" menu and then double-click "Add/Delete a Program". Note Select " Launch MDC System" and click "Finish." If that...

User Manual
Page 81
Main Screen Connect the first display device and the PC by entering the IP address. Refer to another display use an RS-232C serial cable. To connect to the figure above. Introduction Unlike the previous method which used the serial data communication specifications RS-232C, an Ethe function has been added.
Main Screen Connect the first display device and the PC by entering the IP address. Refer to another display use an RS-232C serial cable. To connect to the figure above. Introduction Unlike the previous method which used the serial data communication specifications RS-232C, an Ethe function has been added.
User Manual
Page 143
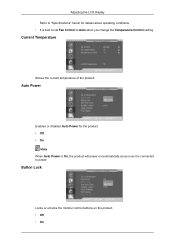
Current Temperature Shows the current temperature of the product. Auto Power Enables or disables Auto Power for details about operating conditions. • It is connected to power. Button Lock Locks or unlocks the monitor control buttons on automatically as soon as it is best to set Fan Control to Auto when you change the Temperature Control setting. Adjusting the LCD Display Refer to "Specifications" herein for the product. • Off • On Note When Auto Power is On, the product will power on the product. • Off • On
Current Temperature Shows the current temperature of the product. Auto Power Enables or disables Auto Power for details about operating conditions. • It is connected to power. Button Lock Locks or unlocks the monitor control buttons on automatically as soon as it is best to set Fan Control to Auto when you change the Temperature Control setting. Adjusting the LCD Display Refer to "Specifications" herein for the product. • Off • On Note When Auto Power is On, the product will power on the product. • Off • On

User Manual
Page 151
step 4 You can choose and set a specific language among them. 4. Setup Information Select Screen Type - Adjusting the LCD Display When using multiple languages, you can select which rotation type will be applied to your device. 5.
step 4 You can choose and set a specific language among them. 4. Setup Information Select Screen Type - Adjusting the LCD Display When using multiple languages, you can select which rotation type will be applied to your device. 5.
User Manual
Page 153
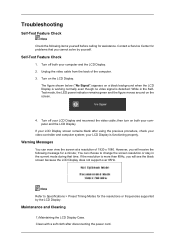
... is detected: While in the current mode during that you cannot solve by the LCD Display. your video controller and computer system; Warning Messages You can choose to Specifications > Preset Timing Modes for the resolutions or frequencies supported by yourself. If the resolution... is functioning properly. Maintenance and Cleaning 1) Maintaining the LCD Display Case. Self-Test Feature Check 1. Note Refer to ...
... is detected: While in the current mode during that you cannot solve by the LCD Display. your video controller and computer system; Warning Messages You can choose to Specifications > Preset Timing Modes for the resolutions or frequencies supported by yourself. If the resolution... is functioning properly. Maintenance and Cleaning 1) Maintaining the LCD Display Case. Self-Test Feature Check 1. Note Refer to ...

User Manual
Page 158
Specifications General General Model Name 320TSn-3 LCD Panel Size Display Area 31.5 inch / 80cm 697.68 mm(H) x 392.25 mm(V) Synchronization Horizontal Vertical 30~81 kHz 56~85 Hz Display Color 16.7M (true) Resolution Optimum resolution Maximum resolution 1366 x 768 @ 60Hz 1920 x 1080 @ 60Hz Maximum Pixel Clock 148.5MHz (Analog, Digital) Power Supply This ...
Specifications General General Model Name 320TSn-3 LCD Panel Size Display Area 31.5 inch / 80cm 697.68 mm(H) x 392.25 mm(V) Synchronization Horizontal Vertical 30~81 kHz 56~85 Hz Display Color 16.7M (true) Resolution Optimum resolution Maximum resolution 1366 x 768 @ 60Hz 1920 x 1080 @ 60Hz Maximum Pixel Clock 148.5MHz (Analog, Digital) Power Supply This ...
User Manual
Page 159
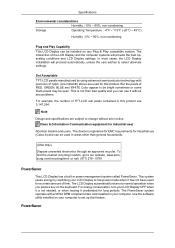
...Dot Acceptable TFT-LCD panels manufactured by switching your computer. But the pixels of the LCD Display and the computer systems will proceed automatically, unless the user wishes to change without any Plug & Play compatible system. Note Design and specifications are 3,147... Play Capability This LCD Display can be used in areas other than general households. (USA Only) Dispose unwanted electronics through an approved recycler. The LCD Display automatically returns to our website, www.samsung.com/recyclingdirect or call, (877) 278 - 0799 PowerSaver This LCD Display has a built-in...
...Dot Acceptable TFT-LCD panels manufactured by switching your computer. But the pixels of the LCD Display and the computer systems will proceed automatically, unless the user wishes to change without any Plug & Play compatible system. Note Design and specifications are 3,147... Play Capability This LCD Display can be used in areas other than general households. (USA Only) Dispose unwanted electronics through an approved recycler. The LCD Display automatically returns to our website, www.samsung.com/recyclingdirect or call, (877) 278 - 0799 PowerSaver This LCD Display has a built-in...

User Manual
Page 160
.... Power sav- However, if the signal differs, the screen may be adjusted automatically. Preset Timing Modes If the signal transferred from home for many hours. Display Mode IBM, 640 x 350 IBM, 640 x 480 IBM, 720 x 400 MAC, 640 x 480 MAC, 832 x 624 MAC, 1152 x 870 VESA, 640 x 480 VESA, 640 x 480....500 +/+ 47.712 59.790 85.500 +/+ 75.000 60.000 162.000 +/+ 67.500 60.000 148.500 +/+ State Power Indicator Power Consumption (Typical) Specifications Normal Op-
.... Power sav- However, if the signal differs, the screen may be adjusted automatically. Preset Timing Modes If the signal transferred from home for many hours. Display Mode IBM, 640 x 350 IBM, 640 x 480 IBM, 720 x 400 MAC, 640 x 480 MAC, 832 x 624 MAC, 1152 x 870 VESA, 640 x 480 VESA, 640 x 480....500 +/+ 47.712 59.790 85.500 +/+ 75.000 60.000 162.000 +/+ 67.500 60.000 148.500 +/+ State Power Indicator Power Consumption (Typical) Specifications Normal Op-

User Manual
Page 161
Unit: kHz Vertical Frequency Like a fluorescent lamp, the screen has to repeat the same image many times per second to display an image to the left edge of the screen horizontally is called the Horizontal Cycle and the inverse number of this repetition is called the Vertical Frequency or Refresh Rate. The frequency of the Horizontal Cycle is called the Horizontal Frequency. Specifications Horizontal Frequency The time to scan one line connecting the right edge to the user. Unit: Hz
Unit: kHz Vertical Frequency Like a fluorescent lamp, the screen has to repeat the same image many times per second to display an image to the left edge of the screen horizontally is called the Horizontal Cycle and the inverse number of this repetition is called the Vertical Frequency or Refresh Rate. The frequency of the Horizontal Cycle is called the Horizontal Frequency. Specifications Horizontal Frequency The time to scan one line connecting the right edge to the user. Unit: Hz


