
User Manual
Page 11
... Wire Cable Introduction Package Contents Note • Please make sure the following items are subject to buy optional items. Note • This stand is not for reasons of the product may vary depending on the model, and the product specifications are included with your dealer. Select Language... Package Contents Your LCD Display Machanical Layout Connections Using the Software Adjusting the LCD Display Troubleshooting Specifications Information Appendix Model SyncMaster 320PX The color and appearance of performance enhancement. If any items are missing, contact your LCD Display.
... Wire Cable Introduction Package Contents Note • Please make sure the following items are subject to buy optional items. Note • This stand is not for reasons of the product may vary depending on the model, and the product specifications are included with your dealer. Select Language... Package Contents Your LCD Display Machanical Layout Connections Using the Software Adjusting the LCD Display Troubleshooting Specifications Information Appendix Model SyncMaster 320PX The color and appearance of performance enhancement. If any items are missing, contact your LCD Display.
User Manual
Page 12
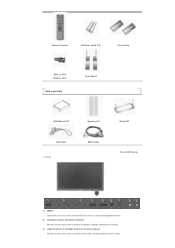
Remote Control Batteries (AAA X 2) Cover-Hole BNC to RCA Adaptor Jack Sold separately Semi Stand Wall Mount KIT Speaker Set DVI Cable Front BNC Cable Stand KIT Your LCD Display 1) MENU Opens the on-screen menu and exits from the menu or closes the adjustment menu. 2) Navigate buttons (Up-Down buttons) Moves from one menu item to another vertically or adjusts selected menu values. 3) Adjust buttons (Left-Right buttons)/ Volume buttons Moves from one menu item to another horizontally or adjusts selected menu values.
Remote Control Batteries (AAA X 2) Cover-Hole BNC to RCA Adaptor Jack Sold separately Semi Stand Wall Mount KIT Speaker Set DVI Cable Front BNC Cable Stand KIT Your LCD Display 1) MENU Opens the on-screen menu and exits from the menu or closes the adjustment menu. 2) Navigate buttons (Up-Down buttons) Moves from one menu item to another vertically or adjusts selected menu values. 3) Adjust buttons (Left-Right buttons)/ Volume buttons Moves from one menu item to another horizontally or adjusts selected menu values.

User Manual
Page 19
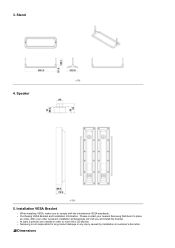
Mechanical Layout | Monitor Head | Stand | Speaker | Installation VESA Bracket | Wall Bracket Installation 1. Monitor Head Mechanical Layout 2.
Mechanical Layout | Monitor Head | Stand | Speaker | Installation VESA Bracket | Wall Bracket Installation 1. Monitor Head Mechanical Layout 2.
User Manual
Page 20
3. Installation VESA Bracket z When installing VESA, make sure to move the LCD Monitor. z Purchasing VESA Bracket and Installation Information : Please contact your order is not responsible for any product damage or any injury caused by installation at customer's discretion. Stand 4. After your nearest Samsung Distributor to place an order. Speaker 5. z Samsung is placed, installation professionals will visit you and install the bracket. z At least 2 persons are needed in order to comply with the international VESA standards. Dimensions
3. Installation VESA Bracket z When installing VESA, make sure to move the LCD Monitor. z Purchasing VESA Bracket and Installation Information : Please contact your order is not responsible for any product damage or any injury caused by installation at customer's discretion. Stand 4. After your nearest Samsung Distributor to place an order. Speaker 5. z Samsung is placed, installation professionals will visit you and install the bracket. z At least 2 persons are needed in order to comply with the international VESA standards. Dimensions
User Manual
Page 23
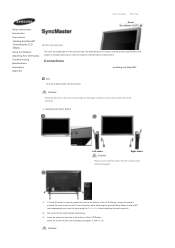
Select Language Main Page Safety Instructions Introduction Connections Installing the Stand KIT Connecting the LCD Display Using the Software Adjusting the LCD Display Troubleshooting Specifications Information Appendix Model SyncMaster 320PX The color and appearance of the product may vary depending ...the LCD Display , where the stand is used . Connections Installing the Stand KIT Note • Only the supplied bolts should be responsible for reasons of the LCD Display. Caution Samsung Electronics will not be used to install the stand with the Caution label folded backwards...
Select Language Main Page Safety Instructions Introduction Connections Installing the Stand KIT Connecting the LCD Display Using the Software Adjusting the LCD Display Troubleshooting Specifications Information Appendix Model SyncMaster 320PX The color and appearance of the product may vary depending ...the LCD Display , where the stand is used . Connections Installing the Stand KIT Note • Only the supplied bolts should be responsible for reasons of the LCD Display. Caution Samsung Electronics will not be used to install the stand with the Caution label folded backwards...

User Manual
Page 24
...' when attaching the wall mount kit. 2) Ensure that the parts are inserted in the right direction and in the right place. (M4 x L15) 3) Insert the stand into the hole indicated and tighten it. (M4 x L15) Connecting the LCD Display Using a Power cord with Earth In the event of the LCD Display... , where the stand is inserted. Under no circumstances use the product as your computer can be connected to protect the hole at the bottom of the LCD Display...
...' when attaching the wall mount kit. 2) Ensure that the parts are inserted in the right direction and in the right place. (M4 x L15) 3) Insert the stand into the hole indicated and tighten it. (M4 x L15) Connecting the LCD Display Using a Power cord with Earth In the event of the LCD Display... , where the stand is inserted. Under no circumstances use the product as your computer can be connected to protect the hole at the bottom of the LCD Display...
User Manual
Page 28
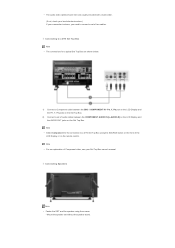
... Display and the AUDIO OUT jacks on the front of Component video, see your camcorder is stereo, you need to connect a set without the speaker stand. PR, Y, PB port on the LCD Display and the PR, Y, PB jacks on the remote control. Note • For an explanation of the LCD Display...
... Display and the AUDIO OUT jacks on the front of Component video, see your camcorder is stereo, you need to connect a set without the speaker stand. PR, Y, PB port on the LCD Display and the PR, Y, PB jacks on the remote control. Note • For an explanation of the LCD Display...

User Manual
Page 68
...Troubleshooting Specifications General PowerSaver Preset Timing Modes Information Appendix Select Language Main Page Model SyncMaster 320PX The color and appearance of performance enhancement. Specifications General General General Model Name SyncMaster 320PX LCD Panel Size 32 " Diagonal (80 cm) Display area 697.6845 mm ... 50/60 Hz Signal Cable 15pin to 15pin D-sub cable, Detachable DVI-D to change without Stand), 16.1 kg / 35.4 lbs 780 X 530 X 223 mm / 30.1 X 20.9 X 8.8 inch (with Stand) VESA Mounting Interface 200 mm x 200 mm (for reasons of the product may vary depending...
...Troubleshooting Specifications General PowerSaver Preset Timing Modes Information Appendix Select Language Main Page Model SyncMaster 320PX The color and appearance of performance enhancement. Specifications General General General Model Name SyncMaster 320PX LCD Panel Size 32 " Diagonal (80 cm) Display area 697.6845 mm ... 50/60 Hz Signal Cable 15pin to 15pin D-sub cable, Detachable DVI-D to change without Stand), 16.1 kg / 35.4 lbs 780 X 530 X 223 mm / 30.1 X 20.9 X 8.8 inch (with Stand) VESA Mounting Interface 200 mm x 200 mm (for reasons of the product may vary depending...


