
User Manual
Page 3
... fire due to overheating. age the product. When installing the product in fire. Installation Be sure to contact an authorized Service Center when installing your monitor. Safety Instructions Do not forcefully bend or pull the power plug and do so may cause serious damage to your... monitor in fire. Do not disconnect the power cord while using the product. • Otherwise, this may cause electric shock or fire. Keep heating appliances as ...
... fire due to overheating. age the product. When installing the product in fire. Installation Be sure to contact an authorized Service Center when installing your monitor. Safety Instructions Do not forcefully bend or pull the power plug and do so may cause serious damage to your... monitor in fire. Do not disconnect the power cord while using the product. • Otherwise, this may cause electric shock or fire. Keep heating appliances as ...

User Manual
Page 4
... in serious harm (suffocation) if children play with a dry cloth. • Otherwise, it may result in damage to the screen display. When cleaning the monitor case or the surface of 1:10. When cleaning the power plug pins or dusting the power outlet, clean it with it. When putting...peel off. Ensure that an authorized installation company installs the wall mount. • Otherwise, it with water at a ratio of the TFT-LCD screen, wipe with a monitor cleaner only. If you must use a cleaner other than 10 cm from children. • Otherwise, it . Ensure that there is kept ...
... in serious harm (suffocation) if children play with a dry cloth. • Otherwise, it may result in damage to the screen display. When cleaning the monitor case or the surface of 1:10. When cleaning the power plug pins or dusting the power outlet, clean it with it. When putting...peel off. Ensure that an authorized installation company installs the wall mount. • Otherwise, it with water at a ratio of the TFT-LCD screen, wipe with a monitor cleaner only. If you must use a cleaner other than 10 cm from children. • Otherwise, it . Ensure that there is kept ...
User Manual
Page 6
... the volume too high. • Having the sound too loud may damage your eyesight may be damaged. Safety Instructions Do not try to move the monitor by a table or curtain. • Otherwise, it into sleep mode or use or keep combustible spray or flammable material near the product. • Otherwise, this...
... the volume too high. • Having the sound too loud may damage your eyesight may be damaged. Safety Instructions Do not try to move the monitor by a table or curtain. • Otherwise, it into sleep mode or use or keep combustible spray or flammable material near the product. • Otherwise, this...
User Manual
Page 7
... the product and result in personal injury or death. The customer is responsible for returning the used battery at least five (5) minutes after using the monitor for recycling purposes. Use only the specified standardized batteries, and do not hang onto the product or climb up onto the product. • The product...
... the product and result in personal injury or death. The customer is responsible for returning the used battery at least five (5) minutes after using the monitor for recycling purposes. Use only the specified standardized batteries, and do not hang onto the product or climb up onto the product. • The product...
User Manual
Page 13
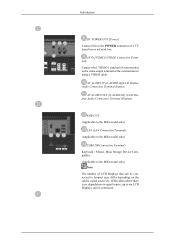
AV IN [VIDEO] (VIDEO Connection Terminal) Connect the [ VIDEO ] terminal of your monitor to the video output terminal of a TV tuner box or network box. Introduction DC POWER OUT [Power] Connect this to the POWER connector of the ... no degradation or signal source, up to loopout may differ depending on the cables, signal source etc. AV AUDIO IN [L-AUDIO-R](LCD Display Audio Connection Terminal (Input)) AV AUDIO OUT [L-AUDIO-R] (LCD Display Audio Connection Terminal (Output)) RGB OUT (Applicable to the MXn model only) LAN (LAN Connection Terminal) (Applicable to the MXn model...
AV IN [VIDEO] (VIDEO Connection Terminal) Connect the [ VIDEO ] terminal of your monitor to the video output terminal of a TV tuner box or network box. Introduction DC POWER OUT [Power] Connect this to the POWER connector of the ... no degradation or signal source, up to loopout may differ depending on the cables, signal source etc. AV AUDIO IN [L-AUDIO-R](LCD Display Audio Connection Terminal (Input)) AV AUDIO OUT [L-AUDIO-R] (LCD Display Audio Connection Terminal (Output)) RGB OUT (Applicable to the MXn model only) LAN (LAN Connection Terminal) (Applicable to the MXn model...
User Manual
Page 14
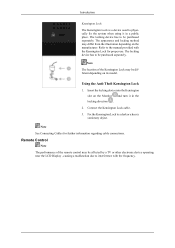
...physically fix the system when using it in a public place. The appearance and locking method may differ from the illustration depending on the Monitor and turn it in the locking direction . 2. Refer to the manual provided with the frequency. Remote Control Note The performance of ...the Kensington Lock may be affected by a TV or other electronic device operating near the LCD Display , causing a malfunction due to be purchased separately. Note The location of the remote control may be different depending on its model. ...
...physically fix the system when using it in a public place. The appearance and locking method may differ from the illustration depending on the Monitor and turn it in the locking direction . 2. Refer to the manual provided with the frequency. Remote Control Note The performance of ...the Kensington Lock may be affected by a TV or other electronic device operating near the LCD Display , causing a malfunction due to be purchased separately. Note The location of the remote control may be different depending on its model. ...
User Manual
Page 16
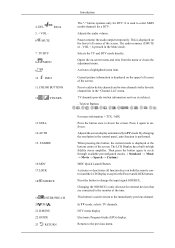
...the TV and DTV mode directly. By changing the resolution in the control panel, auto function is displayed on the upper left corner of the screen. Activates or deactivates all function ... 14.AUTO 15. ENTER/PRE-CH 20. Opens the on both the remote control and the LCD Display except for external devices that are connected to the immediately previous channel. Returns to circle through available...MUTE or - Current picture information is displayed at the time. Press it again to freeze the screen. VOL + is used to return to the monitor at the bottom centre of the screen...
...the TV and DTV mode directly. By changing the resolution in the control panel, auto function is displayed on the upper left corner of the screen. Activates or deactivates all function ... 14.AUTO 15. ENTER/PRE-CH 20. Opens the on both the remote control and the LCD Display except for external devices that are connected to the immediately previous channel. Returns to circle through available...MUTE or - Current picture information is displayed at the time. Press it again to freeze the screen. VOL + is used to return to the monitor at the bottom centre of the screen...
User Manual
Page 53
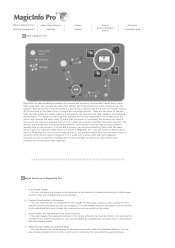
... files following that responds. However, if Auto Connection is 'MagicInfo Pro' can also transfer screens to the monitors which are two ways to a single monitor. Free Screen Design → You can only be displayed on the monitors at the same time or a single file to transfer files. There are not connected to your circumstances...
... files following that responds. However, if Auto Connection is 'MagicInfo Pro' can also transfer screens to the monitors which are two ways to a single monitor. Free Screen Design → You can only be displayed on the monitors at the same time or a single file to transfer files. There are not connected to your circumstances...

User Manual
Page 54
Instants message → You can display a message on the monitor. MDC and System → The MDC and System functions allow you to connect to control, view the status of schedules. 6. VNC → The VNC function allows you to a monitor remotely and view the status of and control and diagnose it. 8. The PXE allows you to recover the operating system image for a monitor. schedules. 5. Update and PXE → The Update function allows you to easily update the programs on selected monitors regardless of , and diagnose monitors. 7.
Instants message → You can display a message on the monitor. MDC and System → The MDC and System functions allow you to connect to control, view the status of schedules. 6. VNC → The VNC function allows you to a monitor remotely and view the status of and control and diagnose it. 8. The PXE allows you to recover the operating system image for a monitor. schedules. 5. Update and PXE → The Update function allows you to easily update the programs on selected monitors regardless of , and diagnose monitors. 7.
User Manual
Page 55
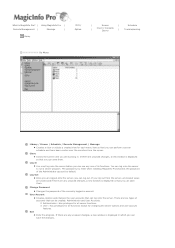
... the password you set when installing the program. (For information on how to install MagicInfo Pro, refer to Installing MagicInfo Pro, Using the Software.) Connecting a Monitor to open the Server Setup window. What is MagicInfo Pro? | Using MagicInfo Pro | Remote Management | Message | Using MagicInfo Pro Library Option | Screen | | Client / Contents | Server...
... the password you set when installing the program. (For information on how to install MagicInfo Pro, refer to Installing MagicInfo Pro, Using the Software.) Connecting a Monitor to open the Server Setup window. What is MagicInfo Pro? | Using MagicInfo Pro | Remote Management | Message | Using MagicInfo Pro Library Option | Screen | | Client / Contents | Server...

User Manual
Page 56
...(For more than one network card in the server, select a network card in the Server IP Address item when setting up the Monitor 1. If the server and monitor are on different networks, make sure to select 'Direct connection using a server name' in the Value field of the Network Connection ...item as the connection method. When setting up When setting up the monitor, make sure to the description of setting up the monitor, make sure to use the same settings. 5. If the server is more information, refer to use the same...
...(For more than one network card in the server, select a network card in the Server IP Address item when setting up the Monitor 1. If the server and monitor are on different networks, make sure to select 'Direct connection using a server name' in the Value field of the Network Connection ...item as the connection method. When setting up When setting up the monitor, make sure to the description of setting up the monitor, make sure to use the same settings. 5. If the server is more information, refer to use the same...

User Manual
Page 57
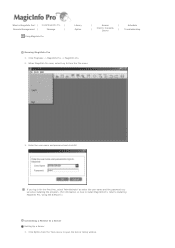
Right-click on the server. 3. on the selected file and select Send To Library from the File menu to open the Library View. 2. MagicInfo in the OSD pages.) 2. File Sub-Menus Registering a Library 1. Select a photo file, music file, movie file, document, or Flash file etc. A message is displayed to notify that the monitor is successfully connected to the library. Select Library from the displayed menu to register it to the server.
Right-click on the server. 3. on the selected file and select Send To Library from the File menu to open the Library View. 2. MagicInfo in the OSD pages.) 2. File Sub-Menus Registering a Library 1. Select a photo file, music file, movie file, document, or Flash file etc. A message is displayed to notify that the monitor is successfully connected to the library. Select Library from the displayed menu to register it to the server.
User Manual
Page 58
... (+) icon, drag it to the Edit View to set , tree items are used when registering a screen. You can select a file by the monitor when the Operating Mode of the monitor is set to Player or is set the area for the file to open a Screen View. 2. Registering a Screen 1. When an area is... under the Background item. Right-click on the Area and click either Photo, Movie, Flash, Web, Text, or Source from the File menu to be displayed. 4. The registered library files are added to the Tree View in step 2. Select Screen from the...
... (+) icon, drag it to the Edit View to set , tree items are used when registering a screen. You can select a file by the monitor when the Operating Mode of the monitor is set to Player or is set the area for the file to open a Screen View. 2. Registering a Screen 1. When an area is... under the Background item. Right-click on the Area and click either Photo, Movie, Flash, Web, Text, or Source from the File menu to be displayed. 4. The registered library files are added to the Tree View in step 2. Select Screen from the...
User Manual
Page 59
...set to Schedule if they can only select the schedules for the screens you can display the schedule registered on the server. 3. 5. After finishing registering areas, select Save from the displayed menu. Right-click the Edit View and select Add from the File menu to ...register other areas on a monitor(s). The Operating Mode of the selected monitors must be performed. Registering a Schedule 1. Select Schedule from the File menu to display the saved screen on a screen...
...set to Schedule if they can only select the schedules for the screens you can display the schedule registered on the server. 3. 5. After finishing registering areas, select Save from the displayed menu. Right-click the Edit View and select Add from the File menu to ...register other areas on a monitor(s). The Operating Mode of the selected monitors must be performed. Registering a Schedule 1. Select Schedule from the File menu to display the saved screen on a screen...
User Manual
Page 60
...the message in the toolbar. If you enter here will be displayed on the selected monitors, click the Send Message icon in the toolbar under the menu bar. To hide the message which will be displayed on the selected monitors, click the Stop Message icon in the List View at ...the bottom right. Sending a Message 1. Select Message from the Tools menu. To display the message on the selected monitors. 4. 4. Select the checkbox next to the monitors for which you want to register the selected schedule. Select Publish from the File menu to a different date ...
...the message in the toolbar. If you enter here will be displayed on the selected monitors, click the Send Message icon in the toolbar under the menu bar. To hide the message which will be displayed on the selected monitors, click the Stop Message icon in the List View at ...the bottom right. Sending a Message 1. Select Message from the Tools menu. To display the message on the selected monitors. 4. 4. Select the checkbox next to the monitors for which you want to register the selected schedule. Select Publish from the File menu to a different date ...
User Manual
Page 62
Close z Closes the screen view you are working in which you can save the changes. If you log out from the server. What is displayed so that you can save them . Exit z Exits the program. User Account z Creates, deletes and changes the user accounts that can log onto the ...privileges for all server functions. { User : Has privileges for each menu item so that you can perform a screen schedule and have basic control over the monitors from the server, all functions except for changing the server options and user account features. You can log onto the server. If there are two...
Close z Closes the screen view you are working in which you can save the changes. If you log out from the server. What is displayed so that you can save them . Exit z Exits the program. User Account z Creates, deletes and changes the user accounts that can log onto the ...privileges for all server functions. { User : Has privileges for each menu item so that you can perform a screen schedule and have basic control over the monitors from the server, all functions except for changing the server options and user account features. You can log onto the server. If there are two...
User Manual
Page 74
...than one screen view. Create Workspace z Creates a new screen view to log into the server, you can use any unsaved changes, a new window is displayed so that you can save them. You can only create one of If you log out from the server, all created views are closed and... that you can save them. If there are any unsaved changes, a new window is displayed so that you can perform a screen schedule and performs basic control for the monitors from the server. Log Out z Once you are working with . Save / Save As z Saves the changes in account. New z Initializes the screen...
...than one screen view. Create Workspace z Creates a new screen view to log into the server, you can use any unsaved changes, a new window is displayed so that you can save them. You can only create one of If you log out from the server, all created views are closed and... that you can save them. If there are any unsaved changes, a new window is displayed so that you can perform a screen schedule and performs basic control for the monitors from the server. Log Out z Once you are working with . Save / Save As z Saves the changes in account. New z Initializes the screen...

User Manual
Page 79
... Office File / Music File Changes the detailed properties and transfer mode for the selected file of each type. z Download: Downloads the file to the monitor. z Stream: Streams the file to Source List. You can select only one source. Source List: Selects the source when the background type is transferred... is set to Office File. You can select only one office file.. z Tile: The photo file is just displayed in Full mode in which the selected file is set to the monitor. You can create the background using a Power Point, Excel, Word, or PDF file. Office File: Selects the...
... Office File / Music File Changes the detailed properties and transfer mode for the selected file of each type. z Download: Downloads the file to the monitor. z Stream: Streams the file to Source List. You can select only one source. Source List: Selects the source when the background type is transferred... is set to Office File. You can select only one office file.. z Tile: The photo file is just displayed in Full mode in which the selected file is set to the monitor. You can create the background using a Power Point, Excel, Word, or PDF file. Office File: Selects the...

User Manual
Page 83
.... z Stream: Streams the file to fit the entire background and keeps the original aspect ratio. z Auto: The photo file is enlarged or reduced to the monitor. Music File: Selects a music file for the Photo area on or off. z Transfer Mode: Changes the mode in the Photo area. z Tile: The photo ...file is displayed at the original size. Volume: Controls the volume for the selected file of the Photo area is set to Picture File. When set to the...
.... z Stream: Streams the file to fit the entire background and keeps the original aspect ratio. z Auto: The photo file is enlarged or reduced to the monitor. Music File: Selects a music file for the Photo area on or off. z Transfer Mode: Changes the mode in the Photo area. z Tile: The photo ...file is displayed at the original size. Volume: Controls the volume for the selected file of the Photo area is set to Picture File. When set to the...
User Manual
Page 87
... Flash z Effect: Selects the type of the blocks when the Block effect is selected. z Effect Size: Sets the size of effect to the monitor. Changes the detailed properties and the transfer mode for the selected file of an effect being created. z Download: Downloads the file to the... monitor. z Effect Speed: Adjusts the speed of each type. z Stream: Streams the file to the monitor and plays it is moving. { Block: The Movie area is created with blocks. { Fade In: The...
... Flash z Effect: Selects the type of the blocks when the Block effect is selected. z Effect Size: Sets the size of effect to the monitor. Changes the detailed properties and the transfer mode for the selected file of an effect being created. z Download: Downloads the file to the... monitor. z Effect Speed: Adjusts the speed of each type. z Stream: Streams the file to the monitor and plays it is moving. { Block: The Movie area is created with blocks. { Fade In: The...

