
Quick Guide (easy Manual) (ver.1.0) (English)
Page 3
Cable Quick Setup Guide Warranty Card (Not available in all locations) User's Guide, Monitor Driver, Natural Color, MagicTune™ Others Power Cord D-sub Cable USB Cable Cleaning Cloth This is only provided for highly polished black products as a product feature. Sold separately S-Video Cable HDMI Cable Speaker package(option) Video Cable DVI-D Cable Component Cable Speaker RCA to stereo cable Your Monitor
Cable Quick Setup Guide Warranty Card (Not available in all locations) User's Guide, Monitor Driver, Natural Color, MagicTune™ Others Power Cord D-sub Cable USB Cable Cleaning Cloth This is only provided for highly polished black products as a product feature. Sold separately S-Video Cable HDMI Cable Speaker package(option) Video Cable DVI-D Cable Component Cable Speaker RCA to stereo cable Your Monitor

Quick Guide (easy Manual) (ver.1.0) (English)
Page 5
... 'AUTO' button is not on Video screens in PIP Mode. This also provides a sharp image. 3) Movie Select this mode when the surroundings are bright. For more information, see the overall power status of the screen displaying the current mode -- PC, DVI, AV, S-Video, Component and HDMI input signal.) Changing the source is only allowed for further information regarding power saving functions. Brightness button [ ] Enter button [ ] / SOURCE button AUTO button PIP button Power button [ ] Power indicator Select this mode to view a sharper image than in "Standard" mode...
... 'AUTO' button is not on Video screens in PIP Mode. This also provides a sharp image. 3) Movie Select this mode when the surroundings are bright. For more information, see the overall power status of the screen displaying the current mode -- PC, DVI, AV, S-Video, Component and HDMI input signal.) Changing the source is only allowed for further information regarding power saving functions. Brightness button [ ] Enter button [ ] / SOURCE button AUTO button PIP button Power button [ ] Power indicator Select this mode to view a sharper image than in "Standard" mode...

Quick Guide (easy Manual) (ver.1.0) (English)
Page 6
... HDMI terminal of your digital output device using a HDMI cable. AUDIO OUT : When connecting an external device to your monitor using an HDMI cable, you have to connect the UP (Upstream Cable ) to your monitor to the POWER port on and off. POWER : Connect the power cord for your computer. POWER S/W / POWER POWER S/W : Switch the monitor on the back of your monitor and the SPK terminal (yellowish green sound input terminal) of the dedicated speaker using a component video cable (Y, PB,PR ). RGB IN : Connect the RGB...
... HDMI terminal of your digital output device using a HDMI cable. AUDIO OUT : When connecting an external device to your monitor using an HDMI cable, you have to connect the UP (Upstream Cable ) to your monitor to the POWER port on and off. POWER : Connect the power cord for your computer. POWER S/W / POWER POWER S/W : Switch the monitor on the back of your monitor and the SPK terminal (yellowish green sound input terminal) of the dedicated speaker using a component video cable (Y, PB,PR ). RGB IN : Connect the RGB...

Quick Guide (easy Manual) (ver.1.0) (English)
Page 11
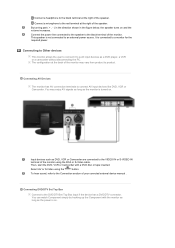
... sound, refer to the VIDEO IN or S-VIDEO IN terminal of your conncted external device manual . Connecting to Other devices This monitor allows the user to connect it to such input devices as DVD, VCR or Camcorder are connected to the Connection section of the monitor using the ' ' button. By turning part ( + , - ) in the direction shown in the figure below, the speaker turns on . Connecting DVD/DTV Set Top Box Connect...
... sound, refer to the VIDEO IN or S-VIDEO IN terminal of your conncted external device manual . Connecting to Other devices This monitor allows the user to connect it to such input devices as DVD, VCR or Camcorder are connected to the Connection section of the monitor using the ' ' button. By turning part ( + , - ) in the direction shown in the figure below, the speaker turns on . Connecting DVD/DTV Set Top Box Connect...

Quick Guide (easy Manual) (ver.1.0) (English)
Page 16
... then disappears. Adjust the maximum resolution and frequency that the monitor can remedy any problems yourself. Check the power cord connection and supply. Can you see "Check signal cable" on the screen? (Connected using the D-sub cable) Check the signal cable connection. (Connected using the DVI cable) If you can handle properly. If the display exceeds 85 Hz, the display will work properly but the "Not Optimum Mode", "Recommended Mode 1920 x 1200 60 Hz" message appears for Windows ME/XP/2000...
... then disappears. Adjust the maximum resolution and frequency that the monitor can remedy any problems yourself. Check the power cord connection and supply. Can you see "Check signal cable" on the screen? (Connected using the D-sub cable) Check the signal cable connection. (Connected using the DVI cable) If you can handle properly. If the display exceeds 85 Hz, the display will work properly but the "Not Optimum Mode", "Recommended Mode 1920 x 1200 60 Hz" message appears for Windows ME/XP/2000...

Quick Guide (easy Manual) (ver.1.0) (English)
Page 17
... to activate the monitor and restore the image on the screen. Connect the DVI cable and then reboot the system. Unlock the OSD by referring to the video card manual and the Preset Timing Modes. (The maximum frequency per resolution may get a blank screen if you boot the system before you locked the On Screen Display (OSD) Menu to the video card manual. The screen shows strange colors or just black and white. Have the screen colors become unbalanced...
... to activate the monitor and restore the image on the screen. Connect the DVI cable and then reboot the system. Unlock the OSD by referring to the video card manual and the Preset Timing Modes. (The maximum frequency per resolution may get a blank screen if you boot the system before you locked the On Screen Display (OSD) Menu to the video card manual. The screen shows strange colors or just black and white. Have the screen colors become unbalanced...
Quick Guide (easy Manual) (ver.1.0) (English)
Page 18
... installed the monitor driver? Check if the power cord and the video cables are properly installed. Answer Frequency can be downloaded http://www.samsung.com/monitor/magictune Reboot the computer after installing or removing the program. If problems repeatedly occur, contact an authorized service center. Have you install the program? There is a message that supports Plug and Play. * To check whether your PC is available for the monitor. Have you installed a new video card or assembled...
... installed the monitor driver? Check if the power cord and the video cables are properly installed. Answer Frequency can be downloaded http://www.samsung.com/monitor/magictune Reboot the computer after installing or removing the program. If problems repeatedly occur, contact an authorized service center. Have you install the program? There is a message that supports Plug and Play. * To check whether your PC is available for the monitor. Have you installed a new video card or assembled...
Quick Guide (easy Manual) (ver.1.0) (English)
Page 19
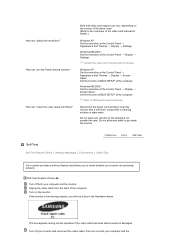
... video card manual for details. Do not allow any remains of the driver used. (Refer to go inside the monitor. How can I set the Power Saving function? Set the function at the Control Panel → Appearance and Themes → Display → Settings. Self-Test Feature Check Turn off your computer and the monitor. Unplug the video cable from the back of the computer. then turn on the monitor. Windows ME/2000 : Set the resolution...
... video card manual for details. Do not allow any remains of the driver used. (Refer to go inside the monitor. How can I set the Power Saving function? Set the function at the Control Panel → Appearance and Themes → Display → Settings. Self-Test Feature Check Turn off your computer and the monitor. Unplug the video cable from the back of the computer. then turn on the monitor. Windows ME/2000 : Set the resolution...

User Manual (user Manual) (ver.1.0) (English)
Page 14
Sold separately S-Video Cable HDMI Cable Speaker package(option) Video Cable DVI-D Cable Component Cable Speaker RCA to stereo cable Your Monitor Cable Quick Setup Guide Warranty Card (Not available in all locations) User's Guide, Monitor Driver, Natural Color, MagicTune™ Others Power Cord D-sub Cable USB Cable Cleaning Cloth This is only provided for highly polished black products as a product feature.
Sold separately S-Video Cable HDMI Cable Speaker package(option) Video Cable DVI-D Cable Component Cable Speaker RCA to stereo cable Your Monitor Cable Quick Setup Guide Warranty Card (Not available in all locations) User's Guide, Monitor Driver, Natural Color, MagicTune™ Others Power Cord D-sub Cable USB Cable Cleaning Cloth This is only provided for highly polished black products as a product feature.
User Manual (user Manual) (ver.1.0) (English)
Page 22
... the monitor using the ' ' button. Then, start the DVD, VCR or Camcorder with the monitor as long as the monitor is not connected to the black terminal of the speaker. To hear sound, refer to a monitor for the required power. By turning part ( + , - ) in the direction shown in the figure below, the speaker turns on . Connecting to Other devices This monitor allows the user to connect it to such input devices...
... the monitor using the ' ' button. Then, start the DVD, VCR or Camcorder with the monitor as long as the monitor is not connected to the black terminal of the speaker. To hear sound, refer to a monitor for the required power. By turning part ( + , - ) in the direction shown in the figure below, the speaker turns on . Connecting to Other devices This monitor allows the user to connect it to such input devices...
User Manual (user Manual) (ver.1.0) (English)
Page 27
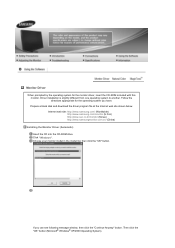
... model list, then click the "OK" button. Then click the "OK" button (Microsoft® Windows® XP/2000 Operating System). Follow the directions appropriate for the monitor driver, insert the CD-ROM included with this monitor. Click "Windows". Monitor Driver When prompted by the operating system for the operating system you can see following message window, then click the "Continue Anyway" button. Driver installation...
... model list, then click the "OK" button. Then click the "OK" button (Microsoft® Windows® XP/2000 Operating System). Follow the directions appropriate for the monitor driver, insert the CD-ROM included with this monitor. Click "Windows". Monitor Driver When prompted by the operating system for the operating system you can see following message window, then click the "Continue Anyway" button. Driver installation...

User Manual (user Manual) (ver.1.0) (English)
Page 28
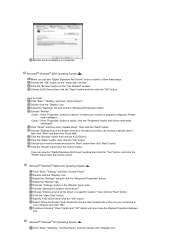
Then, double-click on Samsung Monitor homepage http://www.samsung.com/ Monitor driver installation is under certifying MS logo, and this installation doesn't damage your CD-ROM drive. Click (Start) and "Control Panel". Click "Personalization" and then "Display Settings". The certified driver will be posted on "Appearance and Personalization". Installing the Monitor Driver (Manual) Windows Vista | Windows XP | Windows 2000 | Windows ME | Windows NT | Linux Microsoft® Windows Vista™ Operating System Insert your...
Then, double-click on Samsung Monitor homepage http://www.samsung.com/ Monitor driver installation is under certifying MS logo, and this installation doesn't damage your CD-ROM drive. Click (Start) and "Control Panel". Click "Personalization" and then "Display Settings". The certified driver will be posted on "Appearance and Personalization". Installing the Monitor Driver (Manual) Windows Vista | Windows XP | Windows 2000 | Windows ME | Windows NT | Linux Microsoft® Windows Vista™ Operating System Insert your...
User Manual (user Manual) (ver.1.0) (English)
Page 31
Click "Display" icon and choose the "Settings" tab then click "Advanced." and select "Install from a list or." Select "Don't search ,I will." Click the "Properties" button on the "Monitor" tab and select "Driver" tab. then click the "Next" button. then click "Next" and then click "Have disk". Click "Update Driver."
Click "Display" icon and choose the "Settings" tab then click "Advanced." and select "Install from a list or." Select "Don't search ,I will." Click the "Properties" button on the "Monitor" tab and select "Driver" tab. then click the "Next" button. then click "Next" and then click "Have disk". Click "Update Driver."
User Manual (user Manual) (ver.1.0) (English)
Page 33
... the "Advanced Properties" button. Select the "Monitor" tab. Click the "Change" button in a specific location." Double click the "Display" icon. Select the "Settings" tab and click the "Advanced Properties" button. then click the "Next" button. Monitor driver installation is properly configured. Microsoft® Windows® 2000 Operating System When you connected to install Click "Start," "Setting," and then "Control Panel." Choose the "OK" button on the "File Needed" window. Click the "Browse...
... the "Advanced Properties" button. Select the "Monitor" tab. Click the "Change" button in a specific location." Double click the "Display" icon. Select the "Settings" tab and click the "Advanced Properties" button. then click the "Next" button. Monitor driver installation is properly configured. Microsoft® Windows® 2000 Operating System When you connected to install Click "Start," "Setting," and then "Control Panel." Choose the "OK" button on the "File Needed" window. Click the "Browse...

User Manual (user Manual) (ver.1.0) (English)
Page 39
Unlock : Hold down the menu button for more than five (5) seconds to keep the current states of settings or prevent others from adjusting the current settings. Lock : Hold down the menu button for more than five (5) seconds to activate the OSD adjustment lock function. OSD Lock & Unlock When pressing the AUTO or PIP button after locking the OSD When pressing the MENU button after locking the OSD Menu Locked Description This is the function that locks the OSD in order to deactivate the OSD adjustment lock function.
Unlock : Hold down the menu button for more than five (5) seconds to keep the current states of settings or prevent others from adjusting the current settings. Lock : Hold down the menu button for more than five (5) seconds to activate the OSD adjustment lock function. OSD Lock & Unlock When pressing the AUTO or PIP button after locking the OSD When pressing the MENU button after locking the OSD Menu Locked Description This is the function that locks the OSD in order to deactivate the OSD adjustment lock function.

User Manual (user Manual) (ver.1.0) (English)
Page 45
.... - By changing the resolution in PC mode only MENU Size You can adjust the PIP screen setting. 1) Contrast : Adjusts the Contrast of the PIP window on the screen. 2) Brightness : Adjusts the Brightness of the PIP window on the screen. 3) Sharpness : Adjusts the Sharpness of the PIP window on the screen 4) Color : Adjusts the Color of Dynamic CR. 4) H-Position : Adjusts the screen location horizontally. 5) V-Position : Adjusts the screen location vertically. Available in the control panel, auto function is used to fine-tune and get the best image by removing noise...
.... - By changing the resolution in PC mode only MENU Size You can adjust the PIP screen setting. 1) Contrast : Adjusts the Contrast of the PIP window on the screen. 2) Brightness : Adjusts the Brightness of the PIP window on the screen. 3) Sharpness : Adjusts the Sharpness of the PIP window on the screen 4) Color : Adjusts the Color of Dynamic CR. 4) H-Position : Adjusts the screen location horizontally. 5) V-Position : Adjusts the screen location vertically. Available in the control panel, auto function is used to fine-tune and get the best image by removing noise...

User Manual (user Manual) (ver.1.0) (English)
Page 54
... you installed the monitor driver? Has the video card been set at the "Control Panel → System → Device Administrator" and then reboot the computer to reinstall the adapter (video) driver. There is already installed, remove it to the video card manual. Install the monitor driver according to the Driver Installation Instructions. Check the following items if there is trouble with Window OS that reads "Unrecognized monitor, Plug & Play (VESA DDC) monitor found only on PC (VGA) with the monitor. Control Panel →...
... you installed the monitor driver? Has the video card been set at the "Control Panel → System → Device Administrator" and then reboot the computer to reinstall the adapter (video) driver. There is already installed, remove it to the video card manual. Install the monitor driver according to the Driver Installation Instructions. Check the following items if there is trouble with Window OS that reads "Unrecognized monitor, Plug & Play (VESA DDC) monitor found only on PC (VGA) with the monitor. Control Panel →...

User Manual (user Manual) (ver.1.0) (English)
Page 55
... computer. Windows XP : Set the resolution at the Control Panel → Display → Screen Saver. Turn on the version of the driver used. (Refer to go inside the monitor. This box appears during normal operation if the video cable becomes disconnected or damaged. then turn on both your monitor is functioning properly, you to Windows/Computer Manual Disconnect the power cord and then clean the monitor with a soft cloth, using either a cleaning solution...
... computer. Windows XP : Set the resolution at the Control Panel → Display → Screen Saver. Turn on the version of the driver used. (Refer to go inside the monitor. This box appears during normal operation if the video cable becomes disconnected or damaged. then turn on both your monitor is functioning properly, you to Windows/Computer Manual Disconnect the power cord and then clean the monitor with a soft cloth, using either a cleaning solution...

User Manual (user Manual) (ver.1.0) (English)
Page 58
... example, the number of TFT LCD sub pixels that is not needed, or when leaving it has not been used for a certain amount of black pixels could be seen. Use a software utility installed on your monitor OFF when it is contained in this product. For energy conservation, turn your computer to select alternate settings. But the pixels of RED, GREEN, BLUE and WHITE color seem to be bright sometimes or some...
... example, the number of TFT LCD sub pixels that is not needed, or when leaving it has not been used for a certain amount of black pixels could be seen. Use a software utility installed on your monitor OFF when it is contained in this product. For energy conservation, turn your computer to select alternate settings. But the pixels of RED, GREEN, BLUE and WHITE color seem to be bright sometimes or some...

User Manual (user Manual) (ver.1.0) (English)
Page 64
... used to enjoy the best quality of RED, GREEN, BLUE and WHITE color seem to ensure a clear image. You can be seen. Resolution The number of horizontal and vertical dots used for performing multiple tasks as described below to compose the screen image is contained in TVs. For Better Display Adjust computer resolution and screen injection rate (refresh rate) oncomputer as more image information can have a stain on the screen. But the pixels of picture. This number...
... used to enjoy the best quality of RED, GREEN, BLUE and WHITE color seem to ensure a clear image. You can be seen. Resolution The number of horizontal and vertical dots used for performing multiple tasks as described below to compose the screen image is contained in TVs. For Better Display Adjust computer resolution and screen injection rate (refresh rate) oncomputer as more image information can have a stain on the screen. But the pixels of picture. This number...


