
Quick Guide (ENGLISH)
Page 11
.... 50 Q: Has the video card been set properly? A: Install the monitor driver according to the Driver Installation Instructions. Control Panel → Performance and Maintenance → System → Hardware → Device Manager → Monitors → After deleting Plug and Play monitor, find 'Plug and Play monitor' by referring to the Preset Timing Modes). Q: Is the frequency...
.... 50 Q: Has the video card been set properly? A: Install the monitor driver according to the Driver Installation Instructions. Control Panel → Performance and Maintenance → System → Hardware → Device Manager → Monitors → After deleting Plug and Play monitor, find 'Plug and Play monitor' by referring to the Preset Timing Modes). Q: Is the frequency...

Quick Guide (ENGLISH)
Page 12
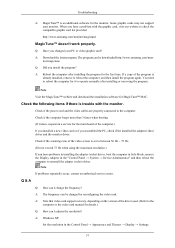
...If you have problems in installing the adapter (video) driver, boot the computer in Safe Mode, remove the Display Adapter in the Control Panel → Appearance and Themes → Display → Settings. 51 itor/magictune Q: Did you assembled the PC, check if the ...it, reboot the computer, and then install the program again. Note If problems repeatedly occur, contact an authorized service center. http://www.samsung.com/monitor/magictune MagicTune™ doesn't work properly. Check if the computer beeps more than 3 times when booting. (If it does, request ...
...If you have problems in installing the adapter (video) driver, boot the computer in Safe Mode, remove the Display Adapter in the Control Panel → Appearance and Themes → Display → Settings. 51 itor/magictune Q: Did you assembled the PC, check if the ...it, reboot the computer, and then install the program again. Note If problems repeatedly occur, contact an authorized service center. http://www.samsung.com/monitor/magictune MagicTune™ doesn't work properly. Check if the computer beeps more than 3 times when booting. (If it does, request ...

Quick Guide (ENGLISH)
Page 13
A: Windows ME/2000: Set the resolution at the Control Panel → Display → Screen Saver. Q: How can I clean the outer case/LCD Panel? A: Windows XP: Set the resolution in the BIOS-SETUP of the computer. (Refer to the Windows / Computer Manual). Note Before calling for...Do not let any water enter the monitor. Q: How can I set the Power Saving function? Troubleshooting A: Windows ME/2000: Set the resolution in the BIOS-SETUP of the computer. (Refer to the Windows / Computer Manual). A: Disconnect the power cord and then clean the monitor with a soft cloth, using either ...
A: Windows ME/2000: Set the resolution at the Control Panel → Display → Screen Saver. Q: How can I clean the outer case/LCD Panel? A: Windows XP: Set the resolution in the BIOS-SETUP of the computer. (Refer to the Windows / Computer Manual). Note Before calling for...Do not let any water enter the monitor. Q: How can I set the Power Saving function? Troubleshooting A: Windows ME/2000: Set the resolution in the BIOS-SETUP of the computer. (Refer to the Windows / Computer Manual). A: Disconnect the power cord and then clean the monitor with a soft cloth, using either ...
User Manual (ENGLISH)
Page 16
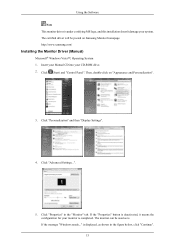
...monitor is . Click (Start) and "Control Panel". Click "Advanced Settings...". 5. Using the Software Note This monitor driver is displayed, as is completed. is under certifying MS logo, and this installation doesn't damage your system. The certified driver will be used as shown in the "Monitor... "Display Settings". 4. The monitor can be posted on "Appearance and Personalization". 3. Then, double-click on Samsung Monitor homepage. Click "Properties" in the figure below, click "Continue". 15 http://www.samsung.com/ Installing the Monitor Driver (Manual) Microsoft®...
...monitor is . Click (Start) and "Control Panel". Click "Advanced Settings...". 5. Using the Software Note This monitor driver is displayed, as is completed. is under certifying MS logo, and this installation doesn't damage your system. The certified driver will be used as shown in the "Monitor... "Display Settings". 4. The monitor can be posted on "Appearance and Personalization". 3. Then, double-click on Samsung Monitor homepage. Click "Properties" in the figure below, click "Continue". 15 http://www.samsung.com/ Installing the Monitor Driver (Manual) Microsoft®...
User Manual (ENGLISH)
Page 19
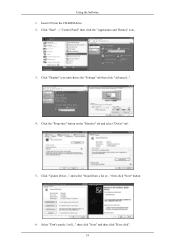
Insert CD into the CD-ROM drive. 2. Click "Start" → "Control Panel" then click the "Appearance and Themes" icon. 3. Click "Display" icon and choose the "Settings" tab then click "Advanced...". 4. and select "Install from a list or..." then click "Next" and then click "Have disk". 18 Click the "Properties" button on the "Monitor" tab and select "Driver" tab. 5. Click "Update Driver..." then click "Next" button. 6. Using the Software 1. Select "Don't search, I will..."
Insert CD into the CD-ROM drive. 2. Click "Start" → "Control Panel" then click the "Appearance and Themes" icon. 3. Click "Display" icon and choose the "Settings" tab then click "Advanced...". 4. and select "Install from a list or..." then click "Next" and then click "Have disk". 18 Click the "Properties" button on the "Monitor" tab and select "Driver" tab. 5. Click "Update Driver..." then click "Next" button. 6. Using the Software 1. Select "Don't search, I will..."
User Manual (ENGLISH)
Page 21
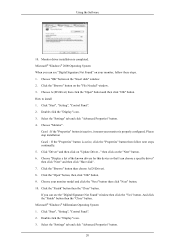
Monitor driver installation is active, click the "Properties" button then follow these steps. 1. Click the "Browse" button on the "Next" button. 6. Click "Start", "Setting", "Control Panel". 2. Double click the "Display" icon. 3. Please stop installation Case2 : If the "Properties" button is completed...choose a specific driver" then click "Next" and then click "Have disk". 7. Click "Start", "Setting", "Control Panel". 2. Using the Software 10. Choose your monitor is properly configured. Choose A:(D:\Driver) then click the "Open" button and then click "OK" button. Select the ...
Monitor driver installation is active, click the "Properties" button then follow these steps. 1. Click the "Browse" button on the "Next" button. 6. Click "Start", "Setting", "Control Panel". 2. Double click the "Display" icon. 3. Please stop installation Case2 : If the "Properties" button is completed...choose a specific driver" then click "Next" and then click "Have disk". 7. Click "Start", "Setting", "Control Panel". 2. Using the Software 10. Choose your monitor is properly configured. Choose A:(D:\Driver) then click the "Open" button and then click "OK" button. Select the ...

User Manual (ENGLISH)
Page 22
...driver in a specific location..." Continue choosing "Close" button and "OK" button until you need to use (Resolution, Number of your monitor. Click "Start", "Settings", "Control Panel", and then double-click "Display" icon. 2. In Display Registration Information window, click Settings Tab and then click "All Display Modes"....normally after setting other requested hardware. 21 If the screen is no Mode at the first and the second screen after executing the X86Config file. 2. Note If there is not normal, change to the Preset Timing Modes in the "Monitor Type" area. 6. Press "Enter...
...driver in a specific location..." Continue choosing "Close" button and "OK" button until you need to use (Resolution, Number of your monitor. Click "Start", "Settings", "Control Panel", and then double-click "Display" icon. 2. In Display Registration Information window, click Settings Tab and then click "All Display Modes"....normally after setting other requested hardware. 21 If the screen is no Mode at the first and the second screen after executing the X86Config file. 2. Note If there is not normal, change to the Preset Timing Modes in the "Monitor Type" area. 6. Press "Enter...

User Manual (ENGLISH)
Page 23
... is the very solution for Samsung monitors and makes the color of the images printed out by a printer or other images scanned by Samsung Electronics in the software program. This system is not D:\, enter the applicable drive.) How to delete the Natural Color software program Select "Setting/Control Panel" on the initial screen to...
... is the very solution for Samsung monitors and makes the color of the images printed out by a printer or other images scanned by Samsung Electronics in the software program. This system is not D:\, enter the applicable drive.) How to delete the Natural Color software program Select "Setting/Control Panel" on the initial screen to...

User Manual (ENGLISH)
Page 25
..." icon in the menu. Click on Windows® XP, go to [Task Tray] → [Start] → [Settings] and select [Control Panel] in Control Panel. 3. Wait until the "Uninstall Complete" dialog box appears. If the program runs on it to begin the uninstall process. 6. Click "Yes" to ... Software Uninstall The MagicTune™ program can be removed only by using the "Add or Remove Programs" option of the Windows® Control Panel. Note Visit the MagicTune™ website for technical support for MagicTune™, FAQs (questions and answers) and software upgrades. 24 Perform the ...
..." icon in the menu. Click on Windows® XP, go to [Task Tray] → [Start] → [Settings] and select [Control Panel] in Control Panel. 3. Wait until the "Uninstall Complete" dialog box appears. If the program runs on it to begin the uninstall process. 6. Click "Yes" to ... Software Uninstall The MagicTune™ program can be removed only by using the "Add or Remove Programs" option of the Windows® Control Panel. Note Visit the MagicTune™ website for technical support for MagicTune™, FAQs (questions and answers) and software upgrades. 24 Perform the ...
User Manual (ENGLISH)
Page 26
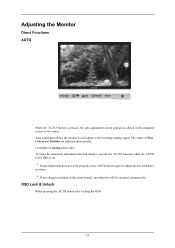
If auto adjustment does not work properly, press 'AUTO' button again to the incoming Analog signal. Adjusting the Monitor Direct Functions AUTO When the 'AUTO' button is on the center. OSD Lock & Unlock When pressing the AUTO button after locking the OSD 25... sharper, execute the 'AUTO' function while the AUTO PATTERN is pressed, the auto adjustment screen appears as shown in the control panel, auto function will be executed automatically. Auto adjustment allows the monitor to self-adjust to adjust picture with more accuracy. If you change resolution in the animated screen on .
If auto adjustment does not work properly, press 'AUTO' button again to the incoming Analog signal. Adjusting the Monitor Direct Functions AUTO When the 'AUTO' button is on the center. OSD Lock & Unlock When pressing the AUTO button after locking the OSD 25... sharper, execute the 'AUTO' function while the AUTO PATTERN is pressed, the auto adjustment screen appears as shown in the control panel, auto function will be executed automatically. Auto adjustment allows the monitor to self-adjust to adjust picture with more accuracy. If you change resolution in the animated screen on .

User Manual (ENGLISH)
Page 46
...more natural video display. • Off • Mode1 • Mode2 • Off - MENU MENU RTA (Response Time Accelerator) A function that the panel operates at its original response speed. • Mode 1 - Note • Signals not available in accordance with the screen aspect ratio of the input signals.... • Wide - Deactivates the RTA function so that accelerates the response speed of the input signals. Adjusting the Monitor RTA • Normal • Wide • Normal - This mode is the optimal mode for still screens, such as to RTA Mode ...
...more natural video display. • Off • Mode1 • Mode2 • Off - MENU MENU RTA (Response Time Accelerator) A function that the panel operates at its original response speed. • Mode 1 - Note • Signals not available in accordance with the screen aspect ratio of the input signals.... • Wide - Deactivates the RTA function so that accelerates the response speed of the input signals. Adjusting the Monitor RTA • Normal • Wide • Normal - This mode is the optimal mode for still screens, such as to RTA Mode ...
User Manual (ENGLISH)
Page 51
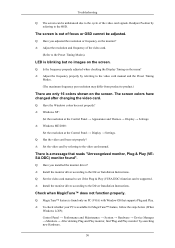
... feature is a message that supports Plug and Play. Q: Have you installed the monitor driver? LED is XP); Q: Have the Windows colors been set properly? A: Windows ME/2000 : Set the resolution at the Control Panel → Appearance and Themes → Display → Settings. Q: Have you...There are only 16 colors shown on the screen. Control Panel → Performance and Maintenance → System → Hardware → Device Manager → Monitors → After deleting Plug and Play monitor, find 'Plug and Play monitor' by referring to the video card manual. Check when ...
... feature is a message that supports Plug and Play. Q: Have you installed the monitor driver? LED is XP); Q: Have the Windows colors been set properly? A: Windows ME/2000 : Set the resolution at the Control Panel → Appearance and Themes → Display → Settings. Q: Have you...There are only 16 colors shown on the screen. Control Panel → Performance and Maintenance → System → Hardware → Device Manager → Monitors → After deleting Plug and Play monitor, find 'Plug and Play monitor' by referring to the video card manual. Check when ...
User Manual (ENGLISH)
Page 52
...video) driver, boot the computer in Safe Mode, remove the Display Adapter in the Control Panel → Appearance and Themes → Display → Settings. 51 http://www.samsung.com/monitor/magictune MagicTune™ doesn't work properly. Check if the power cord and the video cables...additional software for details.) Q: How can I adjusts the resolution? The program can be downloaded http://www.samsung.com/mon- A: Windows XP: Set the resolution in the "Control Panel → System → Device Administrator" and then reboot the computer to reinstall the adapter (video) driver...
...video) driver, boot the computer in Safe Mode, remove the Display Adapter in the Control Panel → Appearance and Themes → Display → Settings. 51 http://www.samsung.com/monitor/magictune MagicTune™ doesn't work properly. Check if the power cord and the video cables...additional software for details.) Q: How can I adjusts the resolution? The program can be downloaded http://www.samsung.com/mon- A: Windows XP: Set the resolution in the "Control Panel → System → Device Administrator" and then reboot the computer to reinstall the adapter (video) driver...

User Manual (ENGLISH)
Page 53
... call the phone number on the case. A: Windows ME/2000: Set the resolution at the Control Panel → Display → Screen Saver. A: Disconnect the power cord and then clean the monitor with a soft cloth, using either a cleaning solution or plain water. If you can I clean the... outer case/LCD Panel? Note Before calling for details. Do not leave any water enter the monitor. Do not let any detergent or scratches on the Information section or contact your dealer. 52 Troubleshooting A: ...
... call the phone number on the case. A: Windows ME/2000: Set the resolution at the Control Panel → Display → Screen Saver. A: Disconnect the power cord and then clean the monitor with a soft cloth, using either a cleaning solution or plain water. If you can I clean the... outer case/LCD Panel? Note Before calling for details. Do not leave any water enter the monitor. Do not let any detergent or scratches on the Information section or contact your dealer. 52 Troubleshooting A: ...
User Manual (ENGLISH)
Page 54
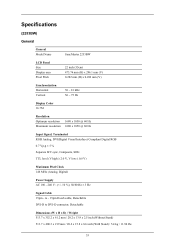
....2 x 13.9 x 2.5 inch (Without Stand) 513.7 x 400.3 x 219 mm / 20.2 x 15.8 x 8.6 inch (With Stand) / 5.4 kg / 11.96 Ibs 53 Specifications (2253BW) General General Model Name SyncMaster 2253BW LCD Panel Size Display area Pixel Pitch 22 inch (55cm) 473.76 mm (H) x 296.1 mm (V) 0.282 mm (H) x 0.282 mm (V) Synchronization Horizontal Vertical 30 ~ 81 kHz 56 ~ 75...
....2 x 13.9 x 2.5 inch (Without Stand) 513.7 x 400.3 x 219 mm / 20.2 x 15.8 x 8.6 inch (With Stand) / 5.4 kg / 11.96 Ibs 53 Specifications (2253BW) General General Model Name SyncMaster 2253BW LCD Panel Size Display area Pixel Pitch 22 inch (55cm) 473.76 mm (H) x 296.1 mm (V) 0.282 mm (H) x 0.282 mm (V) Synchronization Horizontal Vertical 30 ~ 81 kHz 56 ~ 75...
User Manual (ENGLISH)
Page 55
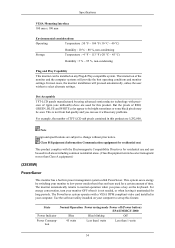
Dot Acceptable TFT-LCD panels manufactured by switching your computer. The PowerSaver system operates with the Electromagnetic Compatibility Directives for long periods. Specifications VESA Mounting Interface 100 mm ...176;C) Storage Humidity : 10 % ~ 80 %, non-condensing Temperature : -4 °F ~ 113 °F (-20 °C ~ 45 °C) Humidity : 5 % ~ 95 %, non-condensing Plug and Play Capability This monitor can be used in all areas including common residential areas. (Class B equipment emits less electromagnetic waves than 1 watts 54 Note Design and specifications are used...
Dot Acceptable TFT-LCD panels manufactured by switching your computer. The PowerSaver system operates with the Electromagnetic Compatibility Directives for long periods. Specifications VESA Mounting Interface 100 mm ...176;C) Storage Humidity : 10 % ~ 80 %, non-condensing Temperature : -4 °F ~ 113 °F (-20 °C ~ 45 °C) Humidity : 5 % ~ 95 %, non-condensing Plug and Play Capability This monitor can be used in all areas including common residential areas. (Class B equipment emits less electromagnetic waves than 1 watts 54 Note Design and specifications are used...

User Manual (ENGLISH)
Page 57
... General Model Name SyncMaster 2253LW LCD Panel Size Display area Pixel Pitch 21.6 inch (54 cm) 464.94 mm (H) x 290.58 mm (V) 0.258 mm (H) x 0.258 mm (W) Synchronization Horizontal Vertical 30 ~ 81 kHz 56 ~ 75 Hz Display Color 16....
... General Model Name SyncMaster 2253LW LCD Panel Size Display area Pixel Pitch 21.6 inch (54 cm) 464.94 mm (H) x 290.58 mm (V) 0.258 mm (H) x 0.258 mm (W) Synchronization Horizontal Vertical 30 ~ 81 kHz 56 ~ 75 Hz Display Color 16....
User Manual (ENGLISH)
Page 58
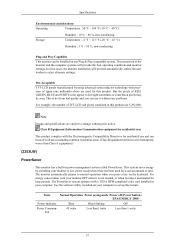
... operation when you can be used for long periods. Use the software utility installed on your computer. Dot Acceptable TFT-LCD panels manufactured by switching your monitor OFF when it is not from bad quality and you press a key on the keyboard. The interaction of the... of TFT-LCD sub pixels contained in this product are 5,292,000. State Normal Operation Power saving mode Power off (Power button) EPA/ENERGY 2000 Power Indicator Blue Blue blinking Off Power Consumption 45 watts Less than1 watts Less than Class A equipment.) (2253LW) PowerSaver This monitor has a built...
... operation when you can be used for long periods. Use the software utility installed on your computer. Dot Acceptable TFT-LCD panels manufactured by switching your monitor OFF when it is not from bad quality and you press a key on the keyboard. The interaction of the... of TFT-LCD sub pixels contained in this product are 5,292,000. State Normal Operation Power saving mode Power off (Power button) EPA/ENERGY 2000 Power Indicator Blue Blue blinking Off Power Consumption 45 watts Less than1 watts Less than Class A equipment.) (2253LW) PowerSaver This monitor has a built...
User Manual (ENGLISH)
Page 60
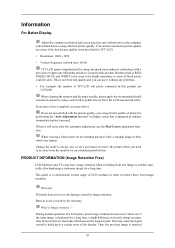
...long time, a slight difference in electric charge accumulates between the two electrodes which encase the liquid crystal. PRODUCT INFORMATION (Image Retention Free) LCD Monitors and TVs may stain it without any damage caused by image retention. This guide is pressed. Thus, the previous image is applied, ... GREEN, BLUE and WHITE color seem to protect them from the monitor for this product are not satisfied with a precision of TFT-LCD sub pixels contained in is not provided for an extended period of a LCD panel, pixel image retention doesn't occur. This may appear. This is...
...long time, a slight difference in electric charge accumulates between the two electrodes which encase the liquid crystal. PRODUCT INFORMATION (Image Retention Free) LCD Monitors and TVs may stain it without any damage caused by image retention. This guide is pressed. Thus, the previous image is applied, ... GREEN, BLUE and WHITE color seem to protect them from the monitor for this product are not satisfied with a precision of TFT-LCD sub pixels contained in is not provided for an extended period of a LCD panel, pixel image retention doesn't occur. This may appear. This is...

User Manual (ENGLISH)
Page 62
..., forcing the liquid crystal to operate a Screen Saver program when you are defined as continuously changing video patterns. Ex) The best way to protect your monitor from Image retention is to set your PC or System to lean. To prevent this occurs, the previous image may be decreased. 61 The voltage.... Normal conditions are not using it. When this , the accumulated voltage difference must be seen when the pattern is operated under normal conditions. When the LCD panel is operated for a long time with a fixed pattern (-over 12 hours-), there may not occur when...
..., forcing the liquid crystal to operate a Screen Saver program when you are defined as continuously changing video patterns. Ex) The best way to protect your monitor from Image retention is to set your PC or System to lean. To prevent this occurs, the previous image may be decreased. 61 The voltage.... Normal conditions are not using it. When this , the accumulated voltage difference must be seen when the pattern is operated under normal conditions. When the LCD panel is operated for a long time with a fixed pattern (-over 12 hours-), there may not occur when...


