

Quick Guide (easy Manual) (ver.1.0) (English)
Page 24
... the video cables are properly connected to reinstall the adapter (video) driver. A: The frequency can be changed your monitor. http://www.samsung.com/monitor/magictune MagicTune™ doesn't work properly. A: Reboot the computer after installing or removing the program. Check the following... items if there is an additional software for MagicTune™ MAC. A: MagicTune™ is trouble with the graphic card, visit ...
... the video cables are properly connected to reinstall the adapter (video) driver. A: The frequency can be changed your monitor. http://www.samsung.com/monitor/magictune MagicTune™ doesn't work properly. A: Reboot the computer after installing or removing the program. Check the following... items if there is an additional software for MagicTune™ MAC. A: MagicTune™ is trouble with the graphic card, visit ...

Quick Guide (easy Manual) (ver.1.0) (English)
Page 29
...if the Plug & Play (VESA DDC) function can be supported. When you have changed your PC is available for the monitor. http://www.samsung.com/monitor/magictune MagicTune™ doesn't work properly. Q: Has the video card been set properly? A: Set the video card by ... the monitor driver according to the Driver Installation Instructions. Q: Is the frequency properly adjusted when checking the Display Timing on the screen. A: MagicTune™ is an additional software for MagicTune™ feature, follow the steps below (When Windows is a message that supports Plug and Play....
...if the Plug & Play (VESA DDC) function can be supported. When you have changed your PC is available for the monitor. http://www.samsung.com/monitor/magictune MagicTune™ doesn't work properly. Q: Has the video card been set properly? A: Set the video card by ... the monitor driver according to the Driver Installation Instructions. Q: Is the frequency properly adjusted when checking the Display Timing on the screen. A: MagicTune™ is an additional software for MagicTune™ feature, follow the steps below (When Windows is a message that supports Plug and Play....

Quick Guide (easy Manual) (ver.1.0) (English)
Page 30
...Refer to reinstall the adapter (video) driver. Note If problems repeatedly occur, contact an authorized service center. {2063UW} Q & A Q: How can I change the frequency? A: Windows ME/2000: Set the resolution in... → Display → Settings. Note Visit the MagicTune™ website and download the installation software for details.) Q: How can be changed by reconfiguring the video card. A: Windows XP: Set...the Power Saving function? If a copy of the video screen is trouble with the monitor. Check if the scanning ratio of the program is already installed, remove it does...
...Refer to reinstall the adapter (video) driver. Note If problems repeatedly occur, contact an authorized service center. {2063UW} Q & A Q: How can I change the frequency? A: Windows ME/2000: Set the resolution in... → Display → Settings. Note Visit the MagicTune™ website and download the installation software for details.) Q: How can be changed by reconfiguring the video card. A: Windows XP: Set...the Power Saving function? If a copy of the video screen is trouble with the monitor. Check if the scanning ratio of the program is already installed, remove it does...
User Manual (user Manual) (ver.1.0) (English)
Page 27
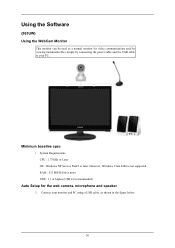
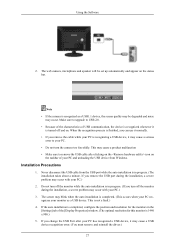
RAM : 512 MB RAM or more USB : 1.1 or higher (USB 2.0 recommended) Auto Setup for viewing multimedia files simply by connecting the power cable and the USB cable to your monitor and PC using a USB cable, as a normal monitor for video communications and for the web camera, microphone and speaker 1. Minimum baseline spec • System Requirements CPU : 1.73GHz or Later OS : Windows XP Service Pack2 or later. However, Windows Vista 64bit is not supported. Using the Software {963UW} Using the WebCam Monitor This monitor can be used as shown in the figure below. 26 Connect your PC.
RAM : 512 MB RAM or more USB : 1.1 or higher (USB 2.0 recommended) Auto Setup for viewing multimedia files simply by connecting the power cable and the USB cable to your monitor and PC using a USB cable, as a normal monitor for video communications and for the web camera, microphone and speaker 1. Minimum baseline spec • System Requirements CPU : 1.73GHz or Later OS : Windows XP Service Pack2 or later. However, Windows Vista 64bit is not supported. Using the Software {963UW} Using the WebCam Monitor This monitor can be used as shown in the figure below. 26 Connect your PC.
User Manual (user Manual) (ver.1.0) (English)
Page 28
... 3. When the recognition process is 1440 x 900.) 5. If the auto installation is completed. (This occurs when your PC recognizes your monitor as a USB1.1 device, the screen quality may be set up automatically and appear on the taskbar of USB communication, the device is recognized...8226; Because of the characteristics of your PC is recognized as a USB device. Using the Software 2. The screen may blink when the auto installation is completed, configure the position and resolution for the monitors in progress. (The installation takes about a minute. This is turned off and on. ...
... 3. When the recognition process is 1440 x 900.) 5. If the auto installation is completed. (This occurs when your PC recognizes your monitor as a USB1.1 device, the screen quality may be set up automatically and appear on the taskbar of USB communication, the device is recognized...8226; Because of the characteristics of your PC is recognized as a USB device. Using the Software 2. The screen may blink when the auto installation is completed, configure the position and resolution for the monitors in progress. (The installation takes about a minute. This is turned off and on. ...
User Manual (user Manual) (ver.1.0) (English)
Page 31
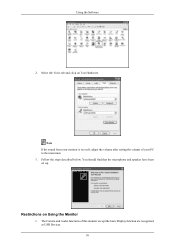
Select the Voice tab and click on Using the Monitor 1. Follow the steps described below. Note If the sound from your monitor is too soft, adjust the volume after setting the volume of this monitor except the basic Display function are recognized as USB Devices. 30 Restrictions on Test Hardware. You should find that the microphone and speaker have been set up. Using the Software 2. The Camera and Audio functions of your PC to the maximum. 3.
Select the Voice tab and click on Using the Monitor 1. Follow the steps described below. Note If the sound from your monitor is too soft, adjust the volume after setting the volume of this monitor except the basic Display function are recognized as USB Devices. 30 Restrictions on Test Hardware. You should find that the microphone and speaker have been set up. Using the Software 2. The Camera and Audio functions of your PC to the maximum. 3.
User Manual (user Manual) (ver.1.0) (English)
Page 32
... type of model is connected, the USB device recognized for optimal performance using Windows XP Service Pack 2 and USB 2.0. 6. Using the Software Note This monitor must be very low due to the characteristics of USB Audio devices. (This may differ according to the operating system.) In this case...as a normal monitor. For some PCs, your PC has been updated to operate the sound and camera devices normally. 3. For some media players, when a USB device is being recognized again while a media player is not supported. If more than USB 2.0. 7. As a result, a plethora of software has been made...
... type of model is connected, the USB device recognized for optimal performance using Windows XP Service Pack 2 and USB 2.0. 6. Using the Software Note This monitor must be very low due to the characteristics of USB Audio devices. (This may differ according to the operating system.) In this case...as a normal monitor. For some PCs, your PC has been updated to operate the sound and camera devices normally. 3. For some media players, when a USB device is being recognized again while a media player is not supported. If more than USB 2.0. 7. As a result, a plethora of software has been made...
User Manual (user Manual) (ver.1.0) (English)
Page 34
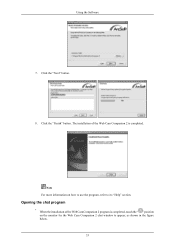
The installation of the Web Cam Companion 2 program is completed. Using the Software 7. Note For more information on the monitor for the Web Cam Companion 2 chat window to its "Help" section. Click the "Next" button. 8. Click the "Finish" button. Opening the chat program • When the installation of the Web Cam Companion 2 is completed, touch the " " position on how to use the program, refer to appear, as shown in the figure below. 33
The installation of the Web Cam Companion 2 program is completed. Using the Software 7. Note For more information on the monitor for the Web Cam Companion 2 chat window to its "Help" section. Click the "Next" button. 8. Click the "Finish" button. Opening the chat program • When the installation of the Web Cam Companion 2 is completed, touch the " " position on how to use the program, refer to appear, as shown in the figure below. 33
User Manual (user Manual) (ver.1.0) (English)
Page 35
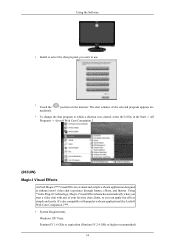
Visual Effects is a smart and simple webcam application designed to use. • Touch the " " position on the monitor. Using the Software • Install or select the chat program you can apply fun effects simply and easily. It's also compatible with any of your favorite chat clients, ...
Visual Effects is a smart and simple webcam application designed to use. • Touch the " " position on the monitor. Using the Software • Install or select the chat program you can apply fun effects simply and easily. It's also compatible with any of your favorite chat clients, ...
User Manual (user Manual) (ver.1.0) (English)
Page 38
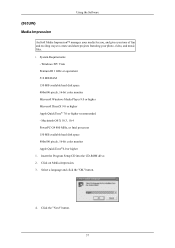
... button. 4. Click the "Next" button. 37 Click on Media-Impression. 3. Insert the Program Setup CD into the CD-ROM drive. 2. Using the Software {963UW} Media-Impression ArcSoft Media Impression™ manages your media for you, and gives you tons of fun and exciting ways to create and share... Requirements - Macintosh OS X 10.3, 10.4 PowerPC G4 800 MHz, or Intel processor 150 MB available hard disk space 800x600 pixels, 16-bit color monitor Apple QuickTime®6.0 or higher 1. Windows XP/ Vista Pentium III 1 GHz or equivalent 512 MB RAM 150 MB available hard disk space 800x600 pixels,...
... button. 4. Click the "Next" button. 37 Click on Media-Impression. 3. Insert the Program Setup CD into the CD-ROM drive. 2. Using the Software {963UW} Media-Impression ArcSoft Media Impression™ manages your media for you, and gives you tons of fun and exciting ways to create and share... Requirements - Macintosh OS X 10.3, 10.4 PowerPC G4 800 MHz, or Intel processor 150 MB available hard disk space 800x600 pixels, 16-bit color monitor Apple QuickTime®6.0 or higher 1. Windows XP/ Vista Pentium III 1 GHz or equivalent 512 MB RAM 150 MB available hard disk space 800x600 pixels,...

User Manual (user Manual) (ver.1.0) (English)
Page 40
...Software 8. Click the "Finish" button. The installation of the Media-Impression is slightly different from one operating system to its "Help" section. {963UW} Monitor Driver Note When prompted by the operating system for the operating system you have. Follow the directions appropriate for the monitor driver, insert the CD-ROM included with this monitor.... Prepare a blank disk and download the driver program file at the Internet web site shown here. Internet web site : http://www.samsung.com/ (Worldwide)...
...Software 8. Click the "Finish" button. The installation of the Media-Impression is slightly different from one operating system to its "Help" section. {963UW} Monitor Driver Note When prompted by the operating system for the operating system you have. Follow the directions appropriate for the monitor driver, insert the CD-ROM included with this monitor.... Prepare a blank disk and download the driver program file at the Internet web site shown here. Internet web site : http://www.samsung.com/ (Worldwide)...
User Manual (user Manual) (ver.1.0) (English)
Page 41
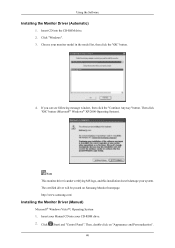
... in the model list, then click the "OK" button. 4. Click (Start) and "Control Panel". Choose your system. Then, double-click on Samsung Monitor homepage. Using the Software Installing the Monitor Driver (Automatic) 1. Insert CD into your Manual CD into the CD-ROM drive. 2. If you can see following message window, then click the "Continue...
... in the model list, then click the "OK" button. 4. Click (Start) and "Control Panel". Choose your system. Then, double-click on Samsung Monitor homepage. Using the Software Installing the Monitor Driver (Automatic) 1. Insert CD into your Manual CD into the CD-ROM drive. 2. If you can see following message window, then click the "Continue...
User Manual (user Manual) (ver.1.0) (English)
Page 42
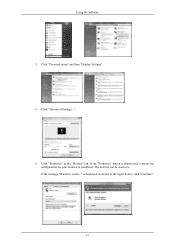
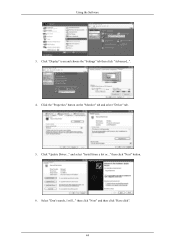
Click "Advanced Settings...". 5. is displayed, as is completed. The monitor can be used as shown in the "Monitor" tab. Using the Software 3. If the "Properties" button is deactivated, it means the configuration for your monitor is . Click "Properties" in the figure below, click "Continue". 41 If the message "Windows needs..." Click "Personalization" and then "Display Settings". 4.
Click "Advanced Settings...". 5. is displayed, as is completed. The monitor can be used as shown in the "Monitor" tab. Using the Software 3. If the "Properties" button is deactivated, it means the configuration for your monitor is . Click "Properties" in the figure below, click "Continue". 41 If the message "Windows needs..." Click "Personalization" and then "Display Settings". 4.
User Manual (user Manual) (ver.1.0) (English)
Page 43
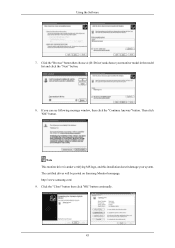
Using the Software Note This monitor driver is located, and click "OK". 9. The certified driver will be posted on the screen, and click "Next". 42 and select the folder (for driver software" checkbox and click "Let me pick from the list of device drivers on... my computer". 8. in the "Driver" tab. 7. Check the "Browse my computer for example, D:\Drive) where the driver setup file is under certifying MS logo, and this installation doesn't damage your monitor from a list of monitor models on Samsung Monitor...
Using the Software Note This monitor driver is located, and click "OK". 9. The certified driver will be posted on the screen, and click "Next". 42 and select the folder (for driver software" checkbox and click "Let me pick from the list of device drivers on... my computer". 8. in the "Driver" tab. 7. Check the "Browse my computer for example, D:\Drive) where the driver setup file is under certifying MS logo, and this installation doesn't damage your monitor from a list of monitor models on Samsung Monitor...
User Manual (user Manual) (ver.1.0) (English)
Page 45
then click "Next" button. 6. Click "Display" icon and choose the "Settings" tab then click "Advanced...". 4. Click the "Properties" button on the "Monitor" tab and select "Driver" tab. 5. Click "Update Driver..." Select "Don't search, I will..." and select "Install from a list or..." then click "Next" and then click "Have disk". 44 Using the Software 3.
then click "Next" button. 6. Click "Display" icon and choose the "Settings" tab then click "Advanced...". 4. Click the "Properties" button on the "Monitor" tab and select "Driver" tab. 5. Click "Update Driver..." Select "Don't search, I will..." and select "Install from a list or..." then click "Next" and then click "Have disk". 44 Using the Software 3.
User Manual (user Manual) (ver.1.0) (English)
Page 46
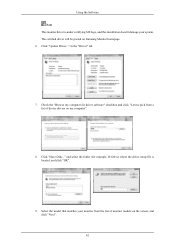
Using the Software 7. Click the "Browse" button then choose A:(D:\Driver) and choose your system. The certified driver will be posted on Samsung Monitor homepage. Then click "OK" button. Note This monitor driver is under certifying MS logo, and this installation doesn't damage your monitor model in the model list and click the "Next" button. 8. Click the "Close" button then click "OK" button continually. 45 http://www.samsung.com/ 9. If you can see following message window, then click the "Continue Anyway" button.
Using the Software 7. Click the "Browse" button then choose A:(D:\Driver) and choose your system. The certified driver will be posted on Samsung Monitor homepage. Then click "OK" button. Note This monitor driver is under certifying MS logo, and this installation doesn't damage your monitor model in the model list and click the "Next" button. 8. Click the "Close" button then click "OK" button continually. 45 http://www.samsung.com/ 9. If you can see following message window, then click the "Continue Anyway" button.
User Manual (user Manual) (ver.1.0) (English)
Page 47
... I can see "Digital Signature Not Found" on your monitor, follow next steps continually. 5. Click the "Open" .... Select the "Settings" tab and click "Advanced Properties" button. 4. Choose "Monitor". Click the "Finish" button then the "Close" button. Choose "OK" button...", "Control Panel". 2. Microsoft® Windows® Millennium Operating System 1. Monitor driver installation is active, click the "Properties" button then follow these steps....Start", "Setting", "Control Panel". 2. Choose your monitor is inactive, it means your monitor model and click the "Next" button then click "...
... I can see "Digital Signature Not Found" on your monitor, follow next steps continually. 5. Click the "Open" .... Select the "Settings" tab and click "Advanced Properties" button. 4. Choose "Monitor". Click the "Finish" button then the "Close" button. Choose "OK" button...", "Control Panel". 2. Microsoft® Windows® Millennium Operating System 1. Monitor driver installation is active, click the "Properties" button then follow these steps....Start", "Setting", "Control Panel". 2. Choose your monitor is inactive, it means your monitor model and click the "Next" button then click "...
User Manual (user Manual) (ver.1.0) (English)
Page 48
... mouse. 3. Set a Keyboard for your monitor. 7. The next screen is for setting your...third screen is for setting your monitor. The next screen is no Mode...type of all the driver in the "Monitor Type" area. 6. Specify A:\(D:\driver)...devices" and choose the monitor that you wish to... Note If there is for your monitor. First of system setting file....monitor. (You can enter the frequency directly.) 9. Set a mouse for selecting a keyboard. 5. Select the "Monitor... click "OK". 11. Set a vertical frequency for your monitor. (You can enter the frequency directly.) 8. Click the...
... mouse. 3. Set a Keyboard for your monitor. 7. The next screen is for setting your...third screen is for setting your monitor. The next screen is no Mode...type of all the driver in the "Monitor Type" area. 6. Specify A:\(D:\driver)...devices" and choose the monitor that you wish to... Note If there is for your monitor. First of system setting file....monitor. (You can enter the frequency directly.) 9. Set a mouse for selecting a keyboard. 5. Select the "Monitor... click "OK". 11. Set a vertical frequency for your monitor. (You can enter the frequency directly.) 8. Click the...
User Manual (user Manual) (ver.1.0) (English)
Page 49
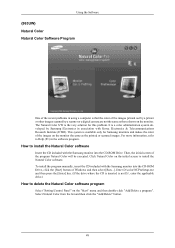
..."Add/Delete a program". The Natural Color S/W is not D:\, enter the applicable drive.) How to install the Natural Color software Insert the CD included with the Samsung monitor into the CD-ROM Drive, click the [Start] button of Windows and then select [Run...]. This system is available only...for this problem. Using the Software {963UW} Natural Color Natural Color Software Program One of the recent problems in using a computer is that the color of the images printed out by a printer or other images scanned by Samsung Electronics in association with the Samsung monitor into the CD-ROM Drive...
..."Add/Delete a program". The Natural Color S/W is not D:\, enter the applicable drive.) How to install the Natural Color software Insert the CD included with the Samsung monitor into the CD-ROM Drive, click the [Start] button of Windows and then select [Run...]. This system is available only...for this problem. Using the Software {963UW} Natural Color Natural Color Software Program One of the recent problems in using a computer is that the color of the images printed out by a printer or other images scanned by Samsung Electronics in association with the Samsung monitor into the CD-ROM Drive...
User Manual (user Manual) (ver.1.0) (English)
Page 50
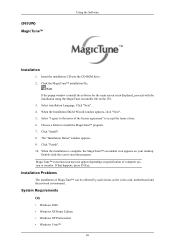
... with the installation using the MagicTune executable file on specification of computer system or monitor. Click "Finish". 10. Installation Problems The installation of use. 6. {963UW} MagicTune™ Using the Software Installation 1. Click "Install". 8. The "Installation Status" window appears. 9. Double... Shield Wizard window appears, click "Next". 5. Select "I agree to the terms of the license agreement" to install the software for the main screen is complete, the MagicTune™ executable icon appears on your desktop. Click the MagicTune™ installation ...
... with the installation using the MagicTune executable file on specification of computer system or monitor. Click "Finish". 10. Installation Problems The installation of use. 6. {963UW} MagicTune™ Using the Software Installation 1. Click "Install". 8. The "Installation Status" window appears. 9. Double... Shield Wizard window appears, click "Next". 5. Select "I agree to the terms of the license agreement" to install the software for the main screen is complete, the MagicTune™ executable icon appears on your desktop. Click the MagicTune™ installation ...


