User Manual (ENGLISH)
Page 2
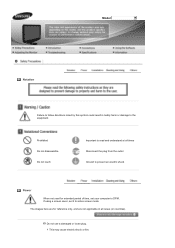
... mode. Do not use a damaged or loose plug. If using a screen saver, set your computer to the equipment. This may cause electric shock or fire. Model Notation Failure to follow directions noted by this symbol could result in all cases (or countries).
... mode. Do not use a damaged or loose plug. If using a screen saver, set your computer to the equipment. This may cause electric shock or fire. Model Notation Failure to follow directions noted by this symbol could result in all cases (or countries).
User Manual (ENGLISH)
Page 8
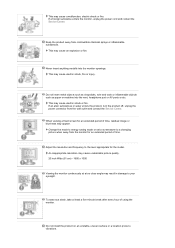
...unplug the power connector from combustible chemical sprays or inflammable substances. An inappropriate resolution may cause undesirable picture quality. 20 inch Wide (51 cm) - 1680 x 1050 Viewing the monitor continuously at least a five-minute break after every hour of time, residual image or blurriness may result in ...Service Center. Never insert anything metallic into the vent, headphone port or AV ports or etc. When viewing a fixed screen for the model. Keep the product away from the wall outlet and contact the Service Center. Change the mode to energy saving mode or set a ...
...unplug the power connector from combustible chemical sprays or inflammable substances. An inappropriate resolution may cause undesirable picture quality. 20 inch Wide (51 cm) - 1680 x 1050 Viewing the monitor continuously at least a five-minute break after every hour of time, residual image or blurriness may result in ...Service Center. Never insert anything metallic into the vent, headphone port or AV ports or etc. When viewing a fixed screen for the model. Keep the product away from the wall outlet and contact the Service Center. Change the mode to energy saving mode or set a ...
User Manual (ENGLISH)
Page 13
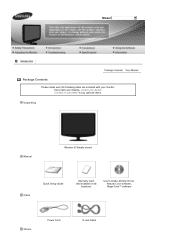
Contact a local dealer to buy optional items. Unpacking Manual Monitor & Simple stand Cable Quick Setup Guide Warranty Card (Not available in all locations) User's Guide, Monitor Driver, Natural Color software, MagicTune™ software Others Power Cord D-sub Cable Model Package Contents Please make sure the following items are missing, contact your monitor. If any items are included with your dealer.
Contact a local dealer to buy optional items. Unpacking Manual Monitor & Simple stand Cable Quick Setup Guide Warranty Card (Not available in all locations) User's Guide, Monitor Driver, Natural Color software, MagicTune™ software Others Power Cord D-sub Cable Model Package Contents Please make sure the following items are missing, contact your monitor. If any items are included with your dealer.

User Manual (ENGLISH)
Page 14
Your Monitor Front MENU button [ ] MagicBright™ button [] Opens the on-screen menu and exits from the menu. You can easily select one of the image you ... by using the OSD menu. 2) Text Each mode has its own pre-configured brightness value. Cleaning Cloth Will be comfortable to black and high gloss models only.
Your Monitor Front MENU button [ ] MagicBright™ button [] Opens the on-screen menu and exits from the menu. You can easily select one of the image you ... by using the OSD menu. 2) Text Each mode has its own pre-configured brightness value. Cleaning Cloth Will be comfortable to black and high gloss models only.

User Manual (ENGLISH)
Page 17
... on your monitor. [RGB IN] Connected to the Macintosh computer using the D-sub connection cable. If your computer. Connect the signal cable to the 15-pin, D-sub port on the back of 0° to18°. Connect the monitor to a Macintosh. - Turn on the video card. - Model Connecting Cables ...Connect the power cord for the monitor into a nearby outlet. Using the Stand Folding the base You can tilt the...
... on your monitor. [RGB IN] Connected to the Macintosh computer using the D-sub connection cable. If your computer. Connect the signal cable to the 15-pin, D-sub port on the back of 0° to18°. Connect the monitor to a Macintosh. - Turn on the video card. - Model Connecting Cables ...Connect the power cord for the monitor into a nearby outlet. Using the Stand Folding the base You can tilt the...
User Manual (ENGLISH)
Page 19
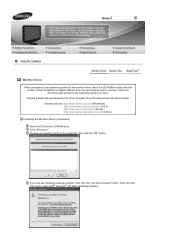
...; XP/2000 Operating System). Internet web site :http://www.samsung.com/ (Worldwide) http://www.samsung.com/monitor (U.S.A) http://www.sec.co.kr/monitor (Korea) http://www.samsungmonitor.com.cn/ (China) Installing the Monitor Driver (Automatic) Insert the CD into the CD-ROM drive. Choose your monitor model in the model list, then click the "OK" button. Click "Windows...
...; XP/2000 Operating System). Internet web site :http://www.samsung.com/ (Worldwide) http://www.samsung.com/monitor (U.S.A) http://www.sec.co.kr/monitor (Korea) http://www.samsungmonitor.com.cn/ (China) Installing the Monitor Driver (Automatic) Insert the CD into the CD-ROM drive. Choose your monitor model in the model list, then click the "OK" button. Click "Windows...
User Manual (ENGLISH)
Page 21
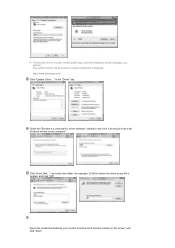
This monitor driver is located, and click "OK". The certified driver will be posted on the screen, and click "Next". and select the folder (for driver software" ..." tab. Check the "Browse my computer for example, D:\Drive) where the driver setup file is under certifying MS logo, and this installation doesn't damage your monitor from a list of monitor models on Samsung Monitor homepage http://www.samsung.com/ Click "Update Driver..." Click "Have Disk..." Select the...
This monitor driver is located, and click "OK". The certified driver will be posted on the screen, and click "Next". and select the folder (for driver software" ..." tab. Check the "Browse my computer for example, D:\Drive) where the driver setup file is under certifying MS logo, and this installation doesn't damage your monitor from a list of monitor models on Samsung Monitor homepage http://www.samsung.com/ Click "Update Driver..." Click "Have Disk..." Select the...
User Manual (ENGLISH)
Page 23
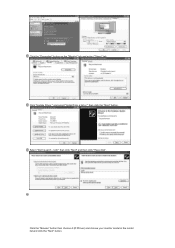
and select "Install from a list or." then click the "Next" button. Click the "Browse" button then choose A:(D:\Driver) and choose your monitor model in the model list and click the "Next" button. Select "Don't search ,I will." Click "Update Driver." then click "Next" and then click "Have disk". Click the "Properties" button on the "Monitor" tab and select "Driver" tab.
and select "Install from a list or." then click the "Next" button. Click the "Browse" button then choose A:(D:\Driver) and choose your monitor model in the model list and click the "Next" button. Select "Don't search ,I will." Click "Update Driver." then click "Next" and then click "Have disk". Click the "Properties" button on the "Monitor" tab and select "Driver" tab.
User Manual (ENGLISH)
Page 25
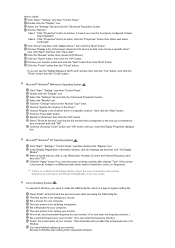
...can see the screen working normally after clicking "Test". The next screen is for your monitor. (You can enter the frequency directly.) Set a vertical frequency for selecting a keyboard. You have finished setting up your monitor model and click the "Next" button then click "Next" button. Click the "Browse" ... mouse. The third screen is for setting your computer and click "OK". The next screen is for setting your monitor. (You can enter the frequency directly.) "Enter" the model name of your computer. Click the "Open" button, then click the "OK" button. Click the "Change" ...
...can see the screen working normally after clicking "Test". The next screen is for your monitor. (You can enter the frequency directly.) Set a vertical frequency for selecting a keyboard. You have finished setting up your monitor model and click the "Next" button then click "Next" button. Click the "Browse" ... mouse. The third screen is for setting your computer and click "OK". The next screen is for setting your monitor. (You can enter the frequency directly.) "Enter" the model name of your computer. Click the "Open" button, then click the "OK" button. Click the "Change" ...
User Manual (ENGLISH)
Page 28
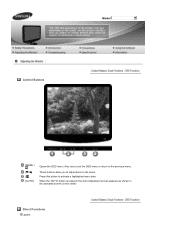
Press this button to the previous menu. When the 'AUTO' button is pressed, the Auto Adjustment screen appears as shown in the menu. These buttons allow you to adjust items in the animated screen on the center. Direct Functions AUTO Model Control Buttons [MENU / ] [] [] [AUTO] Opens the OSD menu. Also use to exit the OSD menu or return to activate a highlighted menu item.
Press this button to the previous menu. When the 'AUTO' button is pressed, the Auto Adjustment screen appears as shown in the menu. These buttons allow you to adjust items in the animated screen on the center. Direct Functions AUTO Model Control Buttons [MENU / ] [] [] [AUTO] Opens the OSD menu. Also use to exit the OSD menu or return to activate a highlighted menu item.
User Manual (ENGLISH)
Page 38
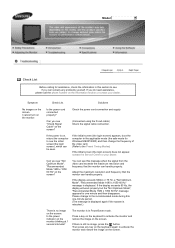
... the screen. If there is displayed. Check List Solutions Is the power cord connected properly? You can see "Check Signal Cable" on the monitor. Then press any problems yourself. Can you can remedy any key on the screen. Can you do need assistance, please call the phone number... 60 Hz" message appears for one -minute period. (The message is displayed again if the system is rebooted.) There is in PowerSaver mode. Model Check List Before calling for assistance, check the information in this section to the recommended mode during this message when the signal from the video...
... the screen. If there is displayed. Check List Solutions Is the power cord connected properly? You can see "Check Signal Cable" on the monitor. Then press any problems yourself. Can you can remedy any key on the screen. Can you do need assistance, please call the phone number... 60 Hz" message appears for one -minute period. (The message is displayed again if the system is rebooted.) There is in PowerSaver mode. Model Check List Before calling for assistance, check the information in this section to the recommended mode during this message when the signal from the video...

