
User Manual (user Manual) (English)
Page 7
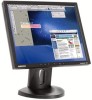
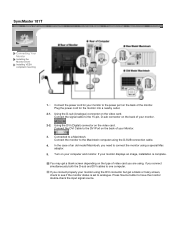
SyncMaster 181T Unpacking Front Rear Monitor and Stand Power Cord Signal Cable DVI Cable Pivot Stand and S/W CD(Option) Quick Setup Guide Warranty Card (Not available in all locations) Please make sure the following items are missing, contact your monitor. If any items are included with your dealer. User's Guide and Driver Installation CD
SyncMaster 181T Unpacking Front Rear Monitor and Stand Power Cord Signal Cable DVI Cable Pivot Stand and S/W CD(Option) Quick Setup Guide Warranty Card (Not available in all locations) Please make sure the following items are missing, contact your monitor. If any items are included with your dealer. User's Guide and Driver Installation CD
User Manual (user Manual) (English)
Page 8
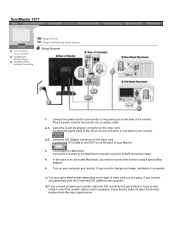
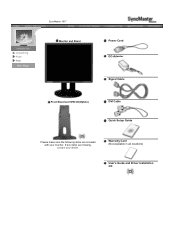
If any items are included with your dealer. SyncMaster 191T Unpacking Front Rear Please make sure the following items are missing, contact your monitor. General Monitor and Stand Power Cord Signal Cable DVI Cable(Option) Pivot Stand and S/W CD(Option) Quick Setup Guide Warranty Card (Not available in all locations) For Multimedia model (Option) User's Guide and Driver Installation CD Multimedia Speaker Stand (Simple Stand or Pivot Stand & Pivot Software) Sound Cable
If any items are included with your dealer. SyncMaster 191T Unpacking Front Rear Please make sure the following items are missing, contact your monitor. General Monitor and Stand Power Cord Signal Cable DVI Cable(Option) Pivot Stand and S/W CD(Option) Quick Setup Guide Warranty Card (Not available in all locations) For Multimedia model (Option) User's Guide and Driver Installation CD Multimedia Speaker Stand (Simple Stand or Pivot Stand & Pivot Software) Sound Cable
User Manual (user Manual) (English)
Page 9
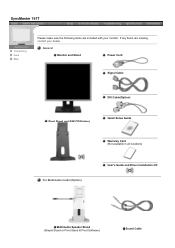
SyncMaster 171N/191N/170N/172N/192N/173N/193N Unpacking Front Rear Please make sure the following items are missing, contact your monitor. If any items are included with your dealer. General Monitor and Stand Power Cord Signal Cable Quick Setup Guide Pivot Stand and S/W CD(Option) Warranty Card (Not available in all locations) User's Guide and Driver Installation CD For Multimedia model (Option) Multimedia Speaker Stand (Simple Stand or Pivot Stand & Pivot Software) Sound Cable
SyncMaster 171N/191N/170N/172N/192N/173N/193N Unpacking Front Rear Please make sure the following items are missing, contact your monitor. If any items are included with your dealer. General Monitor and Stand Power Cord Signal Cable Quick Setup Guide Pivot Stand and S/W CD(Option) Warranty Card (Not available in all locations) User's Guide and Driver Installation CD For Multimedia model (Option) Multimedia Speaker Stand (Simple Stand or Pivot Stand & Pivot Software) Sound Cable
User Manual (user Manual) (English)
Page 10
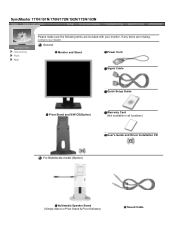
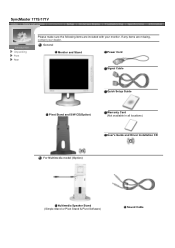
General Monitor and Stand Power Cord Signal Cable Quick Setup Guide Pivot Stand and S/W CD(Option) Warranty Card (Not available in all locations) User's Guide and Driver Installation CD For Multimedia model (Option) Multimedia Speaker Stand (Simple Stand or Pivot Stand & Pivot Software) Sound Cable SyncMaster 171S/171V Unpacking Front Rear Please make sure the following items are missing, contact your monitor. If any items are included with your dealer.
General Monitor and Stand Power Cord Signal Cable Quick Setup Guide Pivot Stand and S/W CD(Option) Warranty Card (Not available in all locations) User's Guide and Driver Installation CD For Multimedia model (Option) Multimedia Speaker Stand (Simple Stand or Pivot Stand & Pivot Software) Sound Cable SyncMaster 171S/171V Unpacking Front Rear Please make sure the following items are missing, contact your monitor. If any items are included with your dealer.
User Manual (user Manual) (English)
Page 18
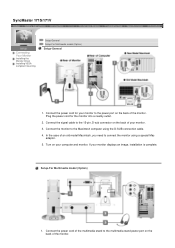
... on the type of the monitor. Press Source button to a Macintosh. Using the D-sub (Analogue) connector on the video card. Connected to have the monitor double-check the input signal source. If your monitor. 2-2. Using the DVI (Digital) connector on the video card. SyncMaster 181T Connecting Your Monitor Installing the Monitor Driver Installing VESA compliant mounting 1. Connect...
... on the type of the monitor. Press Source button to a Macintosh. Using the D-sub (Analogue) connector on the video card. Connected to have the monitor double-check the input signal source. If your monitor. 2-2. Using the DVI (Digital) connector on the video card. SyncMaster 181T Connecting Your Monitor Installing the Monitor Driver Installing VESA compliant mounting 1. Connect...
User Manual (user Manual) (English)
Page 19
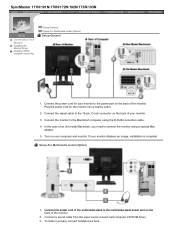
... D-sub (Analogue) connector on the video card. If your monitor using the D-SUB connection cable. 4. Press Source button to a Macintosh. SyncMaster 191T Connecting Your Monitor Installing the Monitor Driver Installing VESA compliant mounting Setup-General Setup-For Multimedia model (Option) Setup-General 1. Connect the power cord for the monitor into a nearby outlet. 2-1. In the case of your...
... D-sub (Analogue) connector on the video card. If your monitor using the D-SUB connection cable. 4. Press Source button to a Macintosh. SyncMaster 191T Connecting Your Monitor Installing the Monitor Driver Installing VESA compliant mounting Setup-General Setup-For Multimedia model (Option) Setup-General 1. Connect the power cord for the monitor into a nearby outlet. 2-1. In the case of your...
User Manual (user Manual) (English)
Page 20
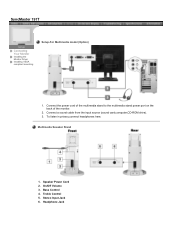
Speaker Power Cord 2. Headphone Jack Connect a sound cable from the input source (sound card,computer,CD-ROM drive). 3. SyncMaster 191T Connecting Your Monitor Installing the Monitor Driver Installing VESA compliant mounting Setup-For Multimedia model (Option) 1. To listen in privacy,connect headphones here. Bass Control 4. On/Off Volume 3. Multimedia Speaker Stand 1. Treble Control 5. Stereo Input Jack 6. Connect the power cord of the multimedia stand to the multimedia stand power port on the back of the monitor. 2.
Speaker Power Cord 2. Headphone Jack Connect a sound cable from the input source (sound card,computer,CD-ROM drive). 3. SyncMaster 191T Connecting Your Monitor Installing the Monitor Driver Installing VESA compliant mounting Setup-For Multimedia model (Option) 1. To listen in privacy,connect headphones here. Bass Control 4. On/Off Volume 3. Multimedia Speaker Stand 1. Treble Control 5. Stereo Input Jack 6. Connect the power cord of the multimedia stand to the multimedia stand power port on the back of the monitor. 2.
User Manual (user Manual) (English)
Page 21
...computer using a special Mac adaptor. 5. If your computer and monitor. To listen in privacy,connect headphones here. Connect the monitor to connect the monitor using the D-SUB connection cable. 4. Turn on your monitor displays an image, installation is complete. Connect a sound cable ...monitor. 2. Plug the power cord for your monitor. 3. Connect the power cord of the multimedia stand to the power port on the back of the monitor. Setup-For Multimedia model (Option) 1. SyncMaster 171N/191N/170N/172N/192N/173N/193N Connecting Your Monitor Installing the Monitor Driver...
...computer using a special Mac adaptor. 5. If your computer and monitor. To listen in privacy,connect headphones here. Connect the monitor to connect the monitor using the D-SUB connection cable. 4. Turn on your monitor displays an image, installation is complete. Connect a sound cable ...monitor. 2. Plug the power cord for your monitor. 3. Connect the power cord of the multimedia stand to the power port on the back of the monitor. Setup-For Multimedia model (Option) 1. SyncMaster 171N/191N/170N/172N/192N/173N/193N Connecting Your Monitor Installing the Monitor Driver...
User Manual (user Manual) (English)
Page 23
... an image, installation is complete. Turn on the back of an old model Macintosh, you need to the Macintosh computer using a special Mac adaptor. 5. SyncMaster 171S/171V Connecting Your Monitor Installing the Monitor Driver Installing VESA compliant mounting Setup-General Setup-For Multimedia model (Option) Setup-General 1. In the case of your computer and...
... an image, installation is complete. Turn on the back of an old model Macintosh, you need to the Macintosh computer using a special Mac adaptor. 5. SyncMaster 171S/171V Connecting Your Monitor Installing the Monitor Driver Installing VESA compliant mounting Setup-General Setup-For Multimedia model (Option) Setup-General 1. In the case of your computer and...
User Manual (user Manual) (English)
Page 31
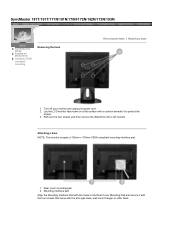
SyncMaster 181T/191T/171N/191N/170N/172N/192N/173N/193N Connecting Your Monitor Installing the Monitor Driver Installing VESA compliant mounting Removing the base Removing the base | Attaching a base 1. Remove the four screws and then remove the Stand from the LCD monitor. Rear cover mounting pad 2. Attaching a base NOTE: This monitor accepts a 100mm x 100mm VESA-compliant mounting interface pad...
SyncMaster 181T/191T/171N/191N/170N/172N/192N/173N/193N Connecting Your Monitor Installing the Monitor Driver Installing VESA compliant mounting Removing the base Removing the base | Attaching a base 1. Remove the four screws and then remove the Stand from the LCD monitor. Rear cover mounting pad 2. Attaching a base NOTE: This monitor accepts a 100mm x 100mm VESA-compliant mounting interface pad...
User Manual (user Manual) (English)
Page 32
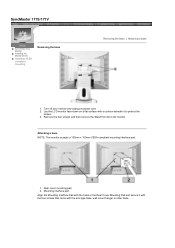
SyncMaster 171S/171V Connecting Your Monitor Installing the Monitor Driver Installing VESA compliant mounting Removing the base Removing the base | Attaching a base 1. Mounting interface pad Align the Mounting Interface Pad with the arm-type base, wall mount hanger or other base. Lay the LCD monitor face-down on a flat surface ...and secure it to protect the screen. 3. Remove the four screws and then remove the Stand from the LCD monitor. Attaching a base NOTE: This monitor accepts a 100mm x 100mm VESA-compliant mounting interface pad. 1. Rear cover mounting pad 2. Turn off your...
SyncMaster 171S/171V Connecting Your Monitor Installing the Monitor Driver Installing VESA compliant mounting Removing the base Removing the base | Attaching a base 1. Mounting interface pad Align the Mounting Interface Pad with the arm-type base, wall mount hanger or other base. Lay the LCD monitor face-down on a flat surface ...and secure it to protect the screen. 3. Remove the four screws and then remove the Stand from the LCD monitor. Attaching a base NOTE: This monitor accepts a 100mm x 100mm VESA-compliant mounting interface pad. 1. Rear cover mounting pad 2. Turn off your...

User Manual (user Manual) (ver.1.0) (English)
Page 8
If any items are included with your dealer. Unparking Front Rear SyncMaster 181T Monitor and Stand Power Cord Signal Cable DVI Cable Pivot Stand and S/W CD(Option) Quick Setup Guide Warranty Card (Not available in all locations) Please make sure the following items are missing, contact your monitor. User's Guide and Driver Installation CD
If any items are included with your dealer. Unparking Front Rear SyncMaster 181T Monitor and Stand Power Cord Signal Cable DVI Cable Pivot Stand and S/W CD(Option) Quick Setup Guide Warranty Card (Not available in all locations) Please make sure the following items are missing, contact your monitor. User's Guide and Driver Installation CD
User Manual (user Manual) (ver.1.0) (English)
Page 9
If any items are included with your dealer. Unparking Front Rear SyncMaster 191T Monitor and Stand Power Cord DC-Adapter Signal Cable Pivot Stand and S/W CD(Option) DVI Cable Quick Setup Guide Please make sure the following items are missing, contact your monitor. Warranty Card (Not available in all locations) User's Guide and Driver Installation CD
If any items are included with your dealer. Unparking Front Rear SyncMaster 191T Monitor and Stand Power Cord DC-Adapter Signal Cable Pivot Stand and S/W CD(Option) DVI Cable Quick Setup Guide Please make sure the following items are missing, contact your monitor. Warranty Card (Not available in all locations) User's Guide and Driver Installation CD
User Manual (user Manual) (ver.1.0) (English)
Page 13
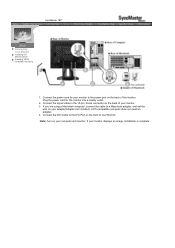
SyncMaster 181T Connecting Your Monitor Installing the Monitor Driver Installing VESA compliant mounting 1. Connect the DVI Cable to a Macintosh adapter, and set the pins on your computer and monitor. If your Monitor. If you are using a Macintosh computer, connect the cable to the DVI Port on the back of the monitor. Plug the power cord for your monitor... to the 15-pin, D-sub connector on the back of your monitor displays an image, installation is complete. A PC-compatible computer ...
SyncMaster 181T Connecting Your Monitor Installing the Monitor Driver Installing VESA compliant mounting 1. Connect the DVI Cable to a Macintosh adapter, and set the pins on your computer and monitor. If your Monitor. If you are using a Macintosh computer, connect the cable to the DVI Port on the back of the monitor. Plug the power cord for your monitor... to the 15-pin, D-sub connector on the back of your monitor displays an image, installation is complete. A PC-compatible computer ...
User Manual (user Manual) (ver.1.0) (English)
Page 14
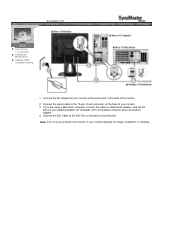
.... 4. Note: Turn on the back of your monitor to the 15-pin, D-sub connector on the back of the monitor. 2. If your computer and monitor. Connect the signal cable to the power port on your monitor displays an image, installation is complete. SyncMaster 191T Connecting Your Monitor Installing the Monitor Driver Installing VESA compliant mounting 1. Connect the DC Adapter...
.... 4. Note: Turn on the back of your monitor to the 15-pin, D-sub connector on the back of the monitor. 2. If your computer and monitor. Connect the signal cable to the power port on your monitor displays an image, installation is complete. SyncMaster 191T Connecting Your Monitor Installing the Monitor Driver Installing VESA compliant mounting 1. Connect the DC Adapter...

