User Manual (user Manual) (Spanish)
Page 63
... installation. User Information Changes or modifications not expressly approved by the party responsible for compliance could void the user's authority to Part 15 of Samsung 3351 Michelson Drive, Suite #290, Irvine, CA92612 USA Tel) 949-975-7310 Fax) 949-922-8301 Warning User must use only UL ...may cause radio interference. Before making the connection, make sure the voltage rating of the computer convenience outlet is the same as the monitor and that the ampere rating of the computer convenience outlet is encouraged to try to any UL Listed personal computer with the limits for ...
... installation. User Information Changes or modifications not expressly approved by the party responsible for compliance could void the user's authority to Part 15 of Samsung 3351 Michelson Drive, Suite #290, Irvine, CA92612 USA Tel) 949-975-7310 Fax) 949-922-8301 Warning User must use only UL ...may cause radio interference. Before making the connection, make sure the voltage rating of the computer convenience outlet is the same as the monitor and that the ampere rating of the computer convenience outlet is encouraged to try to any UL Listed personal computer with the limits for ...

User Manual (user Manual) (Spanish)
Page 64
...Interference z EN55024:1998 - Since it has not been possible so far for reduced electric and magnetic fields. MPR II Compliance This monitor complies with these potentially damaging substances sooner or later enter Nature. Power Line Harmonics z EN61000-3-3:1995 - Your purchase has also contributed...II) recommendations for the majority of electronic equipment to the following European Norms: z EN55022:1998+A1:2000 - You have environmentally-labelled monitors? Cet appareil Numérique de classe B respecte toutes les exigences du Règlemont NMB-03 sur les équipements produisant...
...Interference z EN55024:1998 - Since it has not been possible so far for reduced electric and magnetic fields. MPR II Compliance This monitor complies with these potentially damaging substances sooner or later enter Nature. Power Line Harmonics z EN61000-3-3:1995 - Your purchase has also contributed...II) recommendations for the majority of electronic equipment to the following European Norms: z EN55022:1998+A1:2000 - You have environmentally-labelled monitors? Cet appareil Numérique de classe B respecte toutes les exigences du Règlemont NMB-03 sur les équipements produisant...
User Manual (user Manual) (Spanish)
Page 65
...etc.) it is often routinely left running continuously. The requirements cover a wide range of issues: environment, ergonomics, usability, emission of a monitor, such as a joint effort by this folder you will find a brief summary of display screens must be reasonable for example in batteries... scheme was developed as energy consumption levels, that batteries may not contain more than 25 ppm (parts per million) of monitors. The environmental demands concern among other characteristics of electrical and magnetic fields, energy consumption and electrical and fire safety. z TCO...
...etc.) it is often routinely left running continuously. The requirements cover a wide range of issues: environment, ergonomics, usability, emission of a monitor, such as a joint effort by this folder you will find a brief summary of display screens must be reasonable for example in batteries... scheme was developed as energy consumption levels, that batteries may not contain more than 25 ppm (parts per million) of monitors. The environmental demands concern among other characteristics of electrical and magnetic fields, energy consumption and electrical and fire safety. z TCO...
User Manual (user Manual) (Spanish)
Page 67
... and mammals, due to severe health effects, including reproductive damage in human blood and researchers fear that batteries, the colour-generating layers of flat panel monitors as today there is toxic in higher doses, causes lead poisoning. It also demands that plastic components weighing more than 25 grams must not contain...
... and mammals, due to severe health effects, including reproductive damage in human blood and researchers fear that batteries, the colour-generating layers of flat panel monitors as today there is toxic in higher doses, causes lead poisoning. It also demands that plastic components weighing more than 25 grams must not contain...
User Manual (user Manual) (English)
Page 4
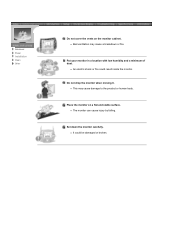
z Bad ventilation may cause damage to the product or human body. Do not drop the monitor when moving it. Put your monitor in a location with low humidity and a minimum of dust. Place the monitor on the monitor cabinet. z It could result inside the monitor. z The monitor can cause injury by falling. Set down the monitor carefully. Notational Power Installation Clean Other Do not cover the vents on a flat and stable surface. z An electric shock or fire could be damaged or broken. z This may cause a breakdown or fire.
z Bad ventilation may cause damage to the product or human body. Do not drop the monitor when moving it. Put your monitor in a location with low humidity and a minimum of dust. Place the monitor on the monitor cabinet. z It could result inside the monitor. z The monitor can cause injury by falling. Set down the monitor carefully. Notational Power Installation Clean Other Do not cover the vents on a flat and stable surface. z An electric shock or fire could be damaged or broken. z This may cause a breakdown or fire.

User Manual (user Manual) (English)
Page 5
... the plug and then contact a service center. Do not spray detergent directly on the monitor. Use the recommended detergent with a dry cloth. z A dirty connector can cause an electric shock or fire. If the connector between the plug and the pin ...is dusty or dirty, clean it properly with a smooth cloth. Do not set a glass of the TFT-LCD, wipe with a slightly moistened, soft fabric. Notational Power Installation Clean Other When cleaning the monitor case or the surface of water, chemicals or any small metal objects on the...
... the plug and then contact a service center. Do not spray detergent directly on the monitor. Use the recommended detergent with a dry cloth. z A dirty connector can cause an electric shock or fire. If the connector between the plug and the pin ...is dusty or dirty, clean it properly with a smooth cloth. Do not set a glass of the TFT-LCD, wipe with a slightly moistened, soft fabric. Notational Power Installation Clean Other When cleaning the monitor case or the surface of water, chemicals or any small metal objects on the...
User Manual (user Manual) (English)
Page 6
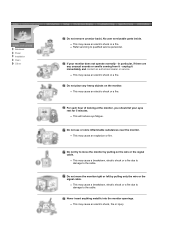
... Clean Other Do not remove cover(or back). No user serviceable parts inside. unplug it - For each hour of looking at the monitor, you should let your monitor does not operate normally - Do not try to the cable. in particular, if there are any heavy objects on the wire or ... may cause an electric shock or a fire. z This may cause a breakdown, electric shock or a fire due to damage to move the monitor right or left by pulling on the monitor. z This may cause an electric shock or a fire. z This may cause an explosion or fire. z Refer servicing to the cable. ...
... Clean Other Do not remove cover(or back). No user serviceable parts inside. unplug it - For each hour of looking at the monitor, you should let your monitor does not operate normally - Do not try to the cable. in particular, if there are any heavy objects on the wire or ... may cause an electric shock or a fire. z This may cause a breakdown, electric shock or a fire due to damage to move the monitor right or left by pulling on the monitor. z This may cause an electric shock or a fire. z This may cause an explosion or fire. z Refer servicing to the cable. ...

User Manual (user Manual) (English)
Page 7
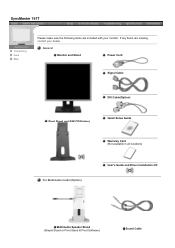
If any items are included with your dealer. User's Guide and Driver Installation CD SyncMaster 181T Unpacking Front Rear Monitor and Stand Power Cord Signal Cable DVI Cable Pivot Stand and S/W CD(Option) Quick Setup Guide Warranty Card (Not available in all locations) Please make sure the following items are missing, contact your monitor.
If any items are included with your dealer. User's Guide and Driver Installation CD SyncMaster 181T Unpacking Front Rear Monitor and Stand Power Cord Signal Cable DVI Cable Pivot Stand and S/W CD(Option) Quick Setup Guide Warranty Card (Not available in all locations) Please make sure the following items are missing, contact your monitor.
User Manual (user Manual) (English)
Page 8
General Monitor and Stand Power Cord Signal Cable DVI Cable(Option) Pivot Stand and S/W CD(Option) Quick Setup Guide Warranty Card (Not available in all locations) For Multimedia model (Option) User's Guide and Driver Installation CD Multimedia Speaker Stand (Simple Stand or Pivot Stand & Pivot Software) Sound Cable If any items are included with your dealer. SyncMaster 191T Unpacking Front Rear Please make sure the following items are missing, contact your monitor.
General Monitor and Stand Power Cord Signal Cable DVI Cable(Option) Pivot Stand and S/W CD(Option) Quick Setup Guide Warranty Card (Not available in all locations) For Multimedia model (Option) User's Guide and Driver Installation CD Multimedia Speaker Stand (Simple Stand or Pivot Stand & Pivot Software) Sound Cable If any items are included with your dealer. SyncMaster 191T Unpacking Front Rear Please make sure the following items are missing, contact your monitor.
User Manual (user Manual) (English)
Page 9
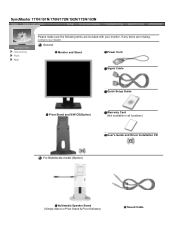
If any items are included with your dealer. SyncMaster 171N/191N/170N/172N/192N/173N/193N Unpacking Front Rear Please make sure the following items are missing, contact your monitor. General Monitor and Stand Power Cord Signal Cable Quick Setup Guide Pivot Stand and S/W CD(Option) Warranty Card (Not available in all locations) User's Guide and Driver Installation CD For Multimedia model (Option) Multimedia Speaker Stand (Simple Stand or Pivot Stand & Pivot Software) Sound Cable
If any items are included with your dealer. SyncMaster 171N/191N/170N/172N/192N/173N/193N Unpacking Front Rear Please make sure the following items are missing, contact your monitor. General Monitor and Stand Power Cord Signal Cable Quick Setup Guide Pivot Stand and S/W CD(Option) Warranty Card (Not available in all locations) User's Guide and Driver Installation CD For Multimedia model (Option) Multimedia Speaker Stand (Simple Stand or Pivot Stand & Pivot Software) Sound Cable
User Manual (user Manual) (English)
Page 10
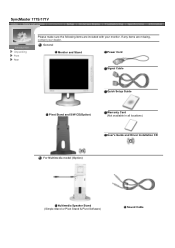
SyncMaster 171S/171V Unpacking Front Rear Please make sure the following items are missing, contact your monitor. General Monitor and Stand Power Cord Signal Cable Quick Setup Guide Pivot Stand and S/W CD(Option) Warranty Card (Not available in all locations) User's Guide and Driver Installation CD For Multimedia model (Option) Multimedia Speaker Stand (Simple Stand or Pivot Stand & Pivot Software) Sound Cable If any items are included with your dealer.
SyncMaster 171S/171V Unpacking Front Rear Please make sure the following items are missing, contact your monitor. General Monitor and Stand Power Cord Signal Cable Quick Setup Guide Pivot Stand and S/W CD(Option) Warranty Card (Not available in all locations) User's Guide and Driver Installation CD For Multimedia model (Option) Multimedia Speaker Stand (Simple Stand or Pivot Stand & Pivot Software) Sound Cable If any items are included with your dealer.

User Manual (user Manual) (English)
Page 11
... this button to turn your adjustments. Use this button to open the OSD and activate a highlighted menu item. For energy conservation, turn the monitor on and off. SyncMaster 181T/191T Unpacking Front Rear 1.Analog(A)/Digital(B) indicator 2. Power button 8. Use this button to auto adjustment direct access. This light glows green during normal operation...
... this button to turn your adjustments. Use this button to open the OSD and activate a highlighted menu item. For energy conservation, turn the monitor on and off. SyncMaster 181T/191T Unpacking Front Rear 1.Analog(A)/Digital(B) indicator 2. Power button 8. Use this button to auto adjustment direct access. This light glows green during normal operation...

User Manual (user Manual) (English)
Page 12
...open the OSD and activate a highlighted menu item. Note: See PowerSaver described in the menu. Exit button 3. For energy conservation, turn the monitor on and off. Menu button 5. Use this button to Exit the active menu or the OSD. This light glows green during normal operation, ...and blinks green once as the monitor saves your monitor OFF when it is not needed, or when leaving it unattended for further information regarding power saving functions. SyncMaster 171N/191N/170N/172N/192N/173N/193N Unpacking Front Rear 1. Auto button 2. ...
...open the OSD and activate a highlighted menu item. Note: See PowerSaver described in the menu. Exit button 3. For energy conservation, turn the monitor on and off. Menu button 5. Use this button to Exit the active menu or the OSD. This light glows green during normal operation, ...and blinks green once as the monitor saves your monitor OFF when it is not needed, or when leaving it unattended for further information regarding power saving functions. SyncMaster 171N/191N/170N/172N/192N/173N/193N Unpacking Front Rear 1. Auto button 2. ...
User Manual (user Manual) (English)
Page 13
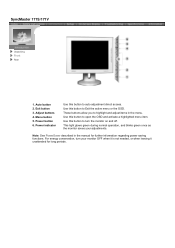
... button to Exit the active menu or the OSD. Use this button to auto adjustment direct access. For energy conservation, turn the monitor on and off. Adjust buttons 4. Use this button to highlight and adjust items in the manual for long periods. Note: See ...PowerSaver described in the menu. SyncMaster 171S/171V Unpacking Front Rear 1. Menu button 5. Auto button 2. These buttons allow you to turn your adjustments. Exit button 3. Power button 6....
... button to Exit the active menu or the OSD. Use this button to auto adjustment direct access. For energy conservation, turn the monitor on and off. Adjust buttons 4. Use this button to highlight and adjust items in the manual for long periods. Note: See ...PowerSaver described in the menu. SyncMaster 171S/171V Unpacking Front Rear 1. Menu button 5. Auto button 2. These buttons allow you to turn your adjustments. Exit button 3. Power button 6....
User Manual (user Manual) (English)
Page 14
Signal Port Connect the power cord for further information regarding cable connections. Connect the DVI Cable to the DVI Port on the back of your monitor to the power port on the back of the monitor. DVI Port 3. Connect the signal cable to product.) 1. Power on the back of your monitor. 4. SyncMaster 181T Unpacking Front Rear (The configuration at the back of the monitor may vary from product to the 15-pin, D-sub connector on /off Switch Note: See Connecting Your Monitor for your Monitor. Power port 2.
Signal Port Connect the power cord for further information regarding cable connections. Connect the DVI Cable to the DVI Port on the back of your monitor to the power port on the back of the monitor. DVI Port 3. Connect the signal cable to product.) 1. Power on the back of your monitor. 4. SyncMaster 181T Unpacking Front Rear (The configuration at the back of the monitor may vary from product to the 15-pin, D-sub connector on /off Switch Note: See Connecting Your Monitor for your Monitor. Power port 2.
User Manual (user Manual) (English)
Page 15
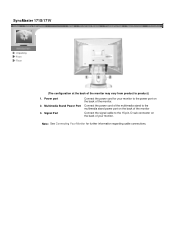
...on the back of your Monitor. Connect the signal cable to the DVI Port on the back of your monitor. Power on/off Switch 3. Multimedia Stand Power Port 4. Signal Port Connect the power cord for further information regarding cable connections. SyncMaster 191T Unpacking Front Rear (The ...configuration at the back of the monitor may vary from product to the...
...on the back of your Monitor. Connect the signal cable to the DVI Port on the back of your monitor. Power on/off Switch 3. Multimedia Stand Power Port 4. Signal Port Connect the power cord for further information regarding cable connections. SyncMaster 191T Unpacking Front Rear (The ...configuration at the back of the monitor may vary from product to the...
User Manual (user Manual) (English)
Page 16
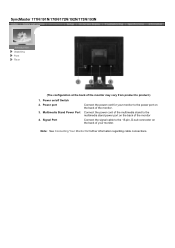
...regarding cable connections. Connect the power cord of the multimedia stand to the multimedia stand power port on the back of the monitor Connect the signal cable to product.) 1. SyncMaster 171N/191N/170N/172N/192N/173N/193N Unpacking Front Rear (The configuration at the back of the... monitor may vary from product to the 15-pin, D-sub connector on the back of your monitor to the power port on /off Switch 2. Multimedia Stand Power ...
...regarding cable connections. Connect the power cord of the multimedia stand to the multimedia stand power port on the back of the monitor Connect the signal cable to product.) 1. SyncMaster 171N/191N/170N/172N/192N/173N/193N Unpacking Front Rear (The configuration at the back of the... monitor may vary from product to the 15-pin, D-sub connector on the back of your monitor to the power port on /off Switch 2. Multimedia Stand Power ...
User Manual (user Manual) (English)
Page 17
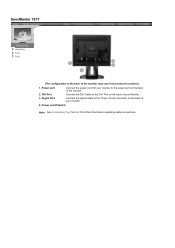
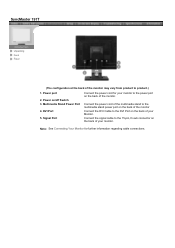
SyncMaster 171S/171V Unpacking Front Rear (The configuration at the back of the monitor. Signal Port Connect the power cord for further information regarding cable connections. Connect the power cord of the multimedia stand to the multimedia stand power port on the back of your monitor. Power port 2. Multimedia Stand Power Port 3. Note: See Connecting Your Monitor for your monitor to the power port on the back of the monitor may vary from product to the 15-pin, D-sub connector on the back of the monitor Connect the signal cable to product.) 1.
SyncMaster 171S/171V Unpacking Front Rear (The configuration at the back of the monitor. Signal Port Connect the power cord for further information regarding cable connections. Connect the power cord of the multimedia stand to the multimedia stand power port on the back of your monitor. Power port 2. Multimedia Stand Power Port 3. Note: See Connecting Your Monitor for your monitor to the power port on the back of the monitor may vary from product to the 15-pin, D-sub connector on the back of the monitor Connect the signal cable to product.) 1.
User Manual (user Manual) (English)
Page 18
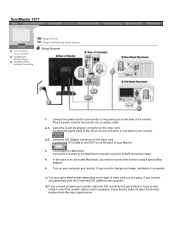
..., if you need to analogue. Plug the power cord for your monitor to the DVI Port on the back of your monitor using the D-SUB connection cable. 4. Connect the power cord for the monitor into a nearby outlet. 2-1. SyncMaster 181T Connecting Your Monitor Installing the Monitor Driver Installing VESA compliant mounting 1. Connect the DVI Cable to the...
..., if you need to analogue. Plug the power cord for your monitor to the DVI Port on the back of your monitor using the D-SUB connection cable. 4. Connect the power cord for the monitor into a nearby outlet. 2-1. SyncMaster 181T Connecting Your Monitor Installing the Monitor Driver Installing VESA compliant mounting 1. Connect the DVI Cable to the...
User Manual (user Manual) (English)
Page 19
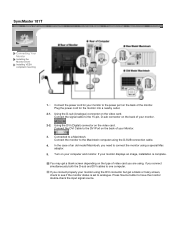
... D-sub (Analogue) connector on the type of your computer and monitor. You may get a blank or fuzzy screen, check to connect the monitor using the D-SUB connection cable. 4. Connected to have the monitor double-check the input signal source. SyncMaster 191T Connecting Your Monitor Installing the Monitor Driver Installing VESA compliant mounting Setup-General Setup-For Multimedia...
... D-sub (Analogue) connector on the type of your computer and monitor. You may get a blank or fuzzy screen, check to connect the monitor using the D-SUB connection cable. 4. Connected to have the monitor double-check the input signal source. SyncMaster 191T Connecting Your Monitor Installing the Monitor Driver Installing VESA compliant mounting Setup-General Setup-For Multimedia...


