
User Manual (ENGLISH)
Page 10
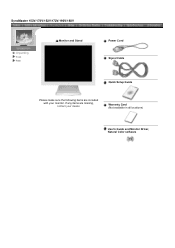
SyncMaster 153V/173V/152V/172V/193V/192V Unpacking Front Rear Monitor and Stand Power Cord Signal Cable Quick Setup Guide Please make sure the following items are missing, contact your monitor. If any items are included with your dealer. Warranty Card (Not available in all locations) User's Guide and Monitor Driver, Natural Color software
SyncMaster 153V/173V/152V/172V/193V/192V Unpacking Front Rear Monitor and Stand Power Cord Signal Cable Quick Setup Guide Please make sure the following items are missing, contact your monitor. If any items are included with your dealer. Warranty Card (Not available in all locations) User's Guide and Monitor Driver, Natural Color software
User Manual (ENGLISH)
Page 11
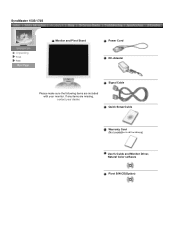
Signal Cable Quick Setup Guide Warranty Card (Not available in all locations) User's Guide and Monitor Driver, Natural Color software Pivot S/W CD(Option) If any items are included with your dealer. SyncMaster 153S/173S Unpacking Front Rear Monitor and Pivot Stand Power Cord DC-Adapter Please make sure the following items are missing, contact your monitor.
Signal Cable Quick Setup Guide Warranty Card (Not available in all locations) User's Guide and Monitor Driver, Natural Color software Pivot S/W CD(Option) If any items are included with your dealer. SyncMaster 153S/173S Unpacking Front Rear Monitor and Pivot Stand Power Cord DC-Adapter Please make sure the following items are missing, contact your monitor.
User Manual (ENGLISH)
Page 12
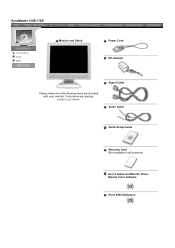
Signal Cable Audio Cable Quick Setup Guide Warranty Card (Not available in all locations) User's Guide and Monitor Driver, Natural Color software Pivot S/W CD(Option) If any items are included with your dealer. SyncMaster 153B/173B Unpacking Front Rear Monitor and Stand Power Cord DC-Adapter Please make sure the following items are missing, contact your monitor.
Signal Cable Audio Cable Quick Setup Guide Warranty Card (Not available in all locations) User's Guide and Monitor Driver, Natural Color software Pivot S/W CD(Option) If any items are included with your dealer. SyncMaster 153B/173B Unpacking Front Rear Monitor and Stand Power Cord DC-Adapter Please make sure the following items are missing, contact your monitor.
User Manual (ENGLISH)
Page 13
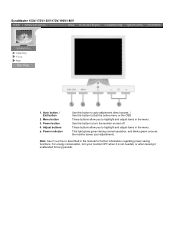
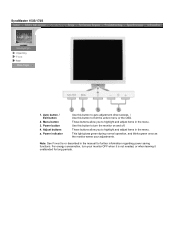
...buttons allow you to highlight and adjust items in the menu. For energy conservation, turn the monitor on and off. This light glows green during normal operation, and blinks green once as the monitor saves your monitor OFF when it is not needed, or when leaving it unattended for further information regarding power...auto adjustment direct access. / Use this button to Exit the active menu or the OSD. Note: See PowerSaver described in the manual for long periods. SyncMaster 153V/173V/152V/172V/193V/192V Unpacking Front Rear 1. Use this button to turn your adjustments.
...buttons allow you to highlight and adjust items in the menu. For energy conservation, turn the monitor on and off. This light glows green during normal operation, and blinks green once as the monitor saves your monitor OFF when it is not needed, or when leaving it unattended for further information regarding power...auto adjustment direct access. / Use this button to Exit the active menu or the OSD. Note: See PowerSaver described in the manual for long periods. SyncMaster 153V/173V/152V/172V/193V/192V Unpacking Front Rear 1. Use this button to turn your adjustments.
User Manual (ENGLISH)
Page 14
... access. / Use this button to highlight and adjust items in the menu. Menu button 3. These buttons allow you to turn your adjustments. SyncMaster 153S/173S Unpacking Front Rear 1. These buttons allow you to Exit the active menu or the OSD. Adjust buttons a. Use this button to...and adjust items in the manual for long periods. This light glows green during normal operation, and blinks green once as the monitor saves your monitor OFF when it is not needed, or when leaving it unattended for further information regarding power saving functions. Note: See PowerSaver ...
... access. / Use this button to highlight and adjust items in the menu. Menu button 3. These buttons allow you to turn your adjustments. SyncMaster 153S/173S Unpacking Front Rear 1. These buttons allow you to Exit the active menu or the OSD. Adjust buttons a. Use this button to...and adjust items in the manual for long periods. This light glows green during normal operation, and blinks green once as the monitor saves your monitor OFF when it is not needed, or when leaving it unattended for further information regarding power saving functions. Note: See PowerSaver ...

User Manual (ENGLISH)
Page 15
...2. When OSD is not needed, or when leaving it is not on the back of terminal your monitor OFF when it unattended for long periods. For energy conservation, turn the monitor on and off. 4. Power button Use this button to highlight and adjust items in the menu.... These buttons allow you to turn your computer. b. PC sound connection Connect the audio cable for further information regarding power saving functions. SyncMaster 153B/173B Unpacking Front Rear 1. Auto button / Exit button Use this button to auto adjustment direct access. / Use this button to highlight and...
...2. When OSD is not needed, or when leaving it is not on the back of terminal your monitor OFF when it unattended for long periods. For energy conservation, turn the monitor on and off. 4. Power button Use this button to highlight and adjust items in the menu.... These buttons allow you to turn your computer. b. PC sound connection Connect the audio cable for further information regarding power saving functions. SyncMaster 153B/173B Unpacking Front Rear 1. Auto button / Exit button Use this button to auto adjustment direct access. / Use this button to highlight and...
User Manual (ENGLISH)
Page 16
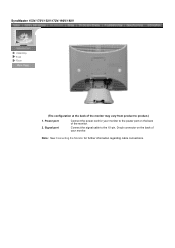
Signal port Connect the power cord for further information regarding cable connections. SyncMaster 153V/173V/152V/172V/193V/192V Unpacking Front Rear (The configuration at the back of the monitor. Note: See Connecting the Monitor for your monitor to product.) 1. Connect the signal cable to the 15-pin, D-sub connector on the back of the monitor may vary from product to the power port on the back of your monitor. Power port 2.
Signal port Connect the power cord for further information regarding cable connections. SyncMaster 153V/173V/152V/172V/193V/192V Unpacking Front Rear (The configuration at the back of the monitor. Note: See Connecting the Monitor for your monitor to product.) 1. Connect the signal cable to the 15-pin, D-sub connector on the back of the monitor may vary from product to the power port on the back of your monitor. Power port 2.
User Manual (ENGLISH)
Page 17
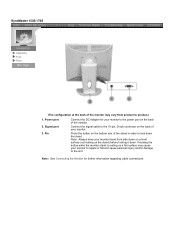
... front side down . Power port 2. Pin Connect the DC Adapter for further information regarding cable connections. SyncMaster 153S/173S Unpacking Front Rear (The configuration at the back of the monitor may cause your monitor to topple or fall and cause personal injury and/or damage to the unit. Pressing the button while the...
... front side down . Power port 2. Pin Connect the DC Adapter for further information regarding cable connections. SyncMaster 153S/173S Unpacking Front Rear (The configuration at the back of the monitor may cause your monitor to topple or fall and cause personal injury and/or damage to the unit. Pressing the button while the...
User Manual (ENGLISH)
Page 18
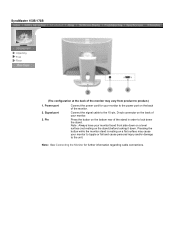
... damage to product.) 1. Note : Always have your monitor to the power port on the stand) before locking it down the stand. Power port 2. SyncMaster 153B/173B Unpacking Front Rear (The configuration at the back of the monitor may cause your monitor. Note: See Connecting the Monitor for your monitor faced front side down on a level surface (not...
... damage to product.) 1. Note : Always have your monitor to the power port on the stand) before locking it down the stand. Power port 2. SyncMaster 153B/173B Unpacking Front Rear (The configuration at the back of the monitor may cause your monitor. Note: See Connecting the Monitor for your monitor faced front side down on a level surface (not...

User Manual (ENGLISH)
Page 19
... the power cord for the monitor into a nearby outlet. 2. Turn on your monitor to the 15-pin, D-sub connector on the back of an old model Macintosh, you need to the Macintosh computer using a special Mac adaptor. 5. SyncMaster 153V/173V/152V/172V/193V/192V Connecting the Monitor Installing the Monitor Driver Installing VESA compliant mounting...
... the power cord for the monitor into a nearby outlet. 2. Turn on your monitor to the 15-pin, D-sub connector on the back of an old model Macintosh, you need to the Macintosh computer using a special Mac adaptor. 5. SyncMaster 153V/173V/152V/172V/193V/192V Connecting the Monitor Installing the Monitor Driver Installing VESA compliant mounting...

User Manual (ENGLISH)
Page 20
... Macintosh computer using a special Mac adaptor. 5. SyncMaster 153S/173S Connecting the Monitor Installing the Monitor Driver Installing VESA compliant mounting English > Main > Setup > Connecting Your Monitor 1. Connect the monitor to the power port on the back of the monitor. Connect the DC Adapter for the monitor into a nearby outlet. 2. If your monitor. 3. Connect the signal cable to connect...
... Macintosh computer using a special Mac adaptor. 5. SyncMaster 153S/173S Connecting the Monitor Installing the Monitor Driver Installing VESA compliant mounting English > Main > Setup > Connecting Your Monitor 1. Connect the monitor to the power port on the back of the monitor. Connect the DC Adapter for the monitor into a nearby outlet. 2. If your monitor. 3. Connect the signal cable to connect...

User Manual (ENGLISH)
Page 21
... from the input source (sound card,computer,CD-ROM drive). SyncMaster 153B/173B Connecting the Monitor Installing the Monitor Driver Installing VESA compliant mounting English > Main > Setup > Connecting Your Monitor 1. Connect the power cord for your monitor to the power port on the back of the monitor. Volume 4. In the case of your computer. 4. If your computer...
... from the input source (sound card,computer,CD-ROM drive). SyncMaster 153B/173B Connecting the Monitor Installing the Monitor Driver Installing VESA compliant mounting English > Main > Setup > Connecting Your Monitor 1. Connect the power cord for your monitor to the power port on the back of the monitor. Volume 4. In the case of your computer. 4. If your computer...
User Manual (ENGLISH)
Page 28
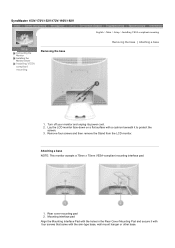
...interface pad Align the Mounting Interface Pad with the arm-type base, wall mount hanger or other base. Lay the LCD monitor face-down on a flat surface with a cushion beneath it with four screws that came with the holes in the Rear ... the screen. 3. Attaching a base NOTE: This monitor accepts a 75mm x 75mm VESA-compliant mounting interface pad. 1. Rear cover mounting pad 2. Turn off your monitor and unplug its power cord. 2. SyncMaster 153V/173V/152V/172V/193V/192V Connecting the Monitor Installing the Monitor Driver Installing VESA compliant mounting Removing the base English ...
...interface pad Align the Mounting Interface Pad with the arm-type base, wall mount hanger or other base. Lay the LCD monitor face-down on a flat surface with a cushion beneath it with four screws that came with the holes in the Rear ... the screen. 3. Attaching a base NOTE: This monitor accepts a 75mm x 75mm VESA-compliant mounting interface pad. 1. Rear cover mounting pad 2. Turn off your monitor and unplug its power cord. 2. SyncMaster 153V/173V/152V/172V/193V/192V Connecting the Monitor Installing the Monitor Driver Installing VESA compliant mounting Removing the base English ...
User Manual (ENGLISH)
Page 29
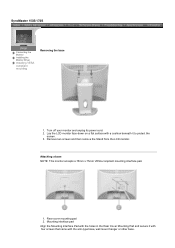
... surface with the arm-type base, wall mount hanger or other base. Attaching a base NOTE: This monitor accepts a 75mm x 75mm VESA-compliant mounting interface pad. 1. Turn off your monitor and unplug its power cord. 2. SyncMaster 153S/173S Connecting the Monitor Installing the Monitor Driver Installing VESA compliant mounting Removing the base 1. Rear cover mounting pad 2.
... surface with the arm-type base, wall mount hanger or other base. Attaching a base NOTE: This monitor accepts a 75mm x 75mm VESA-compliant mounting interface pad. 1. Turn off your monitor and unplug its power cord. 2. SyncMaster 153S/173S Connecting the Monitor Installing the Monitor Driver Installing VESA compliant mounting Removing the base 1. Rear cover mounting pad 2.
User Manual (ENGLISH)
Page 30
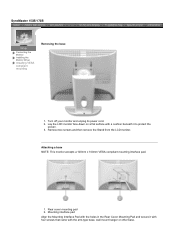
... surface with the arm-type base, wall mount hanger or other base. Attaching a base NOTE: This monitor accepts a 100mm x 100mm VESA-compliant mounting interface pad. 1. Turn off your monitor and unplug its power cord. 2. Mounting interface pad Align the Mounting Interface Pad with the holes in... it with four screws that came with a cushion beneath it to protect the screen. 3. Rear cover mounting pad 2. SyncMaster 153B/173B Removing the base Connecting the Monitor Installing the Monitor Driver Installing VESA compliant mounting 1. Remove two screws and then remove the Stand from the LCD...
... surface with the arm-type base, wall mount hanger or other base. Attaching a base NOTE: This monitor accepts a 100mm x 100mm VESA-compliant mounting interface pad. 1. Turn off your monitor and unplug its power cord. 2. Mounting interface pad Align the Mounting Interface Pad with the holes in... it with four screws that came with a cushion beneath it to protect the screen. 3. Rear cover mounting pad 2. SyncMaster 153B/173B Removing the base Connecting the Monitor Installing the Monitor Driver Installing VESA compliant mounting 1. Remove two screws and then remove the Stand from the LCD...
User Manual (ENGLISH)
Page 39
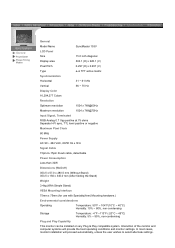
... will provide the best operating conditions and monitor settings. General PowerSaver Preset Timing Modes General Model Name SyncMaster 153V LCD Panel Size 15.0 inch diagonal Display area 304.1 (H) x 228.1 (V) Pixel Pitch 0.297 (H) x 0.297 (V) Type a-si TFT active matrix ...Clock 80 MHz Power Supply AC 90 ~ 264 VAC, 60/50 Hz ± 3Hz Signal Cable 15pin-to select alternate settings. Interaction of the monitor and computer systems will proceed automatically, unless the user wishes to -15pin D-sub cable, detachable Power Consumption Less than 32W Dimensions (WxDxH) 353.5...
... will provide the best operating conditions and monitor settings. General PowerSaver Preset Timing Modes General Model Name SyncMaster 153V LCD Panel Size 15.0 inch diagonal Display area 304.1 (H) x 228.1 (V) Pixel Pitch 0.297 (H) x 0.297 (V) Type a-si TFT active matrix ...Clock 80 MHz Power Supply AC 90 ~ 264 VAC, 60/50 Hz ± 3Hz Signal Cable 15pin-to select alternate settings. Interaction of the monitor and computer systems will proceed automatically, unless the user wishes to -15pin D-sub cable, detachable Power Consumption Less than 32W Dimensions (WxDxH) 353.5...
User Manual (ENGLISH)
Page 43
... will provide the best operating conditions and monitor settings. Interaction of the monitor and computer systems will proceed automatically, unless the user wishes to -15pin D-sub cable, detachable Power Consumption Less than 32W Dimensions (WxDxH)...~113°F (-20°C ~ 45°C) Humidity: 5% ~ 95%, non-condensing Plug and Play Capability This monitor can be installed on any Plug & Play compatible system. General PowerSaver Preset Timing Modes General Model Name SyncMaster 152V LCD Panel Size 15.0 inch diagonal Display area 304.1 (H) x 228.1 (V) Pixel Pitch 0.297 (H) x ...
... will provide the best operating conditions and monitor settings. Interaction of the monitor and computer systems will proceed automatically, unless the user wishes to -15pin D-sub cable, detachable Power Consumption Less than 32W Dimensions (WxDxH)...~113°F (-20°C ~ 45°C) Humidity: 5% ~ 95%, non-condensing Plug and Play Capability This monitor can be installed on any Plug & Play compatible system. General PowerSaver Preset Timing Modes General Model Name SyncMaster 152V LCD Panel Size 15.0 inch diagonal Display area 304.1 (H) x 228.1 (V) Pixel Pitch 0.297 (H) x ...

User Manual (ENGLISH)
Page 51
... will provide the best operating conditions and monitor settings. General PowerSaver Preset Timing Modes General Model Name SyncMaster 153S LCD Panel Size 15.0 inch diagonal Display area 304.1 (H) x 228.1 (V) Pixel Pitch 0.297 (H) x 0.297 (V) Type a-si TFT active ... (WxDxH) / Weight 353.0 x 152 x 350.0 mm / 3.8kg VESA Mounting Interface 75mm x 75mm (for use with precision of the monitor and computer systems will proceed automatically, unless the user wishes to select alternate settings. Dot Acceptable TFT LCD panel manufactured by using advanced semiconductor technology...
... will provide the best operating conditions and monitor settings. General PowerSaver Preset Timing Modes General Model Name SyncMaster 153S LCD Panel Size 15.0 inch diagonal Display area 304.1 (H) x 228.1 (V) Pixel Pitch 0.297 (H) x 0.297 (V) Type a-si TFT active ... (WxDxH) / Weight 353.0 x 152 x 350.0 mm / 3.8kg VESA Mounting Interface 75mm x 75mm (for use with precision of the monitor and computer systems will proceed automatically, unless the user wishes to select alternate settings. Dot Acceptable TFT LCD panel manufactured by using advanced semiconductor technology...

User Manual (ENGLISH)
Page 53
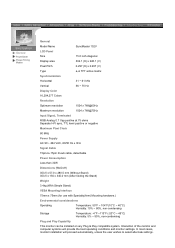
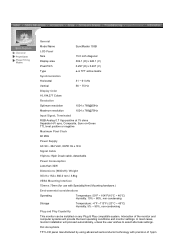
...20°C ~ 45°C) Humidity: 5% ~ 95%, non-condensing Plug and Play Capability This monitor can be installed on any Plug & Play compatible system. General PowerSaver Preset Timing Modes General Model Name SyncMaster 173S LCD Panel Size 17.0 inch diagonal Display area 337.92 (H) x 270.336 (V) Pixel Pitch... AC 90 ~ 264 VAC rms, 60/50 Hz ± 3Hz Signal Cable 15pin-to select alternate settings. Interaction of the monitor and computer systems will proceed automatically, unless the user wishes to -15pin D-sub cable, detachable Power Consumption Less than 40W Dimensions ...
...20°C ~ 45°C) Humidity: 5% ~ 95%, non-condensing Plug and Play Capability This monitor can be installed on any Plug & Play compatible system. General PowerSaver Preset Timing Modes General Model Name SyncMaster 173S LCD Panel Size 17.0 inch diagonal Display area 337.92 (H) x 270.336 (V) Pixel Pitch... AC 90 ~ 264 VAC rms, 60/50 Hz ± 3Hz Signal Cable 15pin-to select alternate settings. Interaction of the monitor and computer systems will proceed automatically, unless the user wishes to -15pin D-sub cable, detachable Power Consumption Less than 40W Dimensions ...
User Manual (ENGLISH)
Page 55
...Hz ± 3Hz Signal Cable 15pin-to select alternate settings. In most cases, monitor installation will provide the best operating conditions and monitor settings. General PowerSaver Preset Timing Modes General Model Name SyncMaster 153B LCD Panel Size 15.0 inch diagonal Display area 304.1 (H) x 228.1 ... 0.7 Vpp positive at 75 ohms Separate H/V sync, Composite, Sync-on any Plug & Play compatible system. Interaction of the monitor and computer systems will proceed automatically, unless the user wishes to -15pin D-sub cable, detachable Power Consumption Less than 32W Dimensions...
...Hz ± 3Hz Signal Cable 15pin-to select alternate settings. In most cases, monitor installation will provide the best operating conditions and monitor settings. General PowerSaver Preset Timing Modes General Model Name SyncMaster 153B LCD Panel Size 15.0 inch diagonal Display area 304.1 (H) x 228.1 ... 0.7 Vpp positive at 75 ohms Separate H/V sync, Composite, Sync-on any Plug & Play compatible system. Interaction of the monitor and computer systems will proceed automatically, unless the user wishes to -15pin D-sub cable, detachable Power Consumption Less than 32W Dimensions...


