
User Manual (ENGLISH)
Page 2
Main Page Safety Instructions Notational Power Installation Cleaning Other Introduction Unpacking Front Rear Setup Connecting the Monitor Installing the Monitor Driver Automatic Manual Installing VESA compliant mounting On-Screen Display Troubleshooting Check List Q & A Self-Test Feature Check Specifications General Specifications PowerSaver Preset Timing Modes Information Service Terms Regulatory Natural Color For Better Display Authority
Main Page Safety Instructions Notational Power Installation Cleaning Other Introduction Unpacking Front Rear Setup Connecting the Monitor Installing the Monitor Driver Automatic Manual Installing VESA compliant mounting On-Screen Display Troubleshooting Check List Q & A Self-Test Feature Check Specifications General Specifications PowerSaver Preset Timing Modes Information Service Terms Regulatory Natural Color For Better Display Authority
User Manual (ENGLISH)
Page 5
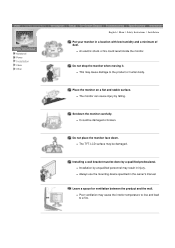
... monitor. z The monitor can cause injury by a qualified professional. Notational Power Installation Clean Other English > Main > Safety Instructions > Installation Put your monitor in the owner's manual. Place the monitor on a flat and stable surface. Do not place the monitor face down the monitor carefully. z Installation by unqualified personnel may be damaged...
... monitor. z The monitor can cause injury by a qualified professional. Notational Power Installation Clean Other English > Main > Safety Instructions > Installation Put your monitor in the owner's manual. Place the monitor on a flat and stable surface. Do not place the monitor face down the monitor carefully. z Installation by unqualified personnel may be damaged...

User Manual (ENGLISH)
Page 13
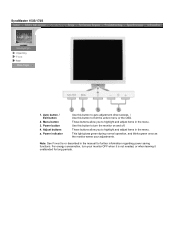
Adjust buttons a. For energy conservation, turn the monitor on and off. Menu button 3. These buttons allow you to highlight and adjust items in the manual for long periods. Auto button / Exit button 2. Power button 4. These buttons allow you to highlight and adjust items in the menu. This light glows green ...
Adjust buttons a. For energy conservation, turn the monitor on and off. Menu button 3. These buttons allow you to highlight and adjust items in the manual for long periods. Auto button / Exit button 2. Power button 4. These buttons allow you to highlight and adjust items in the menu. This light glows green ...
User Manual (ENGLISH)
Page 14
Power button 4. These buttons allow you to highlight and adjust items in the manual for long periods. Adjust buttons a. Note: See PowerSaver described in the menu. Auto button / Exit button 2. Power indicator Use this button to auto adjustment direct ...
Power button 4. These buttons allow you to highlight and adjust items in the manual for long periods. Adjust buttons a. Note: See PowerSaver described in the menu. Auto button / Exit button 2. Power indicator Use this button to auto adjustment direct ...

User Manual (ENGLISH)
Page 15
Auto button / Exit button Use this button to auto adjustment direct access. / Use this button to highlight and adjust items in the manual for further information regarding power saving functions. When OSD is not needed, or when leaving it unattended for your computer. Power indicator This light glows ... the back of terminal your monitor to Exit the active menu or the OSD. 2. Menu button These buttons allow you to adjust volume. a. SyncMaster 153B/173B Unpacking Front Rear 1.
Auto button / Exit button Use this button to auto adjustment direct access. / Use this button to highlight and adjust items in the manual for further information regarding power saving functions. When OSD is not needed, or when leaving it unattended for your computer. Power indicator This light glows ... the back of terminal your monitor to Exit the active menu or the OSD. 2. Menu button These buttons allow you to adjust volume. a. SyncMaster 153B/173B Unpacking Front Rear 1.

User Manual (ENGLISH)
Page 34
...? Is the power indicator on the Information section or contact your dealer. I cannot turn on the keyboard or move the mouse to the video card manual. Reboot the computer. Adjust the maximum resolution and frequency that the monitor can properly handle. The screen shows strange colors or just black and white...
...? Is the power indicator on the Information section or contact your dealer. I cannot turn on the keyboard or move the mouse to the video card manual. Reboot the computer. Adjust the maximum resolution and frequency that the monitor can properly handle. The screen shows strange colors or just black and white...

User Manual (ENGLISH)
Page 35
...Note: If problems repeatedly occur, contact an authorized service center. LED is out of the video card. (Refer to the video card manual. The screen colors have problems in installing the adapter (video) driver, boot the computer in Safe Mode, remove the Display Adapter at ... DDC) monitor found". Readjust Position by referring to the Preset Timing Modes). Adjust the frequency properly by referring to the video card manual and the Preset Timing Modes. (The maximum frequency per resolution may differ from product to product.) There are properly connected to the monitor...
...Note: If problems repeatedly occur, contact an authorized service center. LED is out of the video card. (Refer to the video card manual. The screen colors have problems in installing the adapter (video) driver, boot the computer in Safe Mode, remove the Display Adapter at ... DDC) monitor found". Readjust Position by referring to the Preset Timing Modes). Adjust the frequency properly by referring to the video card manual and the Preset Timing Modes. (The maximum frequency per resolution may differ from product to product.) There are properly connected to the monitor...

User Manual (ENGLISH)
Page 36
... Q & A Self-Test Feature Check Question Answer How can vary, depending on the version of the driver used. (Refer to the computer or the video card manual for details.) Windows ME/XP/2000 : Set the resolution at BIOS-SETUP of the detergent nor scratch the case. Note that video card support can...
... Q & A Self-Test Feature Check Question Answer How can vary, depending on the version of the driver used. (Refer to the computer or the video card manual for details.) Windows ME/XP/2000 : Set the resolution at BIOS-SETUP of the detergent nor scratch the case. Note that video card support can...
User Manual (ENGLISH)
Page 64
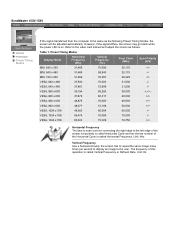
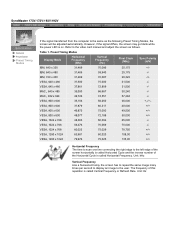
... Vertical Frequency Like a fluorescent lamp, the screen has to repeat the same image many times per second to display an image to the video card manual and adjust the screen as the following Preset Timing Modes, the screen will be adjusted automatically. IBM, 720 x 400 31,469 70,087 28,322...
... Vertical Frequency Like a fluorescent lamp, the screen has to repeat the same image many times per second to display an image to the video card manual and adjust the screen as the following Preset Timing Modes, the screen will be adjusted automatically. IBM, 720 x 400 31,469 70,087 28,322...
User Manual (ENGLISH)
Page 65
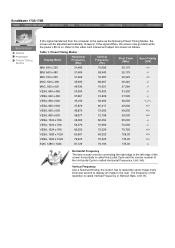
... Vertical Frequency Like a fluorescent lamp, the screen has to repeat the same image many times per second to display an image to the video card manual and adjust the screen as the following Preset Timing Modes, the screen will be adjusted automatically. VESA, 640 x 480 37,861 72,809 31,500...
... Vertical Frequency Like a fluorescent lamp, the screen has to repeat the same image many times per second to display an image to the video card manual and adjust the screen as the following Preset Timing Modes, the screen will be adjusted automatically. VESA, 640 x 480 37,861 72,809 31,500...
User Manual (ENGLISH)
Page 66
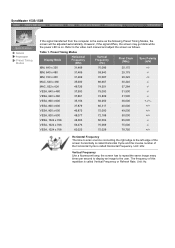
... Vertical Frequency Like a fluorescent lamp, the screen has to repeat the same image many times per second to display an image to the video card manual and adjust the screen as the following Preset Timing Modes, the screen will be adjusted automatically. VESA, 800 x 600 35,156 56,250 36,000...,469 70,087 28,322 -/+ MAC, 640 x 480 35,000 66,667 30,240 -/- VESA, 640 x 480 37,500 75,000 31,500 -/- SyncMaster 173S/173B General PowerSaver Preset Timing Modes If the signal transferred from the computer is the same as follows. IBM, 640 x 480 31,469 59,940 25...
... Vertical Frequency Like a fluorescent lamp, the screen has to repeat the same image many times per second to display an image to the video card manual and adjust the screen as the following Preset Timing Modes, the screen will be adjusted automatically. VESA, 800 x 600 35,156 56,250 36,000...,469 70,087 28,322 -/+ MAC, 640 x 480 35,000 66,667 30,240 -/- VESA, 640 x 480 37,500 75,000 31,500 -/- SyncMaster 173S/173B General PowerSaver Preset Timing Modes If the signal transferred from the computer is the same as follows. IBM, 640 x 480 31,469 59,940 25...
User Manual (ENGLISH)
Page 67
... Vertical Frequency Like a fluorescent lamp, the screen has to repeat the same image many times per second to display an image to the video card manual and adjust the screen as the following Preset Timing Modes, the screen will be adjusted automatically. The frequency of the Horizontal Cycle is called Horizontal...
... Vertical Frequency Like a fluorescent lamp, the screen has to repeat the same image many times per second to display an image to the video card manual and adjust the screen as the following Preset Timing Modes, the screen will be adjusted automatically. The frequency of the Horizontal Cycle is called Horizontal...

User Manual (ENGLISH)
Page 73
... VCCI This is used near a radio or television receiver in a domestic environment, it may cause radio interference. Your purchase has also contributed to the instruction manual. European Notice(Europe Only) Products with the CE marking comply with a product developed for personal computers (TCO'95 applied model only) AB general requirements AB2...
... VCCI This is used near a radio or television receiver in a domestic environment, it may cause radio interference. Your purchase has also contributed to the instruction manual. European Notice(Europe Only) Products with the CE marking comply with a product developed for personal computers (TCO'95 applied model only) AB general requirements AB2...
User Manual (ENGLISH)
Page 78
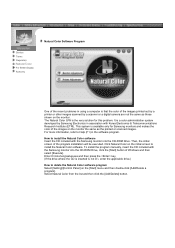
.../Delete] button. This system is not D:\, enter the applicable drive.) How to install the Natural Color software Insert the CD included with the Samsung monitor into the CD-ROM Drive. How to delete the Natural Color software program Select [Setting]/[Control Panel] on the monitor the same as ... the same as the printed or scanned images. For more information, refer to install the Natural Color software. To install the program manually, insert the CD included with the Samsung monitor into the CD-ROM Drive, click the [Start] button of the program installation will be executed.
.../Delete] button. This system is not D:\, enter the applicable drive.) How to install the Natural Color software Insert the CD included with the Samsung monitor into the CD-ROM Drive. How to delete the Natural Color software program Select [Setting]/[Control Panel] on the monitor the same as ... the same as the printed or scanned images. For more information, refer to install the Natural Color software. To install the program manually, insert the CD included with the Samsung monitor into the CD-ROM Drive, click the [Start] button of the program installation will be executed.
User Manual (SPANISH)
Page 61
... following European Norms: z EN55022:1998+A1:2000 - European Notice(Europe Only) Products with the CE marking comply with these directives implies conformity to the instruction manual. If this is a Class B product based on the environment and to the further development of the Voluntary Control Council for reduced electric and magnetic fields...
... following European Norms: z EN55022:1998+A1:2000 - European Notice(Europe Only) Products with the CE marking comply with these directives implies conformity to the instruction manual. If this is a Class B product based on the environment and to the further development of the Voluntary Control Council for reduced electric and magnetic fields...

User Manual (ENGLISH)
Page 2
Main Page Safety Instructions Notational Power Installation Cleaning Other Introduction Unpacking Front Rear Setup Connecting Your Monitor Installing the Monitor Driver Automatic Manual Installing VESA compliant mounting On-Screen Display Troubleshooting Check List Q & A Self-Test Feature Check Specifications General Specifications PowerSaver Preset Display Modes Information Service Terms Regulatory Natural Color For Better Display Authority
Main Page Safety Instructions Notational Power Installation Cleaning Other Introduction Unpacking Front Rear Setup Connecting Your Monitor Installing the Monitor Driver Automatic Manual Installing VESA compliant mounting On-Screen Display Troubleshooting Check List Q & A Self-Test Feature Check Specifications General Specifications PowerSaver Preset Display Modes Information Service Terms Regulatory Natural Color For Better Display Authority
User Manual (ENGLISH)
Page 14
... in the menu. Auto button / Exit button 2. These buttons allow you to turn your adjustments. Use this button to highlight and adjust items in the manual for long periods. Note: See PowerSaver described in the menu. Power button 4. For energy conservation, turn the monitor on and off. SyncMaster 153V/173V/152V...
... in the menu. Auto button / Exit button 2. These buttons allow you to turn your adjustments. Use this button to highlight and adjust items in the manual for long periods. Note: See PowerSaver described in the menu. Power button 4. For energy conservation, turn the monitor on and off. SyncMaster 153V/173V/152V...

User Manual (ENGLISH)
Page 15
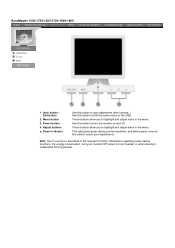
... adjust items in the menu. Note: See PowerSaver described in the menu. Menu button 3. These buttons allow you to highlight and adjust items in the manual for long periods. Auto button / Exit button 2. Power button 4. Adjust buttons a. Use this button to turn your adjustments. Power indicator Use this button to auto...
... adjust items in the menu. Note: See PowerSaver described in the menu. Menu button 3. These buttons allow you to highlight and adjust items in the manual for long periods. Auto button / Exit button 2. Power button 4. Adjust buttons a. Use this button to turn your adjustments. Power indicator Use this button to auto...

User Manual (ENGLISH)
Page 16
... your adjustments. b. For energy conservation, turn the monitor on the screen, push the - or + button to Exit the active menu or the OSD. 2. SyncMaster 153B/173B Unpacking Front Rear 1. Auto button / Exit button Use this button to auto adjustment direct access. / Use this button to highlight and adjust items in the... OFF when it is not on and off. 4. PC sound connection Connect the audio cable for your monitor to highlight and adjust items in the manual for long periods.
... your adjustments. b. For energy conservation, turn the monitor on the screen, push the - or + button to Exit the active menu or the OSD. 2. SyncMaster 153B/173B Unpacking Front Rear 1. Auto button / Exit button Use this button to auto adjustment direct access. / Use this button to highlight and adjust items in the... OFF when it is not on and off. 4. PC sound connection Connect the audio cable for your monitor to highlight and adjust items in the manual for long periods.

User Manual (ENGLISH)
Page 35
... power is in PowerSaver mode. There is fully inserted in it's slot. Press a key on the keyboard or move the mouse to the video card manual. Check the signal cable connection. Adjust screen image position and size using the OSD. Is the power indicator on the monitor blinking at the screen...
... power is in PowerSaver mode. There is fully inserted in it's slot. Press a key on the keyboard or move the mouse to the video card manual. Check the signal cable connection. Adjust screen image position and size using the OSD. Is the power indicator on the monitor blinking at the screen...


