
User Manual (ENGLISH)
Page 5
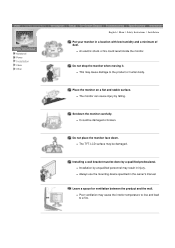
... humidity and a minimum of dust. z The TFT-LCD surface may cause the interior temperature to rise and lead to the product or human body. z This may result in injury. z An electric shock or fire could be damaged. Do not place the monitor face down the monitor carefully. z The monitor can cause injury by falling.
... humidity and a minimum of dust. z The TFT-LCD surface may cause the interior temperature to rise and lead to the product or human body. z This may result in injury. z An electric shock or fire could be damaged. Do not place the monitor face down the monitor carefully. z The monitor can cause injury by falling.

User Manual (ENGLISH)
Page 6
... shock or a fire. Do not set a glass of water, chemicals or any small metal objects on the monitor. z Keep the product's interior clean. Do not spray detergent directly on the monitor. z A dirty connector can cause an electric shock or fire. If the connector between the plug and the ...pin is dusty or dirty, clean it properly with a smooth cloth. z This may cause malfunction or a fire. Dust which has accumulated in the interior over an extended period of the TFT-LCD...
... shock or a fire. Do not set a glass of water, chemicals or any small metal objects on the monitor. z Keep the product's interior clean. Do not spray detergent directly on the monitor. z A dirty connector can cause an electric shock or fire. If the connector between the plug and the ...pin is dusty or dirty, clean it properly with a smooth cloth. z This may cause malfunction or a fire. Dust which has accumulated in the interior over an extended period of the TFT-LCD...
User Manual (ENGLISH)
Page 28
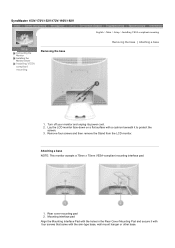
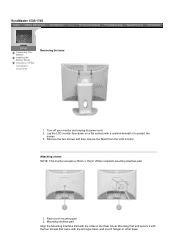
... a 75mm x 75mm VESA-compliant mounting interface pad. 1. SyncMaster 153V/173V/152V/172V/193V/192V Connecting the Monitor Installing the Monitor Driver Installing VESA compliant mounting Removing the base English > Main > Setup > Installing VESA compliant mounting Removing the base | Attaching a base 1. ... with a cushion beneath it to protect the screen. 3. Remove four screws and then remove the Stand from the LCD monitor. Turn off your monitor and unplug its power cord. 2. Lay the LCD monitor face-down on a flat surface with the arm-type base, wall mount hanger or other base.
... a 75mm x 75mm VESA-compliant mounting interface pad. 1. SyncMaster 153V/173V/152V/172V/193V/192V Connecting the Monitor Installing the Monitor Driver Installing VESA compliant mounting Removing the base English > Main > Setup > Installing VESA compliant mounting Removing the base | Attaching a base 1. ... with a cushion beneath it to protect the screen. 3. Remove four screws and then remove the Stand from the LCD monitor. Turn off your monitor and unplug its power cord. 2. Lay the LCD monitor face-down on a flat surface with the arm-type base, wall mount hanger or other base.

User Manual (ENGLISH)
Page 29
... a 75mm x 75mm VESA-compliant mounting interface pad. 1. Lay the LCD monitor face-down on a flat surface with a cushion beneath it with four screws that came with the holes in the Rear Cover Mounting Pad and secure ... Interface Pad with the arm-type base, wall mount hanger or other base. Rear cover mounting pad 2. SyncMaster 153S/173S Connecting the Monitor Installing the Monitor Driver Installing VESA compliant mounting Removing the base 1. Remove two screws and then remove the Stand from the LCD monitor. Turn off your monitor and unplug its power cord. 2.
... a 75mm x 75mm VESA-compliant mounting interface pad. 1. Lay the LCD monitor face-down on a flat surface with a cushion beneath it with four screws that came with the holes in the Rear Cover Mounting Pad and secure ... Interface Pad with the arm-type base, wall mount hanger or other base. Rear cover mounting pad 2. SyncMaster 153S/173S Connecting the Monitor Installing the Monitor Driver Installing VESA compliant mounting Removing the base 1. Remove two screws and then remove the Stand from the LCD monitor. Turn off your monitor and unplug its power cord. 2.

User Manual (ENGLISH)
Page 30
... unplug its power cord. 2. Attaching a base NOTE: This monitor accepts a 100mm x 100mm VESA-compliant mounting interface pad. 1. Mounting interface pad Align the Mounting Interface Pad with the holes in the Rear Cover Mounting Pad ... protect the screen. 3. Rear cover mounting pad 2. SyncMaster 153B/173B Removing the base Connecting the Monitor Installing the Monitor Driver Installing VESA compliant mounting 1. Remove two screws and then remove the Stand from the LCD monitor. Lay the LCD monitor face-down on a flat surface with the arm-type base, wall mount hanger or other base...
... unplug its power cord. 2. Attaching a base NOTE: This monitor accepts a 100mm x 100mm VESA-compliant mounting interface pad. 1. Mounting interface pad Align the Mounting Interface Pad with the holes in the Rear Cover Mounting Pad ... protect the screen. 3. Rear cover mounting pad 2. SyncMaster 153B/173B Removing the base Connecting the Monitor Installing the Monitor Driver Installing VESA compliant mounting 1. Remove two screws and then remove the Stand from the LCD monitor. Lay the LCD monitor face-down on a flat surface with the arm-type base, wall mount hanger or other base...

User Manual (ENGLISH)
Page 36
... I set the Power Saving function? How can I clean the outer case/LCD Panel? Do not leave any water to Windows/Computer Manual). Do not allow any remains of the computer or the screen saver. (Refer to go inside the monitor. Note that video card support can be changed by reconfiguring the video....) Windows ME/XP/2000 : Set the resolution at BIOS-SETUP of the detergent nor scratch the case. Disconnect the power cord and then clean the monitor with a soft cloth, using either a cleaning solution or plain water.
... I set the Power Saving function? How can I clean the outer case/LCD Panel? Do not leave any water to Windows/Computer Manual). Do not allow any remains of the computer or the screen saver. (Refer to go inside the monitor. Note that video card support can be changed by reconfiguring the video....) Windows ME/XP/2000 : Set the resolution at BIOS-SETUP of the detergent nor scratch the case. Disconnect the power cord and then clean the monitor with a soft cloth, using either a cleaning solution or plain water.
User Manual (ENGLISH)
Page 39
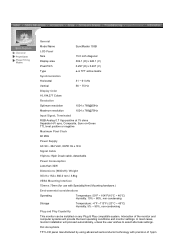
Interaction of the monitor and computer systems will proceed automatically, unless the user wishes to -15pin D-sub cable, detachable Power Consumption Less than 32W Dimensions (WxDxH) 353.5 x 57.0 x 280.5 ...°C) Humidity: 5% ~ 95%, non-condensing Plug and Play Capability This monitor can be installed on any Plug & Play compatible system. In most cases, monitor installation will provide the best operating conditions and monitor settings. General PowerSaver Preset Timing Modes General Model Name SyncMaster 153V LCD Panel Size 15.0 inch diagonal Display area 304.1 (H) x 228...
Interaction of the monitor and computer systems will proceed automatically, unless the user wishes to -15pin D-sub cable, detachable Power Consumption Less than 32W Dimensions (WxDxH) 353.5 x 57.0 x 280.5 ...°C) Humidity: 5% ~ 95%, non-condensing Plug and Play Capability This monitor can be installed on any Plug & Play compatible system. In most cases, monitor installation will provide the best operating conditions and monitor settings. General PowerSaver Preset Timing Modes General Model Name SyncMaster 153V LCD Panel Size 15.0 inch diagonal Display area 304.1 (H) x 228...

User Manual (ENGLISH)
Page 42
Interaction of the monitor and computer systems will proceed automatically, unless the user wishes to be bright sometimes or some of TFT LCD sub pixels that is not from bad quality and you can be seen. In most cases, monitor installation will provide the best operating conditions and monitor settings. This is contained in this product are 3,932,160. Plug and Play Capability This monitor can use it without uneasiness. z For example, the no of black pixels could be installed on any Plug & Play compatible system. color seem to select alternate settings.
Interaction of the monitor and computer systems will proceed automatically, unless the user wishes to be bright sometimes or some of TFT LCD sub pixels that is not from bad quality and you can be seen. In most cases, monitor installation will provide the best operating conditions and monitor settings. This is contained in this product are 3,932,160. Plug and Play Capability This monitor can use it without uneasiness. z For example, the no of black pixels could be installed on any Plug & Play compatible system. color seem to select alternate settings.
User Manual (ENGLISH)
Page 43
Interaction of the monitor and computer systems will proceed automatically, unless the user wishes to -15pin D-sub cable, detachable Power Consumption Less than 32W Dimensions (WxDxH) 353.5 x 57.0 x 280.5 ...°C) Humidity: 5% ~ 95%, non-condensing Plug and Play Capability This monitor can be installed on any Plug & Play compatible system. In most cases, monitor installation will provide the best operating conditions and monitor settings. General PowerSaver Preset Timing Modes General Model Name SyncMaster 152V LCD Panel Size 15.0 inch diagonal Display area 304.1 (H) x 228...
Interaction of the monitor and computer systems will proceed automatically, unless the user wishes to -15pin D-sub cable, detachable Power Consumption Less than 32W Dimensions (WxDxH) 353.5 x 57.0 x 280.5 ...°C) Humidity: 5% ~ 95%, non-condensing Plug and Play Capability This monitor can be installed on any Plug & Play compatible system. In most cases, monitor installation will provide the best operating conditions and monitor settings. General PowerSaver Preset Timing Modes General Model Name SyncMaster 152V LCD Panel Size 15.0 inch diagonal Display area 304.1 (H) x 228...

User Manual (ENGLISH)
Page 46
z For example, the no of black pixels could be installed on any Plug & Play compatible system. Interaction of the monitor and computer systems will proceed automatically, unless the user wishes to be bright sometimes or some of TFT LCD sub pixels that is not from bad quality and you can be seen. Plug and Play Capability This monitor can use it without uneasiness. This is contained in this product are 3,932,160. In most cases, monitor installation will provide the best operating conditions and monitor settings. color seem to select alternate settings.
z For example, the no of black pixels could be installed on any Plug & Play compatible system. Interaction of the monitor and computer systems will proceed automatically, unless the user wishes to be bright sometimes or some of TFT LCD sub pixels that is not from bad quality and you can be seen. Plug and Play Capability This monitor can use it without uneasiness. This is contained in this product are 3,932,160. In most cases, monitor installation will provide the best operating conditions and monitor settings. color seem to select alternate settings.

User Manual (ENGLISH)
Page 48
Plug and Play Capability This monitor can use it without uneasiness. color seem to select alternate settings. z For example, the no of the monitor and computer systems will proceed automatically, unless the user wishes to be bright sometimes or some of black pixels could be installed on any Plug & Play compatible system. This is contained in this product are 3,932,160. Interaction of TFT LCD sub pixels that is not from bad quality and you can be seen. In most cases, monitor installation will provide the best operating conditions and monitor settings.
Plug and Play Capability This monitor can use it without uneasiness. color seem to select alternate settings. z For example, the no of the monitor and computer systems will proceed automatically, unless the user wishes to be bright sometimes or some of black pixels could be installed on any Plug & Play compatible system. This is contained in this product are 3,932,160. Interaction of TFT LCD sub pixels that is not from bad quality and you can be seen. In most cases, monitor installation will provide the best operating conditions and monitor settings.

User Manual (ENGLISH)
Page 50
Plug and Play Capability This monitor can use it without uneasiness. In most cases, monitor installation will provide the best operating conditions and monitor settings. z For example, the no of the monitor and computer systems will proceed automatically, unless the user wishes to be bright sometimes or some of black pixels could be installed on any Plug & Play compatible system. This is contained in this product are 3,932,160. color seem to select alternate settings. Interaction of TFT LCD sub pixels that is not from bad quality and you can be seen.
Plug and Play Capability This monitor can use it without uneasiness. In most cases, monitor installation will provide the best operating conditions and monitor settings. z For example, the no of the monitor and computer systems will proceed automatically, unless the user wishes to be bright sometimes or some of black pixels could be installed on any Plug & Play compatible system. This is contained in this product are 3,932,160. color seem to select alternate settings. Interaction of TFT LCD sub pixels that is not from bad quality and you can be seen.

User Manual (ENGLISH)
Page 51
....0 mm / 3.8kg VESA Mounting Interface 75mm x 75mm (for use with precision of the monitor and computer systems will provide the best operating conditions and monitor settings. Interaction of 1ppm General PowerSaver Preset Timing Modes General Model Name SyncMaster 153S LCD Panel Size 15.0 inch diagonal Display area 304.1 (H) x 228.1 (V) Pixel Pitch 0.297 (H) x 0.297...
....0 mm / 3.8kg VESA Mounting Interface 75mm x 75mm (for use with precision of the monitor and computer systems will provide the best operating conditions and monitor settings. Interaction of 1ppm General PowerSaver Preset Timing Modes General Model Name SyncMaster 153S LCD Panel Size 15.0 inch diagonal Display area 304.1 (H) x 228.1 (V) Pixel Pitch 0.297 (H) x 0.297...

User Manual (ENGLISH)
Page 53
...;F ~113°F (-20°C ~ 45°C) Humidity: 5% ~ 95%, non-condensing Plug and Play Capability This monitor can be installed on any Plug & Play compatible system. General PowerSaver Preset Timing Modes General Model Name SyncMaster 173S LCD Panel Size 17.0 inch diagonal Display area 337.92 (H) x 270.336 (V) Pixel Pitch 0.264 (H) x 0.264 (V) Type...
...;F ~113°F (-20°C ~ 45°C) Humidity: 5% ~ 95%, non-condensing Plug and Play Capability This monitor can be installed on any Plug & Play compatible system. General PowerSaver Preset Timing Modes General Model Name SyncMaster 173S LCD Panel Size 17.0 inch diagonal Display area 337.92 (H) x 270.336 (V) Pixel Pitch 0.264 (H) x 0.264 (V) Type...
User Manual (ENGLISH)
Page 55
...positive at 75 ohms Separate H/V sync, Composite, Sync-on any Plug & Play compatible system. Interaction of 1ppm Dot Acceptable TFT LCD panel manufactured by using advanced semiconductor technology with Specialty(Arm) Mounting hardware.) Environmental considerations Operating Temperature: 50°F ~ 104°F(10... Storage Temperature: -4°F ~113°F (-20°C ~ 45°C) Humidity: 5% ~ 95%, non-condensing Plug and Play Capability This monitor can be installed on -Green TTL level positive or negative Maximum Pixel Clock 80 MHz Power Supply AC 90 ~ 264 VAC, 60/50 Hz...
...positive at 75 ohms Separate H/V sync, Composite, Sync-on any Plug & Play compatible system. Interaction of 1ppm Dot Acceptable TFT LCD panel manufactured by using advanced semiconductor technology with Specialty(Arm) Mounting hardware.) Environmental considerations Operating Temperature: 50°F ~ 104°F(10... Storage Temperature: -4°F ~113°F (-20°C ~ 45°C) Humidity: 5% ~ 95%, non-condensing Plug and Play Capability This monitor can be installed on -Green TTL level positive or negative Maximum Pixel Clock 80 MHz Power Supply AC 90 ~ 264 VAC, 60/50 Hz...
User Manual (ENGLISH)
Page 77
... which accumulate within living organisms. ** Lead, Cadmium and Mercury are luminance, contrast, resolution, reflectance, colour rendition and image stability. Mercury Statement (LCD Monitor, LCD TV, DLP Projection TV, Projector for help. Since the end of the 1980s TCO has been involved in the vicinity. If this label have... BE RECYCLED OR DISPOSED OF ACCORDING TO LOCAL, STATE OR FEDERAL LAWS For details see lamprecycle.org, eiae.org, or call 1-800-Samsung EMC This equipment has been tested and found to +70°C Relative Humidity of liquids. This equipment generates, uses and can be...
... which accumulate within living organisms. ** Lead, Cadmium and Mercury are luminance, contrast, resolution, reflectance, colour rendition and image stability. Mercury Statement (LCD Monitor, LCD TV, DLP Projection TV, Projector for help. Since the end of the 1980s TCO has been involved in the vicinity. If this label have... BE RECYCLED OR DISPOSED OF ACCORDING TO LOCAL, STATE OR FEDERAL LAWS For details see lamprecycle.org, eiae.org, or call 1-800-Samsung EMC This equipment has been tested and found to +70°C Relative Humidity of liquids. This equipment generates, uses and can be...
User Manual (ENGLISH)
Page 80
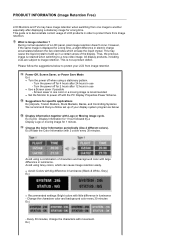
...image retention when switching from one color or a moving image for a long time. Thus, the previous image is Image retention ? z Set the Monitor to power off for a long time, a slight difference in a certain areas of the display. Change the Color Information periodically (Use 2 different ...product defect. Screen saver in order to protect them from Image retention. This is recommended. PRODUCT INFORMATION (Image Retention Free) LCD Monitors and TVs may cause the liquid crystal to build up of characters and background color with little difference in use - This guide...
...image retention when switching from one color or a moving image for a long time. Thus, the previous image is Image retention ? z Set the Monitor to power off for a long time, a slight difference in a certain areas of the display. Change the Color Information periodically (Use 2 different ...product defect. Screen saver in order to protect them from Image retention. This is recommended. PRODUCT INFORMATION (Image Retention Free) LCD Monitors and TVs may cause the liquid crystal to build up of characters and background color with little difference in use - This guide...
User Manual (ENGLISH)
Page 81
... Image retention is changed. To prevent this occurs, the previous image may be decreased. When the LCD panel is operated under normal conditions. Our LCD Monitor satisfies ISO13406-2 Pixel fault Class II When this , the accumulated voltage difference must be slight difference in voltage between electrodes increases with time, forcing the ...
... Image retention is changed. To prevent this occurs, the previous image may be decreased. When the LCD panel is operated under normal conditions. Our LCD Monitor satisfies ISO13406-2 Pixel fault Class II When this , the accumulated voltage difference must be slight difference in voltage between electrodes increases with time, forcing the ...
User Manual (ENGLISH)
Page 30
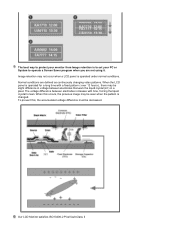
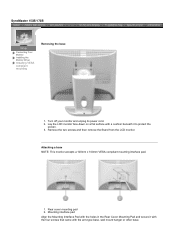
Remove the two screws and then remove the Stand from the LCD monitor. Mounting interface pad Align the Mounting Interface Pad with the holes in the Rear Cover Mounting Pad and secure it with the four screws that ... to protect the screen. 3. Rear cover mounting pad 2. Attaching a base NOTE: This monitor accepts a 75mm x 75mm VESA-compliant mounting interface pad. 1. SyncMaster 153S/173S Connecting Your Monitor Installing the Monitor Driver Installing VESA compliant mounting Removing the base 1. Lay the LCD monitor face-down on a flat surface with the arm-type base, wall mount hanger...
Remove the two screws and then remove the Stand from the LCD monitor. Mounting interface pad Align the Mounting Interface Pad with the holes in the Rear Cover Mounting Pad and secure it with the four screws that ... to protect the screen. 3. Rear cover mounting pad 2. Attaching a base NOTE: This monitor accepts a 75mm x 75mm VESA-compliant mounting interface pad. 1. SyncMaster 153S/173S Connecting Your Monitor Installing the Monitor Driver Installing VESA compliant mounting Removing the base 1. Lay the LCD monitor face-down on a flat surface with the arm-type base, wall mount hanger...
User Manual (ENGLISH)
Page 31
... Pad and secure it with the four screws that came with a cushion beneath it to protect the screen. 3. Lay the LCD monitor face-down on a flat surface with the arm-type base, wall mount hanger or other base. SyncMaster 153B/173B Removing the base... Connecting Your Monitor Installing the Monitor Driver Installing VESA compliant mounting 1. Attaching a base NOTE: This monitor accepts a 100mm x 100mm VESA-compliant mounting interface pad. 1. Rear cover mounting pad 2. Remove the two screws and then remove the Stand from the LCD monitor. Turn off your monitor and unplug its power ...
... Pad and secure it with the four screws that came with a cushion beneath it to protect the screen. 3. Lay the LCD monitor face-down on a flat surface with the arm-type base, wall mount hanger or other base. SyncMaster 153B/173B Removing the base... Connecting Your Monitor Installing the Monitor Driver Installing VESA compliant mounting 1. Attaching a base NOTE: This monitor accepts a 100mm x 100mm VESA-compliant mounting interface pad. 1. Rear cover mounting pad 2. Remove the two screws and then remove the Stand from the LCD monitor. Turn off your monitor and unplug its power ...


