

User Manual (ENGLISH)
Page 2
Main Page Safety Instructions Notational Power Installation Cleaning Other Introduction Unpacking Front Rear Setup Connecting Your Monitor Installing the Monitor Driver Automatic Manual On-Screen Display Troubleshooting Check List Q & A Self-Test Feature Check Specifications General Specifications PowerSaver Preset Display Modes Information Service Terms Regulatory Natural Color For Better Display Authority
Main Page Safety Instructions Notational Power Installation Cleaning Other Introduction Unpacking Front Rear Setup Connecting Your Monitor Installing the Monitor Driver Automatic Manual On-Screen Display Troubleshooting Check List Q & A Self-Test Feature Check Specifications General Specifications PowerSaver Preset Display Modes Information Service Terms Regulatory Natural Color For Better Display Authority
User Manual (ENGLISH)
Page 7
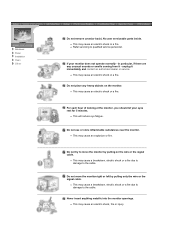
... try to qualified service personnel. No user serviceable parts inside. z This may cause an electric shock or a fire. z This may cause an explosion or fire. z Refer servicing to move the monitor right or left by pulling on the monitor. z This may cause an electric shock, fire or injury. unplug it - Notational Power Installation Clean Other Do not remove cover(or back). z This...
... try to qualified service personnel. No user serviceable parts inside. z This may cause an electric shock or a fire. z This may cause an explosion or fire. z Refer servicing to move the monitor right or left by pulling on the monitor. z This may cause an electric shock, fire or injury. unplug it - Notational Power Installation Clean Other Do not remove cover(or back). z This...
User Manual (ENGLISH)
Page 11
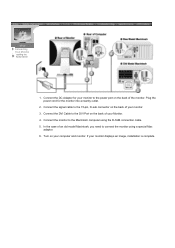
... monitor. Connect the DC Adapter for the monitor into a nearby outlet. 2. Connect the monitor to connect the monitor using the D-SUB connection cable. 5. In the case of your monitor. 3. Plug the power cord for your monitor to the 15-pin, D-sub connector on the back of your Monitor. 4. Turn on the back of an old model Macintosh, you need to the Macintosh computer using a special Mac adaptor. 6. Connect the DVI Cable to the DVI Port on your monitor displays an image, installation...
... monitor. Connect the DC Adapter for the monitor into a nearby outlet. 2. Connect the monitor to connect the monitor using the D-SUB connection cable. 5. In the case of your monitor. 3. Plug the power cord for your monitor to the 15-pin, D-sub connector on the back of your Monitor. 4. Turn on the back of an old model Macintosh, you need to the Macintosh computer using a special Mac adaptor. 6. Connect the DVI Cable to the DVI Port on your monitor displays an image, installation...

User Manual (ENGLISH)
Page 12
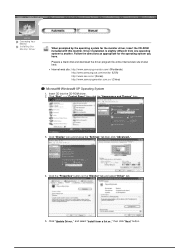
... and download the driver program file at the Internet web site shown here. Follow the directions as appropriate for the monitor driver, insert the CD-ROM included with this monitor. Windows XP/2000 1. Connecting Your Monitor Installing the Monitor Driver When prompted by the operating system for the operating system you have. Choose your monitor model in the model list, then click the "OK" button...
... and download the driver program file at the Internet web site shown here. Follow the directions as appropriate for the monitor driver, insert the CD-ROM included with this monitor. Windows XP/2000 1. Connecting Your Monitor Installing the Monitor Driver When prompted by the operating system for the operating system you have. Choose your monitor model in the model list, then click the "OK" button...
User Manual (ENGLISH)
Page 14
....cn/ (China) Microsoft® Windows® XP Operating System 1. then click "Next" button. Click "Start" -> "Control Panel" then click the "Appearance and Themes" Icon. 3. Click "Update Driver.." Prepare a blank disk and download the driver program file at the Internet web site shown here. Click "Display" icon and choose the "Settings" tab then click "Advanced..". 4. Connecting Your Monitor Installing the Monitor Driver When prompted by the operating...
....cn/ (China) Microsoft® Windows® XP Operating System 1. then click "Next" button. Click "Start" -> "Control Panel" then click the "Appearance and Themes" Icon. 3. Click "Update Driver.." Prepare a blank disk and download the driver program file at the Internet web site shown here. Click "Display" icon and choose the "Settings" tab then click "Advanced..". 4. Connecting Your Monitor Installing the Monitor Driver When prompted by the operating...

User Manual (ENGLISH)
Page 16
... choose the monitor that I can see "Digital Signature Not Found" on the "File Needed" window. 3. Select "Show all the driver in the "Monitor Type" area. 6. Double click the "Display" Icon. 3. Click the "Have Disk" button 9. Choose "Display a list of the driver". 7. Click "Start" , "Setting" , "Control Panel". 2. Continue choosing "Close" button and "OK" button until you can choose a specific driver" then click "Next" and then click "Have disk". 7. Monitor driver installation is...
... choose the monitor that I can see "Digital Signature Not Found" on the "File Needed" window. 3. Select "Show all the driver in the "Monitor Type" area. 6. Double click the "Display" Icon. 3. Click the "Have Disk" button 9. Choose "Display a list of the driver". 7. Click "Start" , "Setting" , "Control Panel". 2. Continue choosing "Close" button and "OK" button until you can choose a specific driver" then click "Next" and then click "Have disk". 7. Monitor driver installation is...
User Manual (ENGLISH)
Page 17
... not normal, change to use (Resolution, Number of colors and Vertical frequency) and then click OK. 4. Set a Keyboard for setting your computer. 6. Enter the model name of system setting file. 1. You have finished setting up your monitor. Select a mode that you need to the Preset Display Modes in the user guide. Microsoft® Windows® NT Operating System 1. Click Start, Settings, Control Panel, and then double-click Display icon. 2. In Display Registration Information window, click Settings Tab and...
... not normal, change to use (Resolution, Number of colors and Vertical frequency) and then click OK. 4. Set a Keyboard for setting your computer. 6. Enter the model name of system setting file. 1. You have finished setting up your monitor. Select a mode that you need to the Preset Display Modes in the user guide. Microsoft® Windows® NT Operating System 1. Click Start, Settings, Control Panel, and then double-click Display icon. 2. In Display Registration Information window, click Settings Tab and...
User Manual (ENGLISH)
Page 23
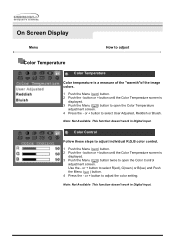
...'t work in Digital input. or + button to adjust individual R,G,B color control. 1 Push the Menu ( ) button. 2 Push the - Note: Not Available This function doesn't work in Digital input. On Screen Display Menu How to adjust Color Temperature Color Temperature Color temperature is displayed. 3 Push the Menu ( ) button twice to open the Color Temperature adjustment screen. 4 Press the - Color Control Follow these steps to select User Adjusted, Reddish or Bluish. Use the - button or + button until the Color Temperature screen is a measure of the "warmth"of the image colors...
...'t work in Digital input. or + button to adjust individual R,G,B color control. 1 Push the Menu ( ) button. 2 Push the - Note: Not Available This function doesn't work in Digital input. On Screen Display Menu How to adjust Color Temperature Color Temperature Color temperature is displayed. 3 Push the Menu ( ) button twice to open the Color Temperature adjustment screen. 4 Press the - Color Control Follow these steps to select User Adjusted, Reddish or Bluish. Use the - button or + button until the Color Temperature screen is a measure of the "warmth"of the image colors...
User Manual (ENGLISH)
Page 24
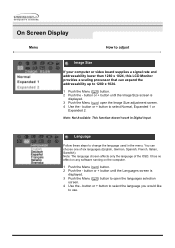
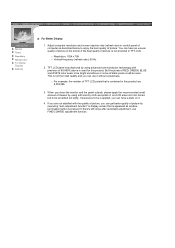
... Languages screen is displayed. 3 Push the Menu ( ) open the languages selection screen. 4 Use the - Language Follow these steps to change the language used in Digital input. On Screen Display Menu How to adjust Image Size If your computer or video board supplies a signal rate and addressability lower than 1280 x 1024, this LCD Monitor provides a scaling processor that can choose one of six languages.(English, German, Spanish, French, Italian, Swedish) Note: The language chosen affects only the language of the OSD. button or + button to use. button...
... Languages screen is displayed. 3 Push the Menu ( ) open the languages selection screen. 4 Use the - Language Follow these steps to change the language used in Digital input. On Screen Display Menu How to adjust Image Size If your computer or video board supplies a signal rate and addressability lower than 1280 x 1024, this LCD Monitor provides a scaling processor that can choose one of six languages.(English, German, Spanish, French, Italian, Swedish) Note: The language chosen affects only the language of the OSD. button or + button to use. button...

User Manual (ENGLISH)
Page 29
... no image on the screen? There is on the screen? Is the power indicator on the monitor. Have you see "Video mode not supported" on , reboot the computer to see the On Screen Display. The monitor is in the applicable mode (the safe mode for Windows ME/XP/2000 and then change the frequency of the video card. (Refer to prevent changes? Can you locked the On Screen Display (OSD) Menu to the Preset Display Modes...
... no image on the screen? There is on the screen? Is the power indicator on the monitor. Have you see "Video mode not supported" on , reboot the computer to see the On Screen Display. The monitor is in the applicable mode (the safe mode for Windows ME/XP/2000 and then change the frequency of the video card. (Refer to prevent changes? Can you locked the On Screen Display (OSD) Menu to the Preset Display Modes...
User Manual (ENGLISH)
Page 30
... the Driver Installation Instructions. Check if the power cord and the cable are only 16 colors shown on the monitor? Check the signal cable connection. Make sure the video card is out of focus or OSD cannot be unbalanced due to reinstall the adapter (video) driver. Has the video card been set properly? Have you have changed the video card or the driver? Have the Windows colors been set at 75Hz or 85Hz. (Do not exceed 60Hz when using the OSD. Readjust Position...
... the Driver Installation Instructions. Check if the power cord and the cable are only 16 colors shown on the monitor? Check the signal cable connection. Make sure the video card is out of focus or OSD cannot be unbalanced due to reinstall the adapter (video) driver. Has the video card been set properly? Have you have changed the video card or the driver? Have the Windows colors been set at 75Hz or 85Hz. (Do not exceed 60Hz when using the OSD. Readjust Position...
User Manual (ENGLISH)
Page 32
... and telephones that are red, green and blue. Turn on the screen or the screen goes blank although the power indicator LED is functioning properly. 1. Turn off both your computer and the monitor. If there are any of the monitor. Turn off your video controller and computer system; If your monitor screen remains blank after using the previous procedure, check your monitor and reconnect the video cable; Unplug the video cable from the back...
... and telephones that are red, green and blue. Turn on the screen or the screen goes blank although the power indicator LED is functioning properly. 1. Turn off both your computer and the monitor. If there are any of the monitor. Turn off your video controller and computer system; If your monitor screen remains blank after using the previous procedure, check your monitor and reconnect the video cable; Unplug the video cable from the back...

User Manual (ENGLISH)
Page 34
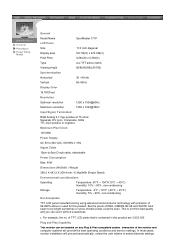
... Model Name SyncMaster 151P LCD Panel Size 15.0 inch diagonal Display area 304.1(H) x 228.1(V) Pixel Pitch 0.297(H) x 0.297(V) Type a-si TFT active matrix Viewing Angle 80/80/80/70(L/R/T/B) Synchronization Horizontal 30 ~60kHz Vertical 56~75Hz Display Color 16.7M (True) Resolution Optimum resolution 1024 x 768@60Hz Maximum resolution 1024 x 768@75Hz Input Signal, Terminated RGB Analog 0.7 Vpp positive at 75 ohms Separate H/V sync, Composite, Sync-On-Green TTL level positive or negative Maximum Pixel Clock 80 MHz Power Supply...
... Model Name SyncMaster 151P LCD Panel Size 15.0 inch diagonal Display area 304.1(H) x 228.1(V) Pixel Pitch 0.297(H) x 0.297(V) Type a-si TFT active matrix Viewing Angle 80/80/80/70(L/R/T/B) Synchronization Horizontal 30 ~60kHz Vertical 56~75Hz Display Color 16.7M (True) Resolution Optimum resolution 1024 x 768@60Hz Maximum resolution 1024 x 768@75Hz Input Signal, Terminated RGB Analog 0.7 Vpp positive at 75 ohms Separate H/V sync, Composite, Sync-On-Green TTL level positive or negative Maximum Pixel Clock 80 MHz Power Supply...

User Manual (ENGLISH)
Page 35
... keyboard. The PowerSaver system operates with VESA DPMS functionality. As an ENERGY STAR® Partner, SAMSUNG has determined that this feature. For energy conservation, turn your monitor OFF when it has not been used with a computer equipped with a VESA DPMS compliant video card installed in power management system called PowerSaver. SyncMaster 151P General PowerSaver Preset Timing Modes This monitor has a built-in your computer.
... keyboard. The PowerSaver system operates with VESA DPMS functionality. As an ENERGY STAR® Partner, SAMSUNG has determined that this feature. For energy conservation, turn your monitor OFF when it has not been used with a computer equipped with a VESA DPMS compliant video card installed in power management system called PowerSaver. SyncMaster 151P General PowerSaver Preset Timing Modes This monitor has a built-in your computer.
User Manual (ENGLISH)
Page 37
... pixels of RED, GREEN, BLUE and WHITE color seem to select alternate settings. General PowerSaver Preset Timing Modes General Model Name SyncMaster 171P LCD Panel Size 17.0 inch diagonal Display area 337.92(H) x 270.336(V) Pixel Pitch 0.264(H) x 0.264(V) Type a-si TFT active matrix Viewing Angle 85/85/85/85(L/R/T/B) Synchronization Horizontal 30 ~81kHz Vertical 56~85Hz Display Color 16.7M(True) Resolution Optimum resolution 1280 x 1024@60Hz Maximum resolution 1280 x 1024@76Hz Input Signal, Terminated RGB Analog 0.7 Vpp positive...
... pixels of RED, GREEN, BLUE and WHITE color seem to select alternate settings. General PowerSaver Preset Timing Modes General Model Name SyncMaster 171P LCD Panel Size 17.0 inch diagonal Display area 337.92(H) x 270.336(V) Pixel Pitch 0.264(H) x 0.264(V) Type a-si TFT active matrix Viewing Angle 85/85/85/85(L/R/T/B) Synchronization Horizontal 30 ~81kHz Vertical 56~85Hz Display Color 16.7M(True) Resolution Optimum resolution 1280 x 1024@60Hz Maximum resolution 1280 x 1024@76Hz Input Signal, Terminated RGB Analog 0.7 Vpp positive...

User Manual (ENGLISH)
Page 38
... used with a computer equipped with a VESA DPMS compliant video card installed in power management system called PowerSaver. For energy conservation, turn your monitor OFF when it unattended for a certain amount of time. As an ENERGY STAR® Partner, SAMSUNG has determined that this feature. State Normal Operation Power saving mode EPA/ENERGY 2000 Power Switch off Power Indicator Power Consumption Green Less than 40W Green, Blinking Less than 3W Black...
... used with a computer equipped with a VESA DPMS compliant video card installed in power management system called PowerSaver. For energy conservation, turn your monitor OFF when it unattended for a certain amount of time. As an ENERGY STAR® Partner, SAMSUNG has determined that this feature. State Normal Operation Power saving mode EPA/ENERGY 2000 Power Switch off Power Indicator Power Consumption Green Less than 40W Green, Blinking Less than 3W Black...
User Manual (ENGLISH)
Page 43
... method is regarded as more image information can be shown on a monitor is composed of the same color is called 'resolution'. Resolution The number of the display. This number shows the accuracy of horizontal and vertical dots used for the Plug & Play function. The distance between two dots of red, green and blue dots. Service Terms Regulatory Natural Color For Better Display Authority Dot Pitch The image on the screen.
... method is regarded as more image information can be shown on a monitor is composed of the same color is called 'resolution'. Resolution The number of the display. This number shows the accuracy of horizontal and vertical dots used for the Plug & Play function. The distance between two dots of red, green and blue dots. Service Terms Regulatory Natural Color For Better Display Authority Dot Pitch The image on the screen.
User Manual (ENGLISH)
Page 44
... generates, uses, and can be suitable for help. This booklet was prepared by one or more of the following warning: Note: This equipment has been tested and found to Part 15 of the Voluntary Control Council for the product. Service Terms Regulatory Natural Color For Better Display Authority FCC Information User Instructions The Federal Communications Commission Radio Frequency Interference Statement...
... generates, uses, and can be suitable for help. This booklet was prepared by one or more of the following warning: Note: This equipment has been tested and found to Part 15 of the Voluntary Control Council for the product. Service Terms Regulatory Natural Color For Better Display Authority FCC Information User Instructions The Federal Communications Commission Radio Frequency Interference Statement...
User Manual (ENGLISH)
Page 50
... RED, GREEN, BLUE and WHITE color seem to be bright sometimes or some of 99.999% above is contained in TFT-LCD. { Resolution: 1024 x 768 { Vertical frequency (refresh rate): 60 Hz 2. If excessive force is applied, you can get better quality of cleaner by executing "auto adjustment function" in display screen that is used for this product are not satisfied with precision of black pixels could be scrubbed out softly. TFT LCD panel...
... RED, GREEN, BLUE and WHITE color seem to be bright sometimes or some of 99.999% above is contained in TFT-LCD. { Resolution: 1024 x 768 { Vertical frequency (refresh rate): 60 Hz 2. If excessive force is applied, you can get better quality of cleaner by executing "auto adjustment function" in display screen that is used for this product are not satisfied with precision of black pixels could be scrubbed out softly. TFT LCD panel...
User Manual (SPANISH)
Page 45
... for help. Before making the connection, make sure the voltage rating of the computer convenience outlet is the same as the monitor and that to which can radiate radio frequency energy and, if not installed and used near a radio or television receiver in accordance with NEMA configuration 6-15P type (tandem blades) plug cap. User Information Changes or modifications not expressly approved by turning...
... for help. Before making the connection, make sure the voltage rating of the computer convenience outlet is the same as the monitor and that to which can radiate radio frequency energy and, if not installed and used near a radio or television receiver in accordance with NEMA configuration 6-15P type (tandem blades) plug cap. User Information Changes or modifications not expressly approved by turning...


