User Manual (ENGLISH)
Page 2
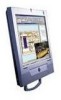
... by executing "auto adjustment function" in display screen that is appeared as described below to be scrubbed out softly. If you can have an uneven quality of picture in the screen if the best quality of Samsung Electronics Co., Ltd. Reproduction in TFT-LCD. • Resolution: 15" 1024 x 768 • Vertical frequency (refresh rate): 60 Hz 17" 1280 x 1024 2. The Samsung logo and SyncMaster are registered trademarks...
... by executing "auto adjustment function" in display screen that is appeared as described below to be scrubbed out softly. If you can have an uneven quality of picture in the screen if the best quality of Samsung Electronics Co., Ltd. Reproduction in TFT-LCD. • Resolution: 15" 1024 x 768 • Vertical frequency (refresh rate): 60 Hz 17" 1280 x 1024 2. The Samsung logo and SyncMaster are registered trademarks...

User Manual (ENGLISH)
Page 3
... Instructions 2 Unpacking Your Monitor 3 Setting up Your LCD Monitor 4 Setting up an Ergonomic Workstation 4 Monitor Location 4 Workstation Height 4 Viewing Angle 4 Connecting Your LCD Monitor 5 Connecting TV Tuner Box (option 6 Plug and Play 7 Installing the Video Driver 7 Self-Test Feature Check (STFC 7 Getting Help 8 Warm-up Time 8 Adjusting Your LCD Monitor 9 User Controls 9 Automatic Save 10 Direct-Access Features 10 OSD Lock/Unlock 11 On Screen Display (OSD 12 Accessing the Menu System 12 OSD Functions and Adjustments 13 PC Functions and Adjustments 14 TV/ Video...
... Instructions 2 Unpacking Your Monitor 3 Setting up Your LCD Monitor 4 Setting up an Ergonomic Workstation 4 Monitor Location 4 Workstation Height 4 Viewing Angle 4 Connecting Your LCD Monitor 5 Connecting TV Tuner Box (option 6 Plug and Play 7 Installing the Video Driver 7 Self-Test Feature Check (STFC 7 Getting Help 8 Warm-up Time 8 Adjusting Your LCD Monitor 9 User Controls 9 Automatic Save 10 Direct-Access Features 10 OSD Lock/Unlock 11 On Screen Display (OSD 12 Accessing the Menu System 12 OSD Functions and Adjustments 13 PC Functions and Adjustments 14 TV/ Video...

User Manual (ENGLISH)
Page 4
.... 7 Put your LCD monitor if the power cord has been damaged. NO USER-SERVICEABLE PARTS INSIDE. REFER SERVICING TO QUALIFIED SERVICE PERSONNEL. Do not allow anything metallic into the cabinet openings of the liquid crystal display (LCD) monitor; Doing so may create the danger of electric shock. 3 To avoid electric shock, never touch the inside of the LCD monitor. Do not clean the front panel with a plastic front...
.... 7 Put your LCD monitor if the power cord has been damaged. NO USER-SERVICEABLE PARTS INSIDE. REFER SERVICING TO QUALIFIED SERVICE PERSONNEL. Do not allow anything metallic into the cabinet openings of the liquid crystal display (LCD) monitor; Doing so may create the danger of electric shock. 3 To avoid electric shock, never touch the inside of the LCD monitor. Do not clean the front panel with a plastic front...

User Manual (ENGLISH)
Page 6
... 3:04 PM Setting up Your LCD Monitor Setting up an Ergonomic Workstation Consider the advice given below your eye level when you install your monitor. Monitor location Choose a position that the top of the screen is slightly below before you are comfortably seated. Tilt the screen English 4 Viewing angle Tilt the screen until you feel comfortable working with your monitor to the least reflection from lights or windows, usually...
... 3:04 PM Setting up Your LCD Monitor Setting up an Ergonomic Workstation Consider the advice given below your eye level when you install your monitor. Monitor location Choose a position that the top of the screen is slightly below before you are comfortably seated. Tilt the screen English 4 Viewing angle Tilt the screen until you feel comfortable working with your monitor to the least reflection from lights or windows, usually...
User Manual (ENGLISH)
Page 7
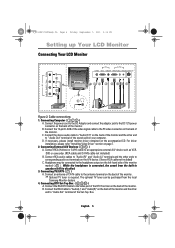
... RCA Cable to "Audio Out" terminal of the monitor. ➮ Optional TV tuner is connected, the sound from the local Samsung Monitor dealers. 4. English 5 Connect the power cord to the DC Adaptor and connect the adaptor jack to the DC 12V power connector on the back of the monitor and the other end to corresponding audio out terminals on page 7. 2. Connect the 15-pin D-SUB of the video signal cable...
... RCA Cable to "Audio Out" terminal of the monitor. ➮ Optional TV tuner is connected, the sound from the local Samsung Monitor dealers. 4. English 5 Connect the power cord to the DC Adaptor and connect the adaptor jack to the DC 12V power connector on the back of the monitor and the other end to corresponding audio out terminals on page 7. 2. Connect the 15-pin D-SUB of the video signal cable...

User Manual (ENGLISH)
Page 8
English 6 Please use a coin or screwdriver to tighten the two screws to "Antenna" port of the tuner box. 4 Insert the tuner box into tuner box housing on . 6 Connect the power cord of the monitor. 4_E151MP171MPbody.fm Page 6 Friday, September 7, 2001 3:04 PM Setting up Your LCD Monitor Connecting TV Tuner Box (option) 1 Unplug the DC adapter. 2 Remove cover of tuner box housing by sliding down. 3 Connect antenna or CATV cable to fix the tuner. 5 Put the tuner box housing cover back on the back of DC adapter then the monitor will be ready for TV function.
English 6 Please use a coin or screwdriver to tighten the two screws to "Antenna" port of the tuner box. 4 Insert the tuner box into tuner box housing on . 6 Connect the power cord of the monitor. 4_E151MP171MPbody.fm Page 6 Friday, September 7, 2001 3:04 PM Setting up Your LCD Monitor Connecting TV Tuner Box (option) 1 Unplug the DC adapter. 2 Remove cover of tuner box housing by sliding down. 3 Connect antenna or CATV cable to fix the tuner. 5 Put the tuner box housing cover back on the back of DC adapter then the monitor will be ready for TV function.

User Manual (ENGLISH)
Page 9
If your monitor and computer are properly connected but the monitor screen remains dark and the power indicator is blinking, run the monitor self-test by checking if the source indicator LED labeled "PC" is on the monitor. English 7 If your PC system needs a video driver, follow the instructions given below : Power Indicator Figure 3. Please refer to use with your monitor is selected as a primary source by following the steps given...
If your monitor and computer are properly connected but the monitor screen remains dark and the power indicator is blinking, run the monitor self-test by checking if the source indicator LED labeled "PC" is on the monitor. English 7 If your PC system needs a video driver, follow the instructions given below : Power Indicator Figure 3. Please refer to use with your monitor is selected as a primary source by following the steps given...
User Manual (ENGLISH)
Page 10
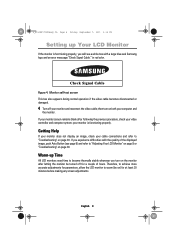
Check Signal Cable Figure 4. then turn on ) for a couple of the displayed image, push Auto Button (see a white box with a large blue oval Samsung logo and an error messsage "Check Signal Cable." Getting Help If your monitor does not display an image, check your cable connections and refer to "Troubleshooting" on both your video controller and computer system; Therefore, to achieve more accurate adjustments for parameters, allow the LCD monitor to warm (be on the monitor after following the previous...
Check Signal Cable Figure 4. then turn on ) for a couple of the displayed image, push Auto Button (see a white box with a large blue oval Samsung logo and an error messsage "Check Signal Cable." Getting Help If your monitor does not display an image, check your cable connections and refer to "Troubleshooting" on both your video controller and computer system; Therefore, to achieve more accurate adjustments for parameters, allow the LCD monitor to warm (be on the monitor after following the previous...

User Manual (ENGLISH)
Page 11
... selected function. I Activates PIP(Picture-in-Picture) window directly in 2 PIP PC mode. User control locations No. Amber : Power Saving Mode or Disconnected Signal Cable. 5 I Indicates the status of the image being displayed. I Selects video sources (Video/S-video/TV). 3 Video I Increases or decreases the channel number. - CH + I Activates full screen video window. I PIP window off. All of these buttons to adjust the controls, an OSD shows you to easily adjust the characteristics of the monitor. - I Increases or decreases the...
... selected function. I Activates PIP(Picture-in-Picture) window directly in 2 PIP PC mode. User control locations No. Amber : Power Saving Mode or Disconnected Signal Cable. 5 I Indicates the status of the image being displayed. I Selects video sources (Video/S-video/TV). 3 Video I Increases or decreases the channel number. - CH + I Activates full screen video window. I PIP window off. All of these buttons to adjust the controls, an OSD shows you to easily adjust the characteristics of the monitor. - I Increases or decreases the...
User Manual (ENGLISH)
Page 13
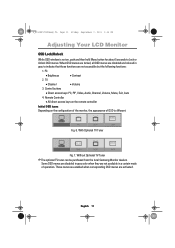
... Page 11 Friday, September 7, 2001 3:04 PM Adjusting Your LCD Monitor OSD Lock/Unlock While OSD window is different. When OSD menus are locked, all OSD menus are disabled and colored in a certain mode of OSD is not on the configuration of the monitor, the appearance of operation. Control buttons • Direct access keys: PC, PIP, Video, Audio, Channel, Volume, Menu, Exit, Auto 4. Fig. 6. PC • Brightness • Contrast 2. Without Optional TV Tuner ➮ The...
... Page 11 Friday, September 7, 2001 3:04 PM Adjusting Your LCD Monitor OSD Lock/Unlock While OSD window is different. When OSD menus are locked, all OSD menus are disabled and colored in a certain mode of OSD is not on the configuration of the monitor, the appearance of operation. Control buttons • Direct access keys: PC, PIP, Video, Audio, Channel, Volume, Menu, Exit, Auto 4. Fig. 6. PC • Brightness • Contrast 2. Without Optional TV Tuner ➮ The...

User Manual (ENGLISH)
Page 17
... Adjusting Your LCD Monitor Table 1. Use the H-Position menu to remove any noise. When Fine value is wrong. If satisfactory results are replaced with the factory default values. English 15 When Coarse value is wrong. I Coarse I Reset Display current display mode. Image lock and position parameters are replaced with jitters and shimmers. Screen controls (Continued) Main Menu Icon Menus and Sub-menus Function Descriptions I Reset Color parameters are not obtained using the Fine adjustment, use the Coarse adjustment...
... Adjusting Your LCD Monitor Table 1. Use the H-Position menu to remove any noise. When Fine value is wrong. If satisfactory results are replaced with the factory default values. English 15 When Coarse value is wrong. I Coarse I Reset Display current display mode. Image lock and position parameters are replaced with jitters and shimmers. Screen controls (Continued) Main Menu Icon Menus and Sub-menus Function Descriptions I Reset Color parameters are not obtained using the Fine adjustment, use the Coarse adjustment...

User Manual (ENGLISH)
Page 20
... installation of time to finish channel scanning is completely depending on page 36) • US-Air • US-Cable • Japan-Air • Japan-Cable Upon selecting a channel system, you will be set in average to scan 70 channels. I *Channel system Select a channel system that is being used in your region. * TV menu ( ) is disabled as well. English...
... installation of time to finish channel scanning is completely depending on page 36) • US-Air • US-Cable • Japan-Air • Japan-Cable Upon selecting a channel system, you will be set in average to scan 70 channels. I *Channel system Select a channel system that is being used in your region. * TV menu ( ) is disabled as well. English...

User Manual (ENGLISH)
Page 23
.... I Contrast Adjust the contrast of video or TV without affecting PC RGB's contrast. SOUND The monitor has a built-in PIP. I Tint Change the tone of video or TV image. I Surround On, Off ACTIVE AREA The Active Area of color. I Bass Bass: Emphasize low frequency audio. The audio circuit processes audio signal from various external input sources such as DVD, VCR, TV, or PC. Narrow Wide English 21 I Reset Picture parameters are replaced with the factory default...
.... I Contrast Adjust the contrast of video or TV without affecting PC RGB's contrast. SOUND The monitor has a built-in PIP. I Tint Change the tone of video or TV image. I Surround On, Off ACTIVE AREA The Active Area of color. I Bass Bass: Emphasize low frequency audio. The audio circuit processes audio signal from various external input sources such as DVD, VCR, TV, or PC. Narrow Wide English 21 I Reset Picture parameters are replaced with the factory default...
User Manual (ENGLISH)
Page 24
... search is from OSD. In rare cases, "Channel auto program" may miss a channel due to weak signals or for 10 seconds. When you finish fine tunning the channel you forgot V-Chip Password • Press and hold the "Audio" button on the number of channels and the video source whether the video source is stored in the "TV Setup" menu from cable or air. *Upon...
... search is from OSD. In rare cases, "Channel auto program" may miss a channel due to weak signals or for 10 seconds. When you finish fine tunning the channel you forgot V-Chip Password • Press and hold the "Audio" button on the number of channels and the video source whether the video source is stored in the "TV Setup" menu from cable or air. *Upon...
User Manual (ENGLISH)
Page 31
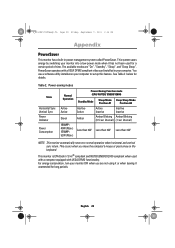
... compliant video card installed in power management system called PowerSaver. This occurs when you are "On", "Standby", "Sleep", and "Deep Sleep". You use a software utility installed on the keyboard. For energy conservation, turn your monitor OFF when you move the computer's mouse or press a key on your computer to normal operation when horizontal and vertical sync return. See Table 2 below for details. Power-saving modes State Horizontal Sync Vertical Sync Power Indicator Power...
... compliant video card installed in power management system called PowerSaver. This occurs when you are "On", "Standby", "Sleep", and "Deep Sleep". You use a software utility installed on the keyboard. For energy conservation, turn your monitor OFF when you move the computer's mouse or press a key on your computer to normal operation when horizontal and vertical sync return. See Table 2 below for details. Power-saving modes State Horizontal Sync Vertical Sync Power Indicator Power...
User Manual (ENGLISH)
Page 32
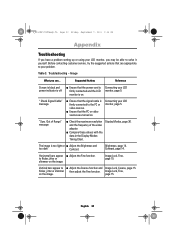
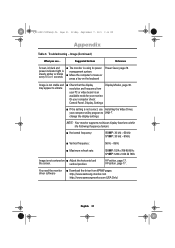
... a problem setting up or using your LCD monitor, you see... Troubleshooting - I Adjust the Fine function. Image Lock, Fine, on . Suggested Actions Reference Screen is black and power indicator is firmly connected to solve it yourself. " Check Signal Cable" message I Ensure that are turned on the image. "Sync. Display Modes, page 36. Horizontal bars appear I Compare these values with the data in the Display Modes Timing Chart. Table 3. Connecting your LCD monitor, page 5. English 30 Out of Range" message I Adjust...
... a problem setting up or using your LCD monitor, you see... Troubleshooting - I Adjust the Fine function. Image Lock, Fine, on . Suggested Actions Reference Screen is black and power indicator is firmly connected to solve it yourself. " Check Signal Cable" message I Ensure that are turned on the image. "Sync. Display Modes, page 36. Horizontal bars appear I Compare these values with the data in the Display Modes Timing Chart. Table 3. Connecting your LCD monitor, page 5. English 30 Out of Range" message I Adjust...
User Manual (ENGLISH)
Page 33
... amber or blinks every 0.5 or 1 seconds I The monitor is an available mode for your PC or video board is using its power management system. H-Position, page 17. Troubleshooting - change the display settings. V-Position, page 17. Image is not stable and may appear to page 7. resolution and frequency from WWW pages: http://www.samsung-monitor.com http://www.samsungmonitor.com (USA Only) English 31 You need the monitor driver software I Adjust the horizontal and the screen. On...
... amber or blinks every 0.5 or 1 seconds I The monitor is an available mode for your PC or video board is using its power management system. H-Position, page 17. Troubleshooting - change the display settings. V-Position, page 17. Image is not stable and may appear to page 7. resolution and frequency from WWW pages: http://www.samsung-monitor.com http://www.samsungmonitor.com (USA Only) English 31 You need the monitor driver software I Adjust the horizontal and the screen. On...
User Manual (ENGLISH)
Page 35
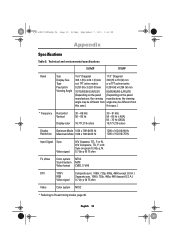
..., Video Color system NTSC Sound system M/N Video format CVBS, S-VHS DTV YPbPr Composite sync. 1080i, 720p, 480p, 480i (except U.S.A.) RGB Separate sync. 1080i, 720p, 480p, 480i (except U.S.A.) Video signal 0.7 Vp-p @ 75 ohm Video Color system NTSC * Referring to Preset timing modes, page 36. or N. Sync-on the panel manufacturer, the viewing manufacturer, the viewing angle may be different from angle may be different from this spec.) this spec.) * Frequency Horizontal Vertical...
..., Video Color system NTSC Sound system M/N Video format CVBS, S-VHS DTV YPbPr Composite sync. 1080i, 720p, 480p, 480i (except U.S.A.) RGB Separate sync. 1080i, 720p, 480p, 480i (except U.S.A.) Video signal 0.7 Vp-p @ 75 ohm Video Color system NTSC * Referring to Preset timing modes, page 36. or N. Sync-on the panel manufacturer, the viewing manufacturer, the viewing angle may be different from angle may be different from this spec.) this spec.) * Frequency Horizontal Vertical...
User Manual (ENGLISH)
Page 40
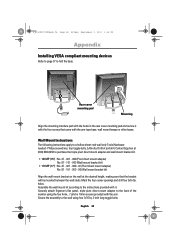
... back of the monitor using four 3/16 by 3-inch long toggle bolts. English 38 Rear cover mounting pad Mounting Align the mounting interface pad with the arm-type base, wall mount hanger or other bases. Secure the assembly to the instructions provided with it with the arm. Assemble the wall mount kit according to the wall using the four 4mm, .7 pitch x 10mm screws provided with the four screws that the bracket...
... back of the monitor using four 3/16 by 3-inch long toggle bolts. English 38 Rear cover mounting pad Mounting Align the mounting interface pad with the arm-type base, wall mount hanger or other bases. Secure the assembly to the instructions provided with it with the arm. Assemble the wall mount kit according to the wall using the four 4mm, .7 pitch x 10mm screws provided with the four screws that the bracket...
User Manual (ENGLISH)
Page 43
.... It is a detachable power supply cord with NEMA configuration 5-15P type (parallel blades) plug cap. Warning User must accept any UL Listed personal computer with this device must use only UL Listed detachable power cord with IEC320 style terminations. These limits are designed to maintain FCC compliance for connection to or exceeds the monitor voltage rating. I Consult the dealer...
.... It is a detachable power supply cord with NEMA configuration 5-15P type (parallel blades) plug cap. Warning User must accept any UL Listed personal computer with this device must use only UL Listed detachable power cord with IEC320 style terminations. These limits are designed to maintain FCC compliance for connection to or exceeds the monitor voltage rating. I Consult the dealer...


