

User Manual (user Manual) (ver.1.0) (English)
Page 1
SyncMaster150MB SyncMaster170MB TFT-LCD Monitor Owner's Instructions
SyncMaster150MB SyncMaster170MB TFT-LCD Monitor Owner's Instructions
User Manual (user Manual) (ver.1.0) (English)
Page 3
...Deutsch Fran•ais English Table of Contents Safety Instructions 2 Unpacking Your Monitor 3 Setting up Your LCD Monitor 4 Setting up an Ergonomic Workstation 4 Monitor Location 4 Workstation Height 4 Viewing Angle 4 Kensington Security Slot 4 Connecting Your LCD Monitor 5 Plug and Play 6 Installing the Video Driver 6 Self-Test ... 26 Installing VESA Compliant Mounting Devices 27 Wall Mount Instructions 27 Retractable Stand 28 Maintenance of Your LCD Monitor 28 Attaching a Wall or Arm Mounting Device 29 Index 30 Regulatory Information Inside back cover Customer Service /...
...Deutsch Fran•ais English Table of Contents Safety Instructions 2 Unpacking Your Monitor 3 Setting up Your LCD Monitor 4 Setting up an Ergonomic Workstation 4 Monitor Location 4 Workstation Height 4 Viewing Angle 4 Kensington Security Slot 4 Connecting Your LCD Monitor 5 Plug and Play 6 Installing the Video Driver 6 Self-Test ... 26 Installing VESA Compliant Mounting Devices 27 Wall Mount Instructions 27 Retractable Stand 28 Maintenance of Your LCD Monitor 28 Attaching a Wall or Arm Mounting Device 29 Index 30 Regulatory Information Inside back cover Customer Service /...

User Manual (user Manual) (ver.1.0) (English)
Page 4
... ventilation openings in particular, if there are provided for an extended period of thin glass with a plastic front surface and can clean the LCD monitor with keton-type materials (e.g., acetone), ethyl alcohol, toluene, ethyl acid, methyl, or chloride - Only a qualified technician should... not be sure to unplug the LCD monitor first. 9 Place the LCD monitor on a bed, sofa, rug, or other sources of dust. 8 Do not expose the LCD monitor to rain or use your LCD monitor in direct sunlight, and keep it away from heaters, stoves, &#...
... ventilation openings in particular, if there are provided for an extended period of thin glass with a plastic front surface and can clean the LCD monitor with keton-type materials (e.g., acetone), ethyl alcohol, toluene, ethyl acid, methyl, or chloride - Only a qualified technician should... not be sure to unplug the LCD monitor first. 9 Place the LCD monitor on a bed, sofa, rug, or other sources of dust. 8 Do not expose the LCD monitor to rain or use your LCD monitor in direct sunlight, and keep it away from heaters, stoves, &#...

User Manual (user Manual) (ver.1.0) (English)
Page 6
...-type security slot location English 4 Please install the program to any window. Figure 2. Monitor location Choose a position that the top of the screen is not included. Workstation height Place your LCD monitor so that exposes your locking device documentation for installation instructions. The best viewing angle can be obtained via AutoAngle™ provided...
...-type security slot location English 4 Please install the program to any window. Figure 2. Monitor location Choose a position that the top of the screen is not included. Workstation height Place your LCD monitor so that exposes your locking device documentation for installation instructions. The best viewing angle can be obtained via AutoAngle™ provided...

User Manual (user Manual) (ver.1.0) (English)
Page 7
Setting up Your LCD Monitor Connecting Your LCD Monitor Figure 3. Cable connections 1 Connect the power cord to the DC adapter and connect the adapter jack to the DC12V power port on the back of your monitor. 2 Connect the signal cable to the video port on your computer. 3 Connect the... your headphone to the Headphone-out port. 7 Turn on both your computer and the monitor. 8 If necessary, install the video driver for the monitor. (See "Installing the video driver" on page 6) 9 After your monitor has been fully installed successfully, run Auto-Adjustment. (See page12) * For SyncMaster 150MP...
Setting up Your LCD Monitor Connecting Your LCD Monitor Figure 3. Cable connections 1 Connect the power cord to the DC adapter and connect the adapter jack to the DC12V power port on the back of your monitor. 2 Connect the signal cable to the video port on your computer. 3 Connect the... your headphone to the Headphone-out port. 7 Turn on both your computer and the monitor. 8 If necessary, install the video driver for the monitor. (See "Installing the video driver" on page 6) 9 After your monitor has been fully installed successfully, run Auto-Adjustment. (See page12) * For SyncMaster 150MP...

User Manual (user Manual) (ver.1.0) (English)
Page 8
...and time consuming setup. Installing the Video Driver The CD that allows you to the operating system your monitor is functioning properly. If your display. English 6 This monitor automatically tells the PC system its Extended Display Identification Data (EDID) using Display Data Channel (DDC) ... product contains the necessary drivers for more information. Power Indicator 1 Turn off both your monitor in a Plug and Play compatible system without the usual hassles and confusion. Setting up Your LCD Monitor Plug and Play The adoption of the computer. 3 Turn on . It allows you ...
...and time consuming setup. Installing the Video Driver The CD that allows you to the operating system your monitor is functioning properly. If your display. English 6 This monitor automatically tells the PC system its Extended Display Identification Data (EDID) using Display Data Channel (DDC) ... product contains the necessary drivers for more information. Power Indicator 1 Turn off both your monitor in a Plug and Play compatible system without the usual hassles and confusion. Setting up Your LCD Monitor Plug and Play The adoption of the computer. 3 Turn on . It allows you ...
User Manual (user Manual) (ver.1.0) (English)
Page 9
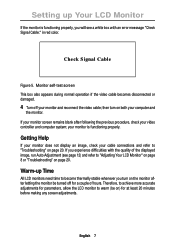
...on page 20. Warm-up Your LCD Monitor If the monitor is functioning properly. Therefore, to achieve more accurate adjustments for parameters, allow the LCD monitor to warm (be turned off your monitor and reconnect the video cable; Setting up Time All LCD monitors need time to become thermally stable ...whenever you turn on both your computer and the monitor. then turn on the monitor after following the previous...
...on page 20. Warm-up Your LCD Monitor If the monitor is functioning properly. Therefore, to achieve more accurate adjustments for parameters, allow the LCD monitor to warm (be turned off your monitor and reconnect the video cable; Setting up Time All LCD monitors need time to become thermally stable ...whenever you turn on both your computer and the monitor. then turn on the monitor after following the previous...

User Manual (user Manual) (ver.1.0) (English)
Page 10
... 2 PIP 3 Exit 4 Menu 5 Power Description n Selects Video source. n PIP to easily adjust the characteristics of the monitor. Adjusting Your LCD Monitor User Controls Your LCD monitor allows you their numeric values as they change. n Activates PIP(Picture-in-Picture) window directly. n Turns ON/OFF the... monitor. n PIP off . n Indicates the status of the control button indicate currently active Video source....
... 2 PIP 3 Exit 4 Menu 5 Power Description n Selects Video source. n PIP to easily adjust the characteristics of the monitor. Adjusting Your LCD Monitor User Controls Your LCD monitor allows you their numeric values as they change. n Activates PIP(Picture-in-Picture) window directly. n Turns ON/OFF the... monitor. n PIP off . n Indicates the status of the control button indicate currently active Video source....

User Manual (user Manual) (ver.1.0) (English)
Page 11
... on page 26 respectively. and 11- In addition to remain active for about 3 seconds without pressing other buttons, the monitor automatically saves any adjustment you open the on the OSD. n Increases or decreases the values of audio volume. These changes are ...stored in the monitor. SyncMaster 150MB and SyncMaster 170MB have made. factory preset modes listed in Table 7 on the OSD. VOL + n Increases or decreases the level of the selected 7 function. - Adjusting Your LCD Monitor No. Automatic Save Whenever you have 9- ...
... on page 26 respectively. and 11- In addition to remain active for about 3 seconds without pressing other buttons, the monitor automatically saves any adjustment you open the on the OSD. n Increases or decreases the values of audio volume. These changes are ...stored in the monitor. SyncMaster 150MB and SyncMaster 170MB have made. factory preset modes listed in Table 7 on the OSD. VOL + n Increases or decreases the level of the selected 7 function. - Adjusting Your LCD Monitor No. Automatic Save Whenever you have 9- ...

User Manual (user Manual) (ver.1.0) (English)
Page 12
... least 5 seconds to adjust the Brightness, Contrast and Volume. OSD Lock/Unlock This function allows you to increase the volume. When locked, a 'LOCKED!' Adjusting Your LCD Monitor Direct-Access Features While you are watching full screen TV or in PIP mode Volume When OSD is not on the screen, push the " " or...
... least 5 seconds to adjust the Brightness, Contrast and Volume. OSD Lock/Unlock This function allows you to increase the volume. When locked, a 'LOCKED!' Adjusting Your LCD Monitor Direct-Access Features While you are watching full screen TV or in PIP mode Volume When OSD is not on the screen, push the " " or...
User Manual (user Manual) (ver.1.0) (English)
Page 13
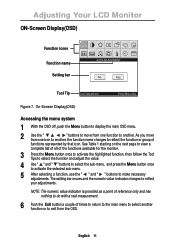
The setting bar moves and the numeric value indicator changes to make necessary adjustments. English 11 Adjusting Your LCD Monitor ON-Screen Display(OSD) Function icons Function name Setting bar AUTO CC AUTO ADJUSTMENT Tool Tip Auto Adjustment Press Menu Key Figure 7. See ...Table 1 starting on the next page to view a complete list of all of the functions available for the monitor. 3 Press the Menu button once to activate the highlighted function, then follow the Tool Tips to select the function and adjust the value. 4 Use ...
The setting bar moves and the numeric value indicator changes to make necessary adjustments. English 11 Adjusting Your LCD Monitor ON-Screen Display(OSD) Function icons Function name Setting bar AUTO CC AUTO ADJUSTMENT Tool Tip Auto Adjustment Press Menu Key Figure 7. See ...Table 1 starting on the next page to view a complete list of all of the functions available for the monitor. 3 Press the Menu button once to activate the highlighted function, then follow the Tool Tips to select the function and adjust the value. 4 Use ...

User Manual (user Manual) (ver.1.0) (English)
Page 14
Adjusting Your LCD Monitor OSD functions and adjustments Table 1. Brightness PC V1 V2 TV Source PIP Exit Menu SyncMaster 150MB VOL PC V1 V2 TV Source PIP Exit Menu SyncMaster 150MB VOL Image Lock PC V1 V2 TV Source PIP Exit Menu SyncMaster 150MB VOL PC V1 V2 TV Source PIP Exit Menu SyncMaster 150MB VOL Image...
Adjusting Your LCD Monitor OSD functions and adjustments Table 1. Brightness PC V1 V2 TV Source PIP Exit Menu SyncMaster 150MB VOL PC V1 V2 TV Source PIP Exit Menu SyncMaster 150MB VOL Image Lock PC V1 V2 TV Source PIP Exit Menu SyncMaster 150MB VOL PC V1 V2 TV Source PIP Exit Menu SyncMaster 150MB VOL Image...

User Manual (user Manual) (ver.1.0) (English)
Page 15
Use the " " and " " buttons to your monitor to remove any noise. Image lock and position parameters are not obtained using the Fine adjustment, use the Coarse adjustment and ... V1 V2 TV Source PIP Exit Menu SyncMaster 150MB VOL PC V1 V2 TV Source PIP Exit Menu SyncMaster 150MB VOL PC V1 V2 TV Source PIP Exit Menu SyncMaster 150MB VOL PC V1 V2 TV Source PIP Exit Menu SyncMaster 150MB VOL English 13 This function may change the ...;ne tune the image quality of the image. Use the H-Position menu to center the image on the screen. Adjusting Your LCD Monitor Table 1.
Use the " " and " " buttons to your monitor to remove any noise. Image lock and position parameters are not obtained using the Fine adjustment, use the Coarse adjustment and ... V1 V2 TV Source PIP Exit Menu SyncMaster 150MB VOL PC V1 V2 TV Source PIP Exit Menu SyncMaster 150MB VOL PC V1 V2 TV Source PIP Exit Menu SyncMaster 150MB VOL PC V1 V2 TV Source PIP Exit Menu SyncMaster 150MB VOL English 13 This function may change the ...;ne tune the image quality of the image. Use the H-Position menu to center the image on the screen. Adjusting Your LCD Monitor Table 1.

User Manual (user Manual) (ver.1.0) (English)
Page 16
...PIP window position. Redish white. Bluish white. When external A/V devices such as VCR or DVD are connected to the monitor, PIP allows you to bluish white. Enable or disable closed caption feature and set the appearance of color can be changed ...small window superimposed on pc video signal. The individual color components are replaced with the factory default values. Plain white. Resize PIP window. Adjusting Your LCD Monitor Table 1. User customizable. Screen controls (Continued) Icon Menus and Sub-menus Function Descriptions Color n Mode1 n Mode2 n Mode3 n User Mode 1 ...
...PIP window position. Redish white. Bluish white. When external A/V devices such as VCR or DVD are connected to the monitor, PIP allows you to bluish white. Enable or disable closed caption feature and set the appearance of color can be changed ...small window superimposed on pc video signal. The individual color components are replaced with the factory default values. Plain white. Resize PIP window. Adjusting Your LCD Monitor Table 1. User customizable. Screen controls (Continued) Icon Menus and Sub-menus Function Descriptions Color n Mode1 n Mode2 n Mode3 n User Mode 1 ...
User Manual (user Manual) (ver.1.0) (English)
Page 17
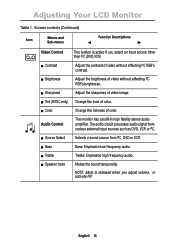
Audio Control The monitor has a built-in high fidelity stereo audio amplifier. n Bass Bass: Emphasize low frequency audio. English 15 n Source Select Selects a sound source from ...) n Contrast Adjust the contrast of video without affecting PC RGB's brightness. n Brightness Adjust the brightness of color. n Treble Treble: Emphasize high frequency audio. Adjusting Your LCD Monitor Table 1. n Sharpness Adjust the sharpness of color. n Color Change the richness of video image. The audio circuit processes audio signal from PC, DVD or VCR.
Audio Control The monitor has a built-in high fidelity stereo audio amplifier. n Bass Bass: Emphasize low frequency audio. English 15 n Source Select Selects a sound source from ...) n Contrast Adjust the contrast of video without affecting PC RGB's brightness. n Brightness Adjust the brightness of color. n Treble Treble: Emphasize high frequency audio. Adjusting Your LCD Monitor Table 1. n Sharpness Adjust the sharpness of color. n Color Change the richness of video image. The audio circuit processes audio signal from PC, DVD or VCR.
User Manual (user Manual) (ver.1.0) (English)
Page 18
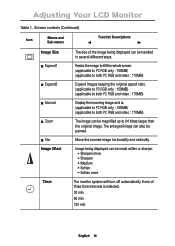
English 16 The enlarged image can be handled in several different ways. Move the zoomed image horizontally and vertically. Adjusting Your LCD Monitor Table 1. Screen controls (Continued) Icon Menus and Sub-menus Function Descriptions Image Size n Expand1 n Expand2 n Normal n Zoom n Pan Image Effect Timer The size... original image. Image being displayed can be panned. Resize the image to fill the whole screen. (applicable to PC RGB only : 150MB) (applicable to both PC RGB and video : 170MB) Expand images keeping the original aspect ratio. (applicable to PC RGB only...
English 16 The enlarged image can be handled in several different ways. Move the zoomed image horizontally and vertically. Adjusting Your LCD Monitor Table 1. Screen controls (Continued) Icon Menus and Sub-menus Function Descriptions Image Size n Expand1 n Expand2 n Normal n Zoom n Pan Image Effect Timer The size... original image. Image being displayed can be panned. Resize the image to fill the whole screen. (applicable to PC RGB only : 150MB) (applicable to both PC RGB and video : 170MB) Expand images keeping the original aspect ratio. (applicable to PC RGB only...
User Manual (user Manual) (ver.1.0) (English)
Page 19
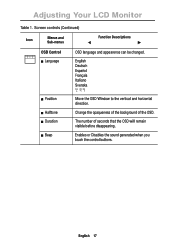
Screen controls (Continued) Icon Menus and Sub-menus Function Descriptions OSD Control n Language OSD language and appearence can be changed. The number of the OSD. Adjusting Your LCD Monitor Table 1. English 17 Change the opaqueness of the background of seconds that the OSD will remain visible before disappearing. Enables or Disables the sound generated when you touch the control buttons. English Deutsch Español Français Italiano Svenska n Position n Halftone n Duration n Beep Move the OSD Window to the vertical and horizontal direction.
Screen controls (Continued) Icon Menus and Sub-menus Function Descriptions OSD Control n Language OSD language and appearence can be changed. The number of the OSD. Adjusting Your LCD Monitor Table 1. English 17 Change the opaqueness of the background of seconds that the OSD will remain visible before disappearing. Enables or Disables the sound generated when you touch the control buttons. English Deutsch Español Français Italiano Svenska n Position n Halftone n Duration n Beep Move the OSD Window to the vertical and horizontal direction.

User Manual (user Manual) (ver.1.0) (English)
Page 22
... customer service, try the suggested actions that the signal cable is off n Ensure that the PC or video sources are appropriate to your LCD monitor, page 5. Table 3. Troubleshooting - n Compare these values with the data in the Display Modes Timing Chart. Contrast, page 12. Vertical... you see... Horizontal bars appear n Adjust the Fine function. " Check Signal Cable" message n Ensure that are turned on . Connecting your LCD monitor, you may be able to n Adjust the Coarse function and flicker, jitter or then adjust the Fine function. Out of Range" message...
... customer service, try the suggested actions that the signal cable is off n Ensure that the PC or video sources are appropriate to your LCD monitor, page 5. Table 3. Troubleshooting - n Compare these values with the data in the Display Modes Timing Chart. Contrast, page 12. Vertical... you see... Horizontal bars appear n Adjust the Fine function. " Check Signal Cable" message n Ensure that are turned on . Connecting your LCD monitor, you may be able to n Adjust the Coarse function and flicker, jitter or then adjust the Fine function. Out of Range" message...
User Manual (user Manual) (ver.1.0) (English)
Page 24
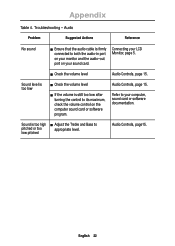
Sound level is too high n Adjust the Treble and Bass to your LCD Monitor, page 5. Refer to pitched or too appropriate level. Sound is too low n Check the volume level Audio Controls, page 15. n If the volume is fi... Actions Reference No sound n Ensure that the audio cable is still too low after turning the control to both the audio-in port on your monitor and the audio-out port on the computer sound card or software program. Connecting your computer, sound card or software documentation.
Sound level is too high n Adjust the Treble and Bass to your LCD Monitor, page 5. Refer to pitched or too appropriate level. Sound is too low n Check the volume level Audio Controls, page 15. n If the volume is fi... Actions Reference No sound n Ensure that the audio cable is still too low after turning the control to both the audio-in port on your monitor and the audio-out port on the computer sound card or software program. Connecting your computer, sound card or software documentation.
User Manual (user Manual) (ver.1.0) (English)
Page 30
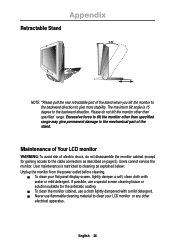
... with water or mild detergent. Maintenance of Your LCD monitor WARNING: To avoid risk of the stand. Users cannot service the monitor. English 28 n To clean your LCD monitor or any other electrical apparatus. Please do not disassemble the monitor cabinet (except for the antistatic coating. n To clean the monitor cabinet, use flammable cleaning material to...
... with water or mild detergent. Maintenance of Your LCD monitor WARNING: To avoid risk of the stand. Users cannot service the monitor. English 28 n To clean your LCD monitor or any other electrical apparatus. Please do not disassemble the monitor cabinet (except for the antistatic coating. n To clean the monitor cabinet, use flammable cleaning material to...


