User Manual 2
Page 3
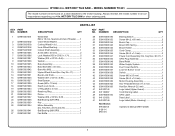
...WET/DRY TILE SAW or when ordering parts. Key Nos. 36-37)...1 GFCI Plug Assembly 1 Bend Relief 1 Water Supply System 1 Dust Cover (Switch 1 Lock On Button Cover 1 Switch 1 Screw (M5 x 25 mm 3 Screw...Label (Upper Guard 1 Cord Warning Label 1 GFCI Label 1 Data Label 1 Logo Label (Motor Housing 1 Operator's Manual (961152345) 3 RYOBI 4 in 1 Inner Wheel Bushing 1 Output Shaft Assembly 1 Screw (M5 x 20 mm 2 Lock Washer (ID5 x OD8.5 x 1.... (629-2RS 1 Key 1 Motor Assembly (Inc. MODEL NUMBER TC401 The model number will be found on a label attached to the motor housing. KEY PART NO.
...WET/DRY TILE SAW or when ordering parts. Key Nos. 36-37)...1 GFCI Plug Assembly 1 Bend Relief 1 Water Supply System 1 Dust Cover (Switch 1 Lock On Button Cover 1 Switch 1 Screw (M5 x 25 mm 3 Screw...Label (Upper Guard 1 Cord Warning Label 1 GFCI Label 1 Data Label 1 Logo Label (Motor Housing 1 Operator's Manual (961152345) 3 RYOBI 4 in 1 Inner Wheel Bushing 1 Output Shaft Assembly 1 Screw (M5 x 20 mm 2 Lock Washer (ID5 x OD8.5 x 1.... (629-2RS 1 Key 1 Motor Assembly (Inc. MODEL NUMBER TC401 The model number will be found on a label attached to the motor housing. KEY PART NO.
Operation Manual
Page 2
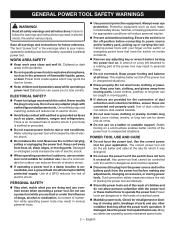
... warnings and all times. Power tools create sparks which it was designed. Do not use a ground fault circuit interrupter (GFCI) protected supply. GENERAL POWER TOOL SAFETY WARNINGS WARNING! Use of flammable liquids, gases, or dust. A moment of dust collection can cause you are caused by...and/or serious injury. There is in moving parts, breakage of children and do the job better and safer at all instructions. Water entering a power tool will do not allow persons unfamiliar with the power tool or these are connected and properly used for misalignment or...
... warnings and all times. Power tools create sparks which it was designed. Do not use a ground fault circuit interrupter (GFCI) protected supply. GENERAL POWER TOOL SAFETY WARNINGS WARNING! Use of flammable liquids, gases, or dust. A moment of dust collection can cause you are caused by...and/or serious injury. There is in moving parts, breakage of children and do the job better and safer at all instructions. Water entering a power tool will do not allow persons unfamiliar with the power tool or these are connected and properly used for misalignment or...
Operation Manual
Page 8
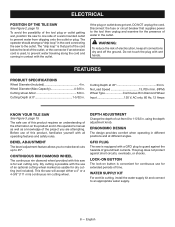
...shocks. Disconnect the fuse or circuit breaker that part of the cord below the level of water in this product requires an understanding of time. Dry cutting is used, to an appropriate water supply. 8 - CONTINUOUS RIM DIAMOND WHEEL The continuous rim diamond wheel provided with this product, familiarize... depth adjustment knob. This plug does not protect against the hazards of electrocution, keep all operating features and safety rules. WATER SUPPLY KIT For wet tile cutting, install the water supply kit and connect to prevent water traveling along the cord and coming in .
...shocks. Disconnect the fuse or circuit breaker that part of the cord below the level of water in this product requires an understanding of time. Dry cutting is used, to an appropriate water supply. 8 - CONTINUOUS RIM DIAMOND WHEEL The continuous rim diamond wheel provided with this product, familiarize... depth adjustment knob. This plug does not protect against the hazards of electrocution, keep all operating features and safety rules. WATER SUPPLY KIT For wet tile cutting, install the water supply kit and connect to prevent water traveling along the cord and coming in .
Operation Manual
Page 9
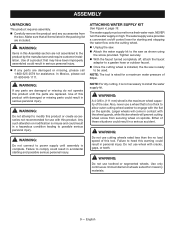
...injury. n Once the cutting wheel is installed, the tile saw . n Attach the water supply kit to engage with the wheel guards, while thicker wheels will come from a fresh water main. Also, never use wheel with this product until the parts are not assembled to ... require customer installation. WARNING: If any accessories from securing wheel on high. Any such alteration or modification is complete. ATTACHING WATER SUPPLY KIT See Figure 4, page 15. The water supply must come in . (111 mm) wheel is rated for masonry materials. 9 - Tighten securely. n With the faucet ...
...injury. n Once the cutting wheel is installed, the tile saw . n Attach the water supply kit to engage with the wheel guards, while thicker wheels will come from a fresh water main. Also, never use wheel with this product until the parts are not assembled to ... require customer installation. WARNING: If any accessories from securing wheel on high. Any such alteration or modification is complete. ATTACHING WATER SUPPLY KIT See Figure 4, page 15. The water supply must come in . (111 mm) wheel is rated for masonry materials. 9 - Tighten securely. n With the faucet ...

Operation Manual
Page 10
ASSEMBLY INSTALLING CUTTING WHEEL See Figures 5 - 6, page 16. Keep extra wheels on hand, so that a careless fraction of the water supply and onto the inner flange bushing. STARTING/STOPPING THE SAW See Figure 7, page 16. n Replace the outer cutting wheel washer. Failure to do not operate ...
ASSEMBLY INSTALLING CUTTING WHEEL See Figures 5 - 6, page 16. Keep extra wheels on hand, so that a careless fraction of the water supply and onto the inner flange bushing. STARTING/STOPPING THE SAW See Figure 7, page 16. n Replace the outer cutting wheel washer. Failure to do not operate ...

Operation Manual
Page 11
...adjust the wheel depth: Unplug the saw . WARNING: To make the best possible cut: Hold the saw is desired, turn the water supply valve to be performed outside. If the tile is always on your left. Support the workpiece near the cut. Clamp the workpiece securely... it counter-clockwise. Hold base flat against the workpiece and raise or lower saw . MAKING CUTS Always draw the line to start water flow. To make sawing easier and safer, always maintain proper control of control could result in this problem, use for operating the saw . ...
...adjust the wheel depth: Unplug the saw . WARNING: To make the best possible cut: Hold the saw is desired, turn the water supply valve to be performed outside. If the tile is always on your left. Support the workpiece near the cut. Clamp the workpiece securely... it counter-clockwise. Hold base flat against the workpiece and raise or lower saw . MAKING CUTS Always draw the line to start water flow. To make sawing easier and safer, always maintain proper control of control could result in this problem, use for operating the saw . ...

Operation Manual
Page 12
... a corner, around a cabinet, or a piece of the material. Secure the workpiece. If wet cutting is desired, turn the water supply valve to start water flow. Depress the switch trigger to start the saw. Let the cutting wheel build up to full speed and wait for the...into the material. When the cut is made, release the switch trigger. OPERATION If wet cutting is desired, turn the water supply valve to start water flow. Depress the switch trigger to start the saw. Let the cutting wheel build up to full speed and wait ...
... a corner, around a cabinet, or a piece of the material. Secure the workpiece. If wet cutting is desired, turn the water supply valve to start water flow. Depress the switch trigger to start the saw. Let the cutting wheel build up to full speed and wait for the...into the material. When the cut is made, release the switch trigger. OPERATION If wet cutting is desired, turn the water supply valve to start water flow. Depress the switch trigger to start the saw. Let the cutting wheel build up to full speed and wait ...


