Ryobi P600 Support and Manuals
Get Help and Manuals for this Ryobi item
Popular Ryobi P600 Manual Pages
English Manual - Page 1

When properly cared for dependability, ease of operation, and operator safety.
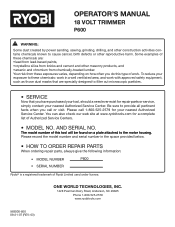
OPERATOR'S MANUAL
18 volt trimmer
P600
batterIES and chargerS sold Separately
Your trimmer has been engineered and manufactured to our high standard for , it will give you for your purchase.
SAVE THIS MANUAL FOR FUTURE REFERENCE WARNING: To reduce the risk of injury, the user...
English Manual - Page 3
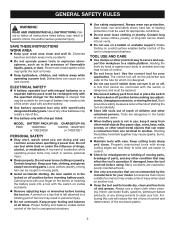
... tool serviced before inserting battery pack. Following this rule will do the job better and safer at all times.
ELECTRICAL SAFETY
A battery operated tool with your application. MODEL BATTERY PACK (P100) CHARGER (P110)
P600
130255004
1423701, 140237023
or 130224028
or 140237021
PERSONAL SAFETY
Stay alert, watch what you to lose control. Contain...
English Manual - Page 7

... a potentially hazardous situation, which , if not avoided, could result in property damage. SAVE THESE INSTRUCTIONS
For service we suggest you read thoroughly and understand completely the operator's manual. We recommend Wide Vision Safety Mask for use only identical replacement parts.
WARNING:
To avoid serious personal injury, do not attempt to your eyes, which can result...
English Manual - Page 9
...
PACKING LIST
Laminate Trimmer
Collet/Latch Adjustment Wrench
Lanyard (not included...parts are missing do so could result in combo)
Operator's Manual
WARNING:
If any parts are replaced. WARNING:
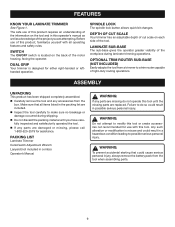
Do not attempt to make sure no breakage or damage occurred during laminate...LAMINATE TRIMMER
See Figure 1. SPINDLE LOCK
The spindle lock button allows quick bit changes.
OPTIONAL TRIM ROUTER SUB-BASE (...
English Manual - Page 10
... lock button and continue tightening the collet nut with 1/4 in a counterclockwise direction.
NOTE: Replace the base before using the trimmer. WARNING:
If you are changing a bit immediately after loosening the collet nut. Always use , be installed once the collet nut is machined to precision tolerances to operate the trimmer without the base installed. If changing bits, the bit will...
English Manual - Page 11

...When battery pack is inserted into your nearest Ryobi Authorized Service Center for electrical check.
Charge...or charger is normal and does not indicate a problem.
Do not place the charger and battery...woodworking sub-base with handles, this tool are charged. CHARGING THE BATTERY PACK
Battery packs for the following purposes: Smooth, professional trimming of laminates...
English Manual - Page 12
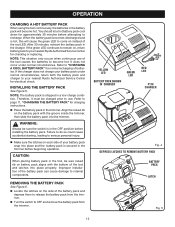
... is in the trimmer. Failure to do so could cause accidental starting, leading to internal components.
Improper installation of the battery pack can cause damage to serious personal injury. If the green LED continues to remain on, return battery pack to your nearest Ryobi Authorized Service Center for checking or replacing.
It does not...
English Manual - Page 14
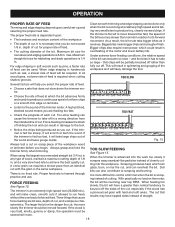
... of your set . OPERATION
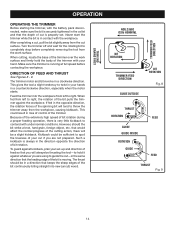
OPERATING THE TRIMMER
Before starting the trimmer, with the workpiece.
If fed in your hand. The thrust should the bit strike a knot, hard grain, foreign object, etc. When cutting, locate the base of the trimmer with under normal conditions. trim end grains first
trimmer feed direction
bit rotation
trimmer feed direction
GUIDE OUTSIDE
bit...
English Manual - Page 16
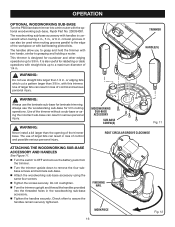
...Ryobi Part No. 200334001. It is convenient when routing 4 in., 5 in., or 6 in . n Tighten the screws securely. WARNING:
Never install a bit larger than 3/8 in the woodworking sub-base
accessory.
1 3/14/12/4
n Tighten the handles securely. Do not overtighten. circular grooves. n Turn the trimmer upright and thread the handles provided
finishing nail
R3
R2 1 2
R2
into a trim router...
English Manual - Page 17
...
R2 1 2
R2
1 3/14/12/4
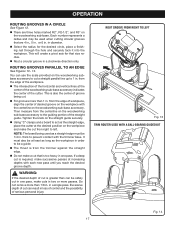
Fig. 13 TRIM ROUTER USED WITH A BALL-BEARING GUIDED BIT
Fig. 14 17 WARNING:
If the desired depth of the cutter. n Using "C" clamps and a board to act as the straight edge, place the cutter at the desired position on the woodworking subbase accessory to cut is from right to prevent...
English Manual - Page 18
...than normal in . The proper feed rate is dependent upon careful set-up and selecting the proper feed rate. For edge shaping in...wood and leave gouge marks. Fig. 15
Always test a cut on laminate.
• Listen to the tool. and a very slow feed ... and will help you do not exceed 1/8 in relation to control a trimmer when the bit is learned through practice and use.
Proper feed...
English Manual - Page 20
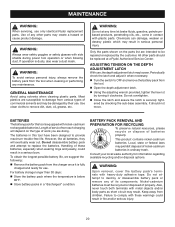
...checking the sub-base assembly. n...service from the charger once it when necessary.
BATTERIES
The battery pack for information regarding available recycling and/or disposal options.
Local, state or federal laws may result in fire and/or serious injury.
20 It should be repaired or replaced by their use only identical Ryobi replacement parts...provide maximum trouble-free ...
English Manual - Page 22
..., always give the following information:
• MODEL NUMBER
P600
• SERIAL NUMBER
Ryobi® is a registered trademark of Authorized Service Centers.
• MODEL NO. You can also check our web site at www.ryobitools.com for repair parts or service, simply contact your exposure to these chemicals are: • lead from lead-based paints, • crystalline silica from bricks...
Repair Sheet - Page 3
...
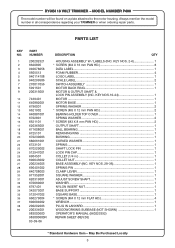
342073001
BASE SUPPORT 1
35
512047002
SQUARE BASE 1
36
660279004
* SCREW (M4 X 12 mm FLAT HD 4
37
690604002
WRENCH 1
38
200292003
PLUG IN LANYARD 1
39
200334001
WOODWORKING SUBBASE (NOT SHOWN 1
983000600
OPERATOR'S MANUAL (960223392)
983000600R
REPAIR SHEET (REV:03)
03-09-06
* Standard Hardware Item - Always mention the model number in 1
26
690043002
COLLET NUT...
Repair Sheet - Page 4
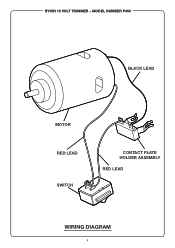
MODEL NUMBER P600
BLACK LEAD
MOTOR
RED LEAD SWITCH
CONTACT PLATE HOLDER ASSEMBLY
RED LEAD
WIRING DIAGRAM
4 RYOBI 18 VOLT TRIMMER -
Ryobi P600 Reviews
We have not received any reviews for Ryobi yet.