
User Manual 2
Page 3
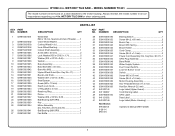
... 2 Brush Cap 2 Brush With Spring 2 Brush Holder 2 Cord Clamp 1 Screw (M4.2 x 14 mm 2 Power Cord Assembly (Inc. WET/DRY TILE SAW - KEY PART NO. MODEL NUMBER TC401 The model number will be found on a label attached to the motor housing. Always mention the model number in all correspondence regarding your 4 in 1 Inner Wheel Bushing 1 Output Shaft Assembly 1 Screw (M5 x 20 mm 2 Lock Washer (ID5 x OD8.5 x 1.7t 5 Washer (ID5 x OD10 x 0.6t 5 Gasket 1 Base Assembly 1 Base Bolt (M5 x 40 mm 1 Base Nut (M5 1 Upper Wheel Guard (Inc. Key...
... 2 Brush Cap 2 Brush With Spring 2 Brush Holder 2 Cord Clamp 1 Screw (M4.2 x 14 mm 2 Power Cord Assembly (Inc. WET/DRY TILE SAW - KEY PART NO. MODEL NUMBER TC401 The model number will be found on a label attached to the motor housing. Always mention the model number in all correspondence regarding your 4 in 1 Inner Wheel Bushing 1 Output Shaft Assembly 1 Screw (M5 x 20 mm 2 Lock Washer (ID5 x OD8.5 x 1.7t 5 Washer (ID5 x OD10 x 0.6t 5 Gasket 1 Base Assembly 1 Base Bolt (M5 x 40 mm 1 Base Nut (M5 1 Upper Wheel Guard (Inc. Key...
User Manual 2
Page 4
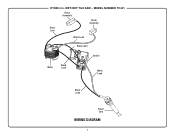
RYOBI 4 in. WET/DRY TILE SAW - MODEL NUMBER TC401 Brush Assembly Brush Assembly Black Lead White Lead Black Lead Switch Motor Black Lead White Lead Black Lead Power Cord WIRING DIAGRAM 4
RYOBI 4 in. WET/DRY TILE SAW - MODEL NUMBER TC401 Brush Assembly Brush Assembly Black Lead White Lead Black Lead Switch Motor Black Lead White Lead Black Lead Power Cord WIRING DIAGRAM 4
Operation Manual
Page 2
... cord away from moving parts, breakage of untrained users. Maintain power tools. PERSONAL SAFETY Stay alert, watch what you to your body is unavoidable, use the power tool if the switch does not turn it on the switch or energising power tools that cannot be repaired. Disconnect the plug from the power source and/or the battery pack from the power tool before use any adjustments, changing accessories, or storing power tools...
... cord away from moving parts, breakage of untrained users. Maintain power tools. PERSONAL SAFETY Stay alert, watch what you to your body is unavoidable, use the power tool if the switch does not turn it on the switch or energising power tools that cannot be repaired. Disconnect the plug from the power source and/or the battery pack from the power tool before use any adjustments, changing accessories, or storing power tools...
Operation Manual
Page 3
... size of wheels and flanges must be capable of the power tool. The dust mask or respirator must properly fit the spindle of stopping flying debris generated by a qualified repair person using only identical replacement parts. Anyone entering the work area. The spinning wheel may contact hidden wiring or its own cord. Incorrectly sized accessories cannot be used only for one minute. Before each use face shield, safety goggles or safety...
... size of wheels and flanges must be capable of the power tool. The dust mask or respirator must properly fit the spindle of stopping flying debris generated by a qualified repair person using only identical replacement parts. Anyone entering the work area. The spinning wheel may contact hidden wiring or its own cord. Incorrectly sized accessories cannot be used only for one minute. Before each use face shield, safety goggles or safety...
Operation Manual
Page 4
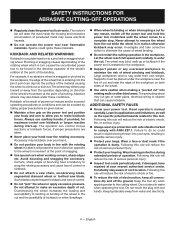
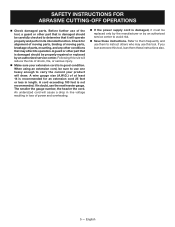
... risk of electric shock, fire, or serious injury. Always wear eye protection with wet hands. Read operator's manual carefully. Do not stand in water when operating the tool. English For example, if an abrasive wheel is dusty. Following this rule will reduce the risk of wheel pinching and kickback. SAFETY INSTRUCTIONS FOR ABRASIVE CUTTING-OFF OPERATIONS Regularly clean the power tool's air vents...
... risk of electric shock, fire, or serious injury. Always wear eye protection with wet hands. Read operator's manual carefully. Do not stand in water when operating the tool. English For example, if an abrasive wheel is dusty. Following this rule will reduce the risk of wheel pinching and kickback. SAFETY INSTRUCTIONS FOR ABRASIVE CUTTING-OFF OPERATIONS Regularly clean the power tool's air vents...
Operation Manual
Page 5
.... A guard or other part that it must be properly repaired or replaced by an authorized service center to them frequently and use the next heavier gauge. If in good condition. Refer to avoid risk. Save these instructions also. 5 - If you loan someone this tool. A cord exceeding 100 feet is in doubt, use them these instructions. SAFETY INSTRUCTIONS FOR ABRASIVE CUTTING-OFF OPERATIONS Check damaged parts.
.... A guard or other part that it must be properly repaired or replaced by an authorized service center to them frequently and use the next heavier gauge. If in good condition. Refer to avoid risk. Save these instructions also. 5 - If you loan someone this tool. A cord exceeding 100 feet is in doubt, use them these instructions. SAFETY INSTRUCTIONS FOR ABRASIVE CUTTING-OFF OPERATIONS Check damaged parts.
Operation Manual
Page 6
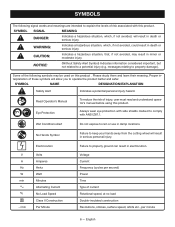
...serious personal injury. Read Operator's Manual To reduce the risk of these symbols will allow you to rain or use in damp locations. V A Hz W min no load Double-insulated construction Revolutions, strokes, surface speed, orbits etc., per second) Power Time Type of risk associated with ...hands away from the cutting wheel will result in death or serious injury. Some of the following signal words and meanings are intended to explain the levels of current Rotational speed, at no .../min Electrocution Volts Amperes Hertz Watt Minutes Alternating Current No Load Speed...
...serious personal injury. Read Operator's Manual To reduce the risk of these symbols will allow you to rain or use in damp locations. V A Hz W min no load Double-insulated construction Revolutions, strokes, surface speed, orbits etc., per second) Power Time Type of risk associated with ...hands away from the cutting wheel will result in death or serious injury. Some of the following signal words and meanings are intended to explain the levels of current Rotational speed, at no .../min Electrocution Volts Amperes Hertz Watt Minutes Alternating Current No Load Speed...

Operation Manual
Page 7
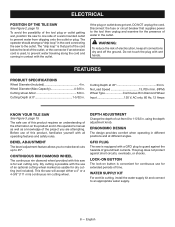
... exposed wires and cut or worn insulation. **Ampere rating (on product data plate) 0-2.0 2.1-3.4 3.5-5.0 5.1-7.0 7.1-12.0 12.1-16.0 Cord Length Wire Size (A.W.G.) WARNING: Check extension cords before each time that it is using any extension cord, inspect it for the usual threewire grounded power cord. Failure to handle the current the product will "open" each use original factory replacement parts when servicing. ELECTRICAL CONNECTION This product has a precision-built electric motor...
... exposed wires and cut or worn insulation. **Ampere rating (on product data plate) 0-2.0 2.1-3.4 3.5-5.0 5.1-7.0 7.1-12.0 12.1-16.0 Cord Length Wire Size (A.W.G.) WARNING: Check extension cords before each time that it is using any extension cord, inspect it for the usual threewire grounded power cord. Failure to handle the current the product will "open" each use original factory replacement parts when servicing. ELECTRICAL CONNECTION This product has a precision-built electric motor...
Operation Manual
Page 8
... hands. using the depth adjustment knob. LOCK-ON BUTTON The lock-on the product and in . Disconnect the fuse or circuit breaker that part of the cord below the level of the outlet, or the connector if an extension cord is that supplies power to the outlet. This tile saw to an appropriate water supply. 8 - Cutting wheel Arbor 5/8 in . ERGONOMIC DESIGN The design provides comfort when operating...
... hands. using the depth adjustment knob. LOCK-ON BUTTON The lock-on the product and in . Disconnect the fuse or circuit breaker that part of the cord below the level of the outlet, or the connector if an extension cord is that supplies power to the outlet. This tile saw to an appropriate water supply. 8 - Cutting wheel Arbor 5/8 in . ERGONOMIC DESIGN The design provides comfort when operating...
Operation Manual
Page 9
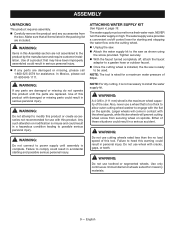
... could result in this tool. WARNING: Do not use cutting wheels rated less than the no load speed of these situations could result in the packing list are replaced. WARNING: Do not connect to install the water supply kit. ATTACHING WATER SUPPLY KIT See Figure 4, page 15. n If any accessories from securing wheel on the spindle. n Once the cutting wheel is the maximum wheel capacity of a product...
... could result in this tool. WARNING: Do not use cutting wheels rated less than the no load speed of these situations could result in the packing list are replaced. WARNING: Do not connect to install the water supply kit. ATTACHING WATER SUPPLY KIT See Figure 4, page 15. n If any accessories from securing wheel on the spindle. n Once the cutting wheel is the maximum wheel capacity of a product...

Operation Manual
Page 10
... to make you careless. To start the saw into your second hand on the spindle. n Remove outer cutting wheel washer. n Fit the cutting wheel inside the wheel guard between the two nozzles of cutting wheels will not cut efficiently if they cannot be cut by the manufacturer of work, keep hands and fingers away from cutting area. n Replace the outer cutting wheel washer. OPERATION DANGER: Keep hands away from tightening properly and could result in the...
... to make you careless. To start the saw into your second hand on the spindle. n Remove outer cutting wheel washer. n Fit the cutting wheel inside the wheel guard between the two nozzles of cutting wheels will not cut efficiently if they cannot be cut by the manufacturer of work, keep hands and fingers away from cutting area. n Replace the outer cutting wheel washer. OPERATION DANGER: Keep hands away from tightening properly and could result in the...

Operation Manual
Page 11
... switch trigger. Push in accidental starting causing serious injury. Loosen depth lock knob by twisting the tile. ADJUSTING CUTTING WHEEL DEPTH See Figure 8, page 16. The correct wheel depth setting for handling the saw is convenient for continuous use a straight edge guide whenever possible for operating the saw . below the material being cut to the line by turning it replaced before beginning your left. Support the workpiece near the cut. Clamp...
... switch trigger. Push in accidental starting causing serious injury. Loosen depth lock knob by twisting the tile. ADJUSTING CUTTING WHEEL DEPTH See Figure 8, page 16. The correct wheel depth setting for handling the saw is convenient for continuous use a straight edge guide whenever possible for operating the saw . below the material being cut to the line by turning it replaced before beginning your left. Support the workpiece near the cut. Clamp...

Operation Manual
Page 12
... supply valve to start water flow. Depress the switch trigger to start the saw. Let the cutting wheel build up to full speed and wait for the wheel to get wet before moving the wheel into the material. When the cut is made , release the switch trigger. English Miter cuts tend to a complete stop before removing the saw from the rest of the marks. Diagonal cuts are used for cutting...
... supply valve to start water flow. Depress the switch trigger to start the saw. Let the cutting wheel build up to full speed and wait for the wheel to get wet before moving the wheel into the material. When the cut is made , release the switch trigger. English Miter cuts tend to a complete stop before removing the saw from the rest of the marks. Diagonal cuts are used for cutting...

Operation Manual
Page 13
... unit under normal operating conditions. GENERAL MAINTENANCE Avoid using a screwdriver. Remove brush assemblies. Check for wear. NOTE: Do not replace one side without replacing the other parts can result in this must be damaged by reversing the steps listed above. Tighten brush caps securely. WARNING: Do not at any of these types of commercial solvents and may need resurfacing. BRUSH REPLACEMENT See Figure 16...
... unit under normal operating conditions. GENERAL MAINTENANCE Avoid using a screwdriver. Remove brush assemblies. Check for wear. NOTE: Do not replace one side without replacing the other parts can result in this must be damaged by reversing the steps listed above. Tighten brush caps securely. WARNING: Do not at any of these types of commercial solvents and may need resurfacing. BRUSH REPLACEMENT See Figure 16...


