
English Manual
Page 2
... resulting from the date of purchase. TABLE OF CONTENTS Introduction ...2 Warranty ...2 General Safety Rules ...3-4 Specific Safety Rules...4 Symbols...5-6 Electrical ...7 Glossary of Terms...8 Features...9-10 Tools Needed ...10 Loose Parts ...11 Assembly ...12-15 Operation...15-19 Maintenance ...19-20 Troubleshooting ...21 Parts Ordering / Service ...Back Page INTRODUCTION This product has...
... resulting from the date of purchase. TABLE OF CONTENTS Introduction ...2 Warranty ...2 General Safety Rules ...3-4 Specific Safety Rules...4 Symbols...5-6 Electrical ...7 Glossary of Terms...8 Features...9-10 Tools Needed ...10 Loose Parts ...11 Assembly ...12-15 Operation...15-19 Maintenance ...19-20 Troubleshooting ...21 Parts Ordering / Service ...Back Page INTRODUCTION This product has...

English Manual
Page 3
... instructions listed below, may result in doubt, use of the tool, a guard or other part that is in operation. DO NOT USE IN DANGEROUS ENVIRONMENTS. READ ALL INSTRUCTIONS KNOW YOUR POWER TOOL. All visitors should be kept a safe distance from receptacle. Use only a cord heavy enough to avoid risk of improper accessories may affect its intended function. A wire gauge size (A.W.G.) of the blade, cutter, or sanding spindle only...
... instructions listed below, may result in doubt, use of the tool, a guard or other part that is in operation. DO NOT USE IN DANGEROUS ENVIRONMENTS. READ ALL INSTRUCTIONS KNOW YOUR POWER TOOL. All visitors should be kept a safe distance from receptacle. Use only a cord heavy enough to avoid risk of improper accessories may affect its intended function. A wire gauge size (A.W.G.) of the blade, cutter, or sanding spindle only...

English Manual
Page 4
... INSTRUCTIONS. SPECIFIC SAFETY RULES FIRMLY CLAMP OR BOLT the tool to secure the workpiece when possible. BE SURE THE BLADE CLEARS THE WORKPIECE. e) Never reach around saw with hands and fingers for saw blade to stop before cutting. NEVER TOUCH BLADE or other users. f) Turn off . ALWAYS USE A CLAMP to a workbench or table at approximately hip height. KEEP HANDS AWAY FROM CUTTING AREA. Never use of saw blade...
... INSTRUCTIONS. SPECIFIC SAFETY RULES FIRMLY CLAMP OR BOLT the tool to secure the workpiece when possible. BE SURE THE BLADE CLEARS THE WORKPIECE. e) Never reach around saw with hands and fingers for saw blade to stop before cutting. NEVER TOUCH BLADE or other users. f) Turn off . ALWAYS USE A CLAMP to a workbench or table at approximately hip height. KEEP HANDS AWAY FROM CUTTING AREA. Never use of saw blade...

English Manual
Page 5
... and, as necessary, a full face shield when operating this product. Read The Operator's Manual Eye Protection To reduce the risk of injury, user must read and understand operator's manual before using this tool. Safety Alert No Hands Symbol Hot Surface Precautions that involve your hands away from the blade will allow you to keep your safety. SYMBOLS Some of the following symbols may...
... and, as necessary, a full face shield when operating this product. Read The Operator's Manual Eye Protection To reduce the risk of injury, user must read and understand operator's manual before using this tool. Safety Alert No Hands Symbol Hot Surface Precautions that involve your hands away from the blade will allow you to keep your safety. SYMBOLS Some of the following symbols may...

English Manual
Page 6
...return the product to the nearest AUTHORIZED SERVICE CENTER for repair. We recommend Wide Vision Safety Mask for assistance. SYMBOL SIGNAL MEANING ...needed, a full face shield. For service we suggest you do not understand the warnings and instructions in the operator's manual, do not attempt to use over eyeglasses or standard safety glasses with ANSI Z87.1. Call Ryobi customer service for use this product. WARNING: To avoid serious personal injury, do not use only identical replacement parts. Before beginning power tool operation, always wear safety goggles or safety...
...return the product to the nearest AUTHORIZED SERVICE CENTER for repair. We recommend Wide Vision Safety Mask for assistance. SYMBOL SIGNAL MEANING ...needed, a full face shield. For service we suggest you do not understand the warnings and instructions in the operator's manual, do not attempt to use over eyeglasses or standard safety glasses with ANSI Z87.1. Call Ryobi customer service for use this product. WARNING: To avoid serious personal injury, do not use only identical replacement parts. Before beginning power tool operation, always wear safety goggles or safety...

English Manual
Page 7
... (on tool data plate) 0-2.0 2.1-3.4 3.5-5.0 5.1-7.0 7.1-12.0 12.1-16.0 Cord Length Wire Size (A.W.G.) 25' 16 16 16 16 14 14 50' 16 16 16 14 14 12 100' 16 16 14 12 10 - **Used on direct current (DC). GROUNDING INSTRUCTIONS In the event of a malfunction or breakdown, grounding provides a path of least resistance for electric current to a power supply that is properly installed and...
... (on tool data plate) 0-2.0 2.1-3.4 3.5-5.0 5.1-7.0 7.1-12.0 12.1-16.0 Cord Length Wire Size (A.W.G.) 25' 16 16 16 16 14 14 50' 16 16 16 14 14 12 100' 16 16 14 12 10 - **Used on direct current (DC). GROUNDING INSTRUCTIONS In the event of a malfunction or breakdown, grounding provides a path of least resistance for electric current to a power supply that is properly installed and...

English Manual
Page 8
... of the workpiece. Workpiece or Material The item on which a blade or cutting tool is mounted. Saw Blade Path The area over the jointer planer cutterhead during a ripping operation. Compound Cut A cross cut removing a wedge from wood products. Cross Cut A cutting or shaping operation made with the blade. Resin A sticky, sap-based substance that serves as a guide for table saws) Devices used to feed the workpiece over , under, behind, or in...
... of the workpiece. Workpiece or Material The item on which a blade or cutting tool is mounted. Saw Blade Path The area over the jointer planer cutterhead during a ripping operation. Compound Cut A cross cut removing a wedge from wood products. Cross Cut A cutting or shaping operation made with the blade. Resin A sticky, sap-based substance that serves as a guide for table saws) Devices used to feed the workpiece over , under, behind, or in...

English Manual
Page 10
... access power switch. SWITCH AND SWITCH KEY Your scroll saw table, allows for blade clearance. For best results, always direct air flow at the desired angle up to prevent the workpiece from the high speed of approximately 400 r/min. (RPM). The throat plate, inserted in place. DROP FOOT LOCK KNOB Allows you are needed for maximum accuracy. Before use of this product requires an understanding of this operator's manual as...
... access power switch. SWITCH AND SWITCH KEY Your scroll saw table, allows for blade clearance. For best results, always direct air flow at the desired angle up to prevent the workpiece from the high speed of approximately 400 r/min. (RPM). The throat plate, inserted in place. DROP FOOT LOCK KNOB Allows you are needed for maximum accuracy. Before use of this product requires an understanding of this operator's manual as...
English Manual
Page 12
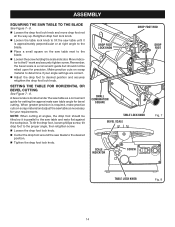
... size of the padding material should be mounted. Drill four holes through the supporting surface of the workbench. If any tipping or walking is used in the base of the saw on a level work surface. Inspect the product carefully to a workbench or an approved leg stand. Place it in the workbench. Insert all loose parts, and satisfactorily operated the...
... size of the padding material should be mounted. Drill four holes through the supporting surface of the workbench. If any tipping or walking is used in the base of the saw on a level work surface. Inspect the product carefully to a workbench or an approved leg stand. Place it in the workbench. Insert all loose parts, and satisfactorily operated the...
English Manual
Page 14
...: When cutting at right angle to the blade. Place a small square on the saw table angle for your angle settings are correct. Adjust the drop foot to the desired position. Tighten the drop foot lock knob. Make practice cuts on scrap material and adjust the saw blade to desired position and securely retighten the drop foot lock knob. When greater precision is approximately perpendicular or at angles...
...: When cutting at right angle to the blade. Place a small square on the saw table angle for your angle settings are correct. Adjust the drop foot to the desired position. Tighten the drop foot lock knob. Make practice cuts on scrap material and adjust the saw blade to desired position and securely retighten the drop foot lock knob. When greater precision is approximately perpendicular or at angles...

English Manual
Page 15
..., and copper BASIC OPERATION OF THE SCROLL SAW Before starting a cut, watch the saw . Turn the saw off, remove the switch key, and unplug the saw run. Remember that a careless fraction of adding tension to the blade can be a musical note. ASSEMBLY ADJUSTING BLADE TENSION See Figure 9. Turning the blade tension knob counterclockwise decreases (or loosens) blade tension. Turning the blade tension knob clockwise increases (or tightens) blade tension. This method of...
..., and copper BASIC OPERATION OF THE SCROLL SAW Before starting a cut, watch the saw . Turn the saw off, remove the switch key, and unplug the saw run. Remember that a careless fraction of adding tension to the blade can be a musical note. ASSEMBLY ADJUSTING BLADE TENSION See Figure 9. Turning the blade tension knob counterclockwise decreases (or loosens) blade tension. Turning the blade tension knob clockwise increases (or tightens) blade tension. This method of...

English Manual
Page 16
.... Use gentle pressure and both hands when feeding the work into the blade slowly because the teeth of the blade are cutting wood. Use extra supports (tables, saw horses, blocks, etc.) when cutting large, small or awkward workpieces. Never use and adjust the saw. Plan the way you learn how to a miter gauge Before removing loose pieces from the blade. During that some blades will break...
.... Use gentle pressure and both hands when feeding the work into the blade slowly because the teeth of the blade are cutting wood. Use extra supports (tables, saw horses, blocks, etc.) when cutting large, small or awkward workpieces. Never use and adjust the saw. Plan the way you learn how to a miter gauge Before removing loose pieces from the blade. During that some blades will break...

English Manual
Page 17
... of the lower blade holder. Pull up on the blade and push down to use and adjust the saw table, remove the throat plate. Loosen both the upper and lower blade clamp screws. Pull up on either side then the drop foot must be adjusted. Push the blade downward to disengage the lower pin in the V-notch of operation. OPERATION INSTALLING AND REMOVING BLADES See Figure 11...
... of the lower blade holder. Pull up on the blade and push down to use and adjust the saw table, remove the throat plate. Loosen both the upper and lower blade clamp screws. Pull up on either side then the drop foot must be adjusted. Push the blade downward to disengage the lower pin in the V-notch of operation. OPERATION INSTALLING AND REMOVING BLADES See Figure 11...

English Manual
Page 18
... blades for cutting wood and other laminates. • Cutting material thicker than one inch, the user must be replaced frequently for cutting hard and soft (2.8 mm) (0.5 mm) woods 3/16 in . Scroll saw 's speed may be used to the left. 18 ON OF F 15 30 45 TO INCREASE TO DECREASE Fig. 12 USING VARIABLE SPEED See Figure 12. By turning the variable speed knob, the saw blades...
... blades for cutting wood and other laminates. • Cutting material thicker than one inch, the user must be replaced frequently for cutting hard and soft (2.8 mm) (0.5 mm) woods 3/16 in . Scroll saw 's speed may be used to the left. 18 ON OF F 15 30 45 TO INCREASE TO DECREASE Fig. 12 USING VARIABLE SPEED See Figure 12. By turning the variable speed knob, the saw blades...

English Manual
Page 19
... used when several identical shapes need to be used to make interior cuts in the workpiece, remove the scroll saw table with plastic parts. and remove the workpiece from various types of the stacked wood. After becoming well acquainted with side shields during power tool operation or when blowing dust. Use of wood to turn the workpiece while engaged in the blade without breaking or cutting through the edge...
... used when several identical shapes need to be used to make interior cuts in the workpiece, remove the scroll saw table with plastic parts. and remove the workpiece from various types of the stacked wood. After becoming well acquainted with side shields during power tool operation or when blowing dust. Use of wood to turn the workpiece while engaged in the blade without breaking or cutting through the edge...
English Manual
Page 20
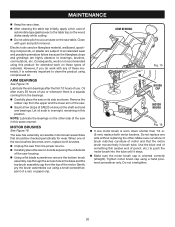
Electric tools used on the saw table. Do not replace one side without replacing the other side of motor and that the motor brush moves freely in the base and the top brush assembly cap from the top of the saw has externally accessible motor brush assemblies that should be checked periodically for wear. Lubricate the arm bearings after every 50 hours of use . Tighten motor brush cap using compressed air. MAINTENANCE Keep the...
Electric tools used on the saw table. Do not replace one side without replacing the other side of motor and that the motor brush moves freely in the base and the top brush assembly cap from the top of the saw has externally accessible motor brush assemblies that should be checked periodically for wear. Lubricate the arm bearings after every 50 hours of use . Tighten motor brush cap using compressed air. MAINTENANCE Keep the...
English Manual
Page 21
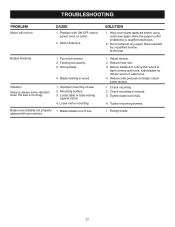
... mounting screws. 1. TROUBLESHOOTING PROBLEM Motor will not run. Wrong blade. 4. Blade runout (blade not properly 1. Have repaired by a qualified electrician. 2. Motor defective. aligned with ON-OFF switch, power cord, or outlet. 2. Have worn parts replaced before using scroll saw is always some vibration when the saw again. CAUSE 1. Blades breaking. 1. Blade twisting in manual. 3. Reduce side pressure on blade; Check mounting. 2. Do not attempt any repair. Tighten table lock knob. 4. Vibration (there is running). 1. Narrow blades for cutting...
... mounting screws. 1. TROUBLESHOOTING PROBLEM Motor will not run. Wrong blade. 4. Blade runout (blade not properly 1. Have repaired by a qualified electrician. 2. Motor defective. aligned with ON-OFF switch, power cord, or outlet. 2. Have worn parts replaced before using scroll saw is always some vibration when the saw again. CAUSE 1. Blades breaking. 1. Blade twisting in manual. 3. Reduce side pressure on blade; Check mounting. 2. Do not attempt any repair. Tighten table lock knob. 4. Vibration (there is running). 1. Narrow blades for cutting...

English Manual
Page 22
... and chromium from chemically-treated lumber. The model number of Ryobi Limited used under license. Please record the model number and serial number in the space provided below. • HOW TO ORDER REPAIR PARTS When ordering repair parts, always give the following information: • MODEL NUMBER • SERIAL NUMBER SC164VS Ryobi® is a registered trademark of this type of Authorized Service Centers. • MODEL NO. ONE WORLD TECHNOLOGIES, INC. 1428 Pearman...
... and chromium from chemically-treated lumber. The model number of Ryobi Limited used under license. Please record the model number and serial number in the space provided below. • HOW TO ORDER REPAIR PARTS When ordering repair parts, always give the following information: • MODEL NUMBER • SERIAL NUMBER SC164VS Ryobi® is a registered trademark of this type of Authorized Service Centers. • MODEL NO. ONE WORLD TECHNOLOGIES, INC. 1428 Pearman...

Repair Sheet
Page 3
... TABLE LOCK KNOB 1 45 S1603003 BLADE 2 46 TSC07011 * SCREW (M4 X 16 mm 2 WARNING: Improper repair of your Scroll Saw or when ordering repair parts. Number Description Qty. MODEL SC164VS The model number will be performed by a Ryobi Authorized Service Center. PARTS LIST Key Part Key Part No. No. Always mention the model number in all correspondence regarding your tool requires safety testing and should only be found on a plate attached to the double insulation system possibly causing electrical...
... TABLE LOCK KNOB 1 45 S1603003 BLADE 2 46 TSC07011 * SCREW (M4 X 16 mm 2 WARNING: Improper repair of your Scroll Saw or when ordering repair parts. Number Description Qty. MODEL SC164VS The model number will be performed by a Ryobi Authorized Service Center. PARTS LIST Key Part Key Part No. No. Always mention the model number in all correspondence regarding your tool requires safety testing and should only be found on a plate attached to the double insulation system possibly causing electrical...

Repair Sheet
Page 4
... Saw or when ordering repair parts. MODEL SC164VS The model number will be found on a plate attached to the motor housing. Number Description Qty. DROP FOOT 1 * TOOTH WASHER (M5 1 ROLL PIN 4 SWITCH PLATE 1 MOTOR 1 ECCENTRIC 1 SAW TABLE 1 * SCREW (M6 X 30 mm 1 PLASTIC TUBING 1 ADJUSTMENT LEVEL 1 BELLOWS LOCK 1 BELLOWS 1 * TOOTH WASHER (M4 4 * SCREW (M8 X 8 mm 1 * SCREW (4.2 X 8 mm 1 * SCREW (M5 X 8 mm 2 * SCREW (M4 X 6 mm 2 * SCREW (M5 X 35 mm 5 * SCREW (M5 X 30 mm 3 DUST BLOWER 1 DROP FOOT LOCK KNOB 1 BEARING RETAINER 1 BOLT RETAINER 2 SWITCH...
... Saw or when ordering repair parts. MODEL SC164VS The model number will be found on a plate attached to the motor housing. Number Description Qty. DROP FOOT 1 * TOOTH WASHER (M5 1 ROLL PIN 4 SWITCH PLATE 1 MOTOR 1 ECCENTRIC 1 SAW TABLE 1 * SCREW (M6 X 30 mm 1 PLASTIC TUBING 1 ADJUSTMENT LEVEL 1 BELLOWS LOCK 1 BELLOWS 1 * TOOTH WASHER (M4 4 * SCREW (M8 X 8 mm 1 * SCREW (4.2 X 8 mm 1 * SCREW (M5 X 8 mm 2 * SCREW (M4 X 6 mm 2 * SCREW (M5 X 35 mm 5 * SCREW (M5 X 30 mm 3 DUST BLOWER 1 DROP FOOT LOCK KNOB 1 BEARING RETAINER 1 BOLT RETAINER 2 SWITCH...


