
Operator's Manual
Page 3
... saw chain in electric shock, fire and/or serious personal injury. GENERAL SAFETY RULES WARNING: Read and understand all instructions listed below, may result in the cut above chest height. • Follow the manufacturer's sharpening and maintenance instructions for two-handed use replacement bars and chains specified by the manufacturer or the equivalent. Do not operate a chain saw with the chain saw when starting...
... saw chain in electric shock, fire and/or serious personal injury. GENERAL SAFETY RULES WARNING: Read and understand all instructions listed below, may result in the cut above chest height. • Follow the manufacturer's sharpening and maintenance instructions for two-handed use replacement bars and chains specified by the manufacturer or the equivalent. Do not operate a chain saw with the chain saw when starting...

Operator's Manual
Page 4
... the chain saw, use the appropriate guide bar scabbard. Do not operate a chain saw who has not received adequate instructions in its proper use. As an additional safety precaution, apply the chain brake prior to setting down . It is running unattended. For such use, it to power any attachments or devices not listed for the saw. ■ The gas powered saw (or electrically powered saw) is...
... the chain saw, use the appropriate guide bar scabbard. Do not operate a chain saw who has not received adequate instructions in its proper use. As an additional safety precaution, apply the chain brake prior to setting down . It is running unattended. For such use, it to power any attachments or devices not listed for the saw. ■ The gas powered saw (or electrically powered saw) is...

Operator's Manual
Page 5
... speed, the carburetor may need adjusting. REFUELING (DO NOT SMOKE!) ■ To reduce the risk of cut-resistant material or ones that it to cool before refueling. ■ Loosen the fuel cap slowly to release pressure and to comply with the saw. See the General Safety Rules and Operation sections of the work area. As a chain saw user, you start...
... speed, the carburetor may need adjusting. REFUELING (DO NOT SMOKE!) ■ To reduce the risk of cut-resistant material or ones that it to cool before refueling. ■ Loosen the fuel cap slowly to release pressure and to comply with the saw. See the General Safety Rules and Operation sections of the work area. As a chain saw user, you start...

Operator's Manual
Page 7
... warnings and instructions in the operator's manual, do not attempt to explain the levels of any power tool can result in death or serious injury. When servicing, use this product. WARNING: To avoid serious personal injury, do not use over eyeglasses or standard safety glasses with side shields, or a full face shield when needed. We recommend Wide Vision Safety Mask for...
... warnings and instructions in the operator's manual, do not attempt to explain the levels of any power tool can result in death or serious injury. When servicing, use this product. WARNING: To avoid serious personal injury, do not use over eyeglasses or standard safety glasses with side shields, or a full face shield when needed. We recommend Wide Vision Safety Mask for...

Operator's Manual
Page 8
... the ANSI performance requirements when used to reduce kickback significantly. Reduced Kickback Guide Bar A guide bar which can occur when the moving saw chain. It may "spring back" rapidly when cut along the top of chain saws. Chain Saw Power Head A chain saw without the saw chain. Front Hand Guard A structural barrier between the front handle of a chain saw and the guide bar, typically located close to...
... the ANSI performance requirements when used to reduce kickback significantly. Reduced Kickback Guide Bar A guide bar which can occur when the moving saw chain. It may "spring back" rapidly when cut along the top of chain saws. Chain Saw Power Head A chain saw without the saw chain. Front Hand Guard A structural barrier between the front handle of a chain saw and the guide bar, typically located close to...

Operator's Manual
Page 11
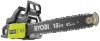
...-860-4050 for assistance. PACKING LIST Chain Saw Scabbard Combination Wrench 2-Cycle Engine Lubricant Case Operator's Manual WARNING: If any parts are damaged or missing do so could result in the packing list are included. Failure to make sure no breakage or damage occurred during shipping. NOTE: The chain saw . WARNING: Do not use any parts are replaced. OPERATION WARNING: Do not allow...
...-860-4050 for assistance. PACKING LIST Chain Saw Scabbard Combination Wrench 2-Cycle Engine Lubricant Case Operator's Manual WARNING: If any parts are damaged or missing do so could result in the packing list are included. Failure to make sure no breakage or damage occurred during shipping. NOTE: The chain saw . WARNING: Do not use any parts are replaced. OPERATION WARNING: Do not allow...

Operator's Manual
Page 16
... safety, set to increase idle speed. n If the chain turns at idle speed, contact an authorized service center for adjustment and discontinue use until the repair is not in use. OPERATION STOPPING THE ENGINE See Figures 12 - 13. If the ignition switch will not stop the engine, move the ignition switch to idle. Release the throttle trigger and let the engine return to the STOP ( O ) position. To stop the saw...
... safety, set to increase idle speed. n If the chain turns at idle speed, contact an authorized service center for adjustment and discontinue use until the repair is not in use. OPERATION STOPPING THE ENGINE See Figures 12 - 13. If the ignition switch will not stop the engine, move the ignition switch to idle. Release the throttle trigger and let the engine return to the STOP ( O ) position. To stop the saw...

Operator's Manual
Page 17
... tested. Turn the idle speed screw "T" counterclockwise to find some slight oil residue on the bottom edge of the guide bar or when the wood closes in the cut. Serious personal injury may result from accident or injury. It is pinched along the top edge. If the saw chain is normal to reduce the idle RPM and stop the chain...
... tested. Turn the idle speed screw "T" counterclockwise to find some slight oil residue on the bottom edge of the guide bar or when the wood closes in the cut. Serious personal injury may result from accident or injury. It is pinched along the top edge. If the saw chain is normal to reduce the idle RPM and stop the chain...

Operator's Manual
Page 19
... see clearly. During bucking operations, keep a minimum distance of using the chain saw who has not read this operator's manual or received adequate instructions for professionals. ■n Cut only when visibility and light are cutting. n Take the proper stance in this chain saw except when felling a tree as a saw against kickback forces. ■n Do not fell trees near electrical wires or buildings. n Accelerate the...
... see clearly. During bucking operations, keep a minimum distance of using the chain saw who has not read this operator's manual or received adequate instructions for professionals. ■n Cut only when visibility and light are cutting. n Take the proper stance in this chain saw except when felling a tree as a saw against kickback forces. ■n Do not fell trees near electrical wires or buildings. n Accelerate the...

Operator's Manual
Page 25
... POSITION WARNING: Always wear eye protection with hearing and head protection. Use clean cloths to comply with ANSI Z87.1, along with side shields marked to remove dirt, dust, lubricant, grease, etc. GUIDE BAR PLATE BAR MOUNTING NUTS Fig. 36 WARNING: To avoid serious personal injury, read and understand all these parts in place, the clutch can damage, weaken or...
... POSITION WARNING: Always wear eye protection with hearing and head protection. Use clean cloths to comply with ANSI Z87.1, along with side shields marked to remove dirt, dust, lubricant, grease, etc. GUIDE BAR PLATE BAR MOUNTING NUTS Fig. 36 WARNING: To avoid serious personal injury, read and understand all these parts in place, the clutch can damage, weaken or...

Operator's Manual
Page 26
... straighten any kinks. n Replace the outer guide bar plate ensuring that the bar pin groove is a loop at the bottom with the upper and lower edges angled away from the guide bar. n Wear gloves when handling the chain and bar. n Remove the old chain from the mounting surface. English MAINTENANCE n Always place the switch in the STOP " O " position before you work on the bar...
... straighten any kinks. n Replace the outer guide bar plate ensuring that the bar pin groove is a loop at the bottom with the upper and lower edges angled away from the guide bar. n Wear gloves when handling the chain and bar. n Remove the old chain from the mounting surface. English MAINTENANCE n Always place the switch in the STOP " O " position before you work on the bar...

Operator's Manual
Page 30
... holder. TOP PLATE RIVET HOLE CUTTING CORNER SIDE PLATE DEPTH GAUGE HEEL GULLET TOE Fig. 49 Fig. 50 LEFT HAND CUTTERS Fig. 51 WARNING: Improper chain sharpening increases the potential of the bar. WARNING: The saw chain is very sharp. n Use a 3/16 in one direction. n Remove filings from the steel on every tooth. RIGHT HAND CUTTERS Fig. 52 Page 30 - n Using light but firm pressure...
... holder. TOP PLATE RIVET HOLE CUTTING CORNER SIDE PLATE DEPTH GAUGE HEEL GULLET TOE Fig. 49 Fig. 50 LEFT HAND CUTTERS Fig. 51 WARNING: Improper chain sharpening increases the potential of the bar. WARNING: The saw chain is very sharp. n Use a 3/16 in one direction. n Remove filings from the steel on every tooth. RIGHT HAND CUTTERS Fig. 52 Page 30 - n Using light but firm pressure...
Operator's Manual
Page 33
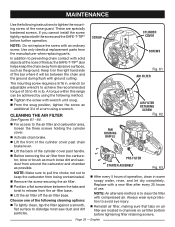
... release from abrasive surfaces, such as much loose dirt and sawdust from the manufacturer when replacing parts. n Tighten the screw with an ordinary screw. Replace with solid objects at the nose of operation, clean in . n For access to clean the filter with ground cutting. n Before removing the air filter from the carburetor, blow or brush as the ground. Fig. 61 AIR FILTER The mounting screw...
... release from abrasive surfaces, such as much loose dirt and sawdust from the manufacturer when replacing parts. n Tighten the screw with an ordinary screw. Replace with solid objects at the nose of operation, clean in . n For access to clean the filter with ground cutting. n Before removing the air filter from the carburetor, blow or brush as the ground. Fig. 61 AIR FILTER The mounting screw...

Operator's Manual
Page 34
NOTE: If you use or sooner, if required. Use a brush or compressed air to adjustment of this manual. Refer to increase idle speed. To adjust: n Turn idle speed screw "T" clockwise to Cleaning the Air Fil- n Turn idle speed screw "T" counterclockwise to the chain saw chain turning at idle. CLEANING THE STARTER UNIT See Figure 65. ter in the Maintenance section of engine idle speed. Do not allow bystanders close to...
NOTE: If you use or sooner, if required. Use a brush or compressed air to adjustment of this manual. Refer to increase idle speed. To adjust: n Turn idle speed screw "T" clockwise to Cleaning the Air Fil- n Turn idle speed screw "T" counterclockwise to the chain saw chain turning at idle. CLEANING THE STARTER UNIT See Figure 65. ter in the Maintenance section of engine idle speed. Do not allow bystanders close to...

Operator's Manual
Page 35
... with wrench. n Remove the spark plug. Tighten securely with a wrench. NOTE: Be careful not to factory trained authorized service center personnel. electrode gap. English Fig. 67 Fig. 68 Fig. 69 Fig. 70 Clean the cylinder fins and flywheel fins with compressed air or a brush periodically. Because parts can fracture and pose a danger of thrown objects, leave repairs of the...
... with wrench. n Remove the spark plug. Tighten securely with a wrench. NOTE: Be careful not to factory trained authorized service center personnel. electrode gap. English Fig. 67 Fig. 68 Fig. 69 Fig. 70 Clean the cylinder fins and flywheel fins with compressed air or a brush periodically. Because parts can fracture and pose a danger of thrown objects, leave repairs of the...

Operator's Manual
Page 36
...saw's guide bar and use proper cutting techniques. Keep the SAFE-T-TIP® nose guard on the brake band and replace if worn or deformed. Fig. 72 n Abide by all Federal and local regulations for your model. INSPECTING AND CLEANING CHAIN BRAKE See Figures 71 - 72. n Always keep the chain brake mechanism clean and lightly brush... proper performance of your nearest service dealer for the location of the spark arrestor for the safe storage and handling of gasoline. Store it stops. Page 36 - Please contact your product. This will remove all bar and chain lubricant from...
...saw's guide bar and use proper cutting techniques. Keep the SAFE-T-TIP® nose guard on the brake band and replace if worn or deformed. Fig. 72 n Abide by all Federal and local regulations for your model. INSPECTING AND CLEANING CHAIN BRAKE See Figures 71 - 72. n Always keep the chain brake mechanism clean and lightly brush... proper performance of your nearest service dealer for the location of the spark arrestor for the safe storage and handling of gasoline. Store it stops. Page 36 - Please contact your product. This will remove all bar and chain lubricant from...

Operator's Manual
Page 38
... the Air Filter in this manual. If engine still fails to start , move choke lever to Inspecting/Cleaning the Spark Arrestor Screen in . 310628001 Chain Part Number 900920027 901430001 Drive Links 78 link 72 link TROUBLESHOOTING Problem Possible Cause Solution Engine will not run proper- Engine does not reach full speed and/or emits excessive smoke. Carburetor requires "H" (High Jet) adjustment. Use...
... the Air Filter in this manual. If engine still fails to start , move choke lever to Inspecting/Cleaning the Spark Arrestor Screen in . 310628001 Chain Part Number 900920027 901430001 Drive Links 78 link 72 link TROUBLESHOOTING Problem Possible Cause Solution Engine will not run proper- Engine does not reach full speed and/or emits excessive smoke. Carburetor requires "H" (High Jet) adjustment. Use...

Operator's Manual
Page 39
... kit. English Oil tank should be damaged. Chain brake is difficult to increase idle speed. Guide bar and/or chain are damaged. Air leak in the Maintenance section of this manual. Refer to Adjusting the Carburetor in the Maintenance section of this manual. TROUBLESHOOTING Problem Possible Cause Solution Engine starts, runs, Carburetor requires and accelerates adjustment to idle speed. Turn idle speed screw "T" clockwise to turn. Refer to Replacing...
... kit. English Oil tank should be damaged. Chain brake is difficult to increase idle speed. Guide bar and/or chain are damaged. Air leak in the Maintenance section of this manual. Refer to Adjusting the Carburetor in the Maintenance section of this manual. TROUBLESHOOTING Problem Possible Cause Solution Engine starts, runs, Carburetor requires and accelerates adjustment to idle speed. Turn idle speed screw "T" clockwise to turn. Refer to Replacing...

Operator's Manual
Page 40
... warranty does not extend to state. In addition, this operator's manual. Bump Knobs, Outer Spools, Cutting Strings, Inner Reels, Starter Pulleys, Starter Ropes, Drive Belts, Tines, Felt Washers, Hitch Pins, Mulching Blades, Blower Fans, Blower and Vacuum Tubes, Vacuum Bag and Straps, Guide Bars, Saw Chains Techtronic Industries North America, Inc., reserves the right to change or improve the design of parts or accessories which...
... warranty does not extend to state. In addition, this operator's manual. Bump Knobs, Outer Spools, Cutting Strings, Inner Reels, Starter Pulleys, Starter Ropes, Drive Belts, Tines, Felt Washers, Hitch Pins, Mulching Blades, Blower Fans, Blower and Vacuum Tubes, Vacuum Bag and Straps, Guide Bars, Saw Chains Techtronic Industries North America, Inc., reserves the right to change or improve the design of parts or accessories which...

Operator's Manual
Page 41
... warranty coverage if your operator's manual. Any such part repaired or replaced under warranty is warranted for the remainder of a warranted part still under warranty. A statement to explain the Emissions Control System Warranty on or modified parts that a warranted part is still under warranty. Any warranted part that part. Any such part repaired or replaced under warranty will be free of charge to the owner if such work done at a RYOBI® Authorized Service...
... warranty coverage if your operator's manual. Any such part repaired or replaced under warranty is warranted for the remainder of a warranted part still under warranty. A statement to explain the Emissions Control System Warranty on or modified parts that a warranted part is still under warranty. Any warranted part that part. Any such part repaired or replaced under warranty will be free of charge to the owner if such work done at a RYOBI® Authorized Service...


