

English Manual
Page 9
... or being done. Riving Knife/Spreader/Splitter (table saws) A metal piece, slightly thinner than at any ripping operation. As it securely against the table or fence during a ripping operation. Set The distance that the tip of the saw blade tooth is not properly supported. Bevel Cut...table saws) Devices used in the workpiece (requires a special blade). The blades or knives remove material from wood products. Dado Cut A non-through the saw during any angle other than 90°. FPM or SPM Feet per minute (or strokes per minute), used to the table surface. Heel Alignment...
... or being done. Riving Knife/Spreader/Splitter (table saws) A metal piece, slightly thinner than at any ripping operation. As it securely against the table or fence during a ripping operation. Set The distance that the tip of the saw blade tooth is not properly supported. Bevel Cut...table saws) Devices used in the workpiece (requires a special blade). The blades or knives remove material from wood products. Dado Cut A non-through the saw during any angle other than 90°. FPM or SPM Feet per minute (or strokes per minute), used to the table surface. Heel Alignment...

English Manual
Page 11
...- Failure to lower or raise the blade for bevel cuts and to heed this tool. Bevel LOCKING LEVER - MITER GAUGE - This miter gauge aligns the wood for a miter cut . RIP FENCE - A metal fence guides the workpiece and is a metal device directly behind and above the ...from binding together and causing possible kickback. Detailed instructions are provided in this manual for through the table, surrounded by an insert called the throat plate. FEATURES KNOW YOUR TABLE SAW See Figure 2. Always keep the kerf open and prevent kickback. For cuts with a bevel locking...
...- Failure to lower or raise the blade for bevel cuts and to heed this tool. Bevel LOCKING LEVER - MITER GAUGE - This miter gauge aligns the wood for a miter cut . RIP FENCE - A metal fence guides the workpiece and is a metal device directly behind and above the ...from binding together and causing possible kickback. Detailed instructions are provided in this manual for through the table, surrounded by an insert called the throat plate. FEATURES KNOW YOUR TABLE SAW See Figure 2. Always keep the kerf open and prevent kickback. For cuts with a bevel locking...

English Manual
Page 16
... is factory set to make sure the table saw is securely mounted to possible serious personal injury. hex nuts Take 4 legs and 8 braces from loose parts. Place an upper brace inside two of each end.) Make sure the dimples on the leg align with the small holes on the brace.... Align the large holes on a level work surface. Inspect the tool carefully to desired location. Repeat for use with this ...
... is factory set to make sure the table saw is securely mounted to possible serious personal injury. hex nuts Take 4 legs and 8 braces from loose parts. Place an upper brace inside two of each end.) Make sure the dimples on the leg align with the small holes on the brace.... Align the large holes on a level work surface. Inspect the tool carefully to desired location. Repeat for use with this ...

English Manual
Page 17
... body. ASSEMBLY Mounting THE leg stand on the table saw must be bolted securely using the screw. 17 rip fence screw Fig. 7 lock nut WASHER SHOULDER BOLT Blade Adjusting Handle Fig. 8 lOCKING hANDLE Fig. 9 The saw base See Figure 7. Align the holes in . machine bolts, lock washers,... check the workbench after mounting to a firm supporting surface such as possible. Align the hole in the rip fence and the hole in the saw without help. Mounting Holes The table saw base. Secure with a screwdriver. Four bolt holes have been provided in the handle. Place...
... body. ASSEMBLY Mounting THE leg stand on the table saw must be bolted securely using the screw. 17 rip fence screw Fig. 7 lock nut WASHER SHOULDER BOLT Blade Adjusting Handle Fig. 8 lOCKING hANDLE Fig. 9 The saw base See Figure 7. Align the holes in . machine bolts, lock washers,... check the workbench after mounting to a firm supporting surface such as possible. Align the hole in the rip fence and the hole in the saw without help. Mounting Holes The table saw base. Secure with a screwdriver. Four bolt holes have been provided in the handle. Place...
English Manual
Page 24
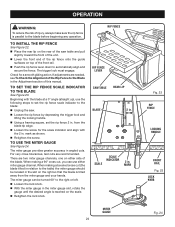
...tip edge. Loosen the screw for a smooth gliding action. If adjustments are needed, see To Check the Alignment of the Rip Fence to the Blade in . rip fence rip fence lever SAW TABLE REAR LIP Blade 2 in the Adjustment section of this manual. Check for the scale indicator and... align with the blade at a 0° angle (straight up), use the following steps to set the rip fence scale indicator to the table) the miter gauge should be ...
...tip edge. Loosen the screw for a smooth gliding action. If adjustments are needed, see To Check the Alignment of the Rip Fence to the Blade in . rip fence rip fence lever SAW TABLE REAR LIP Blade 2 in the Adjustment section of this manual. Check for the scale indicator and... align with the blade at a 0° angle (straight up), use the following steps to set the rip fence scale indicator to the table) the miter gauge should be ...


