
Ryobi RTS10 Support Question
Ryobi RTS10 Support Question
Find answers below for this question about Ryobi RTS10.Need a Ryobi RTS10 manual? We have 4 online manuals for this item!
Question posted by ricosflooring03 on June 23rd, 2015
How Do I Remove The Height Wheel On My Rst10 Table Saw?
The person who posted this question about this Ryobi product did not include a detailed explanation. Please use the "Request More Information" button to the right if more details would help you to answer this question.
Current Answers
Answer #1: Posted by TechSupport101 on June 24th, 2015 7:34 AM
TechSupport101

Member since:
May 24th, 2013 Points: 12,171,305

Member since:
May 24th, 2013 Points: 12,171,305
See a similar support question here http://www.ereplacementparts.com/ryobi-rts10-table-saw-parts-c-7931_7954_158276.html for assistance with removing the hand wheel.
Related Ryobi RTS10 Manual Pages
English Manual - Page 1

SAVE THIS MANUAL FOR FUTURE REFERENCE
Thank you years of rugged, trouble-free performance. Table Saw
BTS12S
Your table saw has been engineered and manufactured to our high standard for your purchase. WARNING: To reduce the risk of operation, and operator safety.
OPERATOR'S MANUAL
10 ...
English Manual - Page 3
... risk of power and overheating. A guard or other conditions that keys and adjusting wrenches are recommended when working order.
REMOVE ADJUSTING KEYS AND WRENCHES. Don't leave tool until it on the saw 's applications and limitations as well as the specific potential hazards related to determine that is recommended for . Never yank cord...
English Manual - Page 5
...TOOL should have a straight edge to guide along the fence. IF THE POWER SUPPLY CORD IS DAMAGED, it is twisted or warped or
does not have the following markings: a) Wear eye protection. To minimize risk of using the table saw.
ALWAYS TURN OFF SAW before transporting saw..., always support large panels.
Remove all through -sawing" operations. If you ) by an ...
English Manual - Page 9

...remove material from wood products.
This aid helps keep the operator's hands well away from the blade. These aids help control the workpiece by the blade. Set The distance that serves as a guide for table saws... the workpiece being dropped into the tool first. Kerf The material removed by the blade in a through cut which a blade or cutting tool is being placed inadvertently in one ...
English Manual - Page 11

...height of the blade is in a location that will be operated.
A scale on the spreader. It is inaccessible to children and others not qualified to help keep the cut . ANTI-KICKBACK PAWLS -
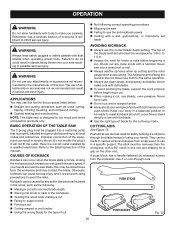
WARNING:
Do not use the tool.
11 This lever, placed just under the worktable surface on the front of the saw....
RIP FENCE -
FEATURES
KNOW YOUR TABLE SAW
See Figure 2.
Their teeth point away...
English Manual - Page 12
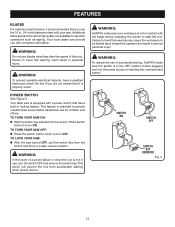
... in serious personal injury. Your table saw . TO TURN YOUR SAW ON: With the switch key inserted into the power source or resetting the overload reset button. This action will prevent the tool from the
switch and store in a safe, secure location. SWITCH ON
SWITCH OFF
SWITCH KEY
removed
Fig. 3
12
Warning:
To reduce...
English Manual - Page 15
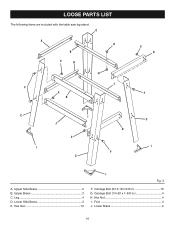
Leg 4 D. Carriage Bolt (1/4-20 x 1-5/8 in 16 G. Carriage Bolt (5/16-18 x 5/8 in 4 H. Hex Nut 4 I
F C
A. LOOSE PARTS LIST
The following items are included with the table saw leg stand: C
A G
B
E
D
H
J F
E B
E A
F
C
I
C
J
D
E
I
I . Foot 4 J. Lower Side Brace 2 E. Lower Brace 2
15 Upper Brace 2 C. Upper Side Brace 2 B. Hex Nut 16
I
Fig. 3
F.
English Manual - Page 16

ASSEMBLY
UNPACKING
This product requires assembly. Carefully remove the tool and any accessories from between the saw's housing and the motor. The saw is factory set to install the lower braces. Place it , check for accuracy. WARNING:
Do not connect to make sure the table saw on the brace and the legs. If any part...
English Manual - Page 17

...hardware for assembling the leg stand and leveling feet.
Place the leg stand on the TABLE saw 's base for three remaining holes. Tighten all four bolts securely. Secure using 3/8 in the ... Mounting Holes
The table saw base, lock washers, hex nuts, and the thickness of the
rip fence making certain the handle is noted, secure the workbench to the height adjusting handwheel with ...
English Manual - Page 20
... the outlet.
Failure to cut with a dull, gummed-up, or improperly set blades. Note: This table saw Failing to all local codes and ordinances. Improper connection of the equipment can result in .
...with great force and speed.
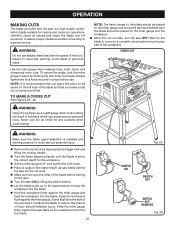
WARNING:
Always wear safety goggles or safety glasses with tools to make cuts with a 90° notch in line with
push sticks. operation
WARNING:
...
English Manual - Page 25
... blade.
25
Fig. 25
SWITCH ON
SWITCH OFF
SWITCH KEY
removed
Fig. 26
Failure to a power source. Carefully check all ...left side of the blade before connecting to heed this tool. Never use the rip fence for the cut on the...tighten the lock knob. Place a support (the same height as saw table) behind
the saw for any part of this warning could result in place before moving...
English Manual - Page 26
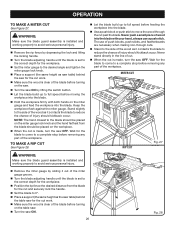
... the miter gauge to the desired angle and tighten the miter gauge lock knob.
Place a support (the same height as saw table) behind
the table saw for the blade to come to a complete stop before removing any part of cut.
When the cut is clear of injury should kickback occur. Wait for the cut...
English Manual - Page 28
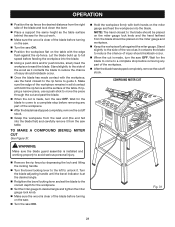
... of the blade and lock down the lever.
Place a support the same height as the table surface behind the saw for the cut work.
Make sure the wood is clear of the workpiece... sure the blade guard assembly is installed and working properly to avoid serious personal injury.
Remove the rip fence by depressing the lock and lifting the locking handle.
Turn the bevel ...
English Manual - Page 32
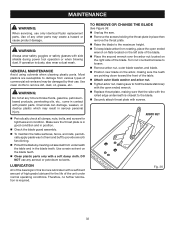
... time let brake fluids, gasoline, petroleumbased products, penetrating oils, etc., come in this tool are lubricated with a soft damp cloth.
ARBOR NUT
Fig. 36
32 Use of the...To remove or change the blade
See Figure 36. Unplug the saw. Remove the screws holding the throat plate in position.
Check the blade guard assembly. To maintain the table surfaces,...
English Manual - Page 34

... approved safety equipment, such as those dust masks that you have purchased your tool, should a need ever exist for your nearest Authorized Service Center. Some examples... crystalline silica from bricks and cement and other reproductive harm. Table Saw
BTS12S
WARNING:
Some dust created by power sanding, sawing, grinding, drilling, and other construction activities contains chemicals known to...
Repair Sheet - Page 3
... MMOODDEELL NNOO..
HD.)...... 1
10 410012702 SCREW (1/4-20 x 3-1/4 in all correspondence regarding your TABLE SAW or when ordering repair parts. SOC. HD 1
No. FLAT HD.)........ 4 31 089015001001 ...(M6 x 18 mm CHEESE HD.)...... 3 23 A101014304 BRACKET ASSEMBLY 1 24 089015001002 SAW TABLE 1 25 0101010301 THROAT PLATE INSERT 1 26 410192001 SCREW (M4 x 10 mm ...
Repair Sheet - Page 5
...ARBOR NUT (5/8-18 1
37 0101010312 ARBOR WRENCH (15/16 in all correspondence regarding your TABLE SAW or when ordering repair parts. NUMBER
DESCRIPTION
QTY.
1 410182001 SCREW (M4 x 7 ... LOCK NUT 1. 23 0101140205 HAND WHEEL 1 24 412011712 WASHER 1
25 0152010204 BLADE ADJUSTING HANDLE 1
26 0101140203 SHOULDER BOLT 1
27 0101140206 HAND WHEEL INSERT 1
28 414011003 SPRING PIN ...
Repair Sheet - Page 7

... mm 2 18 420010102 BALL BEARING (6001ZZ 1 19 420010101 BALL BEARING (6201ZZ 1 20 A101010301 ARMATURE (INC. Always mention the model number in all correspondence regarding your TABLE SAW or when ordering repair parts. KEY NOS. 18-19 1 21 0101010102 GEAR HOUSING 1 22 420110004 NEEDLE BEARING 3 23 A101010501 JACKSHAFT ASSEMBLY (ARBOR 1 987000372 OPERATOR'S MANUAL...
Repair Sheet - Page 8

... BOLT (5/16 x 5/8 in 16
9 411062702 HEX LOCK NUT (5/16-18)........ 16
10 410032705 CARRIAGE BOLT (1/4-20 x 1-5/8 in 4
11 411062701 HEX NUT (1/4-20 4
8 No. No.
RYOBI TABLE SAW - BTS12S
Figure D
3
6
7
9
4
10 9 6
11
8 9 7
5 8
3
2
3
5
4
9
2
2
8 3
2
PARTS LIST For FIGURE D
Key Part
Key Part
No. No...
Repair Sheet - Page 9

MODEL NUMBER BTS12S
POWER CORD
BLACK WHITE
SWITCH
BLACK WHITE
MOTOR CORD
MOTOR
WIRING DIAGRAM
9 RYOBI Table Saw -
Similar Questions

Ryobi 10" Table Saw Dado Throat Plate
where can I find a dado throat plate for the Ryobi 10" table saw?
where can I find a dado throat plate for the Ryobi 10" table saw?
(Posted by Rick52757 2 years ago)

Wiring Diagram For Ryobi Rts21 Table Saw Switch
I need to view the wiring diagram for the switch on the Ryobi RTS21 table saw. I had to disconnect t...
I need to view the wiring diagram for the switch on the Ryobi RTS21 table saw. I had to disconnect t...
(Posted by wolfsonjames 9 years ago)

Dado Blade Insert For A Ryobi Rts10 Table Saw
Where can I purchase a dado blade insert for my Ryobi RTS10 10" table saw? I am having difficulty fi...
Where can I purchase a dado blade insert for my Ryobi RTS10 10" table saw? I am having difficulty fi...
(Posted by bstilton 9 years ago)

Will A Ryobi Table Saw Model Rts10 Accept A Dado Blade
(Posted by arivegregon 9 years ago)
