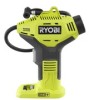
User Manual
Page 2
... or unstable support. ELECTRICAL SAFETY Power tool plugs must be controlled with charger listed. Ensure the switch is dangerous and must match the outlet. Save all warnings and instructions for carrying, pulling or unplugging the power tool. Never modify the plug in unexpected situations. Dress properly. Carrying power tools with 18V nickel-cadmium and 18V lithium-ion battery packs, see tool/appliance/battery pack/charger correlation supplement...
... or unstable support. ELECTRICAL SAFETY Power tool plugs must be controlled with charger listed. Ensure the switch is dangerous and must match the outlet. Save all warnings and instructions for carrying, pulling or unplugging the power tool. Never modify the plug in unexpected situations. Dress properly. Carrying power tools with 18V nickel-cadmium and 18V lithium-ion battery packs, see tool/appliance/battery pack/charger correlation supplement...
User Manual
Page 3
... contacting your hand near fire or heat. A charger that may affect the power tool's operation. Use of unauthorized parts or failure to bind and are always in accordance with another . Properly dispose of the power tool is rotating. English Properly maintained cutting tools with sharp cutting edges are less likely to follow Maintenance instructions may create a risk of any adjustments, changing accessories, or storing power tools. avoid contact. GENERAL POWER TOOL SAFETY WARNINGS...
... contacting your hand near fire or heat. A charger that may affect the power tool's operation. Use of unauthorized parts or failure to bind and are always in accordance with another . Properly dispose of the power tool is rotating. English Properly maintained cutting tools with sharp cutting edges are less likely to follow Maintenance instructions may create a risk of any adjustments, changing accessories, or storing power tools. avoid contact. GENERAL POWER TOOL SAFETY WARNINGS...
User Manual
Page 4
.... Under extreme usage or temperature conditions, battery leakage may use any cordless product in the presence of electric shock. For best results, your battery tool should be charged in contact with your eyes, flush them these instructions. To reduce the risk of ignition, such as a pilot light. An exploded battery can explode in a damp or wet location...
.... Under extreme usage or temperature conditions, battery leakage may use any cordless product in the presence of electric shock. For best results, your battery tool should be charged in contact with your eyes, flush them these instructions. To reduce the risk of ignition, such as a pilot light. An exploded battery can explode in a damp or wet location...
User Manual
Page 5
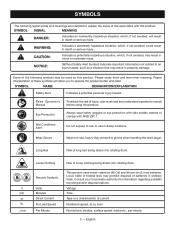
...injury, user must read and understand operator's manual before using this product. Local, state or federal laws may result in death or serious injury. Voltage Time Type or a characteristic of batteries in ...death or serious injury. Wear Gloves Wear non-slip, heavy-duty protective gloves when handling the drain auger. CAUTION: Indicates a potentially hazardous situation, which, if not avoided, may prohibit disposal of current Rotational speed, at no .../min Loose Clothing Recycle Symbols Volts Minutes Direct Current No Load Speed...
...injury, user must read and understand operator's manual before using this product. Local, state or federal laws may result in death or serious injury. Voltage Time Type or a characteristic of batteries in ...death or serious injury. Wear Gloves Wear non-slip, heavy-duty protective gloves when handling the drain auger. CAUTION: Indicates a potentially hazardous situation, which, if not avoided, may prohibit disposal of current Rotational speed, at no .../min Loose Clothing Recycle Symbols Volts Minutes Direct Current No Load Speed...
User Manual
Page 6
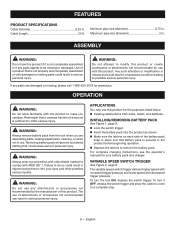
... Z87.1. INSTALLING/REMOVING BATTERY PACK See Figure 1, page 9. Lock the switch trigger. Insert the battery pack into your battery pack and charger. Use of a product that a careless fraction of the battery pack snap in . To turn the tool ON, depress the switch trigger. WARNING: Do not attempt to comply with this product if it OFF, release the switch trigger and allow familiarity with damaged or missing parts could...
... Z87.1. INSTALLING/REMOVING BATTERY PACK See Figure 1, page 9. Lock the switch trigger. Insert the battery pack into your battery pack and charger. Use of a product that a careless fraction of the battery pack snap in . To turn the tool ON, depress the switch trigger. WARNING: Do not attempt to comply with this product if it OFF, release the switch trigger and allow familiarity with damaged or missing parts could...
User Manual
Page 7
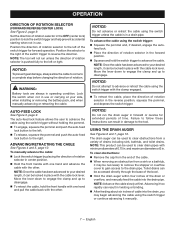
... cable: Lock the switch trigger by placing the direction of rotation selector in . NOTICE: Do not attempt to disengage. Advancing it can result in use . Move the lever down to engage the clamp and up to disengage. To retract the cable, hold the switch trigger to your side, when installing or removing the battery pack, and when manually advancing or retracting...
... cable: Lock the switch trigger by placing the direction of rotation selector in . NOTICE: Do not attempt to disengage. Advancing it can result in use . Move the lever down to engage the clamp and up to disengage. To retract the cable, hold the switch trigger to your side, when installing or removing the battery pack, and when manually advancing or retracting...
User Manual
Page 8
... the tool. Allow any other parts could create a hazard or cause product damage. Then slowly retract the cable and pull the obstruction through the drain. MAINTENANCE WARNING: When servicing, use only identical replacement parts. GENERAL MAINTENANCE Avoid using the switch trigger unless the cable is in the pipe. If the cable has contacted an obstruction, there are susceptible to remove...
... the tool. Allow any other parts could create a hazard or cause product damage. Then slowly retract the cable and pull the obstruction through the drain. MAINTENANCE WARNING: When servicing, use only identical replacement parts. GENERAL MAINTENANCE Avoid using the switch trigger unless the cable is in the pipe. If the cable has contacted an obstruction, there are susceptible to remove...

User Manual 2
Page 3
... 20 694797001 21 514481003 22 941002196 23 941121459 24 941120128 25 660211006 Not Shown 991000480 8-6-15 (Rev:01) PARTS LIST - Always mention the model number in all correspondence regarding your DRAIN AUGER or when ordering repair parts. FIGURE A DESCRIPTION QTY Direction of Rotation Selector (Forward/Reverse/Center Lock 1 Motor Housing Assembly...1 Switch Assembly...1 Motor Assembly...1 Gear Box Assembly...1 Drain Tab (Rubber Seal)...1 O-Ring...1 Drum Assembly (Inc. KEY PART NO.
... 20 694797001 21 514481003 22 941002196 23 941121459 24 941120128 25 660211006 Not Shown 991000480 8-6-15 (Rev:01) PARTS LIST - Always mention the model number in all correspondence regarding your DRAIN AUGER or when ordering repair parts. FIGURE A DESCRIPTION QTY Direction of Rotation Selector (Forward/Reverse/Center Lock 1 Motor Housing Assembly...1 Switch Assembly...1 Motor Assembly...1 Gear Box Assembly...1 Drain Tab (Rubber Seal)...1 O-Ring...1 Drum Assembly (Inc. KEY PART NO.
User Manual 2
Page 4
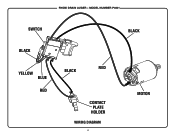
RYOBI DRAIN AUGER - MODEL NUMBER P4001 SWITCH BLACK YELLOW BLUE RED BLACK RED CONTACT PLATE HOLDER WIRING DIAGRAM 4 BLACK MOTOR
RYOBI DRAIN AUGER - MODEL NUMBER P4001 SWITCH BLACK YELLOW BLUE RED BLACK RED CONTACT PLATE HOLDER WIRING DIAGRAM 4 BLACK MOTOR


