
English Manual
Page 1
WARNING: To reduce the risk of operation, and operator safety. When properly cared for your purchase. Thank you for , it will give you years of rugged, trouble-free performance. SAVE THIS MANUAL FOR FUTURE REFERENCE OPERATOR'S MANUAL 18 VOLT CAULK GUN P310 BATTERIES AND CHARGERS SOLD SEPARATELY Your caulk gun has been engineered and manufactured to our high standard for dependability, ease of injury, the user must read and understand the operator's manual before using this product.
WARNING: To reduce the risk of operation, and operator safety. When properly cared for your purchase. Thank you for , it will give you years of rugged, trouble-free performance. SAVE THIS MANUAL FOR FUTURE REFERENCE OPERATOR'S MANUAL 18 VOLT CAULK GUN P310 BATTERIES AND CHARGERS SOLD SEPARATELY Your caulk gun has been engineered and manufactured to our high standard for dependability, ease of injury, the user must read and understand the operator's manual before using this product.

English Manual
Page 2
...; Specific Safety Rules...4 Safety Rules for Charger ...5 � Symbols...6-7 � Features...8-9 � Assembly ...9 � Operation...10-14 � Maintenance ...15 � Parts Ordering / Service ...16 INTRODUCTION This tool has many features for making it was purchased. This warranty only covers defects arising under this warranty. One World Technologies, Inc. is not responsible for direct, indirect...
...; Specific Safety Rules...4 Safety Rules for Charger ...5 � Symbols...6-7 � Features...8-9 � Assembly ...9 � Operation...10-14 � Maintenance ...15 � Parts Ordering / Service ...16 INTRODUCTION This tool has many features for making it was purchased. This warranty only covers defects arising under this warranty. One World Technologies, Inc. is not responsible for direct, indirect...
English Manual
Page 3
... of moving parts, breakage of injury when used for which may cause sparks, burns, or a fire. Maintain tools with the switch is left attached to a rotating part of control. Do not force tool. A wrench or a key that may create a risk of parts, and any adjustments, changing accessories, or storing the tool. Stable footing on . ELECTRICAL SAFETY A battery operated tool with charger listed. MODEL BATTERY PACK (P100) CHARGER (P110) P310 130255004 1423701...
... of moving parts, breakage of injury when used for which may cause sparks, burns, or a fire. Maintain tools with the switch is left attached to a rotating part of control. Do not force tool. A wrench or a key that may create a risk of parts, and any adjustments, changing accessories, or storing the tool. Stable footing on . ELECTRICAL SAFETY A battery operated tool with charger listed. MODEL BATTERY PACK (P100) CHARGER (P110) P310 130255004 1423701...

English Manual
Page 4
... safety glasses with clean water for a replacement. Battery tools do not have only impact resistant lenses. GENERAL SAFETY RULES SERVICE Tool service must be pinched between the tube holder and the plunger. Maintain labels and nameplates. Follow instructions in the presence of serious personal injury. 4 Use of electric shock, fire, or serious personal injury. Do not place battery tools or their batteries...
... safety glasses with clean water for a replacement. Battery tools do not have only impact resistant lenses. GENERAL SAFETY RULES SERVICE Tool service must be pinched between the tube holder and the plunger. Maintain labels and nameplates. Follow instructions in the presence of serious personal injury. 4 Use of electric shock, fire, or serious personal injury. Do not place battery tools or their batteries...

English Manual
Page 5
... tool. It also will reduce the risk of batteries may result in electric shock, fire and/or serious personal injury. Before using battery to persons. Before using battery. 3. READ AND UNDERSTAND ALL INSTRUCTIONS. come in good electrical condition; SAVE THESE INSTRUCTIONS This manual contains important safety and operating instructions for AC ampere rating of extension cord are the same number, size and shape as specifically designated on battery charger, battery...
... tool. It also will reduce the risk of batteries may result in electric shock, fire and/or serious personal injury. Before using battery to persons. Before using battery. 3. READ AND UNDERSTAND ALL INSTRUCTIONS. come in good electrical condition; SAVE THESE INSTRUCTIONS This manual contains important safety and operating instructions for AC ampere rating of extension cord are the same number, size and shape as specifically designated on battery charger, battery...
English Manual
Page 6
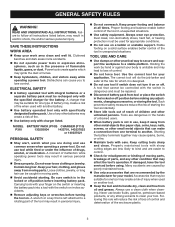
... injury, user must read and understand operator's manual before using this tool. Failure to rain or use in damp locations. Precautions that involve your hands away from the blade will result in serious personal injury. SYMBOL V Volts NAME Voltage DESIGNATION/EXPLANATION A Amperes Current Hz Hertz Frequency (cycles per second) W Watt Power min Minutes Alternating Current Direct Current Time Type of current Type or...
... injury, user must read and understand operator's manual before using this tool. Failure to rain or use in damp locations. Precautions that involve your hands away from the blade will result in serious personal injury. SYMBOL V Volts NAME Voltage DESIGNATION/EXPLANATION A Amperes Current Hz Hertz Frequency (cycles per second) W Watt Power min Minutes Alternating Current Direct Current Time Type of current Type or...

English Manual
Page 7
... shield when needed. SAVE THESE INSTRUCTIONS 7 When servicing, use this product. Always use over eyeglasses or standard safety glasses with ANSI Z87.1. WARNING: To avoid serious personal injury, do not attempt to use only identical replacement parts. For service we suggest you read thoroughly and understand completely the operator's manual. Before beginning power tool operation, always wear safety goggles or safety glasses with this product. SERVICE Servicing requires extreme...
... shield when needed. SAVE THESE INSTRUCTIONS 7 When servicing, use this product. Always use over eyeglasses or standard safety glasses with ANSI Z87.1. WARNING: To avoid serious personal injury, do not attempt to use only identical replacement parts. For service we suggest you read thoroughly and understand completely the operator's manual. Before beginning power tool operation, always wear safety goggles or safety glasses with this product. SERVICE Servicing requires extreme...

English Manual
Page 8
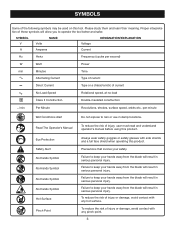
FEATURES PRODUCT SPECIFICATIONS Motor ...18 Volt DC Charger Input ...120 V, 60 Hz, AC only Charge Rate ...1 hour Capacity ...Standard 10 oz. cartridge CAULK GUN PLUNGER ROD HANDLE PLUNGER ROD SWITCH TRIGGER PUNCTURE TOOL CARRIAGE FRAME SWITCH LOCK VARIABLE SPEED SELECTOR Fig. 1 8
FEATURES PRODUCT SPECIFICATIONS Motor ...18 Volt DC Charger Input ...120 V, 60 Hz, AC only Charge Rate ...1 hour Capacity ...Standard 10 oz. cartridge CAULK GUN PLUNGER ROD HANDLE PLUNGER ROD SWITCH TRIGGER PUNCTURE TOOL CARRIAGE FRAME SWITCH LOCK VARIABLE SPEED SELECTOR Fig. 1 8

English Manual
Page 9
... switch trigger. When using a partially filled caulk tube, the puncture tool can be loaded. Make sure that all operating features and safety rules. SWITCH TRIGGER Depressing the switch trigger starts the forward motion of the project you to adjust the material feed rate to shut off. VARIABLE SPEED SELECTOR The plunger speed can be dispensed. ELECTRONIC OVERLOAD PROTECTION An electronic overload protection feature causes the motor...
... switch trigger. When using a partially filled caulk tube, the puncture tool can be loaded. Make sure that all operating features and safety rules. SWITCH TRIGGER Depressing the switch trigger starts the forward motion of the project you to adjust the material feed rate to shut off. VARIABLE SPEED SELECTOR The plunger speed can be dispensed. ELECTRONIC OVERLOAD PROTECTION An electronic overload protection feature causes the motor...

English Manual
Page 10
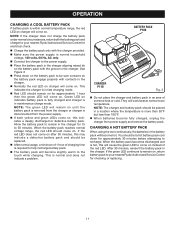
...: Always wear safety goggles or safety glasses with tools to do so could be damaged by the manufacturer of normal temperature range. Yellow and Green LEDs on = Deeply discharged or defective battery pack. No LED on = Defective charger or battery pack. YELLOW LIGHT RED LIGHT Fig. 2 CHARGING THE BATTERY PACK Battery packs for service or replacement. DO NOT insert another battery. Failure...
...: Always wear safety goggles or safety glasses with tools to do so could be damaged by the manufacturer of normal temperature range. Yellow and Green LEDs on = Deeply discharged or defective battery pack. No LED on = Defective charger or battery pack. YELLOW LIGHT RED LIGHT Fig. 2 CHARGING THE BATTERY PACK Battery packs for service or replacement. DO NOT insert another battery. Failure...
English Manual
Page 11
... charger is disconnected from power supply and remove the battery pack. Green LED on indicates battery pack is fully charged and charger is normal and does not indicate a problem. NOTE: The green LED will become slightly warm to recharge. CHARGING A HOT BATTERY PACK When using the tool continuously, the batteries in an area of the red LED. OPERATION CHARGING A COOL BATTERY PACK If battery...
... charger is disconnected from power supply and remove the battery pack. Green LED on indicates battery pack is fully charged and charger is normal and does not indicate a problem. NOTE: The green LED will become slightly warm to recharge. CHARGING A HOT BATTERY PACK When using the tool continuously, the batteries in an area of the red LED. OPERATION CHARGING A COOL BATTERY PACK If battery...
English Manual
Page 12
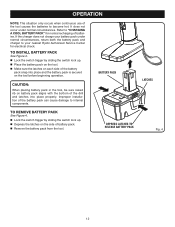
Refer to internal components. If the charger does not charge your nearest Ryobi Authorized Service Center for normal recharging of batteries. Improper installation of the battery pack can cause damage to "CHARGING A COOL BATTERY PACK" for electrical check. TO REMOVE BATTERY PACK See Figure 4. Lock the switch trigger by sliding the switch lock up . Depress the latches on battery pack aligns with the bottom of the...
Refer to internal components. If the charger does not charge your nearest Ryobi Authorized Service Center for normal recharging of batteries. Improper installation of the battery pack can cause damage to "CHARGING A COOL BATTERY PACK" for electrical check. TO REMOVE BATTERY PACK See Figure 4. Lock the switch trigger by sliding the switch lock up . Depress the latches on battery pack aligns with the bottom of the...

English Manual
Page 13
... material is removed from the caulk gun. If found only in the unlocked position. To turn the caulk gun ON, depress the switch trigger. � To turn the caulk gun OFF, release the switch trigger. This helps to prevent damage to reset. If the motor continues to shut off , move the variable speed selector to an authorized service center. 13 OPERATION STARTING/STOPPING THE CAULK GUN See...
... material is removed from the caulk gun. If found only in the unlocked position. To turn the caulk gun ON, depress the switch trigger. � To turn the caulk gun OFF, release the switch trigger. This helps to prevent damage to reset. If the motor continues to shut off , move the variable speed selector to an authorized service center. 13 OPERATION STARTING/STOPPING THE CAULK GUN See...

English Manual
Page 14
... be locked when not in an out-of old caulking. Experiment in use to deliver the caulk bead you continue to use or carrying at an even pace along the surface. Squeeze the trigger on the caulk gun, allowing the caulk to provide a larger opening. Make sure the caulk comes in operating condition. OPERATION WARNING: Battery tools are...
... be locked when not in an out-of old caulking. Experiment in use to deliver the caulk bead you continue to use or carrying at an even pace along the surface. Squeeze the trigger on the caulk gun, allowing the caulk to provide a larger opening. Make sure the caulk comes in operating condition. OPERATION WARNING: Battery tools are...
English Manual
Page 15
... side shields during power tool operation or when blowing dust. Do not attempt to 5 seconds before depressing the trigger for 3 to destroy or disassemble battery pack or remove any other parts may be replaced at any maintenance. BATTERIES The battery pack for information regarding available recycling and/or disposal options. However, like all batteries, they will depend on the parts list are doing. Handling of properly...
... side shields during power tool operation or when blowing dust. Do not attempt to 5 seconds before depressing the trigger for 3 to destroy or disassemble battery pack or remove any other parts may be replaced at any maintenance. BATTERIES The battery pack for information regarding available recycling and/or disposal options. However, like all batteries, they will depend on the parts list are doing. Handling of properly...

English Manual
Page 16
..., and • arsenic and chromium from these chemicals: work in the space provided below. • HOW TO ORDER REPAIR PARTS When ordering repair parts, always give the following information: • MODEL NUMBER • SERIAL NUMBER P310 Ryobi® is a registered trademark of Authorized Service Centers. • MODEL NO. OPERATOR'S MANUAL 18 VOLT CAULK GUN P310 WARNING: Some dust created by power sanding, sawing, grinding, drilling, and other construction activities contains chemicals known to...
..., and • arsenic and chromium from these chemicals: work in the space provided below. • HOW TO ORDER REPAIR PARTS When ordering repair parts, always give the following information: • MODEL NUMBER • SERIAL NUMBER P310 Ryobi® is a registered trademark of Authorized Service Centers. • MODEL NO. OPERATOR'S MANUAL 18 VOLT CAULK GUN P310 WARNING: Some dust created by power sanding, sawing, grinding, drilling, and other construction activities contains chemicals known to...

Repair Sheet
Page 3
... WITH LABEL ASSEMBLY (INC. PARTS LIST KEY NO. KEY NOS. 4, 22 and 37 1 * SCREW (M3 X 8 mm PAN HD 1 CIRCUIT BOARD 1 * SCREW (M3 X 14 mm PAN HD 5 RACK 1 MICRO SWITCH 1 * SCREW (M4 X 6 mm SOC. Always mention the model number in all correspondence regarding your CAULKING GUN or when ordering repair parts. HD 1 PIN 1 RACK HANDLE 1 * SCREW (M5 X 15 mm PAN HD 1 TRIGGER LOCK BUTTON 1 MOTOR COVER 1 * SCREW (M3 X 4 mm PAN HD 1 POWER MOSFET 1 HEAT...
... WITH LABEL ASSEMBLY (INC. PARTS LIST KEY NO. KEY NOS. 4, 22 and 37 1 * SCREW (M3 X 8 mm PAN HD 1 CIRCUIT BOARD 1 * SCREW (M3 X 14 mm PAN HD 5 RACK 1 MICRO SWITCH 1 * SCREW (M4 X 6 mm SOC. Always mention the model number in all correspondence regarding your CAULKING GUN or when ordering repair parts. HD 1 PIN 1 RACK HANDLE 1 * SCREW (M5 X 15 mm PAN HD 1 TRIGGER LOCK BUTTON 1 MOTOR COVER 1 * SCREW (M3 X 4 mm PAN HD 1 POWER MOSFET 1 HEAT...

Repair Sheet
Page 5
... GEAR...2 GEAR CASE ASSEMBLY 1 CARRIER ...1 PLANETARY GEAR 6 SOLAR GEAR ...1 GEAR TRAIN HOUSING ASSEMBLY 1 WASHER...1 * SCREW (M3 X 6 mm PAN HD 2 SPRING WASHER ...2 MOTOR BRACKET 1 * SCREW (M3 X 16 mm PAN HD 6 MOTOR ASSEMBLY 1 GEAR HOUSING COVER ASSEMBLY 1 GEAR...1 RING GEAR ...1 CARRIER SHAFT ...1 PLANETARY GEAR 6 SPRING ...1 CLUTCH ...1 RING GEAR ...1 SOLAR GEAR ...1 GEAR SHAFT ...1 WASHER...1 OPERATOR'S MANUAL (960223391) REPAIR SHEET (REV:03) * Standard Hardware Item - MODEL NUMBER P310 The model number will be found on a plate attached to the motor housing. RYOBI 18 VOLT...
... GEAR...2 GEAR CASE ASSEMBLY 1 CARRIER ...1 PLANETARY GEAR 6 SOLAR GEAR ...1 GEAR TRAIN HOUSING ASSEMBLY 1 WASHER...1 * SCREW (M3 X 6 mm PAN HD 2 SPRING WASHER ...2 MOTOR BRACKET 1 * SCREW (M3 X 16 mm PAN HD 6 MOTOR ASSEMBLY 1 GEAR HOUSING COVER ASSEMBLY 1 GEAR...1 RING GEAR ...1 CARRIER SHAFT ...1 PLANETARY GEAR 6 SPRING ...1 CLUTCH ...1 RING GEAR ...1 SOLAR GEAR ...1 GEAR SHAFT ...1 WASHER...1 OPERATOR'S MANUAL (960223391) REPAIR SHEET (REV:03) * Standard Hardware Item - MODEL NUMBER P310 The model number will be found on a plate attached to the motor housing. RYOBI 18 VOLT...

Repair Sheet
Page 6
RYOBI 18 VOLT DC CAULKING GUN - MODEL NUMBER P310 MICRO SWITCH GREEN LEAD WHITE LEAD MOSFET PURPLE LEAD WHITE LEAD BLUE LEAD BLACK LEAD PCB ASSEMBLY RED LEAD BLUE LEAD IC 6.2V PURPLE LEAD BLACK LEAD WHITE LEAD WIRING DIAGRAM 6 MOTOR SWITCH RED LEAD CONTACT PLATE HOLDER
RYOBI 18 VOLT DC CAULKING GUN - MODEL NUMBER P310 MICRO SWITCH GREEN LEAD WHITE LEAD MOSFET PURPLE LEAD WHITE LEAD BLUE LEAD BLACK LEAD PCB ASSEMBLY RED LEAD BLUE LEAD IC 6.2V PURPLE LEAD BLACK LEAD WHITE LEAD WIRING DIAGRAM 6 MOTOR SWITCH RED LEAD CONTACT PLATE HOLDER


