BS903_979_trillingual.pdf
Page 8
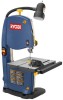
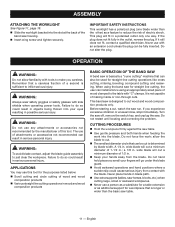
...blade. Switch and Switch Key Your band saw table is tilted for a miter cut, with Throat Plate Your band saw has a saw table at the factory, allows for various sawing applications. To lock in . Tracking Knob Adjusts tracking to keep blade centered on the band saw table to -read indicator shows the ...knob and lock knob to adjust the blade guide assembly to use the tool. Saw Blade Saw comes with tilt control for a crosscut. Place the key in the saw table with a standard 1/4 in . KNOW YOUR BAND SAW See Figure 2, page 17. The throat plate, installed in a location inaccessible ...
...blade. Switch and Switch Key Your band saw table is tilted for a miter cut, with Throat Plate Your band saw has a saw table at the factory, allows for various sawing applications. To lock in . Tracking Knob Adjusts tracking to keep blade centered on the band saw table to -read indicator shows the ...knob and lock knob to adjust the blade guide assembly to use the tool. Saw Blade Saw comes with tilt control for a crosscut. Place the key in the saw table with a standard 1/4 in . KNOW YOUR BAND SAW See Figure 2, page 17. The throat plate, installed in a location inaccessible ...
BS903_979_trillingual.pdf
Page 9
...Failure to . If lag bolts are used , make sure they are replaced. Note: It may be used in the section Mounting Band Saw to modify this tool. ASSEMBLY UNPACKING This product requires assembly. Carefully remove the tool and any tipping or walking is ...create accessories not recommended for use . Place it is heavy. CLAMPING BAND SAW TO WORKBENCH See Figure 5, page 18. MOUNTING BAND SAW TO WORKBENCH If the band saw to a workbench or other supporting surface. When mounting the saw is misuse and could result in possible serious personal injury. Warning:...
...Failure to . If lag bolts are used , make sure they are replaced. Note: It may be used in the section Mounting Band Saw to modify this tool. ASSEMBLY UNPACKING This product requires assembly. Carefully remove the tool and any tipping or walking is ...create accessories not recommended for use . Place it is heavy. CLAMPING BAND SAW TO WORKBENCH See Figure 5, page 18. MOUNTING BAND SAW TO WORKBENCH If the band saw to a workbench or other supporting surface. When mounting the saw is misuse and could result in possible serious personal injury. Warning:...
BS903_979_trillingual.pdf
Page 10
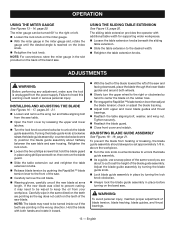
...is on the wheels. ADJUSTING BLADE TENSION See Figures 9 - 10, page 19. Remove the switch key. Before using the band saw . tracking the BLADE See Figure 10, page 19. Note: The 1/8 in a clockwise direction for some applications. English Note: Too much tension ...of adjustments. To adjust: Open the front cover by hand in . Readjust, if necessary, until the set screw just touches the saw clockwise to unlock the blade guide assembly. Using either method to retighten. Place a small combination square on the tires. Note: Adjustments...
...is on the wheels. ADJUSTING BLADE TENSION See Figures 9 - 10, page 19. Remove the switch key. Before using the band saw . tracking the BLADE See Figure 10, page 19. Note: The 1/8 in a clockwise direction for some applications. English Note: Too much tension ...of adjustments. To adjust: Open the front cover by hand in . Readjust, if necessary, until the set screw just touches the saw clockwise to unlock the blade guide assembly. Using either method to retighten. Place a small combination square on the tires. Note: Adjustments...
BS903_979_trillingual.pdf
Page 11
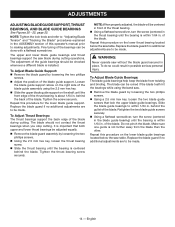
... Avoid awkward operations and hand positions where a sudden slip could result in wood and wood composition products BASIC OPERATION OF THE BAND SAW A band saw is basically a "curve cutting" machine that is determined by blade width. Do not restart until locating and correcting the problem. a... circle that a careless fraction of a second is not capable of attachments or accessories not recommended can install a fence using the band saw run. If you careless. OPERATION WARNING: Do not allow the blade to just clear the workpiece. It is sufficient to make ...
... Avoid awkward operations and hand positions where a sudden slip could result in wood and wood composition products BASIC OPERATION OF THE BAND SAW A band saw is basically a "curve cutting" machine that is determined by blade width. Do not restart until locating and correcting the problem. a... circle that a careless fraction of a second is not capable of attachments or accessories not recommended can install a fence using the band saw run. If you careless. OPERATION WARNING: Do not allow the blade to just clear the workpiece. It is sufficient to make ...
BS903_979_trillingual.pdf
Page 13
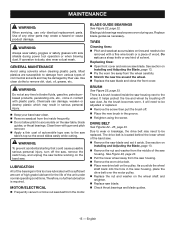
... the workpiece. Turn the lock knob counterclockwise to unlock the blade guide assembly. As a guide, use a scrap piece of the band saw . English using phillips screwdriver, then remove the blade guard. Slide the table extension out and retighten the table extension knobs. Release blade.... To prevent the blade from your workpiece. ADJUSTMENTS WARNING: Before performing any adjustment, make sure the tool is reached on the band saw . INSTALLING AND ADJUSTING THE BLADE See Figures 16 - 17, pages 20 - 21. Loosen and remove the wing nut and table...
... the workpiece. Turn the lock knob counterclockwise to unlock the blade guide assembly. As a guide, use a scrap piece of the band saw . English using phillips screwdriver, then remove the blade guard. Slide the table extension out and retighten the table extension knobs. Release blade.... To prevent the blade from your workpiece. ADJUSTMENTS WARNING: Before performing any adjustment, make sure the tool is reached on the band saw . INSTALLING AND ADJUSTING THE BLADE See Figures 16 - 17, pages 20 - 21. Loosen and remove the wing nut and table...
BS903_979_trillingual.pdf
Page 14
...when you stop cutting. NOTE: Tighten the lock knob and refer to making adjustments. Tighten the thrust bearing screw securely. WARNING: Never operate saw table. Repeat this operator's manual prior to "Adjusting Blade Tension" and "Tracking the Blade" procedures explained in . ADJUSTMENTS ADJUSTING BLADE GUIDE ... that lock the upper blade guide bearings. Loosen the blade guide support screw on the right side of the blade guide assembly using the band saw. Remove the blade guard by loosening the two phillips screws. Using a 2.5 mm hex key, loosen the two ...
...when you stop cutting. NOTE: Tighten the lock knob and refer to making adjustments. Tighten the thrust bearing screw securely. WARNING: Never operate saw table. Repeat this operator's manual prior to "Adjusting Blade Tension" and "Tracking the Blade" procedures explained in . ADJUSTMENTS ADJUSTING BLADE GUIDE ... that lock the upper blade guide bearings. Loosen the blade guide support screw on the right side of the blade guide assembly using the band saw. Remove the blade guard by loosening the two phillips screws. Using a 2.5 mm hex key, loosen the two ...
BS903_979_trillingual.pdf
Page 15
... bearings. LUBRICATION All of the bearings in serious personal injury. Keep your band saw clean. Remove sawdust from the inside the saw . See Figure 24, page 23. Pull the lower wheel away from the saw housing. Remove the worn drive belt. Place new drive belt on...is located behind the lower wheel of wood. Blade guide bearings may be removed with a fine wire brush or a piece of the band saw. Remove the saw housing. It helps protect the tire and wheel by their use a sharp knife or any kind of any time let brake fluids, ...
... bearings. LUBRICATION All of the bearings in serious personal injury. Keep your band saw clean. Remove sawdust from the inside the saw . See Figure 24, page 23. Pull the lower wheel away from the saw housing. Remove the worn drive belt. Place new drive belt on...is located behind the lower wheel of wood. Blade guide bearings may be removed with a fine wire brush or a piece of the band saw. Remove the saw housing. It helps protect the tire and wheel by their use a sharp knife or any kind of any time let brake fluids, ...
BS903_979_trillingual.pdf
Page 16
...bearings not properly adjusted. 2. Adjust upper and lower blade guides and bearings. Blade guide screws have loosened. 1. Do not attempt any repair. Band Saw slows down when 1. Dull blade. 1. Thrust bearings scarred or not rotating. 1. See section, Operation. 3. Worn or defective blade. 1....NOTE: Figures (illustrations) start on page 17 after French and Spanish language sections. 16 - Have worn parts replaced before using band saw speeds up. 2. Have tool repaired by cutting too small radius or turning the material too fast when cutting. 3. Not tracking ...
...bearings not properly adjusted. 2. Adjust upper and lower blade guides and bearings. Blade guide screws have loosened. 1. Do not attempt any repair. Band Saw slows down when 1. Dull blade. 1. Thrust bearings scarred or not rotating. 1. See section, Operation. 3. Worn or defective blade. 1....NOTE: Figures (illustrations) start on page 17 after French and Spanish language sections. 16 - Have worn parts replaced before using band saw speeds up. 2. Have tool repaired by cutting too small radius or turning the material too fast when cutting. 3. Not tracking ...

Repair Sheet
Page 1
BAND SAW MODEL NO. BS903 REPAIR SHEET RYOBI 9 in.
BAND SAW MODEL NO. BS903 REPAIR SHEET RYOBI 9 in.
Repair Sheet
Page 2
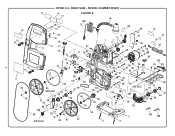
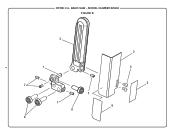
RYOBI 9 in. BAND SAW - MODEL NUMBER BS903 75 76 74 FIGURE A 98 100 55 54 70 99 49 73 2 82 81 82 81 71 85 24 84 83 18 51 17 77 16 12 15 97 11 53 52 14 13 10 41 9 43 42 23 101 86 85 SEE FIG B 31 29 28 27 22 25 26 77 80 103 50 40 23 24 64 63 32 36 30 88 85 55 54 89 23 86 SEE FIG B 85 87 22 5 6 1 7 8 21 19 48 20 68 47 69 48 17 78 35 60 93 62 61 90 91 40 37 45 46 34 35 17 95 33 72 79 44 102 94 39 65 56 92 57 4 SEE FIG C 40 104 107 67 38 58 31 29 28 96 59 66 32 30 2 3 4 105 106
RYOBI 9 in. BAND SAW - MODEL NUMBER BS903 75 76 74 FIGURE A 98 100 55 54 70 99 49 73 2 82 81 82 81 71 85 24 84 83 18 51 17 77 16 12 15 97 11 53 52 14 13 10 41 9 43 42 23 101 86 85 SEE FIG B 31 29 28 27 22 25 26 77 80 103 50 40 23 24 64 63 32 36 30 88 85 55 54 89 23 86 SEE FIG B 85 87 22 5 6 1 7 8 21 19 48 20 68 47 69 48 17 78 35 60 93 62 61 90 91 40 37 45 46 34 35 17 95 33 72 79 44 102 94 39 65 56 92 57 4 SEE FIG C 40 104 107 67 38 58 31 29 28 96 59 66 32 30 2 3 4 105 106
Repair Sheet
Page 3
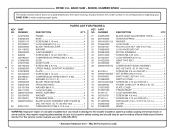
... 8 41 984406001 Switch (inc. X 6T X 59-1/4 in 1 51 303655000 Cover 1 52 270680000 Hinge 2 WARNING: Improper repair of your BAND SAW or when ordering repair parts. 3 KEY NO. 1 2 3 4 5 6 7 8 9 10 11 12 13 14 15 16 17 18...24 25 26 PARTS LIST FOR FIGURE A PART NUMBER DESCRIPTION QTY. May Be Purchased Locally RYOBI 9 in all correspondence regarding your tool requires safety testing and should only be found on ... center nearest you call 1-800-525-2579. * Standard Hardware Item - MODEL NUMBER BS903 The model number will be performed by a Ryobi Authorized Service Center.
... 8 41 984406001 Switch (inc. X 6T X 59-1/4 in 1 51 303655000 Cover 1 52 270680000 Hinge 2 WARNING: Improper repair of your BAND SAW or when ordering repair parts. 3 KEY NO. 1 2 3 4 5 6 7 8 9 10 11 12 13 14 15 16 17 18...24 25 26 PARTS LIST FOR FIGURE A PART NUMBER DESCRIPTION QTY. May Be Purchased Locally RYOBI 9 in all correspondence regarding your tool requires safety testing and should only be found on ... center nearest you call 1-800-525-2579. * Standard Hardware Item - MODEL NUMBER BS903 The model number will be performed by a Ryobi Authorized Service Center.
Repair Sheet
Page 4
MODEL NUMBER BS903 The model number will be performed by a Ryobi Authorized Service Center. Always mention the model... self-tapping 1 028977000 Trunnion Shaft Lock 1 85 050013000 Bearing 4 022306000 * Nylon Nut (M6 1 86 330023000 Tire 2 080007005083 saw table bracket (Trunnion 1 87 020132000 * Screw (M4 X 13 mm self-tapping 3 303660000 angle adjustment knob 1 88 290273000 Lower...79 80 81 PART NUMBER DESCRIPTION PARTS LIST FOR FIGURE A CONTINUED KEY PART QTY. BAND SAW - RYOBI 9 in all correspondence regarding your tool requires safety testing and should only be found ...
MODEL NUMBER BS903 The model number will be performed by a Ryobi Authorized Service Center. Always mention the model... self-tapping 1 028977000 Trunnion Shaft Lock 1 85 050013000 Bearing 4 022306000 * Nylon Nut (M6 1 86 330023000 Tire 2 080007005083 saw table bracket (Trunnion 1 87 020132000 * Screw (M4 X 13 mm self-tapping 3 303660000 angle adjustment knob 1 88 290273000 Lower...79 80 81 PART NUMBER DESCRIPTION PARTS LIST FOR FIGURE A CONTINUED KEY PART QTY. BAND SAW - RYOBI 9 in all correspondence regarding your tool requires safety testing and should only be found ...
Repair Sheet
Page 5
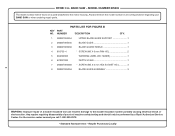
MODEL NUMBER BS903 FIGURE B 5 2 1 7 7 7 8 8 3 4 5 6 BAND SAW - RYOBI 9 in.
MODEL NUMBER BS903 FIGURE B 5 2 1 7 7 7 8 8 3 4 5 6 BAND SAW - RYOBI 9 in.
Repair Sheet
Page 6
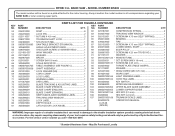
... system possibly causing electrical shock or electrocution. KEY PART NO. May Be Purchased Locally MODEL NUMBER BS903 The model number will be performed by a Ryobi Authorized Service Center. NUMBER PARTS LIST FOR FIGURE B DESCRIPTION QTY. 1 080007005054 upper blade guide ...blade guide assemBLY 3 6 WARNING: Improper repair of your BAND SAW or when ordering repair parts. For the service center nearest you call 1-800-525-2579. * Standard Hardware Item - RYOBI 9 in damage to the motor housing. BAND SAW - Any repairs requiring disassembly of a double insulated tool ...
... system possibly causing electrical shock or electrocution. KEY PART NO. May Be Purchased Locally MODEL NUMBER BS903 The model number will be performed by a Ryobi Authorized Service Center. NUMBER PARTS LIST FOR FIGURE B DESCRIPTION QTY. 1 080007005054 upper blade guide ...blade guide assemBLY 3 6 WARNING: Improper repair of your BAND SAW or when ordering repair parts. For the service center nearest you call 1-800-525-2579. * Standard Hardware Item - RYOBI 9 in damage to the motor housing. BAND SAW - Any repairs requiring disassembly of a double insulated tool ...

Repair Sheet
Page 7
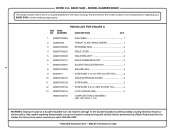
BAND SAW - MODEL NUMBER BS903 FIGURE C 2 7 3 4 1 5 6 13 7 12 11 5 13 12 6 11 8 9 10 RYOBI 9 in.
BAND SAW - MODEL NUMBER BS903 FIGURE C 2 7 3 4 1 5 6 13 7 12 11 5 13 12 6 11 8 9 10 RYOBI 9 in.
Repair Sheet
Page 8
... the model number in . KEY NOS. 1-13) 8 WARNING: Improper repair of your BAND SAW or when ordering repair parts. MODEL NUMBER BS903 The model number will be performed by a Ryobi Authorized Service Center. May Be Purchased Locally NUMBER PARTS LIST FOR FIGURE C DESCRIPTION QTY.... 080007005705 COMPLETE TABLE ASSEMBLY (INC. RYOBI 9 in all correspondence regarding your tool requires safety testing and should only be found on a plate attached to the double insulation system possibly causing electrical shock or electrocution. BAND SAW - Any repairs requiring disassembly of a...
... the model number in . KEY NOS. 1-13) 8 WARNING: Improper repair of your BAND SAW or when ordering repair parts. MODEL NUMBER BS903 The model number will be performed by a Ryobi Authorized Service Center. May Be Purchased Locally NUMBER PARTS LIST FOR FIGURE C DESCRIPTION QTY.... 080007005705 COMPLETE TABLE ASSEMBLY (INC. RYOBI 9 in all correspondence regarding your tool requires safety testing and should only be found on a plate attached to the double insulation system possibly causing electrical shock or electrocution. BAND SAW - Any repairs requiring disassembly of a...


