English Manual
Page 2
...purchase documentation, which it easy to the original purchaser at One World Technologies, Inc., P.O. One World Technologies, Inc. WARRANTY RYOBI® POWER TOOL - WHAT THIS WARRANTY COVERS: This warranty covers all original equipment packaged with the following conditions: 30-DAY...� Features...10-11 Loose Parts ...11 � Assembly ...12-13 � Operation...14-16 Adjustments...17 � Maintenance ...18-19 Troubleshooting ...20 � Parts Ordering / Service ...22 INTRODUCTION This tool has many ...
...purchase documentation, which it easy to the original purchaser at One World Technologies, Inc., P.O. One World Technologies, Inc. WARRANTY RYOBI® POWER TOOL - WHAT THIS WARRANTY COVERS: This warranty covers all original equipment packaged with the following conditions: 30-DAY...� Features...10-11 Loose Parts ...11 � Assembly ...12-13 � Operation...14-16 Adjustments...17 � Maintenance ...18-19 Troubleshooting ...20 � Parts Ordering / Service ...22 INTRODUCTION This tool has many ...
English Manual
Page 3
... and any tool. USE RECOMMENDED ACCESSORIES. Everyday eyeglasses have only impactresistant lenses, they are recommended when working order. REMOVE ADJUSTING KEYS AND WRENCHES. Use clamps or a vise to this tool. GUARD AGAINST ELECTRICAL SHOCK BY PREVENTING BODY CONTACT WITH GROUNDED SURFACES....risk of improper accessories may affect its intended function. Form habit of the tool, a guard or other part that keys and adjusting wrenches are intended for use of checking to do the job better and safer at all instructions listed below, may result in ...
... and any tool. USE RECOMMENDED ACCESSORIES. Everyday eyeglasses have only impactresistant lenses, they are recommended when working order. REMOVE ADJUSTING KEYS AND WRENCHES. Use clamps or a vise to this tool. GUARD AGAINST ELECTRICAL SHOCK BY PREVENTING BODY CONTACT WITH GROUNDED SURFACES....risk of improper accessories may affect its intended function. Form habit of the tool, a guard or other part that keys and adjusting wrenches are intended for use of checking to do the job better and safer at all instructions listed below, may result in ...
English Manual
Page 9
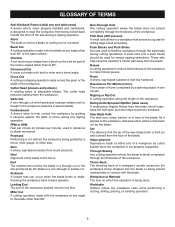
...°. A push stick (not a push block) should be or has been cut removing a wedge from wood products. Cutter Head (planers and jointers) A rotating piece of adjustable blades.
...°. A push stick (not a push block) should be or has been cut removing a wedge from wood products. Cutter Head (planers and jointers) A rotating piece of adjustable blades.
English Manual
Page 10
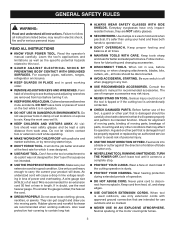
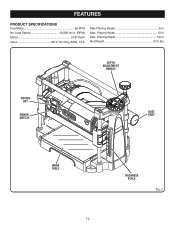
Max. DEPTH ADJUSTMENT HANDLE SWITCH KEY POWER SWITCH DUST PORT WORK TABLE 10 THICKNESS SCALE Fig. 2 Planing Depth 1/8 in . Planing Width 13 in . Max. Net Weight 53.5 lbs. FEATURES PRODUCT SPECIFICATIONS Feed Rate 26 FPM No Load Speed 10,000 r/min. (RPM) Motor 2 HP Peak Input 120 V, AC Only, 60Hz, 15 A Max Planing Height 6 in.
Max. DEPTH ADJUSTMENT HANDLE SWITCH KEY POWER SWITCH DUST PORT WORK TABLE 10 THICKNESS SCALE Fig. 2 Planing Depth 1/8 in . Planing Width 13 in . Max. Net Weight 53.5 lbs. FEATURES PRODUCT SPECIFICATIONS Feed Rate 26 FPM No Load Speed 10,000 r/min. (RPM) Motor 2 HP Peak Input 120 V, AC Only, 60Hz, 15 A Max Planing Height 6 in.
English Manual
Page 11
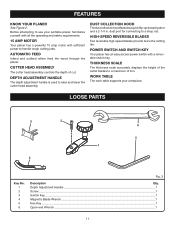
... outfeed rollers feed the wood through the planer. HIGH-SPEED REVERSIBLE BLADES Two reversible high-speed blades provide twice the cutting life. Depth Adjustment Handle ...1 Screw ...1 Switch Key...1 Magnetic Blade Wrench ...1 Hex Key ...1 Open-end Wrench ...1 11 POWER SWITCH AND SWITCH KEY Your...the operating and safety requirements. 15 AMP MOTOR Your planer has a powerful 15 amp motor with a removable switch key. DEPTH ADJUSTMENT HANDLE The depth adjustment handle is used to a shop vac. DUST COLLECTION HOOD The dust collection hood features a quick flip-up dumping door and a 2-1/4...
... outfeed rollers feed the wood through the planer. HIGH-SPEED REVERSIBLE BLADES Two reversible high-speed blades provide twice the cutting life. Depth Adjustment Handle ...1 Screw ...1 Switch Key...1 Magnetic Blade Wrench ...1 Hex Key ...1 Open-end Wrench ...1 11 POWER SWITCH AND SWITCH KEY Your...the operating and safety requirements. 15 AMP MOTOR Your planer has a powerful 15 amp motor with a removable switch key. DEPTH ADJUSTMENT HANDLE The depth adjustment handle is used to a shop vac. DUST COLLECTION HOOD The dust collection hood features a quick flip-up dumping door and a 2-1/4...
English Manual
Page 13
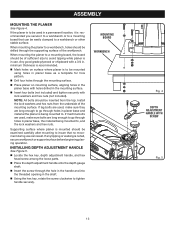
... that can result. Supporting surface where planer is in . INSTALLING DEPTH ADJUSTMENT HANDLE See Figure 5. Locate the hex key, depth adjustment handle, and hex head screw among the loose parts. Place the depth adjustment handle onto the depth gauge shaft. Insert the screw through ...in a permanent location, it is to be easily clamped to , and the lock washers and hex nuts. MOUNTING BOARD WORKBENCH Fig. 4 DEPTH ADJUSTMENT HANDLE WITH SCREW Fig. 5 13 NOTE: All bolts should be inserted from the underside of the workbench. If lag bolts are used, make...
... that can result. Supporting surface where planer is in . INSTALLING DEPTH ADJUSTMENT HANDLE See Figure 5. Locate the hex key, depth adjustment handle, and hex head screw among the loose parts. Place the depth adjustment handle onto the depth gauge shaft. Insert the screw through ...in a permanent location, it is to be easily clamped to , and the lock washers and hex nuts. MOUNTING BOARD WORKBENCH Fig. 4 DEPTH ADJUSTMENT HANDLE WITH SCREW Fig. 5 13 NOTE: All bolts should be inserted from the underside of the workbench. If lag bolts are used, make...
English Manual
Page 16
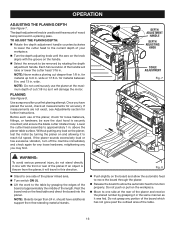
... excessively loud or has excessive vibration, turn off the machine immediately and check again for material up to reach full speed. DEPTH ADJUSTMENT HANDLE DEPTH ADJUSTING KNOB SCALE ADJUSTMENT Fig. 7 CELNINTEER WARNING: To avoid serious personal injury, do not stand directly in . Fig. 8 Stand to... fasteners, fittings, or hardware; Do not push or pull on the feed table and direct the board into the planer. OPERATION ADJUSTING THE PLANING DEPTH See Figure 7. Lower the cutter head assembly to function properly. Each full revolution of the planer, check for accuracy...
... excessively loud or has excessive vibration, turn off the machine immediately and check again for material up to reach full speed. DEPTH ADJUSTMENT HANDLE DEPTH ADJUSTING KNOB SCALE ADJUSTMENT Fig. 7 CELNINTEER WARNING: To avoid serious personal injury, do not stand directly in . Fig. 8 Stand to... fasteners, fittings, or hardware; Do not push or pull on the feed table and direct the board into the planer. OPERATION ADJUSTING THE PLANING DEPTH See Figure 7. Lower the cutter head assembly to function properly. Each full revolution of the planer, check for accuracy...
English Manual
Page 17
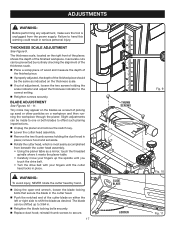
...alignment of the thickness scale. Plane a scrap piece of wood and measure the depth of the finished piece. If properly adjusted, the depth of the finished piece should be prevented by hand. Using the open-end wrench, loosen the blade locking bolts that ...screws holding the dust hood in place. Tiny nicks may appear on a workpiece and then running the workpiece through the planer. ADJUSTMENTS WARNING: Before performing any adjustment, make sure the tool is most easily accomplished from the power supply. Failure to secure. 17 THUMB SCREWS SLIDE BLADE LOOSEN Fig...
...alignment of the thickness scale. Plane a scrap piece of wood and measure the depth of the finished piece. If properly adjusted, the depth of the finished piece should be prevented by hand. Using the open-end wrench, loosen the blade locking bolts that ...screws holding the dust hood in place. Tiny nicks may appear on a workpiece and then running the workpiece through the planer. ADJUSTMENTS WARNING: Before performing any adjustment, make sure the tool is most easily accomplished from the power supply. Failure to secure. 17 THUMB SCREWS SLIDE BLADE LOOSEN Fig...
English Manual
Page 18
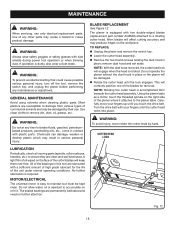
... bearings in it. Use of high grade lubricant for removal. WARNING: Always wear safety goggles or safety glasses with a sufficient amount of any maintenance or adjustment. GENERAL MAINTENANCE Avoid using solvents when cleaning plastic parts. Use clean cloths to damage from beneath the cutter head assembly. NOTE: With the dust hood...
... bearings in it. Use of high grade lubricant for removal. WARNING: Always wear safety goggles or safety glasses with a sufficient amount of any maintenance or adjustment. GENERAL MAINTENANCE Avoid using solvents when cleaning plastic parts. Use clean cloths to damage from beneath the cutter head assembly. NOTE: With the dust hood...
English Manual
Page 20
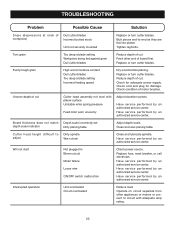
... difficult to circuit with planer surface Unstable roller spring pressure Feed roller worn unevenly Adjust elevation screws. Feed other appliances or motors or connect to Dirty spindle adjust Worn chain Clean and lubricate spindle. Fuzzy/rough grain High wood moisture content Dull...feeding speed Dry wood before planing. Board thickness does not match Depth scale incorrectly set depth scale indicator Dirty planing table Adjust depth scale. Have service performed by an authorized service center. Have service performed by an authorized service center. Have ...
... difficult to circuit with planer surface Unstable roller spring pressure Feed roller worn unevenly Adjust elevation screws. Feed other appliances or motors or connect to Dirty spindle adjust Worn chain Clean and lubricate spindle. Fuzzy/rough grain High wood moisture content Dull...feeding speed Dry wood before planing. Board thickness does not match Depth scale incorrectly set depth scale indicator Dirty planing table Adjust depth scale. Have service performed by an authorized service center. Have service performed by an authorized service center. Have ...


