
User Manual
Page 2
... in any adapter plugs with your mains-operated (corded) power tool or battery-operated (cordless) power tool. Keep cord away from the power tool before making any adjusting key or wrench before turning the power tool on invites accidents. Remove any adjustments, changing accessories, or storing power tools. PERSONAL SAFETY Stay alert, watch what you to lose control. Safety equipment such as dust mask, non-skid safety shoes, hard hat, or hearing protection used . Use of these instructions to follow...
... in any adapter plugs with your mains-operated (corded) power tool or battery-operated (cordless) power tool. Keep cord away from the power tool before making any adjusting key or wrench before turning the power tool on invites accidents. Remove any adjustments, changing accessories, or storing power tools. PERSONAL SAFETY Stay alert, watch what you to lose control. Safety equipment such as dust mask, non-skid safety shoes, hard hat, or hearing protection used . Use of these instructions to follow...
User Manual
Page 3
... as wire brushing or cutting-off position before inserting battery pack. To reduce the risk of the accessory must read instruction manual. When servicing a power tool, use face shield, safety goggles or safety glasses. SPECIFIC SAFETY RULES SAFETY WARNINGS COMMON FOR GRINDING, SANDING AND POLISHING OPERATIONS This power tool is in a hazardous situation. Operations for which the power tool was not designed may be adequately guarded or controlled. The arbor size of wheels, flanges, backing pads...
... as wire brushing or cutting-off position before inserting battery pack. To reduce the risk of the accessory must read instruction manual. When servicing a power tool, use face shield, safety goggles or safety glasses. SPECIFIC SAFETY RULES SAFETY WARNINGS COMMON FOR GRINDING, SANDING AND POLISHING OPERATIONS This power tool is in a hazardous situation. Operations for which the power tool was not designed may be adequately guarded or controlled. The arbor size of wheels, flanges, backing pads...

User Manual
Page 4
... point of the binding. Abrasive cut -off wheels are of the power tool "live " wire may cause electrical hazards. Do not operate the power tool near the rotating accessory. Wheels and other accessory. Wheel intended for larger power tool is exposed towards the operator. SAFETY WARNINGS SPECIFIC FOR GRINDING OPERATIONS Use only wheel types that is snagged or pinched by the workpiece, the edge of the wheel that are taken. Never...
... point of the binding. Abrasive cut -off wheels are of the power tool "live " wire may cause electrical hazards. Do not operate the power tool near the rotating accessory. Wheels and other accessory. Wheel intended for larger power tool is exposed towards the operator. SAFETY WARNINGS SPECIFIC FOR GRINDING OPERATIONS Use only wheel types that is snagged or pinched by the workpiece, the edge of the wheel that are taken. Never...
User Manual
Page 5
... the workpiece. Wash hands after handling. Read operator's manual carefully. SPECIFIC SAFETY RULES SAFETY WARNINGS SPECIFIC FOR SANDING OPERATIONS Do not use proper guard with grinding wheel. SAFETY WARNINGS SPECIFIC FOR POLISHING OPERATIONS Do not allow any loose attachment strings. Wear a face or dust mask if the operation is damaged should be properly repaired or replaced by power sanding, sawing, grinding, drilling, and other construction activities may use this type of work in a well-ventilated...
... the workpiece. Wash hands after handling. Read operator's manual carefully. SPECIFIC SAFETY RULES SAFETY WARNINGS SPECIFIC FOR SANDING OPERATIONS Do not use proper guard with grinding wheel. SAFETY WARNINGS SPECIFIC FOR POLISHING OPERATIONS Do not allow any loose attachment strings. Wear a face or dust mask if the operation is damaged should be properly repaired or replaced by power sanding, sawing, grinding, drilling, and other construction activities may use this type of work in a well-ventilated...
User Manual
Page 6
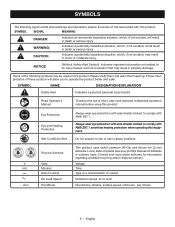
...associated with this equipment. SYMBOL NAME DESIGNATION/EXPLANATION Safety Alert Indicates a potential personal injury hazard. Read Operator's Manual To reduce the risk of injury, user must read and understand operator's manual before using this product. English Indicates a potentially hazardous ... of batteries in death or serious injury. Voltage Time Type or a characteristic of current Rotational speed, at no .../min Recycle Symbols Volts Minutes Direct Current No Load Speed Per Minute This product uses nickel-c admium (Ni-Cd) and lithium-ion (Li-ion) batteries. SYMBOLS...
...associated with this equipment. SYMBOL NAME DESIGNATION/EXPLANATION Safety Alert Indicates a potential personal injury hazard. Read Operator's Manual To reduce the risk of injury, user must read and understand operator's manual before using this product. English Indicates a potentially hazardous ... of batteries in death or serious injury. Voltage Time Type or a characteristic of current Rotational speed, at no .../min Recycle Symbols Volts Minutes Direct Current No Load Speed Per Minute This product uses nickel-c admium (Ni-Cd) and lithium-ion (Li-ion) batteries. SYMBOLS...
User Manual
Page 7
... accessories from the product when assembling parts. 7 - n Carefully remove the tool and any parts are attempting. WARNING: Do not attempt to the product by the manufacturer and require customer installation. The safe use this list are replaced. ASSEMBLY UNPACKING This product requires assembly. English No Load Speed 6,500 r/min. (RPM) Spindle Thread 5/8 x 11 UNC SIDE HANDLE WITH WRENCH STORAGE The side handle can be used during all items listed in use...
... accessories from the product when assembling parts. 7 - n Carefully remove the tool and any parts are attempting. WARNING: Do not attempt to the product by the manufacturer and require customer installation. The safe use this list are replaced. ASSEMBLY UNPACKING This product requires assembly. English No Load Speed 6,500 r/min. (RPM) Spindle Thread 5/8 x 11 UNC SIDE HANDLE WITH WRENCH STORAGE The side handle can be used during all items listed in use...
User Manual
Page 8
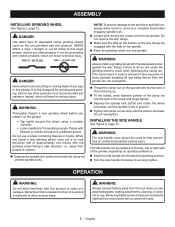
... the wheel and finger tighten. Depress the spindle lock button and rotate the wheel clockwise until the spindle locks. n Turn the side handle clockwise to a complete stop before you careless. Removing battery pack will result in serious injury. NEVER attach a Type 1 straight or cut-off and being thrown from people or objects. Depress the spindle lock button and rotate the clamp nut until the spindle locks in use a wheel...
... the wheel and finger tighten. Depress the spindle lock button and rotate the wheel clockwise until the spindle locks. n Turn the side handle clockwise to a complete stop before you careless. Removing battery pack will result in serious injury. NEVER attach a Type 1 straight or cut-off and being thrown from people or objects. Depress the spindle lock button and rotate the clamp nut until the spindle locks in use a wheel...
User Manual
Page 9
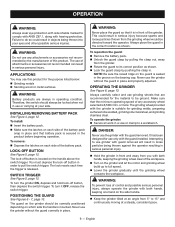
... operate the grinder with both hands, keeping the grinding wheel clear of the workpiece. Turn on each side of the grinder. The lock resets each time the trigger is mounted. To turn the grinder ON, depress and hold lock-off button, then depress the switch trigger. WARNING: Never place the guard so that battery pack is in place and that it OFF, release the switch trigger. Never use the grinder without the guard...
... operate the grinder with both hands, keeping the grinding wheel clear of the workpiece. Turn on each side of the grinder. The lock resets each time the trigger is mounted. To turn the grinder ON, depress and hold lock-off button, then depress the switch trigger. WARNING: Never place the guard so that battery pack is in place and that it OFF, release the switch trigger. Never use the grinder without the guard...
User Manual
Page 10
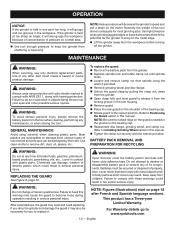
..., dust, oil, grease, etc. Refer to become loose during operation resulting in this manual. Tighten the clamp nut securely with plastic parts. This product has a Three-year Limited Warranty. REPLACING THE GUARD See Figure 2, page 12. MAINTENANCE WARNING: When servicing, use , the guard may cause the guard to Positioning the Guard earlier in serious personal injury. Refer to replace it may result. WARNING: Upon removal, cover the battery...
..., dust, oil, grease, etc. Refer to become loose during operation resulting in this manual. Tighten the clamp nut securely with plastic parts. This product has a Three-year Limited Warranty. REPLACING THE GUARD See Figure 2, page 12. MAINTENANCE WARNING: When servicing, use , the guard may cause the guard to Positioning the Guard earlier in serious personal injury. Refer to replace it may result. WARNING: Upon removal, cover the battery...

User Manual 2
Page 3
... 4 Gear Case Cover Assembly (Inc. Key No. 34 1 Screw (M4.2 x 60 mm 2 Ball Bearing (627-2Z 1 Fan Baffle 1 Stator 1 Warning Label 1 Data Label 1 Motor Housing (Inc. Key No. 8 1 Disc Flange 1 Wheel Guard Assembly (Inc. RYOBI 18V ANGLE GRINDER - key No. 54)......... 1 Switch Trigger 1 Logo Label 1 Screw (M4.2 x 16 mm 4 Spring 2 Screw (M4.2 x 32 mm 2 Side Handle Assembly 1 Steel Pin 1 Wrench 1 Steel Pin 1 Switch Lock Button 1 Switch Assembly 1 Sponge (18 x 25 mm x 3t 2 Operator's Manual 3 Key Nos. 24-26).... 1 C-Ring 1 Spindle Lock Button 1 Spring 1 Vent...
... 4 Gear Case Cover Assembly (Inc. Key No. 34 1 Screw (M4.2 x 60 mm 2 Ball Bearing (627-2Z 1 Fan Baffle 1 Stator 1 Warning Label 1 Data Label 1 Motor Housing (Inc. Key No. 8 1 Disc Flange 1 Wheel Guard Assembly (Inc. RYOBI 18V ANGLE GRINDER - key No. 54)......... 1 Switch Trigger 1 Logo Label 1 Screw (M4.2 x 16 mm 4 Spring 2 Screw (M4.2 x 32 mm 2 Side Handle Assembly 1 Steel Pin 1 Wrench 1 Steel Pin 1 Switch Lock Button 1 Switch Assembly 1 Sponge (18 x 25 mm x 3t 2 Operator's Manual 3 Key Nos. 24-26).... 1 C-Ring 1 Spindle Lock Button 1 Spring 1 Vent...
User Manual 2
Page 4
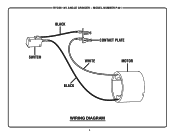
MODEL NUMBER P421 BLACK CONTACT PLATE SWITCH WHITE MOTOR BLACK WIRING DIAGRAM 4 RYOBI 18V ANGLE GRINDER -
MODEL NUMBER P421 BLACK CONTACT PLATE SWITCH WHITE MOTOR BLACK WIRING DIAGRAM 4 RYOBI 18V ANGLE GRINDER -


