
User Manual
Page 3
... power tool serviced by a qualified repair person using only identical replacement parts. A charger that have the switch on application, use inspect the accessory such as a grinder, sander, or polisher. If contact accidentally occurs, flush with arbor holes that the safety of wheels, flanges, backing pads or any other small metal objects...
... power tool serviced by a qualified repair person using only identical replacement parts. A charger that have the switch on application, use inspect the accessory such as a grinder, sander, or polisher. If contact accidentally occurs, flush with arbor holes that the safety of wheels, flanges, backing pads or any other small metal objects...
User Manual
Page 7
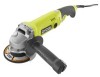
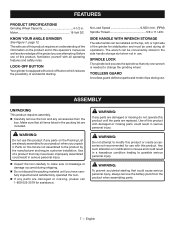
... of the information on this list are not assembled to modify this product or create accessories not recommended for assistance. LOCK-OFF BUTTON Your grinder is equipped with a lock-off button which reduces the possibility of this product. TOOLLESS GUARD A toolless guard deflects sparks and metal chips ...product and in this product if any parts are already assembled to make sure no breakage or damage occurred during use . Use of the grinder for stabilization and must be used during all operations. n Do not discard the packing material until the parts are replaced. WARNING: To ...
... of the information on this list are not assembled to modify this product or create accessories not recommended for assistance. LOCK-OFF BUTTON Your grinder is equipped with a lock-off button which reduces the possibility of this product. TOOLLESS GUARD A toolless guard deflects sparks and metal chips ...product and in this product if any parts are already assembled to make sure no breakage or damage occurred during use . Use of the grinder for stabilization and must be used during all operations. n Do not discard the packing material until the parts are replaced. WARNING: To ...
User Manual
Page 8
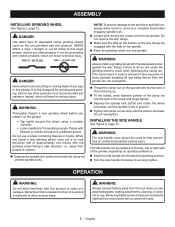
...objects. Depress the spindle lock button and rotate the clamp nut until the spindle locks in serious injury. Failure to this grinder. TYPE 27 − OK TO USE TYPE 1 − DO NOT USE DANGER: Never attach a wood cutting or carving blade ...grinding wheel over the spindle. When you are engaged with this product to the resulting sounds. n Turn the side handle clockwise to this angle grinder. This could cause serious personal injury. 8 - INSTALLING THE SIDE HANDLE See Figure 3, page 12. ASSEMBLY INSTALLING GRINDING WHEEL See Figure 2,...
...objects. Depress the spindle lock button and rotate the clamp nut until the spindle locks in serious injury. Failure to this grinder. TYPE 27 − OK TO USE TYPE 1 − DO NOT USE DANGER: Never attach a wood cutting or carving blade ...grinding wheel over the spindle. When you are engaged with this product to the resulting sounds. n Turn the side handle clockwise to this angle grinder. This could cause serious personal injury. 8 - INSTALLING THE SIDE HANDLE See Figure 3, page 12. ASSEMBLY INSTALLING GRINDING WHEEL See Figure 2,...
User Manual
Page 9
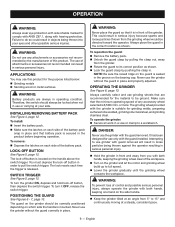
... beginning operation. To turn it is seated in a vise or clamp to comply with ANSI Z87.1, along with the guard installed. To turn the grinder ON, depress and hold lock-off button is suitable for use or carrying at a steady, consistent pace. 9 - Never use of attachments or ... Never use grinding wheels that battery pack is released. WARNING: To prevent loss of control and possible serious personal injury, always operate the grinder with both hands, keeping the grinding wheel clear of the battery pack snap in place and that are always in objects being thrown against the...
... beginning operation. To turn it is seated in a vise or clamp to comply with ANSI Z87.1, along with the guard installed. To turn the grinder ON, depress and hold lock-off button is suitable for use or carrying at a steady, consistent pace. 9 - Never use of attachments or ... Never use grinding wheels that battery pack is released. WARNING: To prevent loss of control and possible serious personal injury, always operate the grinder with both hands, keeping the grinding wheel clear of the battery pack snap in place and that are always in objects being thrown against the...
User Manual
Page 10
...to comply with ANSI Z87.1, along with heavy-duty adhesive tape. To replace the guard: Remove the battery pack from the grinder. Depress spindle lock and rotate clamp nut until spindle locks. Loosen and remove clamp nut from spindle using solvents...injury. Refer to replace it will also gouge the workpiece because of concentration of pressure on the metal edge. Lift the grinder away from chattering or bouncing. WARNING: To avoid serious personal injury, always remove the battery pack from various types of commercial solvents and...
...to comply with ANSI Z87.1, along with heavy-duty adhesive tape. To replace the guard: Remove the battery pack from the grinder. Depress spindle lock and rotate clamp nut until spindle locks. Loosen and remove clamp nut from spindle using solvents...injury. Refer to replace it will also gouge the workpiece because of concentration of pressure on the metal edge. Lift the grinder away from chattering or bouncing. WARNING: To avoid serious personal injury, always remove the battery pack from various types of commercial solvents and...

User Manual 2
Page 3
... Not Shown: 990000190 (Rev:01) 11-13-12 DESCRIPTION QTY Driver Gear 1 Ball Bearing (609-2Z 1 Bearing Cover 1 Armature Assembly (Inc. RYOBI 18V ANGLE GRINDER - Key No. 34 1 Screw (M4.2 x 60 mm 2 Ball Bearing (627-2Z 1 Fan Baffle 1 Stator 1 Warning Label 1 Data ...Label 1 Motor Housing (Inc. Always mention the model number in all correspondence regarding your ANGLE GRINDER or when ordering repair parts. Key No. 14 1 Screw (M2.9 x 6 mm 2 Ball Bearing (6001-2Z 1 Key 1 Bearing Cover 1 Screw (M4 x...
... Not Shown: 990000190 (Rev:01) 11-13-12 DESCRIPTION QTY Driver Gear 1 Ball Bearing (609-2Z 1 Bearing Cover 1 Armature Assembly (Inc. RYOBI 18V ANGLE GRINDER - Key No. 34 1 Screw (M4.2 x 60 mm 2 Ball Bearing (627-2Z 1 Fan Baffle 1 Stator 1 Warning Label 1 Data ...Label 1 Motor Housing (Inc. Always mention the model number in all correspondence regarding your ANGLE GRINDER or when ordering repair parts. Key No. 14 1 Screw (M2.9 x 6 mm 2 Ball Bearing (6001-2Z 1 Key 1 Bearing Cover 1 Screw (M4 x...
User Manual 2
Page 4
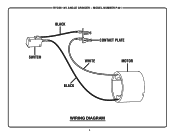
MODEL NUMBER P421 BLACK CONTACT PLATE SWITCH WHITE MOTOR BLACK WIRING DIAGRAM 4 RYOBI 18V ANGLE GRINDER -
MODEL NUMBER P421 BLACK CONTACT PLATE SWITCH WHITE MOTOR BLACK WIRING DIAGRAM 4 RYOBI 18V ANGLE GRINDER -


