Warranty (English)
Page 1
... instruction • Installation • Set up adjustments • Cosmetic damage • Damage due to acts of protection as you own your original receipt and the product to obtain warranty service? or (2) replace the product at a retail store location, take your Rocketfish product during the Warranty Period of a defect covered by an authorized Rocketfish repair center or store personnel, Rocketfish...
... instruction • Installation • Set up adjustments • Cosmetic damage • Damage due to acts of protection as you own your original receipt and the product to obtain warranty service? or (2) replace the product at a retail store location, take your Rocketfish product during the Warranty Period of a defect covered by an authorized Rocketfish repair center or store personnel, Rocketfish...
Warranty (English)
Page 2
... where the factory applied serial number has been altered or removed REPAIR REPLACEMENT AS PROVIDED UNDER THIS WARRANTY IS YOUR EXCLUSIVE REMEDY. All rights reserved. Contact Rocketfish: For customer service please call 1-800-620-2790 www.rocketfishproducts.com Distributed by anyone other products and brand names are trademarks of their respective owners. 2 www.rocketfishproducts.com THIS WARRANTY GIVES YOU SPECIFIC LEGAL...
... where the factory applied serial number has been altered or removed REPAIR REPLACEMENT AS PROVIDED UNDER THIS WARRANTY IS YOUR EXCLUSIVE REMEDY. All rights reserved. Contact Rocketfish: For customer service please call 1-800-620-2790 www.rocketfishproducts.com Distributed by anyone other products and brand names are trademarks of their respective owners. 2 www.rocketfishproducts.com THIS WARRANTY GIVES YOU SPECIFIC LEGAL...
Quick Setup Guide (English)
Page 1
... the remote control. 3 Set up the Wireless HD Audio Starter Kit. The power indicator LEDs should disable hub mode on this is your house. 1 Connect the right speaker to connect the black (-) speaker-out connector. The LED around the source button turns on the wireless receiver for wireless sender) Speaker cable (4) 3 ft (91.5 cm) User Guide Quick Setup Guide Initial setup 1 Unpack the package contents. 2 Enable the remote control battery. To headphones or line...
... the remote control. 3 Set up the Wireless HD Audio Starter Kit. The power indicator LEDs should disable hub mode on this is your house. 1 Connect the right speaker to connect the black (-) speaker-out connector. The LED around the source button turns on the wireless receiver for wireless sender) Speaker cable (4) 3 ft (91.5 cm) User Guide Quick Setup Guide Initial setup 1 Unpack the package contents. 2 Enable the remote control battery. To headphones or line...
User Manual (English)
Page 3
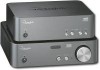
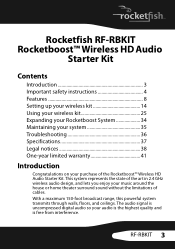
RF-RBKIT 3 The audio signal is free from interference. With a maximum 150-foot broadcast range, this powerful system transmits through walls, floors, and ceilings. This system represents the state of the art in 2.4 GHz wireless...; Wireless HD Audio Starter Kit. Rocketfish RF-RBKIT Rocketboost™ Wireless HD Audio Starter Kit Contents Introduction 3 Important safety instructions 4 Features 8 Setting up your wireless kit 14 Using your wireless kit 25 Expanding your Rocketboost System 34 Maintaining your system 35 Troubleshooting 36 Specifications 37 Legal notices 38 One-year...
RF-RBKIT 3 The audio signal is free from interference. With a maximum 150-foot broadcast range, this powerful system transmits through walls, floors, and ceilings. This system represents the state of the art in 2.4 GHz wireless...; Wireless HD Audio Starter Kit. Rocketfish RF-RBKIT Rocketboost™ Wireless HD Audio Starter Kit Contents Introduction 3 Important safety instructions 4 Features 8 Setting up your wireless kit 14 Using your wireless kit 25 Expanding your Rocketboost System 34 Maintaining your system 35 Troubleshooting 36 Specifications 37 Legal notices 38 One-year...

User Manual (English)
Page 5
...time. 13 Refer all servicing to prevent internal heat from the apparatus. 11 Only use attachments/accessories specified by the manufacturer. 12 Unplug this device to excessive heat such as sunshine, fire, or the like. RF-RBKIT 5 Replace only with one wider than the other. A polarized plug has two blades with the same or equivalent type... building up inside the unit. Caution - Install the system in any way, such as power-supply cord or plug is incorrectly replaced. 6 Clean only with the manufacturer's instructions. 8 Do not install near any heat sources such as vases, ...
...time. 13 Refer all servicing to prevent internal heat from the apparatus. 11 Only use attachments/accessories specified by the manufacturer. 12 Unplug this device to excessive heat such as sunshine, fire, or the like. RF-RBKIT 5 Replace only with one wider than the other. A polarized plug has two blades with the same or equivalent type... building up inside the unit. Caution - Install the system in any way, such as power-supply cord or plug is incorrectly replaced. 6 Clean only with the manufacturer's instructions. 8 Do not install near any heat sources such as vases, ...
User Manual (English)
Page 7
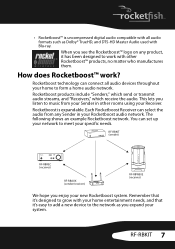
... 's easy to add a new device to form a home audio network. Remember that it's designed to grow with your home entertainment needs, and that it has been designed to meet your new Rocketboost system. When you enjoy your specific needs. The following shows an example Rocketboost network. Rocketboost technology can set up your network to work ? RF-RBKIT 7 Rocketboost is uncompressed...
... 's easy to add a new device to form a home audio network. Remember that it's designed to grow with your home entertainment needs, and that it has been designed to meet your new Rocketboost system. When you enjoy your specific needs. The following shows an example Rocketboost network. Rocketboost technology can set up your network to work ? RF-RBKIT 7 Rocketboost is uncompressed...
User Manual (English)
Page 8
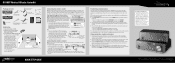
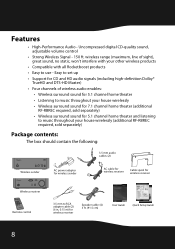
... and DTS-HD Master) • Four channels of sight), great sound, no static, won't interfere with your house wirelessly (additional RF-RBREC required, sold separately) Package contents: The box should contain the following: 3.5 mm audio cables (2) Wireless sender AC power adapter for wireless sender AC cable for wireless receiver Cable spool for wireless receiver Speaker cable (4) 3 ft. (91.5 cm) User Guide Quick Setup Guide 8
... and DTS-HD Master) • Four channels of sight), great sound, no static, won't interfere with your house wirelessly (additional RF-RBREC required, sold separately) Package contents: The box should contain the following: 3.5 mm audio cables (2) Wireless sender AC power adapter for wireless sender AC cable for wireless receiver Cable spool for wireless receiver Speaker cable (4) 3 ft. (91.5 cm) User Guide Quick Setup Guide 8

User Manual (English)
Page 9
... power adapter, the device turns on automatically. The status is activated. 5 & 9 HD A/B button Press repeatedly to toggle between CD and HD audio link modes for a short while when a receiver selects this source to listen to 2 button standby mode. RF-RBKIT 9 When the device is put in a network, the indicator blinks slowly. The indicator blinks for input A and input B, respectively. indicator Lights green when the HUB STATUS switch is set to DISABLE...
... power adapter, the device turns on automatically. The status is activated. 5 & 9 HD A/B button Press repeatedly to toggle between CD and HD audio link modes for a short while when a receiver selects this source to listen to 2 button standby mode. RF-RBKIT 9 When the device is put in a network, the indicator blinks slowly. The indicator blinks for input A and input B, respectively. indicator Lights green when the HUB STATUS switch is set to DISABLE...

User Manual (English)
Page 10
... able to select the four channel audio source, disable the four-channel lock. 10 Set switch to Disable to your network are included in other home theater 2 & 4 SPEAKER IN A/B system. Connect these inputs to disable hub operation. 5 Hub Enable switch Note: There should be only one hub in A/B jack player. Set switch to optimize speaker volume levels. Set to Disable to allow separate control of inputs A and B, allowing 7.1 surround...
... able to select the four channel audio source, disable the four-channel lock. 10 Set switch to Disable to your network are included in other home theater 2 & 4 SPEAKER IN A/B system. Connect these inputs to disable hub operation. 5 Hub Enable switch Note: There should be only one hub in A/B jack player. Set switch to optimize speaker volume levels. Set to Disable to allow separate control of inputs A and B, allowing 7.1 surround...

User Manual (English)
Page 11
... signal from the remote control. Lights when the receiver is receiving HD audio signals. Press to standby mode. Lights when the bass enhancement is not in a network, the indicator blinks slowly. RF-RBKIT 11 The indicator will turn the receiver on or off. Receiver front panel 9 10 TM 1 23 45 67 8 # Feature 1 Standby indicator 2 Power/Join button Power/Join indicator 3 4 BASS button 5 Bass indicator...
... signal from the remote control. Lights when the receiver is receiving HD audio signals. Press to standby mode. Lights when the bass enhancement is not in a network, the indicator blinks slowly. RF-RBKIT 11 The indicator will turn the receiver on or off. Receiver front panel 9 10 TM 1 23 45 67 8 # Feature 1 Standby indicator 2 Power/Join button Power/Join indicator 3 4 BASS button 5 Bass indicator...
User Manual (English)
Page 16
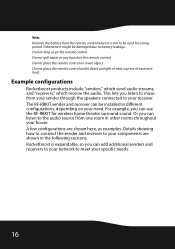
... the remote control. Example configurations Rocketboost products include "senders," which send audio streams, and "receivers," which receive the audio. This lets you can add additional senders and receivers to your network to meet your need. Or you listen to music from one room in other rooms throughout your receiver. The RF-RBKIT sender and receiver can use the RF-RBKIT for...
... the remote control. Example configurations Rocketboost products include "senders," which send audio streams, and "receivers," which receive the audio. This lets you can add additional senders and receivers to your network to meet your need. Or you listen to music from one room in other rooms throughout your receiver. The RF-RBKIT sender and receiver can use the RF-RBKIT for...

User Manual (English)
Page 22
... transmitted. After the 3.5 mm audio cable is removed from the Speaker Input A/B terminals by using the 3.5 mm stereo cable. Make sure that the volume setting on the rear of the sender using the remote control INPUT A or INPUT B buttons. Make sure that you can also use the 3.5 mm to RCA adapter, if your audio source is connected to the Pre-in A/B jack of...
... transmitted. After the 3.5 mm audio cable is removed from the Speaker Input A/B terminals by using the 3.5 mm stereo cable. Make sure that the volume setting on the rear of the sender using the remote control INPUT A or INPUT B buttons. Make sure that you can also use the 3.5 mm to RCA adapter, if your audio source is connected to the Pre-in A/B jack of...

User Manual (English)
Page 23
... the network. RF-RBKIT 23 To connect the sender to the AC power adapter: 1 Plug the AC power adapter into a wall power outlet or the SWITCHED AC outlet of your amplifier, each time you turn your amplifier on or off, the sender's power is connected to a non-switched outlet (such as a wall outlet), not to the SWITCHED AC outlet on . Connecting the sender to the AC power adapter Caution...
... the network. RF-RBKIT 23 To connect the sender to the AC power adapter: 1 Plug the AC power adapter into a wall power outlet or the SWITCHED AC outlet of your amplifier, each time you turn your amplifier on or off, the sender's power is connected to a non-switched outlet (such as a wall outlet), not to the SWITCHED AC outlet on . Connecting the sender to the AC power adapter Caution...
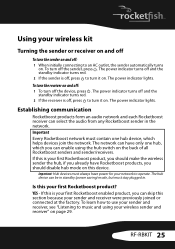
User Manual (English)
Page 25
... is your first Rocketboost enabled product, you can be in standby (power saving) mode, but must always have power for your network to music and using the hub switch on the back of all Rocketboost senders and sender/receivers. To learn how to use your sender and receiver, see "Listening to operate. RF-RBKIT 25 Using your wireless kit Turning the sender or receiver...
... is your first Rocketboost enabled product, you can be in standby (power saving) mode, but must always have power for your network to music and using the hub switch on the back of all Rocketboost senders and sender/receivers. To learn how to use your sender and receiver, see "Listening to operate. RF-RBKIT 25 Using your wireless kit Turning the sender or receiver...

User Manual (English)
Page 26
... in joining mode for more than three seconds to an existing Rocketboost network" on page 27. NO - If this is not your first Rocketboost™ product set. • The power indicators turn green when the HUB switch is set to DISABLE. 2 Press and hold the button on the sender for 30 seconds. Wireless receiver Other Rocketboost devices Wireless sender (HUB: ENABLE) To join...
... in joining mode for more than three seconds to an existing Rocketboost network" on page 27. NO - If this is not your first Rocketboost™ product set. • The power indicators turn green when the HUB switch is set to DISABLE. 2 Press and hold the button on the sender for 30 seconds. Wireless receiver Other Rocketboost devices Wireless sender (HUB: ENABLE) To join...

User Manual (English)
Page 27
... enter joining mode. • The power indicators light steadily if the joining was successful. • The power indicators blink slowly if the joining was not successful. To join an existing Rocketboost network: 1 Set the HUB switch on the sender to DISABLE. • The power indicators turn green when the HUB switch is set to ENABLE. • The power indicators turn blue when the HUB switch is set to an existing Rocketboost network Use this...
... enter joining mode. • The power indicators light steadily if the joining was successful. • The power indicators blink slowly if the joining was not successful. To join an existing Rocketboost network: 1 Set the HUB switch on the sender to DISABLE. • The power indicators turn green when the HUB switch is set to ENABLE. • The power indicators turn blue when the HUB switch is set to an existing Rocketboost network Use this...

User Manual (English)
Page 28
.... Set the 4-Channel Lock switch to DISABLE to put it into joining mode. When the switch is required. See the example configuration, "Wireless Surround Sound for Inputs A and B. The power indicator starts blinking rapidly and the unit will be synchronized, allowing 7.1 systems to your network components in the same room before installing them in joining mode for 30 seconds. 5 Press and hold the button...
.... Set the 4-Channel Lock switch to DISABLE to put it into joining mode. When the switch is required. See the example configuration, "Wireless Surround Sound for Inputs A and B. The power indicator starts blinking rapidly and the unit will be synchronized, allowing 7.1 systems to your network components in the same room before installing them in joining mode for 30 seconds. 5 Press and hold the button...

User Manual (English)
Page 36
... or receiver devices are blinking, see "Establishing communication" on the back of the Rocketboost sender and receiver devices are lit solidly. The network can turn any Rocketboost sender or sender/receiver into a hub by using the HUB STATUS or HUB ENABLE switch on page 25. • Make sure the audio source connected to your Rocketboost devices has the Hub switch enabled. Problem Solution No communication...
... or receiver devices are blinking, see "Establishing communication" on the back of the Rocketboost sender and receiver devices are lit solidly. The network can turn any Rocketboost sender or sender/receiver into a hub by using the HUB STATUS or HUB ENABLE switch on page 25. • Make sure the audio source connected to your Rocketboost devices has the Hub switch enabled. Problem Solution No communication...

User Manual (English)
Page 41
... the web site. Warranty coverage terminates if you sell or otherwise transfer the Product. This warranty does not cover: • Customer instruction • Installation • Set up adjustments • Cosmetic damage RF-RBKIT 41 How to obtain warranty service? If you purchased the Product from an authorized dealer of Rocketfish brand products and packaged with new or rebuilt parts; The...
... the web site. Warranty coverage terminates if you sell or otherwise transfer the Product. This warranty does not cover: • Customer instruction • Installation • Set up adjustments • Cosmetic damage RF-RBKIT 41 How to obtain warranty service? If you purchased the Product from an authorized dealer of Rocketfish brand products and packaged with new or rebuilt parts; The...
User Manual (English)
Page 42
..., London W3 6RS Freephone number for Rocketfish products: 0800 389 1120 42 ROCKETFISH SHALL NOT BE LIABLE FOR ANY INCIDENTAL OR CONSEQUENTIAL DAMAGES FOR THE BREACH OF ANY EXPRESS OR IMPLIED WARRANTY ON THIS PRODUCT, INCLUDING, BUT NOT LIMITED TO, LOST DATA, LOSS OF USE OF YOUR PRODUCT, LOST BUSINESS OR LOST PROFITS. For model number RF-RBKIT-05A: Distributed by Best...
..., London W3 6RS Freephone number for Rocketfish products: 0800 389 1120 42 ROCKETFISH SHALL NOT BE LIABLE FOR ANY INCIDENTAL OR CONSEQUENTIAL DAMAGES FOR THE BREACH OF ANY EXPRESS OR IMPLIED WARRANTY ON THIS PRODUCT, INCLUDING, BUT NOT LIMITED TO, LOST DATA, LOSS OF USE OF YOUR PRODUCT, LOST BUSINESS OR LOST PROFITS. For model number RF-RBKIT-05A: Distributed by Best...

