
Operating Instructions
Page 14
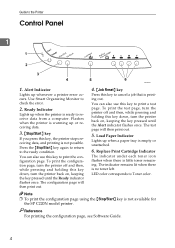
... this key down , turn the printer back on , keeping the key pressed until the Alert indicator flashes once. Reference For printing the configuration page, see Software Guide. 4 Use Smart Organizing Monitor to the ready condition. Flashes when the printer is warming up when the printer ... a test page. Load Paper Indicator Lights up whenever a printer error occurs. The indicator remains lit when there is not available for the SP C220N model printer. Alert Indicator Lights up when a paper tray is printing out. Ready Indicator Lights up or receiving data. 3. {Stop/Start...
... this key down , turn the printer back on , keeping the key pressed until the Alert indicator flashes once. Reference For printing the configuration page, see Software Guide. 4 Use Smart Organizing Monitor to the ready condition. Flashes when the printer is warming up when the printer ... a test page. Load Paper Indicator Lights up whenever a printer error occurs. The indicator remains lit when there is not available for the SP C220N model printer. Alert Indicator Lights up when a paper tray is printing out. Ready Indicator Lights up or receiving data. 3. {Stop/Start...

Operating Instructions
Page 25
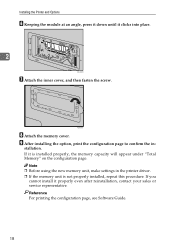
C Remove the adhesive tape from the wall outlet. Align them with the holes on the underside of the printer. stallation. 15 Installing Options B Turn off the printer's power switch, and then unplug the printer's power cord from the optional paper feed unit. 2 ASH025S D Lift the printer using the inset grips on both sides of the printer, and then carefully lower the printer. ASH003S F After installing the option, print the configuration page to confirm the in- ASH051S E There are three upright pins on the optional paper feed unit.
C Remove the adhesive tape from the wall outlet. Align them with the holes on the underside of the printer. stallation. 15 Installing Options B Turn off the printer's power switch, and then unplug the printer's power cord from the optional paper feed unit. 2 ASH025S D Lift the printer using the inset grips on both sides of the printer, and then carefully lower the printer. ASH003S F After installing the option, print the configuration page to confirm the in- ASH051S E There are three upright pins on the optional paper feed unit.
Operating Instructions
Page 26
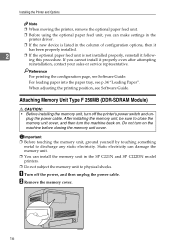
...can damage the memory unit. ❒ You can make settings in the printer driver. ❒ If the new device is listed in the SP C221N and SP C222DN model printers. ❒ Do not subject the memory unit to discharge any static electricity. Attaching Memory Unit Type F 256MB (DDR-SDRAM ... unplug the power cable. When adjusting the printing position, see Software Guide. If you can install the memory unit in the column of configuration options, then it has been properly installed. 2 ❒ If the optional paper feed unit is not installed properly, reinstall it properly ...
...can damage the memory unit. ❒ You can make settings in the printer driver. ❒ If the new device is listed in the SP C221N and SP C222DN model printers. ❒ Do not subject the memory unit to discharge any static electricity. Attaching Memory Unit Type F 256MB (DDR-SDRAM ... unplug the power cable. When adjusting the printing position, see Software Guide. If you can install the memory unit in the column of configuration options, then it has been properly installed. 2 ❒ If the optional paper feed unit is not installed properly, reinstall it properly ...
Operating Instructions
Page 28
... installed, repeat this procedure. Note ❒ Before using the new memory unit, make settings in - I After installing the option, print the configuration page to confirm the in the printer driver. ❒ If the memory unit is installed properly, the memory capacity will appear under "Total Memory..." on the configuration page. If you cannot install it clicks into place. 2 ASH030S G Attach the inner cover, and then fasten the screw. Installing the Printer ...
... installed, repeat this procedure. Note ❒ Before using the new memory unit, make settings in - I After installing the option, print the configuration page to confirm the in the printer driver. ❒ If the memory unit is installed properly, the memory capacity will appear under "Total Memory..." on the configuration page. If you cannot install it clicks into place. 2 ASH030S G Attach the inner cover, and then fasten the screw. Installing the Printer ...
Operating Instructions
Page 36
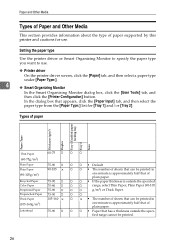
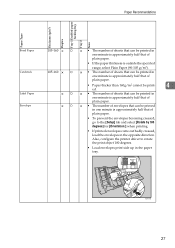
... type under [Paper Type:]. 4 ❖ Smart Organizing Monitor In the Smart Organizing Monitor dialog box, click the [User Tools] tab, and then click the [Printer Configuration] button. Setting the paper type Use the printer driver or Smart Organizing Monitor to specify the paper type you want to use . Types of paper...
... type under [Paper Type:]. 4 ❖ Smart Organizing Monitor In the Smart Organizing Monitor dialog box, click the [User Tools] tab, and then click the [Printer Configuration] button. Setting the paper type Use the printer driver or Smart Organizing Monitor to specify the paper type you want to use . Types of paper...
Operating Instructions
Page 37
Also, configure the printer driver to the [Setup] tab and select [Rotate by 180 degrees] for [Orientation:] when printing. • If printed envelopes come out badly creased, ...
Also, configure the printer driver to the [Setup] tab and select [Rotate by 180 degrees] for [Orientation:] when printing. • If printed envelopes come out badly creased, ...
Operating Instructions
Page 88
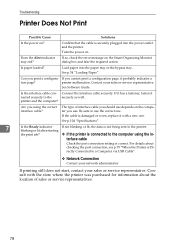
...? blinking or lit after starting the print job? ❖ If the printer is Di- For details about the location of interface cable you cannot print a configuration page, it nected securely to the securely as well. See Software Guide. If the cable is securely plugged into the paper tray or the bypass...
...? blinking or lit after starting the print job? ❖ If the printer is Di- For details about the location of interface cable you cannot print a configuration page, it nected securely to the securely as well. See Software Guide. If the cable is securely plugged into the paper tray or the bypass...
Operating Instructions
Page 114
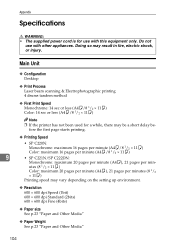
utes (8 1/2 × 11K) Color: maximum 20 pages per minute (A4K), 21 pages per min- Main Unit ❖ Configuration Desktop ❖ Print Process Laser beam scanning & Electrophotographic printing 4 drums tandem method ❖ First Print Speed Monochrome: 14 sec or...a short delay before the first page starts printing. ❖ Printing Speed • SP C220N: Monochrome: maximum 16 pages per minute (A4K/8 1/2 × 11K) Color: maximum 16 pages per minute (A4K/8 1/2 × 11K) 9 • SP C221N/SP C222DN: Monochrome: maximum 20 pages per minute (A4K), 21 pages per minutes (8 ...
utes (8 1/2 × 11K) Color: maximum 20 pages per minute (A4K), 21 pages per min- Main Unit ❖ Configuration Desktop ❖ Print Process Laser beam scanning & Electrophotographic printing 4 drums tandem method ❖ First Print Speed Monochrome: 14 sec or...a short delay before the first page starts printing. ❖ Printing Speed • SP C220N: Monochrome: maximum 16 pages per minute (A4K/8 1/2 × 11K) Color: maximum 16 pages per minute (A4K/8 1/2 × 11K) 9 • SP C221N/SP C222DN: Monochrome: maximum 20 pages per minute (A4K), 21 pages per minutes (8 ...
Operating Instructions
Page 1
Operating Instructions Software Guide 1 Preparing for Printing 2 Setting Up the Printer Driver 3 Other Print Operations 4 Direct Printing from a Digital Camera (PictBridge) 5 Monitoring and Configuring the Printer 6 Using a Print Server 7 Special Operations under Windows 8 Mac OS Configuration 9 Appendix Read this machine and keep it handy for future reference. For safe and correct use, be sure to read "Safety Information" before you use this manual carefully before using the machine.
Operating Instructions Software Guide 1 Preparing for Printing 2 Setting Up the Printer Driver 3 Other Print Operations 4 Direct Printing from a Digital Camera (PictBridge) 5 Monitoring and Configuring the Printer 6 Using a Print Server 7 Special Operations under Windows 8 Mac OS Configuration 9 Appendix Read this machine and keep it handy for future reference. For safe and correct use, be sure to read "Safety Information" before you use this manual carefully before using the machine.
Operating Instructions
Page 7
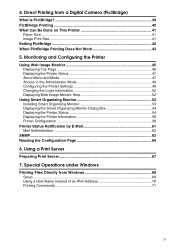
...5. Direct Printing from Windows 69 Setup ...69 Using a Host Name Instead of an IPv4 Address 70 Printing Commands 71 v Monitoring and Configuring the Printer Using Web Image Monitor 45 Displaying Top Page 46 Displaying the Printer Status 47 About Menu and Mode 47 Access in the ...Administrator Mode 49 Configuring the Printer Settings 49 Changing the Login Information 52 Displaying Web Image Monitor Help 52 Using Smart Organizing Monitor 53 Installing Smart Organizing...
...5. Direct Printing from Windows 69 Setup ...69 Using a Host Name Instead of an IPv4 Address 70 Printing Commands 71 v Monitoring and Configuring the Printer Using Web Image Monitor 45 Displaying Top Page 46 Displaying the Printer Status 47 About Menu and Mode 47 Access in the ...Administrator Mode 49 Configuring the Printer Settings 49 Changing the Login Information 52 Displaying Web Image Monitor Help 52 Using Smart Organizing Monitor 53 Installing Smart Organizing...
Operating Instructions
Page 8
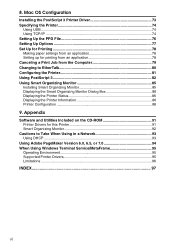
... Making paper settings from an application 78 Setting up for this Printer 91 Smart Organizing Monitor 92 Cautions to EtherTalk 80 Configuring the Printer 81 Using PostScript 3 82 Using Smart Organizing Monitor 85 Installing Smart Organizing Monitor 85 Displaying the Smart Organizing ...Monitor Dialog Box 86 Displaying the Printer Status 86 Displaying the Printer Information 86 Printer Configuration 88 9. Appendix Software and Utilities Included on the CD-ROM 91 Printer Drivers for printing from an application 78 Canceling a...
... Making paper settings from an application 78 Setting up for this Printer 91 Smart Organizing Monitor 92 Cautions to EtherTalk 80 Configuring the Printer 81 Using PostScript 3 82 Using Smart Organizing Monitor 85 Installing Smart Organizing Monitor 85 Displaying the Smart Organizing ...Monitor Dialog Box 86 Displaying the Printer Status 86 Displaying the Printer Information 86 Printer Configuration 88 9. Appendix Software and Utilities Included on the CD-ROM 91 Printer Drivers for printing from an application 78 Canceling a...
Operating Instructions
Page 14
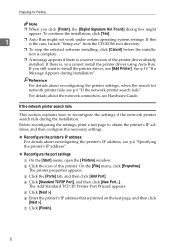
... driver already installed. The printer properties appears. If this printer. Before reconfiguring the settings, print a test page to obtain the printer's IP address, and then configure the necessary settings. ❖ Reconfigure the printer's IP address For details about reconfiguring the printer's IP address, see p.6 "If the network printer search fails". C Click...
... driver already installed. The printer properties appears. If this printer. Before reconfiguring the settings, print a test page to obtain the printer's IP address, and then configure the necessary settings. ❖ Reconfigure the printer's IP address For details about reconfiguring the printer's IP address, see p.6 "If the network printer search fails". C Click...

Operating Instructions
Page 15
Log on the configuration page. G Click [Create a new port]. The IPv4 address you enter here is the address you have an account that has Manage Printers permission. You can ...
Log on the configuration page. G Click [Create a new port]. The IPv4 address you enter here is the address you have an account that has Manage Printers permission. You can ...
Operating Instructions
Page 16
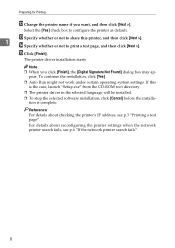
...". 8 Select the [Yes] check box to print a test page, and then click [Next >]. If this printer, and then click [Next >]. 1 N Specify whether or not to configure the printer as default.
...". 8 Select the [Yes] check box to print a test page, and then click [Next >]. If this printer, and then click [Next >]. 1 N Specify whether or not to configure the printer as default.
Operating Instructions
Page 17
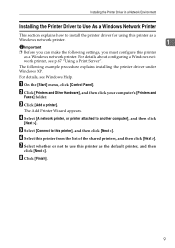
... attached to use this printer as the default printer, and then click [Next >]. work printer, see Windows Help. The following settings, you must configure this printer as a Windows network printer. For details, see p.67 "Using a Print Server". B Click [Printers and Other Hardware], and then ... folder. E Select [Connect to this printer from the list of the shared printers, and then click [Next >]. H Click [Finish]. 9 For details about configuring a Windows net- G Select whether or not to another computer], and then click [Next >]. A On the [Start] menu, click [Control Panel]. The ...
... attached to use this printer as the default printer, and then click [Next >]. work printer, see Windows Help. The following settings, you must configure this printer as a Windows network printer. For details, see p.67 "Using a Print Server". B Click [Printers and Other Hardware], and then ... folder. E Select [Connect to this printer from the list of the shared printers, and then click [Next >]. H Click [Finish]. 9 For details about configuring a Windows net- G Select whether or not to another computer], and then click [Next >]. A On the [Start] menu, click [Control Panel]. The ...
Operating Instructions
Page 23
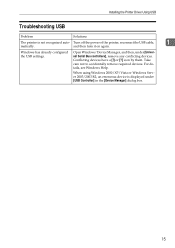
Windows has already configured the USB settings. Open Windows' Device Manager, and then, under [USB Controller] in the [Device Manager] dialog box. 15 and then turn it on again. ...
Windows has already configured the USB settings. Open Windows' Device Manager, and then, under [USB Controller] in the [Device Manager] dialog box. 15 and then turn it on again. ...

Operating Instructions
Page 27
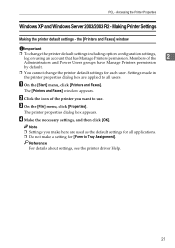
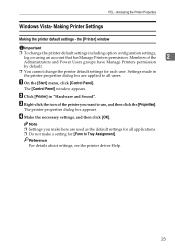
... the icon of the Administrators and Power Users groups have Manage Printers permission by default. ❒ You cannot change the printer default settings including option configuration settings, log on using an account that has Manage Printers permission. Windows 2000 -
... the icon of the Administrators and Power Users groups have Manage Printers permission by default. ❒ You cannot change the printer default settings including option configuration settings, log on using an account that has Manage Printers permission. Windows 2000 -
Operating Instructions
Page 29
... the icon of the 2 Administrators and Power Users groups have Manage Printers permission by default. ❒ You cannot change the printer default settings including option configuration settings, log on using an account that has Manage Printers permission. PCL - C On the [File] menu, click [Properties]. Making Printer Settings Making the printer default...
... the icon of the 2 Administrators and Power Users groups have Manage Printers permission by default. ❒ You cannot change the printer default settings including option configuration settings, log on using an account that has Manage Printers permission. PCL - C On the [File] menu, click [Properties]. Making Printer Settings Making the printer default...
Operating Instructions
Page 31
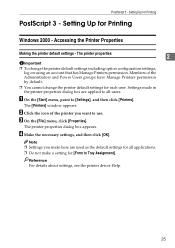
... the icon of the 2 Administrators and Power Users groups have Manage Printers permission by default. ❒ You cannot change the printer default settings including option configuration settings, log on using an account that has Manage Printers permission. Note ❒ Settings you want to Tray Assignment]. Reference For details about settings, see...
... the icon of the 2 Administrators and Power Users groups have Manage Printers permission by default. ❒ You cannot change the printer default settings including option configuration settings, log on using an account that has Manage Printers permission. Note ❒ Settings you want to Tray Assignment]. Reference For details about settings, see...
Operating Instructions
Page 33
... the icon of the Administrators and Power Users groups have Manage Printers permission by default. ❒ You cannot change the printer default settings including option configuration settings, log on using an account that has Manage Printers permission. Setting Up for Printing PostScript 3 - Note ❒ Settings you want to [Settings], and then...
... the icon of the Administrators and Power Users groups have Manage Printers permission by default. ❒ You cannot change the printer default settings including option configuration settings, log on using an account that has Manage Printers permission. Setting Up for Printing PostScript 3 - Note ❒ Settings you want to [Settings], and then...