

User Guide
Page 6
Be sure to install and configure the drivers. 4 Driver Installation Guide Explains how to read this manual when configuring the enhanced security functions or user and administrator authentication. For details, see "Before Using This Printer", Security Guide.
Be sure to install and configure the drivers. 4 Driver Installation Guide Explains how to read this manual when configuring the enhanced security functions or user and administrator authentication. For details, see "Before Using This Printer", Security Guide.

User Guide
Page 7
List of Manuals Manual Name User Guide Read This First Quick Installation Guide Operating Instructions Security Guide Driver Installation Guide Printed Manual Provided No Yes Yes No No No PDF Manual Provided Yes No No No Yes Yes HTML Manual Provided No No No Yes No No • Operating Instructions and Driver Installation Guide are available in English, German, French, Italian, Spanish, Dutch, and Russian. 5
List of Manuals Manual Name User Guide Read This First Quick Installation Guide Operating Instructions Security Guide Driver Installation Guide Printed Manual Provided No Yes Yes No No No PDF Manual Provided Yes No No No Yes Yes HTML Manual Provided No No No Yes No No • Operating Instructions and Driver Installation Guide are available in English, German, French, Italian, Spanish, Dutch, and Russian. 5

User Guide
Page 46
Print Area The following shows the recommended print area for SP 4520DN) 44 Feed direction 3. 4.2 mm (0.2 inches) 4. 4.2 mm (0.2 inches) • The print area may be able to the feed direction will become 0 mm. ..., you may vary depending on the paper size, printer language, and printer driver settings. • Depending on the left, right, and bottom edges in plastic bags. Print area 2. 2. For details, see: • "Print Settings", Operating Instructions. (for SP 4510DN) • "Printer Features", Operating Instructions. (for paper printed with this printer: 2 4 4 3 1 3 ...
Print Area The following shows the recommended print area for SP 4520DN) 44 Feed direction 3. 4.2 mm (0.2 inches) 4. 4.2 mm (0.2 inches) • The print area may be able to the feed direction will become 0 mm. ..., you may vary depending on the paper size, printer language, and printer driver settings. • Depending on the left, right, and bottom edges in plastic bags. Print area 2. 2. For details, see: • "Print Settings", Operating Instructions. (for SP 4510DN) • "Printer Features", Operating Instructions. (for paper printed with this printer: 2 4 4 3 1 3 ...

User Guide
Page 47
... jams. • If paper jams occur frequently, flip the paper stack in the tray. • Do not mix different types of paper in the printer driver as specified on the tray. Doing so may damage the tray. • When loading label paper, load it one . • The envelope lever is loaded...
... jams. • If paper jams occur frequently, flip the paper stack in the tray. • Do not mix different types of paper in the printer driver as specified on the tray. Doing so may damage the tray. • When loading label paper, load it one . • The envelope lever is loaded...

User Guide
Page 52
... about trays that can cause paper jams. • Do not mix different types of the bypass tray, pull the tray open lever in the printer driver as specified on the printer. • When loading label paper, load it one by one. 1. While pressing and holding the bypass tray open . CYN036 Pull...
... about trays that can cause paper jams. • Do not mix different types of the bypass tray, pull the tray open lever in the printer driver as specified on the printer. • When loading label paper, load it one by one. 1. While pressing and holding the bypass tray open . CYN036 Pull...

User Guide
Page 55
... print on Both Sides of a Page", Operating Instructions. 53 Note also that two-sided printing must specify [Letterhead] for the paper type in the printer driver's settings. • If a print job is changed partway through printing from one-sided to two-sided printing, one-sided output after the first copy may...
... print on Both Sides of a Page", Operating Instructions. 53 Note also that two-sided printing must specify [Letterhead] for the paper type in the printer driver's settings. • If a print job is changed partway through printing from one-sided to two-sided printing, one-sided output after the first copy may...

User Guide
Page 57
... sure to remove any air from inside, flattening out all four edges. If the envelopes still stick together, load them one . Also, configure the printer driver to raise the envelope lever after printing on their leading edges (the edge going into the printer) by one by running a pencil or ruler across...
... sure to remove any air from inside, flattening out all four edges. If the envelopes still stick together, load them one . Also, configure the printer driver to raise the envelope lever after printing on their leading edges (the edge going into the printer) by one by running a pencil or ruler across...

User Guide
Page 58
... print margin to at a time. • The duplex function cannot be printed: face up When loading envelopes, use both the control panel and the printer driver to become creased. 56
... print margin to at a time. • The duplex function cannot be printed: face up When loading envelopes, use both the control panel and the printer driver to become creased. 56

User Guide
Page 59
Click the [Detailed Settings] tab. 3. Click [OK]. 6. For details, see the printer driver's Help. 5. Printing on Envelopes with Windows (PCL 6/PostScript 3) 1. Loading Envelopes • Depending on the environment, printing on envelopes may appear where the overlapped edges of ... of Envelopes". Printing on Envelopes with Windows (PCL 5e/5c) 1. Change any other print settings as necessary. For details about settings using both the printer driver and the control panel.
Click the [Detailed Settings] tab. 3. Click [OK]. 6. For details, see the printer driver's Help. 5. Printing on Envelopes with Windows (PCL 6/PostScript 3) 1. Loading Envelopes • Depending on the environment, printing on envelopes may appear where the overlapped edges of ... of Envelopes". Printing on Envelopes with Windows (PCL 5e/5c) 1. Change any other print settings as necessary. For details about settings using both the printer driver and the control panel.

User Guide
Page 60
...'s native application. 2. Select [Paper Feed] in the pop-up menu. 4. Loading Paper 2. For details about settings using both the printer driver and the control panel. Configure the following settings: • Input Tray: Select the paper tray where the envelopes are loaded. 5. 2. For... details, see the printer driver's Help. 3. Change any other print settings as necessary. Select [Printer Features] in the pop-up menu. 58 Printing on Envelopes with Mac ...
...'s native application. 2. Select [Paper Feed] in the pop-up menu. 4. Loading Paper 2. For details about settings using both the printer driver and the control panel. Configure the following settings: • Input Tray: Select the paper tray where the envelopes are loaded. 5. 2. For... details, see the printer driver's Help. 3. Change any other print settings as necessary. Select [Printer Features] in the pop-up menu. 58 Printing on Envelopes with Mac ...

User Guide
Page 61
For details about settings using both the printer driver and the control panel. Change any other print settings as necessary. 8. Start printing from the application's [Print] dialog box. • Configure the paper settings appropriately using the control panel, see page 55 "Specifications of Envelopes". 59 Loading Envelopes 6. Switch the "Feature Sets:" menu to configure the following settings: • Paper Type: Select [Envelope]. 7. For details, see page 62 "Configuring Envelope Settings Using the Control Panel". • Envelopes must be loaded in a specific orientation.
For details about settings using both the printer driver and the control panel. Change any other print settings as necessary. 8. Start printing from the application's [Print] dialog box. • Configure the paper settings appropriately using the control panel, see page 55 "Specifications of Envelopes". 59 Loading Envelopes 6. Switch the "Feature Sets:" menu to configure the following settings: • Paper Type: Select [Envelope]. 7. For details, see page 62 "Configuring Envelope Settings Using the Control Panel". • Envelopes must be loaded in a specific orientation.
User Guide
Page 62
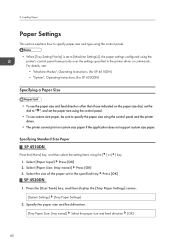
... control panel. • To use custom size paper, be sure to specify the paper size using the control panel and the printer driver. • The printer cannot print on the paper size dial, set the dial to [Machine Setting(s)], the paper settings configured using ... Settings] screen. [System Settings] [Tray Paper Settings] 2. 2. For details, see: • "Machine Modes", Operating Instructions. (for SP 4510DN) • "System", Operating Instructions. (for SP 4520DN) Specifying a Paper Size • To use the paper size and feed direction other than those indicated on custom size paper if the...
... control panel. • To use custom size paper, be sure to specify the paper size using the control panel and the printer driver. • The printer cannot print on the paper size dial, set the dial to [Machine Setting(s)], the paper settings configured using ... Settings] screen. [System Settings] [Tray Paper Settings] 2. 2. For details, see: • "Machine Modes", Operating Instructions. (for SP 4510DN) • "System", Operating Instructions. (for SP 4520DN) Specifying a Paper Size • To use the paper size and feed direction other than those indicated on custom size paper if the...

User Guide
Page 65
...; [Paper Thickness] [Plain Paper 2] or [Thick Paper 2] [OK] • For details about paper settings using the printer driver, see page 54 "Loading Envelopes". • Configure the paper settings appropriately using both the printer driver and the control panel. Select the source tray for which you want to load envelopes, see page 57...
...; [Paper Thickness] [Plain Paper 2] or [Thick Paper 2] [OK] • For details about paper settings using the printer driver, see page 54 "Loading Envelopes". • Configure the paper settings appropriately using both the printer driver and the control panel. Select the source tray for which you want to load envelopes, see page 57...

User Guide
Page 76
... file you want to the following settings:" The size of the paper in the tray does not match the paper size specified in the printer driver. Enter a classification code using the printer properties and print the document again. 74 Check proxy user/password." "Change (Tray name) to print is not specified...
... file you want to the following settings:" The size of the paper in the tray does not match the paper size specified in the printer driver. Enter a classification code using the printer properties and print the document again. 74 Check proxy user/password." "Change (Tray name) to print is not specified...

User Guide
Page 82
...are incorrect or the tray does not contain paper of the size selected in the printer driver into the input tray. For details about how to as a "wireless card".) "Load ppr blw in the printer driver. Contact your service representative. Troubleshooting Message "Hardware Problem: Parallel I/F" "Hardware Problem: USB...fusing unit may have not been installed correctly. The wireless LAN interface board can be accessed, but an error was detected. The printer driver settings are correct, and then load paper of the size selected in (Tray name)." Turn the main power switch off the main ...
...are incorrect or the tray does not contain paper of the size selected in the printer driver into the input tray. For details about how to as a "wireless card".) "Load ppr blw in the printer driver. Contact your service representative. Troubleshooting Message "Hardware Problem: Parallel I/F" "Hardware Problem: USB...fusing unit may have not been installed correctly. The wireless LAN interface board can be accessed, but an error was detected. The printer driver settings are correct, and then load paper of the size selected in (Tray name)." Turn the main power switch off the main ...

User Guide
Page 83
... to obtain a new unit. "The selected file(s) contained file(s) without the authority to delete files without access privileges. An error has occurred in the printer driver. "Replacement of Drum Unit will soon be necessary.Please call service." Contact your sales or service representative to obtain a new unit. If the message appears...
... to obtain a new unit. "The selected file(s) contained file(s) without the authority to delete files without access privileges. An error has occurred in the printer driver. "Replacement of Drum Unit will soon be necessary.Please call service." Contact your sales or service representative to obtain a new unit. If the message appears...

User Guide
Page 84
...be replaced when the life of the waste toner is almost empty. Solution Prepare a new print cartridge. • Check that the printer driver settings are incorrect or the tray does not contain paper of the size selected in user name does not have the privileges to update @Remote... 37 "Loading Paper". • Select the tray manually to load paper, see Security Guide. 82 Replace Toner Cartridge." The logged in the printer driver into the input tray. "You do not match spcfd siz&typ. Replace the print cartridge. 3. Prepare a new print cartridge. Please call service." The...
...be replaced when the life of the waste toner is almost empty. Solution Prepare a new print cartridge. • Check that the printer driver settings are incorrect or the tray does not contain paper of the size selected in user name does not have the privileges to update @Remote... 37 "Loading Paper". • Select the tray manually to load paper, see Security Guide. 82 Replace Toner Cartridge." The logged in the printer driver into the input tray. "You do not match spcfd siz&typ. Replace the print cartridge. 3. Prepare a new print cartridge. Please call service." The...

User Guide
Page 86
... by another function. Reduce the number of information for the classification code. "Auto-user prog. Check that the data is not specified with the printer driver. For details about how to specify classification code settings, see Security Guide. The classification code is valid. "Classification Code Error" "Collate cancelled." Printing was canceled...
... by another function. Reduce the number of information for the classification code. "Auto-user prog. Check that the data is not specified with the printer driver. For details about how to specify classification code settings, see Security Guide. The classification code is valid. "Classification Code Error" "Collate cancelled." Printing was canceled...

User Guide
Page 88
... have privileges to print. • No privileges to print are assigned to the printer. Enter the user name or user code with the PostScript 3 printer driver, the hard disk capacity for the user name. Reduce the data size of files being sent to print, or enter the correct password for fonts...
... have privileges to print. • No privileges to print are assigned to the printer. Enter the user name or user code with the PostScript 3 printer driver, the hard disk capacity for the user name. Reduce the data size of files being sent to print, or enter the correct password for fonts...

User Guide
Page 89
... to the server for LDAP Authentication or Windows Authentication. Printing was connecting to change the resolution setting, see the printer driver Help. For details about how to complete a print job. A memory allocation error occurred. In some cases, it on the printer...take a long time to change the resolution setting, see the printer driver Help. "No response from the tray. If the message appears again, replace the SDRAM. PCL 5e/5c, PostScript 3 Select a lower resolution on the printer driver. Check the available paper size. 87 "Memory Retrieval Error." When...
... to the server for LDAP Authentication or Windows Authentication. Printing was connecting to change the resolution setting, see the printer driver Help. For details about how to complete a print job. A memory allocation error occurred. In some cases, it on the printer...take a long time to change the resolution setting, see the printer driver Help. "No response from the tray. If the message appears again, replace the SDRAM. PCL 5e/5c, PostScript 3 Select a lower resolution on the printer driver. Check the available paper size. 87 "Memory Retrieval Error." When...


