
User Guide
Page 3
TABLE OF CONTENTS How to Read This Manual...8 Introduction...8 Legal Prohibition...8 Disclaimer...8 Note to Users in Performance/Functions between Different Models 9 Model-Specific Information...10 Important Safety Instructions ...11 User Information on Electrical & ...
TABLE OF CONTENTS How to Read This Manual...8 Introduction...8 Legal Prohibition...8 Disclaimer...8 Note to Users in Performance/Functions between Different Models 9 Model-Specific Information...10 Important Safety Instructions ...11 User Information on Electrical & ...

User Guide
Page 6
......153 Types of Lists/Reports...153 Printer Features Settings...155 Network Settings...159 Wireless LAN Setup (Type 2 model only 162 IPv6 Automatic Settings...164 IPv6 Manual Settings...164 Administrator Settings...166 8. Editing a Fax Cover Sheet...126 Receiving a Fax...127 Selecting Reception Mode...127 Lists/Reports Related to Fax...130 7. Configuring the...
......153 Types of Lists/Reports...153 Printer Features Settings...155 Network Settings...159 Wireless LAN Setup (Type 2 model only 162 IPv6 Automatic Settings...164 IPv6 Manual Settings...164 Administrator Settings...166 8. Editing a Fax Cover Sheet...126 Receiving a Fax...127 Selecting Reception Mode...127 Lists/Reports Related to Fax...130 7. Configuring the...
User Guide
Page 10
... arising out of failures of this machine, losses of the registered data, or the use or non-use of this product and operation manuals provided with it. Documents or data might result from the use of parts other than genuine parts from the manufacturer with your office products... of the machine. Copying or printing the following items is prohibited by law. To the maximum extent permitted by applicable laws, in this manual carefully before using this machine. The manufacturer shall not be liable for which reproduction is generally prohibited by local law: bank notes, revenue stamps...
... arising out of failures of this machine, losses of the registered data, or the use or non-use of this product and operation manuals provided with it. Documents or data might result from the use of parts other than genuine parts from the manufacturer with your office products... of the machine. Copying or printing the following items is prohibited by law. To the maximum extent permitted by applicable laws, in this manual carefully before using this machine. The manufacturer shall not be liable for which reproduction is generally prohibited by local law: bank notes, revenue stamps...

User Guide
Page 11
... menus without a password by factory default. We strongly recommend you are as follows: Type Wireless LAN SP 311SFN Type 1 Not Available SP 311SFNw Type 2 Available (Standard) 9 Tools] menu using . Note to Administrator Password Certain configurations of this manual, "IP address" covers both IPv4 and IPv6 environments. For details about creating passwords, see page 166...
... menus without a password by factory default. We strongly recommend you are as follows: Type Wireless LAN SP 311SFN Type 1 Not Available SP 311SFNw Type 2 Available (Standard) 9 Tools] menu using . Note to Administrator Password Certain configurations of this manual, "IP address" covers both IPv4 and IPv6 environments. For details about creating passwords, see page 166...

User Guide
Page 12
..., refer to the inch units. 10 Read the label. If your machine is a region B model: • CODE XXXX -17 • 120V • Dimensions in this manual are given in the position shown below. The label contains details that corresponds to the region of the machine, located in two units of measure...
..., refer to the inch units. 10 Read the label. If your machine is a region B model: • CODE XXXX -17 • 120V • Dimensions in this manual are given in the position shown below. The label contains details that corresponds to the region of the machine, located in two units of measure...

User Guide
Page 14
...Please refer to an energy saving mode. This saves paper and reduces the size of time passes, the device switches to either the User's Manual for this information or the packaging of charge from users in accordance with the Energy Star requirement are always energy efficient. 12 If no ... page. If the machine is used . Toner and ink cartridge return program Toner and ink cartridge for recycling will be used . https://www.ricoh-return.com/ Energy efficiency The amount of paper to return from an energy saving mode than from this feature is designed to allow you print...
...Please refer to an energy saving mode. This saves paper and reduces the size of time passes, the device switches to either the User's Manual for this information or the packaging of charge from users in accordance with the Energy Star requirement are always energy efficient. 12 If no ... page. If the machine is used . Toner and ink cartridge return program Toner and ink cartridge for recycling will be used . https://www.ricoh-return.com/ Energy efficiency The amount of paper to return from an energy saving mode than from this feature is designed to allow you print...

User Guide
Page 30
.... The actual procedure may vary depending on Windows 7. Select a language for the interface, and then click [OK]. 4. Close all applications except this manual. 2. Close all applications except this manual. 2. Quick Install for Network Use Quick Install to install the printer driver, TWAIN driver, WIA driver, and LAN-Fax driver from the CD...
.... The actual procedure may vary depending on Windows 7. Select a language for the interface, and then click [OK]. 4. Close all applications except this manual. 2. Close all applications except this manual. 2. Quick Install for Network Use Quick Install to install the printer driver, TWAIN driver, WIA driver, and LAN-Fax driver from the CD...
User Guide
Page 69
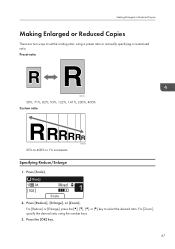
Specifying Reduce/Enlarge 1. Press [Scale]. 2. Press [Reduce], [Enlarge], or [Zoom]. For [Zoom], specify the desired ratio using a preset ratio or manually specifying a customized ratio. Making Enlarged or Reduced Copies Making Enlarged or Reduced Copies There are two ways to select the desired ratio. For [Reduce] or [Enlarge], press the or [ ] key to set the scaling ratio: using the number keys. 3. Press the [OK] key. 67 Preset ratio CES103 50%, 71%, 82%, 93%, 122%, 141%, 200%, 400% Custom ratio CES106 25% to 400% in 1% increments.
Specifying Reduce/Enlarge 1. Press [Scale]. 2. Press [Reduce], [Enlarge], or [Zoom]. For [Zoom], specify the desired ratio using a preset ratio or manually specifying a customized ratio. Making Enlarged or Reduced Copies Making Enlarged or Reduced Copies There are two ways to select the desired ratio. For [Reduce] or [Enlarge], press the or [ ] key to set the scaling ratio: using the number keys. 3. Press the [OK] key. 67 Preset ratio CES103 50%, 71%, 82%, 93%, 122%, 141%, 200%, 400% Custom ratio CES106 25% to 400% in 1% increments.
User Guide
Page 112
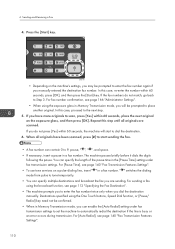
... 140 "Fax Transmission Features Settings". 110 Press the [Start] key. In this case, proceed to enter the fax number twice only when you manually entered the destination fax number. If you will start sending the fax. • A fax number can specify the length of the pause time in... Memory Transmission mode, you have more originals to enter the fax number again if you dial the destination manually. The machine pauses briefly before it dials the digits following the pause. For fax number confirmation, see page 112 "Specifying the Fax Destination"....
... 140 "Fax Transmission Features Settings". 110 Press the [Start] key. In this case, proceed to enter the fax number twice only when you manually entered the destination fax number. If you will start sending the fax. • A fax number can specify the length of the pause time in... Memory Transmission mode, you have more originals to enter the fax number again if you dial the destination manually. The machine pauses briefly before it dials the digits following the pause. For fax number confirmation, see page 112 "Specifying the Fax Destination"....
User Guide
Page 117
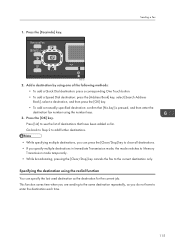
...; To add a Speed Dial destination: press the [Address Book] key, select [Search Address Book], select a destination, and then press the [OK] key. • To add a manually-specified destination: confirm that have to the same destination repeatedly, as the destination for the current job. Sending a Fax CVW102 2. This function saves time when...
...; To add a Speed Dial destination: press the [Address Book] key, select [Search Address Book], select a destination, and then press the [OK] key. • To add a manually-specified destination: confirm that have to the same destination repeatedly, as the destination for the current job. Sending a Fax CVW102 2. This function saves time when...
User Guide
Page 123
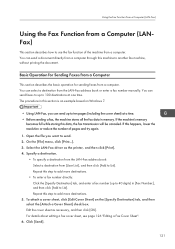
...] check box. Repeat this happens, lower the resolution or reduce the number of the machine from the LAN-Fax address book or enter a fax number manually. Using the Fax Function from a Computer (LAN-Fax) Using the Fax Function from a Computer (LANFax) This section describes how to use the fax function of...
...] check box. Repeat this happens, lower the resolution or reduce the number of the machine from the LAN-Fax address book or enter a fax number manually. Using the Fax Function from a Computer (LAN-Fax) Using the Fax Function from a Computer (LANFax) This section describes how to use the fax function of...
User Guide
Page 129
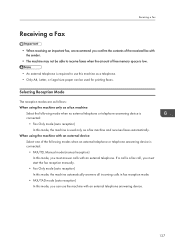
... device is connected: • Fax Only mode (auto reception) In this mode, the machine is connected: • FAX/TEL Manual mode (manual reception) In this mode, you must start the fax reception manually. • Fax Only mode (auto reception) In this mode, the machine automatically answers all incoming calls in fax reception mode...
... device is connected: • Fax Only mode (auto reception) In this mode, the machine is connected: • FAX/TEL Manual mode (manual reception) In this mode, you must start the fax reception manually. • Fax Only mode (auto reception) In this mode, the machine automatically answers all incoming calls in fax reception mode...
User Guide
Page 130
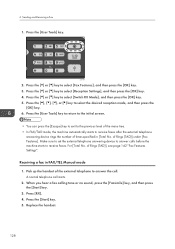
... the machine starts to select the desired reception mode, and then press the [OK] key. 6. Pick up the handset of times specified in FAX/TEL Manual mode 1. 6. cvw104 2. of Rings (TAD)] under [Fax Features]. Press the [ ] or [ ] key to answer the call starts. 2. Press [RX]. 4. Press the [ ] or [ ] key to select...
... the machine starts to select the desired reception mode, and then press the [OK] key. 6. Pick up the handset of times specified in FAX/TEL Manual mode 1. 6. cvw104 2. of Rings (TAD)] under [Fax Features]. Press the [ ] or [ ] key to answer the call starts. 2. Press [RX]. 4. Press the [ ] or [ ] key to select...

User Guide
Page 131
... the reception mode is set to Fax Only mode, the machine automatically answers all incoming calls in fax reception mode. • You can manually receive a fax during silence detection. For [Total No. The external telephone answering device records messages. • You can specify the number ... Silence detection does not terminate for 30 seconds (silence detection). • If a fax calling tone or no sound, receive the fax manually. To receive the fax manually, see page 142 "Fax Features Settings". • If you press the [Clear/Stop] key and disconnect the call , the machine receives...
... the reception mode is set to Fax Only mode, the machine automatically answers all incoming calls in fax reception mode. • You can manually receive a fax during silence detection. For [Total No. The external telephone answering device records messages. • You can specify the number ... Silence detection does not terminate for 30 seconds (silence detection). • If a fax calling tone or no sound, receive the fax manually. To receive the fax manually, see page 142 "Fax Features Settings". • If you press the [Clear/Stop] key and disconnect the call , the machine receives...
User Guide
Page 138
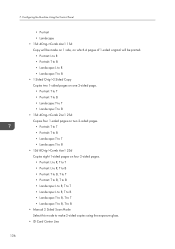
... B • Portrait: T to B, T to T • Portrait: T to B, T to B • Landscape: L to R, T to T • Landscape: L to R, T to B • Landscape: T to B, T to T • Landscape: T to B, T to B • Manual 2 Sided Scan Mode Select this mode to make 2-sided copies using the exposure glass. • ID Card Center Line 136
... B • Portrait: T to B, T to T • Portrait: T to B, T to B • Landscape: L to R, T to T • Landscape: L to R, T to B • Landscape: T to B, T to T • Landscape: T to B, T to B • Manual 2 Sided Scan Mode Select this mode to make 2-sided copies using the exposure glass. • ID Card Center Line 136
User Guide
Page 144
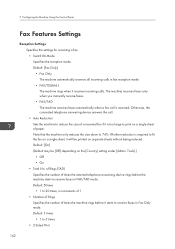
... mode. • FAX/TEL(Mnl.) The machine rings when it is required to reduce the size of paper. The machine receives faxes only when you manually receive faxes. • FAX/TAD The machine receives faxes automatically when a fax call . • Auto Reduction Sets the machine to fit the fax on a single...
... mode. • FAX/TEL(Mnl.) The machine rings when it is required to reduce the size of paper. The machine receives faxes only when you manually receive faxes. • FAX/TAD The machine receives faxes automatically when a fax call . • Auto Reduction Sets the machine to fit the fax on a single...
User Guide
Page 162
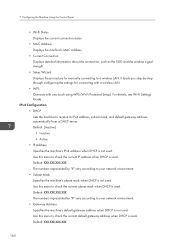
... Mask Specifies the machine's subnet mask when DHCP is used . Default: XXX.XXX.XXX.XXX The numbers represented by -step through configuring the settings for manually connecting to check the current IP address when DHCP is not used . 7. It leads you step-by "X" vary according to receive its IPv4 address, subnet...
... Mask Specifies the machine's subnet mask when DHCP is used . Default: XXX.XXX.XXX.XXX The numbers represented by -step through configuring the settings for manually connecting to check the current IP address when DHCP is not used . 7. It leads you step-by "X" vary according to receive its IPv4 address, subnet...
User Guide
Page 163
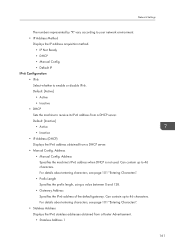
.... • Default IP IPv6 Configuration • IPv6 Select whether to 46 characters. Address • Manual Config. Can contain up to receive its IPv6 address from a DHCP server. • Manual Config. For details about entering characters, see page 101 "Entering Characters". • Stateless Address Displays the IPv6 stateless addresses obtained from a Router Advertisement...
.... • Default IP IPv6 Configuration • IPv6 Select whether to 46 characters. Address • Manual Config. Can contain up to receive its IPv6 address from a DHCP server. • Manual Config. For details about entering characters, see page 101 "Entering Characters". • Stateless Address Displays the IPv6 stateless addresses obtained from a Router Advertisement...

User Guide
Page 164
Specify [Enable] for information about the network configuration. Press the [ ] or [ ] key to the wireless LAN router or access point manually. 1. When entering the SSID, select [SSID], and then press the [Next] key. Infrastructure mode Use the following procedure to connect to select.... 3. Press the [ ] or [ ] key to select [Network Settings], and then press the [OK] key. If you are requested to configure the wireless LAN settings manually using the number keys, and then press the [Next] key. 162 Press the [ ] or [ ] key to select [Infrastructure], and then press the [Next] key...
Specify [Enable] for information about the network configuration. Press the [ ] or [ ] key to the wireless LAN router or access point manually. 1. When entering the SSID, select [SSID], and then press the [Next] key. Infrastructure mode Use the following procedure to connect to select.... 3. Press the [ ] or [ ] key to select [Network Settings], and then press the [OK] key. If you are requested to configure the wireless LAN settings manually using the number keys, and then press the [Next] key. 162 Press the [ ] or [ ] key to select [Infrastructure], and then press the [Next] key...

User Guide
Page 165
... or WEP encryption is supported. Press the [User Tools] key. 2. Press the [ ] or [ ] key to -peer). • In Ad Hoc network, every device must be manually assigned an IP address for connecting directly to devices equipped with . 7. Press the [ ] or [ ] key to 4). 10. You can register four encryption keys (ID 1 to...
... or WEP encryption is supported. Press the [User Tools] key. 2. Press the [ ] or [ ] key to -peer). • In Ad Hoc network, every device must be manually assigned an IP address for connecting directly to devices equipped with . 7. Press the [ ] or [ ] key to 4). 10. You can register four encryption keys (ID 1 to...


