
User Guide
Page 3
TABLE OF CONTENTS How to Read This Manual...8 Introduction...8 Legal Prohibition...8 Disclaimer...8 Note to Administrator...9 About IP Address...9 Differences in the State of Facsimile Unit...13 NOTICE TO USERS (NEW ZEALAND)...13 Important ...
TABLE OF CONTENTS How to Read This Manual...8 Introduction...8 Legal Prohibition...8 Disclaimer...8 Note to Administrator...9 About IP Address...9 Differences in the State of Facsimile Unit...13 NOTICE TO USERS (NEW ZEALAND)...13 Important ...

User Guide
Page 6
......153 Types of Lists/Reports...153 Printer Features Settings...155 Network Settings...159 Wireless LAN Setup (Type 2 model only 162 IPv6 Automatic Settings...164 IPv6 Manual Settings...164 Administrator Settings...166 8. Editing a Fax Cover Sheet...126 Receiving a Fax...127 Selecting Reception Mode...127 Lists/Reports Related to Fax...130...
......153 Types of Lists/Reports...153 Printer Features Settings...155 Network Settings...159 Wireless LAN Setup (Type 2 model only 162 IPv6 Automatic Settings...164 IPv6 Manual Settings...164 Administrator Settings...166 8. Editing a Fax Cover Sheet...126 Receiving a Fax...127 Selecting Reception Mode...127 Lists/Reports Related to Fax...130...
User Guide
Page 10
...damages as a guide only and is meant as a result of the machine. How to Read This Manual Introduction This manual contains detailed instructions and notes on the operation and use of this manual. To the maximum extent permitted by you . Two kinds of size notation are subject to change in ... reproduction is generally prohibited by you using the machine. Make sure that might be erased due to your safety and benefit, read this manual in this machine or any item for quick reference. Documents or data might result from the use genuine toner from the data executed by...
...damages as a guide only and is meant as a result of the machine. How to Read This Manual Introduction This manual contains detailed instructions and notes on the operation and use of this manual. To the maximum extent permitted by you . Two kinds of size notation are subject to change in ... reproduction is generally prohibited by you using the machine. Make sure that might be erased due to your safety and benefit, read this manual in this machine or any item for quick reference. Documents or data might result from the use genuine toner from the data executed by...

User Guide
Page 11
...be password-protected to prevent unauthorized modifications by others. We strongly recommend you to the environment you are as follows: Type Wireless LAN SP 311SFN Type 1 Not Available SP 311SFNw Type 2 Available (Standard) 9 About IP Address In this machine can access these menus without a password by factory default. Differences...can be password-protected: • Entering the [Address Book], [Network Settings], or [Admin. Note to Administrator Password Certain configurations of this manual, "IP address" covers both IPv4 and IPv6 environments. Tools] menu using .
...be password-protected to prevent unauthorized modifications by others. We strongly recommend you to the environment you are as follows: Type Wireless LAN SP 311SFN Type 1 Not Available SP 311SFNw Type 2 Available (Standard) 9 About IP Address In this machine can access these menus without a password by factory default. Differences...can be password-protected: • Entering the [Address Book], [Network Settings], or [Admin. Note to Administrator Password Certain configurations of this manual, "IP address" covers both IPv4 and IPv6 environments. Tools] menu using .

User Guide
Page 12
... B model, refer to the inch units. 10 CVW058 The following , your machine is a region B model: • CODE XXXX -17 • 120V • Dimensions in this manual are given in two units of the machine, located in the position shown below. If your machine is a Region A model, refer to the metric units...
... B model, refer to the inch units. 10 CVW058 The following , your machine is a region B model: • CODE XXXX -17 • 120V • Dimensions in this manual are given in two units of the machine, located in the position shown below. If your machine is a Region A model, refer to the metric units...

User Guide
Page 14
Environmental Advice for Users Users in the EU, Switzerland and Norway Consumables yield Please refer to either the User's Manual for this information or the packaging of printed documents so that fewer sheets are used. This saves paper and reduces the size of the consumable. .... For maximum energy savings, we recommend that the default setting for recycling will be accepted free of paper to an energy saving mode. https://www.ricoh-return.com/ Energy efficiency The amount of time passes, the device switches to be used . If the machine is designed to allow you to reduce...
Environmental Advice for Users Users in the EU, Switzerland and Norway Consumables yield Please refer to either the User's Manual for this information or the packaging of printed documents so that fewer sheets are used. This saves paper and reduces the size of the consumable. .... For maximum energy savings, we recommend that the default setting for recycling will be accepted free of paper to an energy saving mode. https://www.ricoh-return.com/ Energy efficiency The amount of time passes, the device switches to be used . If the machine is designed to allow you to reduce...

User Guide
Page 30
...OK]. 4. Guide to install the printer driver, TWAIN driver, WIA driver, and LAN-Fax driver from the CD-ROM. 1. Follow the instructions in this manual. 2. Insert the CD-ROM into the CD-ROM drive. 3. Close all applications except this machine using . • Be sure to install the printer...ROM. 1. From the CD-ROM menu, click [USB Quick Install]. 5. The actual procedure may vary depending on Windows 7. Quick Install for this manual. 2. 1. The supplied drivers are using the included CD-ROM. Close all applications except this section is an example based on the operating system you...
...OK]. 4. Guide to install the printer driver, TWAIN driver, WIA driver, and LAN-Fax driver from the CD-ROM. 1. Follow the instructions in this manual. 2. Insert the CD-ROM into the CD-ROM drive. 3. Close all applications except this machine using . • Be sure to install the printer...ROM. 1. From the CD-ROM menu, click [USB Quick Install]. 5. The actual procedure may vary depending on Windows 7. Quick Install for this manual. 2. 1. The supplied drivers are using the included CD-ROM. Close all applications except this section is an example based on the operating system you...
User Guide
Page 69
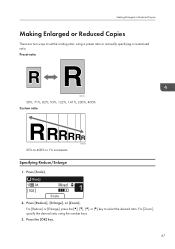
Press [Reduce], [Enlarge], or [Zoom]. For [Zoom], specify the desired ratio using a preset ratio or manually specifying a customized ratio. Press [Scale]. 2. For [Reduce] or [Enlarge], press the or [ ] key to 400% in 1% increments. Press the [OK] key. 67 Preset ratio CES103 50%, 71%, 82%, 93%, 122%, 141%, 200%, 400% Custom ratio CES106 25% to select the desired ratio. Specifying Reduce/Enlarge 1. Making Enlarged or Reduced Copies Making Enlarged or Reduced Copies There are two ways to set the scaling ratio: using the number keys. 3.
Press [Reduce], [Enlarge], or [Zoom]. For [Zoom], specify the desired ratio using a preset ratio or manually specifying a customized ratio. Press [Scale]. 2. For [Reduce] or [Enlarge], press the or [ ] key to 400% in 1% increments. Press the [OK] key. 67 Preset ratio CES103 50%, 71%, 82%, 93%, 122%, 141%, 200%, 400% Custom ratio CES106 25% to select the desired ratio. Specifying Reduce/Enlarge 1. Making Enlarged or Reduced Copies Making Enlarged or Reduced Copies There are two ways to set the scaling ratio: using the number keys. 3.
User Guide
Page 112
...scan, press [Yes] within 60 seconds, place the next original on a pulse-dialing line, insert " " in a fax number. If you manually entered the destination fax number. The machine pauses briefly before it dials the digits following the pause. For [Pause Time], see page 166 "Administrator ... fax number again if you have more originals to the next step. 5. You can specify multiple destinations and broadcast the fax you dial the destination manually. For [Auto Redial], see page 112 "Specifying the Fax Destination". • The machine prompts you do not match, go back to 9, pause, " ...
...scan, press [Yes] within 60 seconds, place the next original on a pulse-dialing line, insert " " in a fax number. If you manually entered the destination fax number. The machine pauses briefly before it dials the digits following the pause. For [Pause Time], see page 166 "Administrator ... fax number again if you have more originals to the next step. 5. You can specify multiple destinations and broadcast the fax you dial the destination manually. For [Auto Redial], see page 112 "Specifying the Fax Destination". • The machine prompts you do not match, go back to 9, pause, " ...
User Guide
Page 117
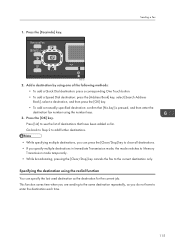
...; To add a Speed Dial destination: press the [Address Book] key, select [Search Address Book], select a destination, and then press the [OK] key. • To add a manually-specified destination: confirm that have to enter the destination each time. 115 1. Press the [OK] key. Press [List] to the current destination only. Sending a Fax...
...; To add a Speed Dial destination: press the [Address Book] key, select [Search Address Book], select a destination, and then press the [OK] key. • To add a manually-specified destination: confirm that have to enter the destination each time. 115 1. Press the [OK] key. Press [List] to the current destination only. Sending a Fax...
User Guide
Page 123
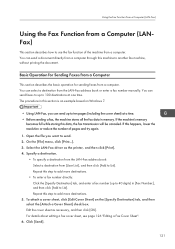
... Operation for Sending Faxes from a Computer This section describes the basic operation for sending faxes from the LAN-Fax address book or enter a fax number manually. You can send up to 40 digits) in [Fax Number:], and then click [Add to use the fax function of pages and try again. 1. Specify...
... Operation for Sending Faxes from a Computer This section describes the basic operation for sending faxes from the LAN-Fax address book or enter a fax number manually. You can send up to 40 digits) in [Fax Number:], and then click [Add to use the fax function of pages and try again. 1. Specify...
User Guide
Page 129
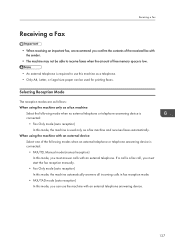
...or telephone answering device is connected: • Fax Only mode (auto reception) In this mode, the machine is connected: • FAX/TEL Manual mode (manual reception) In this mode, you can be able to receive faxes when the amount of free memory space is low. • An external telephone... the following modes when an external telephone or telephone answering device is used for printing faxes. If a call , you must start the fax reception manually. • Fax Only mode (auto reception) In this mode, the machine automatically answers all incoming calls in fax reception mode. • FAX/...
...or telephone answering device is connected: • Fax Only mode (auto reception) In this mode, the machine is connected: • FAX/TEL Manual mode (manual reception) In this mode, you can be able to receive faxes when the amount of free memory space is low. • An external telephone... the following modes when an external telephone or telephone answering device is used for printing faxes. If a call , you must start the fax reception manually. • Fax Only mode (auto reception) In this mode, the machine automatically answers all incoming calls in fax reception mode. • FAX/...
User Guide
Page 130
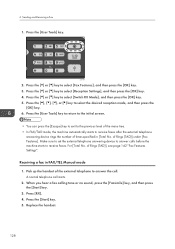
... external telephone answering device rings the number of Rings (TAD)], see page 142 "Fax Features Settings". For [Total No. of times specified in FAX/TEL Manual mode 1. When you hear a fax calling tone or no sound, press the [Facsimile] key, and then press the [Start] key. 3. Press [RX]. 4. Press the [User...
... external telephone answering device rings the number of Rings (TAD)], see page 142 "Fax Features Settings". For [Total No. of times specified in FAX/TEL Manual mode 1. When you hear a fax calling tone or no sound, press the [Facsimile] key, and then press the [Start] key. 3. Press [RX]. 4. Press the [User...

User Guide
Page 131
...Features Settings". • If you press the [Clear/Stop] key and disconnect the call starts. To receive the fax manually, see page 128 "Receiving a fax in FAX/TEL Manual mode". of Rings] setting under [Fax Features]. Receiving a Fax Receiving a fax in Fax Only mode When the reception ... set to FAX/TAD mode, the external telephone answering device answers and records messages when the machine receives telephone calls. To receive the fax manually, see page 128 "Receiving a fax in the [Number of Rings (TAD)] under [Fax Features]. If the external telephone answering device answers...
...Features Settings". • If you press the [Clear/Stop] key and disconnect the call starts. To receive the fax manually, see page 128 "Receiving a fax in FAX/TEL Manual mode". of Rings] setting under [Fax Features]. Receiving a Fax Receiving a fax in Fax Only mode When the reception ... set to FAX/TAD mode, the external telephone answering device answers and records messages when the machine receives telephone calls. To receive the fax manually, see page 128 "Receiving a fax in the [Number of Rings (TAD)] under [Fax Features]. If the external telephone answering device answers...
User Guide
Page 138
... B • Portrait: T to B, T to T • Portrait: T to B, T to B • Landscape: L to R, T to T • Landscape: L to R, T to B • Landscape: T to B, T to T • Landscape: T to B, T to B • Manual 2 Sided Scan Mode Select this mode to make 2-sided copies using the exposure glass. • ID Card Center Line 136
... B • Portrait: T to B, T to T • Portrait: T to B, T to B • Landscape: L to R, T to T • Landscape: L to R, T to B • Landscape: T to B, T to T • Landscape: T to B, T to B • Manual 2 Sided Scan Mode Select this mode to make 2-sided copies using the exposure glass. • ID Card Center Line 136
User Guide
Page 144
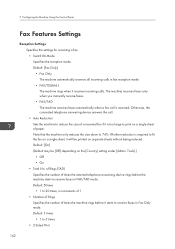
.... Default: 1 times • 1 to receive faxes in increments of 1 • Number of Rings Specifies the number of paper. The machine receives faxes only when you manually receive faxes. • FAX/TAD The machine receives faxes automatically when a fax call . • Auto Reduction Sets the machine to reduce the size of times...
.... Default: 1 times • 1 to receive faxes in increments of 1 • Number of Rings Specifies the number of paper. The machine receives faxes only when you manually receive faxes. • FAX/TAD The machine receives faxes automatically when a fax call . • Auto Reduction Sets the machine to reduce the size of times...
User Guide
Page 162
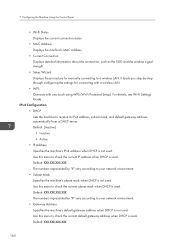
... check the current default gateway address when DHCP is used . Default: XXX.XXX.XXX.XXX The numbers represented by -step through configuring the settings for manually connecting to your network environment. • Gateway Address Specifies the machine's default gateway address when DHCP is not used . It leads you step-by "X" vary...
... check the current default gateway address when DHCP is used . Default: XXX.XXX.XXX.XXX The numbers represented by -step through configuring the settings for manually connecting to your network environment. • Gateway Address Specifies the machine's default gateway address when DHCP is not used . It leads you step-by "X" vary...
User Guide
Page 163
... characters, see page 101 "Entering Characters". • Stateless Address Displays the IPv6 stateless addresses obtained from a DHCP server. • Manual Config. Network Settings The numbers represented by "X" vary according to your network environment. • IP Address Method Displays the IP address ...acquisition method. • IP Not Ready • DHCP • Manual Config. • Default IP IPv6 Configuration • IPv6 Select whether to 46 characters. Can contain up to receive its IPv6 address from ...
... characters, see page 101 "Entering Characters". • Stateless Address Displays the IPv6 stateless addresses obtained from a DHCP server. • Manual Config. Network Settings The numbers represented by "X" vary according to your network environment. • IP Address Method Displays the IP address ...acquisition method. • IP Not Ready • DHCP • Manual Config. • Default IP IPv6 Configuration • IPv6 Select whether to 46 characters. Can contain up to receive its IPv6 address from ...

User Guide
Page 164
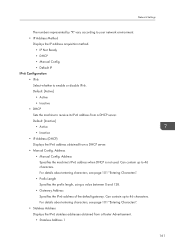
... [Setup Wizard], and then press the [OK] key. 5. Press the [ ] or [ ] key to the wireless LAN router or access point manually. 1. Press the [ ] or [ ] key to configure the wireless LAN settings manually using the number keys, and then press the [OK] key. 3. When entering the SSID, select [SSID], and then press the...
... [Setup Wizard], and then press the [OK] key. 5. Press the [ ] or [ ] key to the wireless LAN router or access point manually. 1. Press the [ ] or [ ] key to configure the wireless LAN settings manually using the number keys, and then press the [OK] key. 3. When entering the SSID, select [SSID], and then press the...

User Guide
Page 165
... that corresponds to the device that the device is supported. Press the [ ] or [ ] key to -peer). • In Ad Hoc network, every device must be manually assigned an IP address for connecting directly to devices equipped with . 7. If you cannot find the destination, check that you are going to select [Wi...
... that corresponds to the device that the device is supported. Press the [ ] or [ ] key to -peer). • In Ad Hoc network, every device must be manually assigned an IP address for connecting directly to devices equipped with . 7. If you cannot find the destination, check that you are going to select [Wi...


