Setup Guide
Page 7
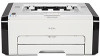
...printer driver only. 7 2. Installing the Software Checking the available connection SP 210/SP 210SU/SP 210SF/ SP 211/SP 211SU/SP 211SF USB Available Ethernet Not available Wi-Fi Not available SP 212w/SP 212SUw/ SP 212SFw/SP 213w/ SP 213SUw/SP 213SFw Available Not available Available SP 212Nw/SP 212SNw/ SP 212SFNw/SP 213Nw/ SP 213SNw/SP...with a built-in DHCP server is required. • Ethernet and wireless LAN settings cannot be used with SP 212w/SP 212Nw/SP 213w/SP 213Nw, first connect the machine and computer via a USB cable, install Smart Organizing Monitor only, and then configure...
...printer driver only. 7 2. Installing the Software Checking the available connection SP 210/SP 210SU/SP 210SF/ SP 211/SP 211SU/SP 211SF USB Available Ethernet Not available Wi-Fi Not available SP 212w/SP 212SUw/ SP 212SFw/SP 213w/ SP 213SUw/SP 213SFw Available Not available Available SP 212Nw/SP 212SNw/ SP 212SFNw/SP 213Nw/ SP 213SNw/SP...with a built-in DHCP server is required. • Ethernet and wireless LAN settings cannot be used with SP 212w/SP 212Nw/SP 213w/SP 213Nw, first connect the machine and computer via a USB cable, install Smart Organizing Monitor only, and then configure...
Setup Guide
Page 9
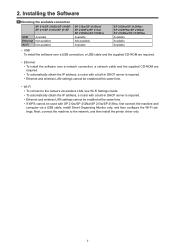
... the driver, see "Installing the Driver and Software", User Guide . SP 210/SP 211/SP 212w SP 212Nw/SP 213w/SP 213Nw • Printer driver • Smart Organizing Monitor SP 210SU/SP 211SU SP 212SUw/SP 212SNw SP 213SUw/SP 213SNw • Printer driver • TWAIN/WIA driver SP 210SF/SP 211SF SP 212SFw/SP 212SFNw SP 213SFw/SP 213SFNw • Printer driver • TWAIN/WIA driver 9 If you want to install...
... the driver, see "Installing the Driver and Software", User Guide . SP 210/SP 211/SP 212w SP 212Nw/SP 213w/SP 213Nw • Printer driver • Smart Organizing Monitor SP 210SU/SP 211SU SP 212SUw/SP 212SNw SP 213SUw/SP 213SNw • Printer driver • TWAIN/WIA driver SP 210SF/SP 211SF SP 212SFw/SP 212SFNw SP 213SFw/SP 213SFNw • Printer driver • TWAIN/WIA driver 9 If you want to install...
Setup Guide
Page 12
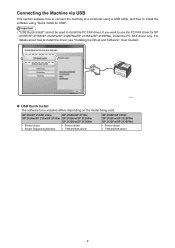
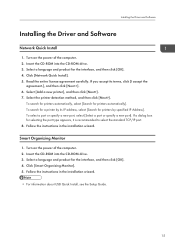
SP 212w/SP 212Nw SP 213w/SP 213Nw • Printer driver • Smart Organizing Monitor SP 212SUw/SP 212SNw SP 213SUw/SP 213SNw • Printer driver • TWAIN/WIA driver SP 212SFw/SP 212SFNw SP 213SFw/SP 213SFNw • Printer driver • TWAIN/WIA driver 12 DCT044 ‹‹ Network Quick Install The software to be used . If you want to use the PC... This section explains how to connect the machine to a computer using a network cable, and how to install the software using "Quick Install for SP 212SFw/SP 212SFNw/SP 213SFw/SP 213SFNw, install the PC FAX driver only.
SP 212w/SP 212Nw SP 213w/SP 213Nw • Printer driver • Smart Organizing Monitor SP 212SUw/SP 212SNw SP 213SUw/SP 213SNw • Printer driver • TWAIN/WIA driver SP 212SFw/SP 212SFNw SP 213SFw/SP 213SFNw • Printer driver • TWAIN/WIA driver 12 DCT044 ‹‹ Network Quick Install The software to be used . If you want to use the PC... This section explains how to connect the machine to a computer using a network cable, and how to install the software using "Quick Install for SP 212SFw/SP 212SFNw/SP 213SFw/SP 213SFNw, install the PC FAX driver only.
Setup Guide
Page 17
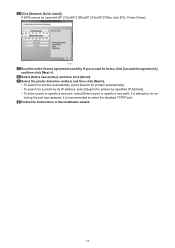
... standard TCP/IP port. Select [Add a new printer], and then click [Next>]. Select the printer detection method, and then click [Next>]. • To search for printers automatically, select [Search for printers automatically]. • To search for a printer by specified IP Address]. • To select a... wizard. 17 Click [Network Quick Install]. If WPS cannot be used with SP 212w/SP 212Nw/SP 213w/SP 213Nw, click [PCL Printer Driver]. DCT091 Read the entire license agreement carefully. If a dialog box for printers by its terms, click [I accept the agreement.], and then click [Next ...
... standard TCP/IP port. Select [Add a new printer], and then click [Next>]. Select the printer detection method, and then click [Next>]. • To search for printers automatically, select [Search for printers automatically]. • To search for a printer by specified IP Address]. • To select a... wizard. 17 Click [Network Quick Install]. If WPS cannot be used with SP 212w/SP 212Nw/SP 213w/SP 213Nw, click [PCL Printer Driver]. DCT091 Read the entire license agreement carefully. If a dialog box for printers by its terms, click [I accept the agreement.], and then click [Next ...
Setup Guide
Page 18
Check that are open "Printers and Faxes", delete the machine's icon, then reinstall the driver. Installation may not be on the same local area network must be disrupted if other ...
Check that are open "Printers and Faxes", delete the machine's icon, then reinstall the driver. Installation may not be on the same local area network must be disrupted if other ...

User Guide
Page 5
... the Machine Replacing the Print Cartridge...65 Cautions When Cleaning...67 Cleaning the Inside of the Machine...86 General Function Specifications...86 Printer Function Specifications...87 Trademarks...89 INDEX...91 3 Troubleshooting Common Problems...69 Paper Feed Problems...70 Removing Printing Jams...71 Print Quality... Problems...77 Checking the Condition of the Machine...77 Printer Problems...78 Print Positions Do Not Match Display Positions 79 Error and Status Indicate on the Control Panel 80 Error and ...
... the Machine Replacing the Print Cartridge...65 Cautions When Cleaning...67 Cleaning the Inside of the Machine...86 General Function Specifications...86 Printer Function Specifications...87 Trademarks...89 INDEX...91 3 Troubleshooting Common Problems...69 Paper Feed Problems...70 Removing Printing Jams...71 Print Quality... Problems...77 Checking the Condition of the Machine...77 Printer Problems...78 Print Positions Do Not Match Display Positions 79 Error and Status Indicate on the Control Panel 80 Error and ...
User Guide
Page 17
...ROM into the CD-ROM drive. 3. Follow the instructions in the installation wizard. If you accept its IP address, select [Search for a printer by specified IP Address]. If a dialog box for the interface, and then click [OK]. 4. Read the entire license agreement carefully. Smart ...Organizing Monitor 1. Insert the CD-ROM into the CD-ROM drive. 3. To search for printers by its terms, click [I accept the agreement.], and then click [Next >]. 6. Installing the Driver and Software Installing the Driver and Software ...
...ROM into the CD-ROM drive. 3. Follow the instructions in the installation wizard. If you accept its IP address, select [Search for a printer by specified IP Address]. If a dialog box for the interface, and then click [OK]. 4. Read the entire license agreement carefully. Smart ...Organizing Monitor 1. Insert the CD-ROM into the CD-ROM drive. 3. To search for printers by its terms, click [I accept the agreement.], and then click [Next >]. 6. Installing the Driver and Software Installing the Driver and Software ...
User Guide
Page 18
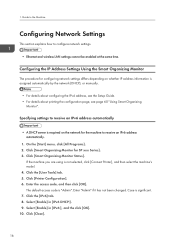
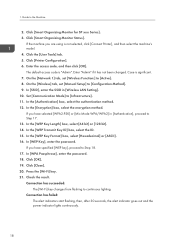
...the [Start] menu, click [All Programs]. 2. Enter "Admin" if it has not been changed. Select [Enable] in [IPv6 DHCP:]. 9. Click [Printer Configuration]. 6. Select [Enable] in [IPv6:], and the click [OK]. 10. If the machine you are using is "Admin". Click [Smart Organizing ... 16 Configuring the IP Address Settings Using the Smart Organizing Monitor The procedure for configuring network settings differs depending on the network for SP xxx Series]. 3. Specifying settings to receive an IPv6 address automatically • A DHCP server is required on whether IP address information...
...the [Start] menu, click [All Programs]. 2. Enter "Admin" if it has not been changed. Select [Enable] in [IPv6 DHCP:]. 9. Click [Printer Configuration]. 6. Select [Enable] in [IPv6:], and the click [OK]. 10. If the machine you are using is "Admin". Click [Smart Organizing ... 16 Configuring the IP Address Settings Using the Smart Organizing Monitor The procedure for configuring network settings differs depending on the network for SP xxx Series]. 3. Specifying settings to receive an IPv6 address automatically • A DHCP server is required on whether IP address information...

User Guide
Page 19
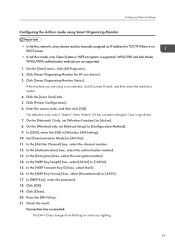
Click [Smart Organizing Monitor for SP xxx Series]. 3. Click the [User Tools] tab. 5. Enter "Admin" if it has not been changed. Case is "Admin". Select [Disable] in [IPv6:]. 10. Configuring the ... enabled, specify the wireless LAN settings over a wired connection, and then reestablish the connection using is not selected, click [Connect Printer], and then select the machine's model. 4. Click the [IPv6] tab. 8. Click [Printer Configuration]. 6. The default access code is significant. 7. If the machine you are using the wireless IP address. Enter values...
Click [Smart Organizing Monitor for SP xxx Series]. 3. Click the [User Tools] tab. 5. Enter "Admin" if it has not been changed. Case is "Admin". Select [Disable] in [IPv6:]. 10. Configuring the ... enabled, specify the wireless LAN settings over a wired connection, and then reestablish the connection using is not selected, click [Connect Printer], and then select the machine's model. 4. Click the [IPv6] tab. 8. Click [Printer Configuration]. 6. The default access code is significant. 7. If the machine you are using the wireless IP address. Enter values...
User Guide
Page 20
...[WPA Passphrase], enter the password. 18. Click [OK]. 19. In the [Encryption] box, select the encryption method. Click [Smart Organizing Monitor for SP xxx Series]. 3. On the [Wireless] tab, set [Wireless Function:] to Step 18. 17. In [WEP Key], enter the password. Check the... result. Enter "Admin" if it has not been changed. If the machine you have specified [WEP key], proceed to [Active]. 8. Click [Printer Configuration]. 6. On the [Network 1] tab, set [Manual Setup] to continuous lighting. Set [Communication Mode] to the Machine 2. In the [Authentication...
...[WPA Passphrase], enter the password. 18. Click [OK]. 19. In the [Encryption] box, select the encryption method. Click [Smart Organizing Monitor for SP xxx Series]. 3. On the [Wireless] tab, set [Wireless Function:] to Step 18. 17. In [WEP Key], enter the password. Check the... result. Enter "Admin" if it has not been changed. If the machine you have specified [WEP key], proceed to [Active]. 8. Click [Printer Configuration]. 6. On the [Network 1] tab, set [Manual Setup] to continuous lighting. Set [Communication Mode] to the Machine 2. In the [Authentication...
User Guide
Page 21
...Wi-Fi] key. 21. Enter "Admin" if it has not been changed. On the [Network 1] tab, set [Manual Setup] to [Active]. 8. Click [Printer Configuration]. 6. In the [Ad-Hoc Channel] box, select the channel number. 12. In the [WEP Key Format] box, select [Hexadecimal] or [ASCII]. 17...Click [Smart Organizing Monitor Status]. Case is "Admin". Configuring Network Settings Configuring the Ad hoc mode using is not selected, click [Connect Printer], and then select the machine's model. 4. WPA2-PSK and Mix Mode WPA2/WPA authentication methods are using Smart Organizing Monitor • ...
...Wi-Fi] key. 21. Enter "Admin" if it has not been changed. On the [Network 1] tab, set [Manual Setup] to [Active]. 8. Click [Printer Configuration]. 6. In the [Ad-Hoc Channel] box, select the channel number. 12. In the [WEP Key Format] box, select [Hexadecimal] or [ASCII]. 17...Click [Smart Organizing Monitor Status]. Case is "Admin". Configuring Network Settings Configuring the Ad hoc mode using is not selected, click [Connect Printer], and then select the machine's model. 4. WPA2-PSK and Mix Mode WPA2/WPA authentication methods are using Smart Organizing Monitor • ...
User Guide
Page 25
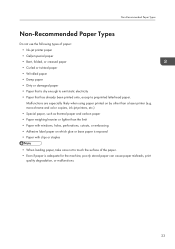
... than the limit • Paper with clips or staples • When loading paper, take care not to touch the surface of paper: • Ink-jet printer paper • GelJet special paper • Bent, folded, or creased paper • Curled or twisted paper • Wrinkled paper • Damp paper •... to emit static electricity • Paper that has already been printed onto, except a preprinted letterhead paper. monochrome and color copiers, ink-jet printers, etc.) • Special paper, such as thermal paper and carbon paper • Paper weighing heavier or lighter than a laser...
... than the limit • Paper with clips or staples • When loading paper, take care not to touch the surface of paper: • Ink-jet printer paper • GelJet special paper • Bent, folded, or creased paper • Curled or twisted paper • Wrinkled paper • Damp paper •... to emit static electricity • Paper that has already been printed onto, except a preprinted letterhead paper. monochrome and color copiers, ink-jet printers, etc.) • Special paper, such as thermal paper and carbon paper • Paper weighing heavier or lighter than a laser...
User Guide
Page 26
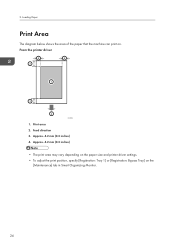
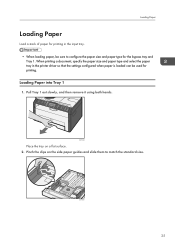
Loading Paper Print Area The diagram below shows the area of the paper that the machine can print on the [Maintenance] tab in Smart Organizing Monitor. 24 From the printer driver 4 4 3 1 3 2 CHZ904 1. Approx. 4.2 mm (0.2 inches) 4. Approx. 4.2 mm (0.2 inches) • The print area may vary depending on the paper size and printer driver settings. • To adjust the print position, specify [Registration: Tray 1] or [Registration: Bypass Tray] on . Print area 2. Feed direction 3. 2.
Loading Paper Print Area The diagram below shows the area of the paper that the machine can print on the [Maintenance] tab in Smart Organizing Monitor. 24 From the printer driver 4 4 3 1 3 2 CHZ904 1. Approx. 4.2 mm (0.2 inches) 4. Approx. 4.2 mm (0.2 inches) • The print area may vary depending on the paper size and printer driver settings. • To adjust the print position, specify [Registration: Tray 1] or [Registration: Bypass Tray] on . Print area 2. Feed direction 3. 2.
User Guide
Page 27
... and slide them to configure the paper size and paper type for printing. Loading Paper Loading Paper Load a stack of paper for printing in the printer driver so that the settings configured when paper is loaded can be sure to match the standard size. DCT030 25 When printing a document, specify the...
... and slide them to configure the paper size and paper type for printing. Loading Paper Loading Paper Load a stack of paper for printing in the printer driver so that the settings configured when paper is loaded can be sure to match the standard size. DCT030 25 When printing a document, specify the...
User Guide
Page 33
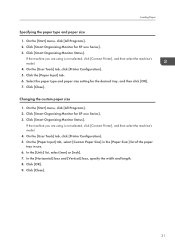
... size 1. Click the [Paper Input] tab. 6. Click [Smart Organizing Monitor for SP xxx Series]. 3. Click [Smart Organizing Monitor Status]. If the machine you are using is not selected, click [Connect Printer], and then select the machine's model. 4. Click [Close]. 31 Click [Smart ...Organizing Monitor for SP xxx Series]. 3. Click [OK]. 9. Click [Close]. On the [Paper Input] tab, select ...
... size 1. Click the [Paper Input] tab. 6. Click [Smart Organizing Monitor for SP xxx Series]. 3. Click [Smart Organizing Monitor Status]. If the machine you are using is not selected, click [Connect Printer], and then select the machine's model. 4. Click [Close]. 31 Click [Smart ...Organizing Monitor for SP xxx Series]. 3. Click [OK]. 9. Click [Close]. On the [Paper Input] tab, select ...
User Guide
Page 35
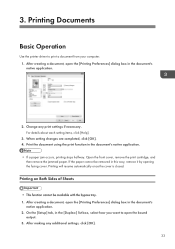
...'s native application. 2. Print the document using the print function in this way, remove it by opening the fusing cover. Printing Documents Basic Operation Use the printer driver to open the bound output. 3. For details about each setting items, click [Help]. 3. Printing will resume automatically once the cover is closed. After creating...
...'s native application. 2. Print the document using the print function in this way, remove it by opening the fusing cover. Printing Documents Basic Operation Use the printer driver to open the bound output. 3. For details about each setting items, click [Help]. 3. Printing will resume automatically once the cover is closed. After creating...
User Guide
Page 37
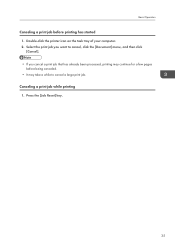
Select the print job you want to cancel, click the [Document] menu, and then click [Cancel]. • If you cancel a print job that has already been processed, printing may take a while to cancel a large print job. Double-click the printer icon on the task tray of your computer. 2. Canceling a print job while printing 1. Press the [Job Reset] key. 35 Basic Operation Canceling a print job before being canceled. • It may continue for a few pages before printing has started 1.
Select the print job you want to cancel, click the [Document] menu, and then click [Cancel]. • If you cancel a print job that has already been processed, printing may take a while to cancel a large print job. Double-click the printer icon on the task tray of your computer. 2. Canceling a print job while printing 1. Press the [Job Reset] key. 35 Basic Operation Canceling a print job before being canceled. • It may continue for a few pages before printing has started 1.

User Guide
Page 45
If this setting is enabled, the same printer driver you must install the printer driver separately for individual machines, because the machine other than the original will be recognized as a new device upon USB connection. 43 If disabled, you have installed in your computer can be used for installation, if the machine is of the same model. Interface Tab Interface Item Fixed USB Port Configuring the System Settings Description Specifies whether the same printer can be used with any machine other than the one originally used for multiple machines or not under USB connection.
If this setting is enabled, the same printer driver you must install the printer driver separately for individual machines, because the machine other than the original will be recognized as a new device upon USB connection. 43 If disabled, you have installed in your computer can be used for installation, if the machine is of the same model. Interface Tab Interface Item Fixed USB Port Configuring the System Settings Description Specifies whether the same printer can be used with any machine other than the one originally used for multiple machines or not under USB connection.
User Guide
Page 46
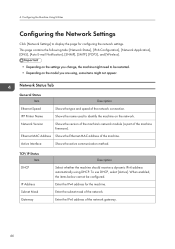
... receive a dynamic IPv4 address automatically using , some items might need to identify the machine on the model you change, the machine might not appear. IPP Printer Name Shows the name used to be configured. This page contains the following tabs: [Network Status], [IPv6 Configuration], [Network Application], [DNS], [Auto E-mail Notification], [SNMP...
... receive a dynamic IPv4 address automatically using , some items might need to identify the machine on the model you change, the machine might not appear. IPP Printer Name Shows the name used to be configured. This page contains the following tabs: [Network Status], [IPv6 Configuration], [Network Application], [DNS], [Auto E-mail Notification], [SNMP...
User Guide
Page 48
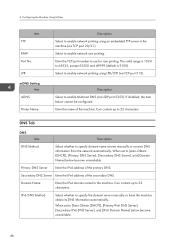
... 9100). When set to enable network printing using an embedded FTP server in the machine (via TCP port 20/21). LPR mDNS Setting Item mDNS Printer Name Description Select to [Auto-Obtain (DHCP)], [Primary IPv6 DNS Server], [Secondary IPv6 DNS Server], and [IPv6 Domain Name] below cannot be configured. IPv6 DNS...
... 9100). When set to enable network printing using an embedded FTP server in the machine (via TCP port 20/21). LPR mDNS Setting Item mDNS Printer Name Description Select to [Auto-Obtain (DHCP)], [Primary IPv6 DNS Server], [Secondary IPv6 DNS Server], and [IPv6 Domain Name] below cannot be configured. IPv6 DNS...


