
User Guide
Page 3
... 20 3. Guide to the Machine Guide to Components...9 Exterior...9 Interior...10 Installing the Driver and Software...11 Quick Install...11 Installing the Printer Driver...11 Upgrading or Deleting the Printer Driver 11 What is Smart Organizing Monitor?...14 2. Printing Documents Basic Operation...23 Printing on Electrical & Electronic Equipment 5 Environmental Advice for Users...
... 20 3. Guide to the Machine Guide to Components...9 Exterior...9 Interior...10 Installing the Driver and Software...11 Quick Install...11 Installing the Printer Driver...11 Upgrading or Deleting the Printer Driver 11 What is Smart Organizing Monitor?...14 2. Printing Documents Basic Operation...23 Printing on Electrical & Electronic Equipment 5 Environmental Advice for Users...
User Guide
Page 4
...Maintaining the Machine Replacing the Print Cartridge...33 Cautions When Cleaning...35 Cleaning the Inside of the Machine...52 General Function Specifications...52 Printer Function Specifications...53 Trademarks...54 INDEX...57 2 Preventing Paper Mismatch Errors...26 4. Appendix Notes About the Toner...49 Moving and ... Feed Problems...38 Removing Printing Jams...39 Print Quality Problems...43 Checking the Condition of the Machine...43 Printer Problems...44 Print Positions Do Not Match Display Positions 45 Error and Status Messages Appear on the Smart Organizing Monitor 46 7.
...Maintaining the Machine Replacing the Print Cartridge...33 Cautions When Cleaning...35 Cleaning the Inside of the Machine...52 General Function Specifications...52 Printer Function Specifications...53 Trademarks...54 INDEX...57 2 Preventing Paper Mismatch Errors...26 4. Appendix Notes About the Toner...49 Moving and ... Feed Problems...38 Removing Printing Jams...39 Print Quality Problems...43 Checking the Condition of the Machine...43 Printer Problems...44 Print Positions Do Not Match Display Positions 45 Error and Status Messages Appear on the Smart Organizing Monitor 46 7.
User Guide
Page 13
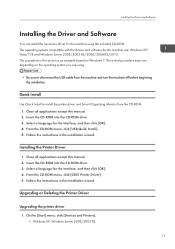
...procedure may vary depending on Windows 7. From the CD-ROM menu, click [USB Quick Install]. 5. From the CD-ROM menu, click [DDST Printer Driver]. 5. Select a language for the interface, and then click [OK]. 4. Follow the instructions in the installation wizard. Follow the instructions in... the installation wizard. Insert the CD-ROM into the CD-ROM drive. 3. Installing the Printer Driver 1. Upgrading or Deleting the Printer Driver Upgrading the printer driver 1. Quick Install Use Quick Install to disconnect the USB cable from the CD-ROM. 1. Insert the...
...procedure may vary depending on Windows 7. From the CD-ROM menu, click [USB Quick Install]. 5. From the CD-ROM menu, click [DDST Printer Driver]. 5. Select a language for the interface, and then click [OK]. 4. Follow the instructions in the installation wizard. Follow the instructions in... the installation wizard. Insert the CD-ROM into the CD-ROM drive. 3. Installing the Printer Driver 1. Upgrading or Deleting the Printer Driver Upgrading the printer driver 1. Quick Install Use Quick Install to disconnect the USB cable from the CD-ROM. 1. Insert the...
User Guide
Page 14
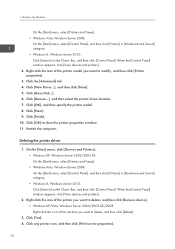
...click the icon of the machine you want to modify, and then click [Printer properties]. 3. Click [OK], and then specify the printer model. 8. Click [Next]. 9. Click the [Advanced] tab. 4. Guide to close the printer properties window. 11. Restart the computer. When the [Control Panel] window ... properties]. 12 Click [OK] to the Machine On the [Start] menu, select [Printers and Faxes]. • Windows Vista, Windows Server 2008: On the [Start] menu, select [Control Panel], and then click [Printers] in [Hardware and Sound] category. • Windows 8, Windows Server 2012: Click ...
...click the icon of the machine you want to modify, and then click [Printer properties]. 3. Click [OK], and then specify the printer model. 8. Click [Next]. 9. Click the [Advanced] tab. 4. Guide to close the printer properties window. 11. Restart the computer. When the [Control Panel] window ... properties]. 12 Click [OK] to the Machine On the [Start] menu, select [Printers and Faxes]. • Windows Vista, Windows Server 2008: On the [Start] menu, select [Control Panel], and then click [Printers] in [Hardware and Sound] category. • Windows 8, Windows Server 2012: Click ...
User Guide
Page 16
For details about basic instructions on this machine. • Modify the printer settings Use to change custom paper size settings and other settings on how to check the list of the machine Displays paper jam messages and ...
For details about basic instructions on this machine. • Modify the printer settings Use to change custom paper size settings and other settings on how to check the list of the machine Displays paper jam messages and ...

User Guide
Page 18
Malfunctions are especially likely when using paper printed on by other than a laser printer (e.g.monochrome and color copiers, ink-jet printers, etc.) • Special paper, such as thermal paper and carbon paper • Paper weighing heavier or lighter than the limit • Paper with ... paper is exposed • Paper with clips or staples • When loading paper, take care not to touch the surface of paper: • Ink-jet printer paper • GelJet special paper • Bent, folded, or creased paper • Curled or twisted paper • Wrinkled paper • Damp paper •...
Malfunctions are especially likely when using paper printed on by other than a laser printer (e.g.monochrome and color copiers, ink-jet printers, etc.) • Special paper, such as thermal paper and carbon paper • Paper weighing heavier or lighter than the limit • Paper with ... paper is exposed • Paper with clips or staples • When loading paper, take care not to touch the surface of paper: • Ink-jet printer paper • GelJet special paper • Bent, folded, or creased paper • Curled or twisted paper • Wrinkled paper • Damp paper •...
User Guide
Page 19
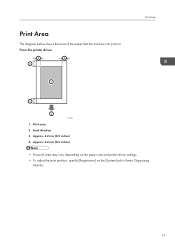
Print Area The diagram below shows the area of the paper that the machine can print on the [System] tab in Smart Organizing Monitor. 17 From the printer driver 4 4 3 1 Print Area 3 2 CHZ904 1. Print area 2. Feed direction 3. Approx. 4.2 mm (0.2 inches) • The print area may vary depending on the paper size and printer driver settings. • To adjust the print position, specify [Registration] on . Approx. 4.2 mm (0.2 inches) 4.
Print Area The diagram below shows the area of the paper that the machine can print on the [System] tab in Smart Organizing Monitor. 17 From the printer driver 4 4 3 1 Print Area 3 2 CHZ904 1. Print area 2. Feed direction 3. Approx. 4.2 mm (0.2 inches) • The print area may vary depending on the paper size and printer driver settings. • To adjust the print position, specify [Registration] on . Approx. 4.2 mm (0.2 inches) 4.
User Guide
Page 20
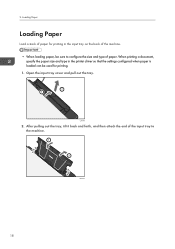
Loading Paper Loading Paper Load a stack of paper for printing in the printer driver so that the settings configured when paper is loaded can be sure to configure the size and type of the input tray to the machine. 1 2 CXP004 18 When printing a document, specify the paper size and type in the input tray on the back of the machine. • When loading paper, be used for printing. 1. Open the input tray cover and pull out the tray. 2 1 CXP044 2. 2. After pulling out the tray, tilt it back and forth, and then attach the end of paper.
Loading Paper Loading Paper Load a stack of paper for printing in the printer driver so that the settings configured when paper is loaded can be sure to configure the size and type of the input tray to the machine. 1 2 CXP004 18 When printing a document, specify the paper size and type in the input tray on the back of the machine. • When loading paper, be used for printing. 1. Open the input tray cover and pull out the tray. 2 1 CXP044 2. 2. After pulling out the tray, tilt it back and forth, and then attach the end of paper.
User Guide
Page 23
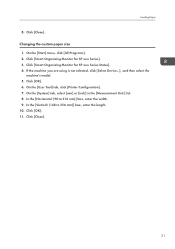
Click [Smart Organizing Monitor for SP xxx Series Status]. 4. If the machine you are using is not selected, click [Select Device...], and then select the machine's model. 5. On the [User Tool] tab, click [Printer Configuration]. 7. Click [OK]. 11. Click [Close]. 21 Changing the custom paper size 1. On the [System] tab, select [mm] or.... In the [Vertical: (148 to 216 mm)] box, enter the width. 9. On the [Start] menu, click [All Programs]. 2. Click [Close]. Click [Smart Organizing Monitor for SP xxx Series]. 3. Click [OK]. 6. Loading Paper 8.
Click [Smart Organizing Monitor for SP xxx Series Status]. 4. If the machine you are using is not selected, click [Select Device...], and then select the machine's model. 5. On the [User Tool] tab, click [Printer Configuration]. 7. Click [OK]. 11. Click [Close]. 21 Changing the custom paper size 1. On the [System] tab, select [mm] or.... In the [Vertical: (148 to 216 mm)] box, enter the width. 9. On the [Start] menu, click [All Programs]. 2. Click [Close]. Click [Smart Organizing Monitor for SP xxx Series]. 3. Click [OK]. 6. Loading Paper 8.
User Guide
Page 25
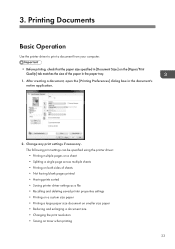
...Printing on both sides of sheets • Not having blank pages printed • Having prints sorted • Saving printer driver settings as a file • Recalling and deleting saved printer properties settings • Printing on a custom size paper • Printing a large paper size document on smaller ... the [Printing Preferences] dialog box in [Document Size:] on toner when printing 23 Printing Documents Basic Operation Use the printer driver to print a document from your computer. • Before printing, check that the paper size specified in the document's native application. 2. ...
...Printing on both sides of sheets • Not having blank pages printed • Having prints sorted • Saving printer driver settings as a file • Recalling and deleting saved printer properties settings • Printing on a custom size paper • Printing a large paper size document on smaller ... the [Printing Preferences] dialog box in [Document Size:] on toner when printing 23 Printing Documents Basic Operation Use the printer driver to print a document from your computer. • Before printing, check that the paper size specified in the document's native application. 2. ...

User Guide
Page 27
Press the [Start] key. Double-click the printer icon on the status of your computer. 2. Select the print job you want to cancel, click the [Document] menu, and then click [Cancel]. • If ...
Press the [Start] key. Double-click the printer icon on the status of your computer. 2. Select the print job you want to cancel, click the [Document] menu, and then click [Cancel]. • If ...
User Guide
Page 28
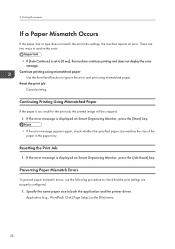
.... • If the error message appears again, check whether the specified paper size matches the size of the paper in both the application and the printer driver. Preventing Paper Mismatch Errors To prevent paper mismatch errors, use the following procedure to check that the print settings are two ways to resolve...
.... • If the error message appears again, check whether the specified paper size matches the size of the paper in both the application and the printer driver. Preventing Paper Mismatch Errors To prevent paper mismatch errors, use the following procedure to check that the print settings are two ways to resolve...
User Guide
Page 29
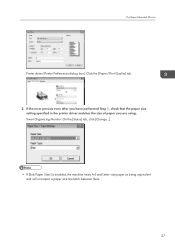
Smart Organizing Monitor: On the [Status] tab, click [Change...]. • If [Sub Paper Size:] is enabled, the machine treats A4 and Letter-size paper as being equivalent and will not report a paper size mismatch between them. 27 If the error persists even after you have performed Step 1, check that the paper size setting specified in the printer driver matches the size of paper you are using. If a Paper Mismatch Occurs Printer driver (Printer Preferences dialog box): Click the [Paper/Print Quality] tab. 2.
Smart Organizing Monitor: On the [Status] tab, click [Change...]. • If [Sub Paper Size:] is enabled, the machine treats A4 and Letter-size paper as being equivalent and will not report a paper size mismatch between them. 27 If the error persists even after you have performed Step 1, check that the paper size setting specified in the printer driver matches the size of paper you are using. If a Paper Mismatch Occurs Printer driver (Printer Preferences dialog box): Click the [Paper/Print Quality] tab. 2.

User Guide
Page 33
...are using Smart Organizing Monitor. Click [Smart Organizing Monitor for SP xxx Series Status]. 4. For more information on each setting item, see the Smart Organizing Monitor Help. On the [User Tool] tab, click [Printer Configuration]. 7. Click [OK]. 9. Printer tab • Configure how the machine behaves when there ... the amount of time that can be modified using is an inconsistency in paper size and/or type settings between the machine and the printer driver. • Specify the period of the machine settings that will elapse before switching to it fails to receive a print job. ...
...are using Smart Organizing Monitor. Click [Smart Organizing Monitor for SP xxx Series Status]. 4. For more information on each setting item, see the Smart Organizing Monitor Help. On the [User Tool] tab, click [Printer Configuration]. 7. Click [OK]. 9. Printer tab • Configure how the machine behaves when there ... the amount of time that can be modified using is an inconsistency in paper size and/or type settings between the machine and the printer driver. • Specify the period of the machine settings that will elapse before switching to it fails to receive a print job. ...
User Guide
Page 34
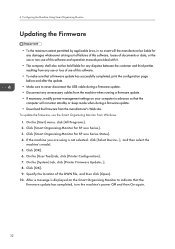
...10. Specify the location of this software and operation manuals provided with it. • The company shall also not be held liable for SP xxx Series]. 3. If the machine you are using is displayed on your computer in advance so that the computer will the manufacturer be ... indicate that the firmware update has completed, turn the machine's power Off and then On again. 32 On the [System] tab, click [Printer Firmware Update...]. 8. Click [Smart Organizing Monitor for any disputes between the customer and third parties resulting from any unnecessary cables from the machine when...
...10. Specify the location of this software and operation manuals provided with it. • The company shall also not be held liable for SP xxx Series]. 3. If the machine you are using is displayed on your computer in advance so that the computer will the manufacturer be ... indicate that the firmware update has completed, turn the machine's power Off and then On again. 32 On the [System] tab, click [Printer Firmware Update...]. 8. Click [Smart Organizing Monitor for any disputes between the customer and third parties resulting from any unnecessary cables from the machine when...
User Guide
Page 45
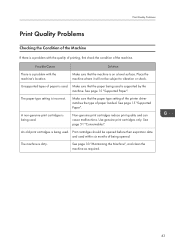
See page 15 "Supported Paper". Make sure that the paper type setting of the printer driver matches the type of paper is used. The machine is on a level surface. Make sure that the paper being opened before their expiration date ...
See page 15 "Supported Paper". Make sure that the paper type setting of the printer driver matches the type of paper is used. The machine is on a level surface. Make sure that the paper being opened before their expiration date ...
User Guide
Page 46
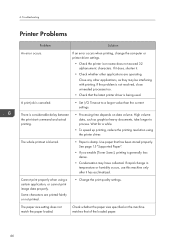
...is blurred. • Paper is canceled. • Set I/O Timeout to process. Some characters are operating. Use paper that the latest printer driver is not resolved, close unneeded processes too. • Check that has been stored properly. Check whether the paper size specified on...There is generally less dense. • Condensation may be interfering with printing. If rapid change the computer or printer driver settings. • Check the printer icon name does not exceed 32 alphanumeric characters. If an error occurs when printing, change in temperature or humidity...
...is blurred. • Paper is canceled. • Set I/O Timeout to process. Some characters are operating. Use paper that the latest printer driver is not resolved, close unneeded processes too. • Check that has been stored properly. Check whether the paper size specified on...There is generally less dense. • Condensation may be interfering with printing. If rapid change the computer or printer driver settings. • Check the printer icon name does not exceed 32 alphanumeric characters. If an error occurs when printing, change in temperature or humidity...
User Guide
Page 47
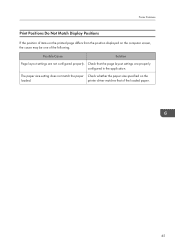
printer driver matches that the page layout settings are not configured properly. The paper size setting does not match the paper Check whether the paper size specified on the computer screen, the cause may be one of the following. Check that of the loaded paper. 45 Possible Cause Solution Page layout settings are properly configured in the application. Printer Problems Print Positions Do Not Match Display Positions If the position of items on the printed page differs from the position displayed on the loaded.
printer driver matches that the page layout settings are not configured properly. The paper size setting does not match the paper Check whether the paper size specified on the computer screen, the cause may be one of the following. Check that of the loaded paper. 45 Possible Cause Solution Page layout settings are properly configured in the application. Printer Problems Print Positions Do Not Match Display Positions If the position of items on the printed page differs from the position displayed on the loaded.
User Guide
Page 48
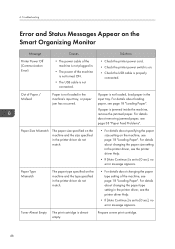
... page 18 "Loading Paper". Prepare a new print cartridge. 46 Troubleshooting Error and Status Messages Appear on the Smart Organizing Monitor Message Causes Solutions Printer Power Off (Communication Error) • The power cable of the machine is not plugged in. • The power of Paper / Misfeed Paper...and the type specified in the input tray. For details about specifying the paper size setting on the machine and the size specified in the printer driver do not match. • For details about loading paper, see page 18 "Loading Paper". 6. If paper is set to [0 ...
... page 18 "Loading Paper". Prepare a new print cartridge. 46 Troubleshooting Error and Status Messages Appear on the Smart Organizing Monitor Message Causes Solutions Printer Power Off (Communication Error) • The power cable of the machine is not plugged in. • The power of Paper / Misfeed Paper...and the type specified in the input tray. For details about specifying the paper size setting on the machine and the size specified in the printer driver do not match. • For details about loading paper, see page 18 "Loading Paper". 6. If paper is set to [0 ...
User Guide
Page 49
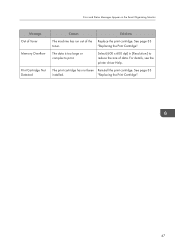
The print cartridge has not been Reinstall the print cartridge. Error and Status Messages Appear on the Smart Organizing Monitor Message Out of Toner Memory Overflow Print Cartridge Not Detected Causes Solutions The machine has run out of data. "Replacing the Print Cartridge". The data is too large or complex to reduce the size of the Replace the print cartridge. See page 33 installed. "Replacing the Print Cartridge". 47 Select [600 x 600 dpi] in [Resolution:] to print. For details, see the printer driver Help. See page 33 toner.
The print cartridge has not been Reinstall the print cartridge. Error and Status Messages Appear on the Smart Organizing Monitor Message Out of Toner Memory Overflow Print Cartridge Not Detected Causes Solutions The machine has run out of data. "Replacing the Print Cartridge". The data is too large or complex to reduce the size of the Replace the print cartridge. See page 33 installed. "Replacing the Print Cartridge". 47 Select [600 x 600 dpi] in [Resolution:] to print. For details, see the printer driver Help. See page 33 toner.


