
Network Guide
Page 62
... settings can also check the Ethernet status. 56 Menu User mode Administrator mode Reset Printer Job - $ Status Input Tray ❍ ❍ Output Tray ❍ ❍ Master ❍ ❍ Drum ❍ ❍ Function ❍ ❍ System ❍ ❍ Printer Language ❍ ❍ Job Printer Job History ❍ ❍ Error Log ❍ ❍...
... settings can also check the Ethernet status. 56 Menu User mode Administrator mode Reset Printer Job - $ Status Input Tray ❍ ❍ Output Tray ❍ ❍ Master ❍ ❍ Drum ❍ ❍ Function ❍ ❍ System ❍ ❍ Printer Language ❍ ❍ Job Printer Job History ❍ ❍ Error Log ❍ ❍...
Network Guide
Page 64
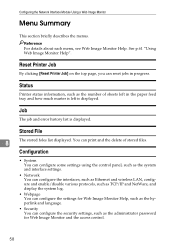
... displayed. Reset Printer Job By clicking [Reset Printer Job] on the top page, you can reset jobs in the paper feed tray and how much master is left is displayed. Reference For details about each menu, see Web Image Monitor Help.
... displayed. Reset Printer Job By clicking [Reset Printer Job] on the top page, you can reset jobs in the paper feed tray and how much master is left is displayed. Reference For details about each menu, see Web Image Monitor Help.

Network Guide
Page 75
..., k8, k16 Number of collated sets (1-9999) Specifies the number to make the master only for the size of the print image is half the maximum master size, select whether or not to collate. modeclear_none tialize the settings. mastercut_on, mastercut_off... jisb6, ledg- Specifies the paper size. modeclear_on, modeclear_off, Select whether or not to print with the normal amount of master making and print inksaver_off, inksaver_lv1, inksaver_lv2, inksaver_none Select whether or not to ini- intprint_off, intprint_afterprint, intprint_aftermastermaking, intprint_all, intprint_none...
..., k8, k16 Number of collated sets (1-9999) Specifies the number to make the master only for the size of the print image is half the maximum master size, select whether or not to collate. modeclear_none tialize the settings. mastercut_on, mastercut_off... jisb6, ledg- Specifies the paper size. modeclear_on, modeclear_off, Select whether or not to print with the normal amount of master making and print inksaver_off, inksaver_lv1, inksaver_lv2, inksaver_none Select whether or not to ini- intprint_off, intprint_afterprint, intprint_aftermastermaking, intprint_all, intprint_none...
Network Guide
Page 81
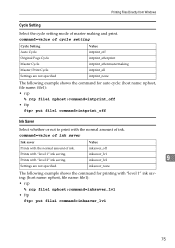
... Directly from Windows Cycle Setting Select the cycle setting mode of cycle setting Cycle Setting Auto Cycle Original Page Cycle Master Cycle Master/Print Cycle Settings are not specified. command=value of master making and print. inksaver_off Prints with "level 2" ink saving. Prints with "level 1" ink saving. inksaver_none The following example shows the...
... Directly from Windows Cycle Setting Select the cycle setting mode of cycle setting Cycle Setting Auto Cycle Original Page Cycle Master Cycle Master/Print Cycle Settings are not specified. command=value of master making and print. inksaver_off Prints with "level 2" ink saving. Prints with "level 1" ink saving. inksaver_none The following example shows the...
Network Guide
Page 83
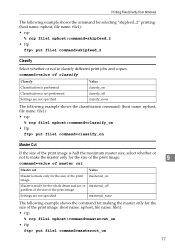
... of the size of classify Classify Classification is performed. command=value of the print image. mastercut_none The following example shows the command for making the master only for the size of the print image: (host name: nphost, file name: file1): • rcp % rcp file1 nphost:command=mastercut_on &#... • ftp ftp> put file1 command=skipfeed_2 Classify Select whether or not to make the master only for the size of the print image. 9 command=value of master cut Master cut Value Master is made for the whole drum surface, re- Classification is made only for the size of...
... of the size of classify Classify Classification is performed. command=value of the print image. mastercut_none The following example shows the command for making the master only for the size of the print image: (host name: nphost, file name: file1): • rcp % rcp file1 nphost:command=mastercut_on &#... • ftp ftp> put file1 command=skipfeed_2 Classify Select whether or not to make the master only for the size of the print image. 9 command=value of master cut Master cut Value Master is made for the whole drum surface, re- Classification is made only for the size of...
Network Guide
Page 110
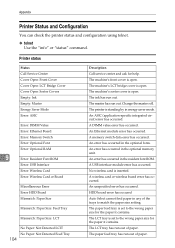
... tray is open . Printer status Status Call Service Center Cover Open: Front Cover Cover Open: LCT Bridge Cover Cover Open: Sorter Covers Empty: Ink Empty: Master Energy Saver Mode Error: ASIC Error: DIMM Value Error: Ethernet Board Error: Memory Switch Error: Optional Font Error: Optional RAM 9 Error: Resident Font ROM Error... size setting. The LCT tray is standing by in the optional fonts. A USB interface module error has occurred. A memory switch data error has occurred. The master has run out of the trays to the wrong paper size for help. Change the...
... tray is open . Printer status Status Call Service Center Cover Open: Front Cover Cover Open: LCT Bridge Cover Cover Open: Sorter Covers Empty: Ink Empty: Master Energy Saver Mode Error: ASIC Error: DIMM Value Error: Ethernet Board Error: Memory Switch Error: Optional Font Error: Optional RAM 9 Error: Resident Font ROM Error... size setting. The LCT tray is standing by in the optional fonts. A USB interface module error has occurred. A memory switch data error has occurred. The master has run out of the trays to the wrong paper size for help. Change the...
Network Guide
Page 127
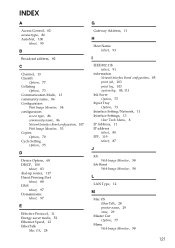
... telnet, 87 J Job Web Image Monitor, 58 Job Reset Web Image Monitor, 58 L LAN Type, 12 M Mac OS EtherTalk, 28 printer name, 29 zone, 29 Master Cut Option, 77 Menu Web Image Monitor, 58 121
... telnet, 87 J Job Web Image Monitor, 58 Job Reset Web Image Monitor, 58 L LAN Type, 12 M Mac OS EtherTalk, 28 printer name, 29 zone, 29 Master Cut Option, 77 Menu Web Image Monitor, 58 121

Operating Instructions
Page 2
... reading this mamual. • Type1 (Pixel Density 600 × 600 dpi): CP6346/LDD280/HQ9000/3590DNP • Type2 (Pixel Density 400 × 400 dpi): CP6334/LDD250/HQ7000/3580DNP Some illustrations in this machine refer to a power source as a result of Adobe Systems Incorporated. Power Source 120V, 60Hz, 3.2A or more Please be... symbols for direct, indirect, special, incidental, or consequential damages as above. Introduction This manual contains detailed instructions and notes on the operation and use genuine master and ink from the machine.
... reading this mamual. • Type1 (Pixel Density 600 × 600 dpi): CP6346/LDD280/HQ9000/3590DNP • Type2 (Pixel Density 400 × 400 dpi): CP6334/LDD250/HQ7000/3580DNP Some illustrations in this machine refer to a power source as a result of Adobe Systems Incorporated. Power Source 120V, 60Hz, 3.2A or more Please be... symbols for direct, indirect, special, incidental, or consequential damages as above. Introduction This manual contains detailed instructions and notes on the operation and use genuine master and ink from the machine.
Operating Instructions
Page 4
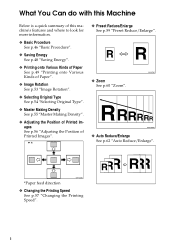
... "Printing onto Various Kinds of Paper". ❖ Image Rotation See p.53 "Image Rotation". ❖ Selecting Original Type See p.54 "Selecting Original Type". ❖ Master Making Density See p.55 "Master Making Density". ❖ Adjusting the Position of Printed Images See p.56 "Adjusting the Position of Printed Images". ❖ Preset Reduce/Enlarge See p.59...
... "Printing onto Various Kinds of Paper". ❖ Image Rotation See p.53 "Image Rotation". ❖ Selecting Original Type See p.54 "Selecting Original Type". ❖ Master Making Density See p.55 "Master Making Density". ❖ Adjusting the Position of Printed Images See p.56 "Adjusting the Position of Printed Images". ❖ Preset Reduce/Enlarge See p.59...
Operating Instructions
Page 6
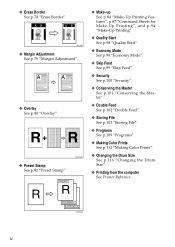
... Start". ❖ Economy Mode See p.98 "Economy Mode". ❖ Skip Feed See p.99 "Skip Feed". ❖ Security See p.100 "Security". ❖ Conserving the Master See p.101 "Conserving the Master". ❖ Double Feed See p.102 "Double Feed". ❖ Storing File See p.103 "Storing File". ❖ Programs See p.109 "Programs". ❖ Making Color Prints...
... Start". ❖ Economy Mode See p.98 "Economy Mode". ❖ Skip Feed See p.99 "Skip Feed". ❖ Security See p.100 "Security". ❖ Conserving the Master See p.101 "Conserving the Master". ❖ Double Feed See p.102 "Double Feed". ❖ Storing File See p.103 "Storing File". ❖ Programs See p.109 "Programs". ❖ Making Color Prints...
Operating Instructions
Page 8
...Printing onto Standard Paper 49 Printing onto Envelopes 49 Printing onto Special Paper 50 Making a Master and Prints 51 Selecting Cycle Setting 52 Image Rotation...53 Selecting Original Type 54 Master Making Density 55 Sample Print and Adjustment 56 Adjusting the Position of Printed Images 56 Changing... Sheets for Make-Up Printing 87 Make-Up Printing ...94 Quality Start ...98 Economy Mode ...98 Skip Feed ...99 Security ...100 Conserving the Master 101 Double Feed...102 Storing File ...103 Storing Data ...103 Changing a Stored File's User Name, File Name, or Password 105 Searching for...
...Printing onto Standard Paper 49 Printing onto Envelopes 49 Printing onto Special Paper 50 Making a Master and Prints 51 Selecting Cycle Setting 52 Image Rotation...53 Selecting Original Type 54 Master Making Density 55 Sample Print and Adjustment 56 Adjusting the Position of Printed Images 56 Changing... Sheets for Make-Up Printing 87 Make-Up Printing ...94 Quality Start ...98 Economy Mode ...98 Skip Feed ...99 Security ...100 Conserving the Master 101 Double Feed...102 Storing File ...103 Storing Data ...103 Changing a Stored File's User Name, File Name, or Password 105 Searching for...
Operating Instructions
Page 9
... 134 "x + C" Paper Misfeeds in the Paper Exit Section 136 "x + D" Master Misfeeds in the Master Feed Section 137 "x + B + D" Master Misfeeds in the Master Feed Section 138 "x + B + E" Master Misfeeds in the Master Eject Section 138 "x + E" Master Misfeeds in the Master Eject Section 139 "x + P" Original Misfeeds Occur in the Auto Document Feeder 140 ... Feed Tray 143 Changing the Paper Size of LCIT 144 MWhen the Open Cover/Unit Indicator Lights 145 kRemoving the Used Master 146 When Multiple Sheets Are Fed at the Same Time 147 When Prints Are Not Delivered in Two Colors 114 Changing...
... 134 "x + C" Paper Misfeeds in the Paper Exit Section 136 "x + D" Master Misfeeds in the Master Feed Section 137 "x + B + D" Master Misfeeds in the Master Feed Section 138 "x + B + E" Master Misfeeds in the Master Eject Section 138 "x + E" Master Misfeeds in the Master Eject Section 139 "x + P" Original Misfeeds Occur in the Auto Document Feeder 140 ... Feed Tray 143 Changing the Paper Size of LCIT 144 MWhen the Open Cover/Unit Indicator Lights 145 kRemoving the Used Master 146 When Multiple Sheets Are Fed at the Same Time 147 When Prints Are Not Delivered in Two Colors 114 Changing...
Operating Instructions
Page 10
... Characters 177 Keys ...177 Entering Text...178 viii User Tools User Tools Menu 149 System Settings ...149 Master Making/Print Settings 151 Accessing User Tools (System Settings/Master Making/Print Settings)......154 Changing Default Settings 154 Quitting User Tools 154 Settings You Can Change with User Tools... 155 System Settings ...155 Master Making/Print Settings 160 User Code ...164 Registering a User Code 164 Changing a User Code 165 Deleting a User Code 165 ...
... Characters 177 Keys ...177 Entering Text...178 viii User Tools User Tools Menu 149 System Settings ...149 Master Making/Print Settings 151 Accessing User Tools (System Settings/Master Making/Print Settings)......154 Changing Default Settings 154 Quitting User Tools 154 Settings You Can Change with User Tools... 155 System Settings ...155 Master Making/Print Settings 160 User Code ...164 Registering a User Code 164 Changing a User Code 165 Deleting a User Code 165 ...
Operating Instructions
Page 22
... a fire or an electric shock might occur. • Our products are hard to remove. • Be careful not to remove misfed sheets of paper or masters. • If ink comes into contact with ink, wash the affected area thoroughly with your clothes when replacing an ink container. For other small metallic...
... a fire or an electric shock might occur. • Our products are hard to remove. • Be careful not to remove misfed sheets of paper or masters. • If ink comes into contact with ink, wash the affected area thoroughly with your clothes when replacing an ink container. For other small metallic...

Operating Instructions
Page 24
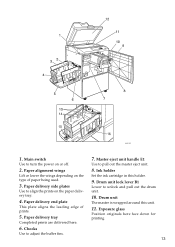
Paper feed tray Load paper here. 7. Guide To Components 1. Master making unit Open this unit when installing the master. 4. Paper feed side plates knob Use to lower the paper feed tray. Paper feed side plates knob lock lever Locks the paper feed side plates. 12 Control panel See p.18 "Control Panel". 3. Paper feed side plates Prevent paper skewing. 6. Paper feed tray down key Press to move the side plates. 8. Front door Open to access the inside of the machine. 2. AJK111S 5.
Paper feed tray Load paper here. 7. Guide To Components 1. Master making unit Open this unit when installing the master. 4. Paper feed side plates knob Use to lower the paper feed tray. Paper feed side plates knob lock lever Locks the paper feed side plates. 12 Control panel See p.18 "Control Panel". 3. Paper feed side plates Prevent paper skewing. 6. Paper feed tray down key Press to move the side plates. 8. Front door Open to access the inside of the machine. 2. AJK111S 5.
Operating Instructions
Page 25
...end plate This plate aligns the leading edge of paper being used. 3. Drum unit The master is wrapped around this holder. 9. Main switch Use to adjust the buffer fins. 7. ...printing. 13 Paper alignment wings Lift or lower the wings depending on the paper delivery tray. 4. Master eject unit handle E1 Use to align the prints on the type of prints. 5. Paper delivery side plates ...Use to pull out the master eject unit. 8. AJK110S 1. Paper delivery tray Completed prints are delivered here. 6. Ink holder Set the...
...end plate This plate aligns the leading edge of paper being used. 3. Drum unit The master is wrapped around this holder. 9. Main switch Use to adjust the buffer fins. 7. ...printing. 13 Paper alignment wings Lift or lower the wings depending on the paper delivery tray. 4. Master eject unit handle E1 Use to align the prints on the type of prints. 5. Paper delivery side plates ...Use to pull out the master eject unit. 8. AJK110S 1. Paper delivery tray Completed prints are delivered here. 6. Ink holder Set the...
Operating Instructions
Page 30
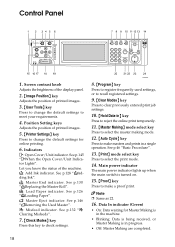
...mode. 14. Data In indicator (Green) • On: Data waiting for online printing. 6. See p.130 "CReplacing the Master Roll". B: Load Paper indicator. k: Master Eject indicator. j: Add Ink indicator. Main power indicator The main power indicator lights up when the main switch is in }...panel. 2. {Image Position} key Adjusts the position of printed images. 3. {User Tools} key Press to change the default settings for Master Making is in a single operation. Control Panel 1. Position Setting keys Adjusts the position of the machine. Indicators M: Open Cover/Unit indicator....
...mode. 14. Data In indicator (Green) • On: Data waiting for online printing. 6. See p.130 "CReplacing the Master Roll". B: Load Paper indicator. k: Master Eject indicator. j: Add Ink indicator. Main power indicator The main power indicator lights up when the main switch is in }...panel. 2. {Image Position} key Adjusts the position of printed images. 3. {User Tools} key Press to change the default settings for Master Making is in a single operation. Control Panel 1. Position Setting keys Adjusts the position of the machine. Indicators M: Open Cover/Unit indicator....
Operating Instructions
Page 31
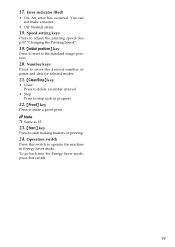
.... 22. {Proof} key Press to adjust the printing speed. See p.57 "Changing the Printing Speed". 19. {Initial position} key Press to reset to start making masters or printing. 24. Note ❒ Same as 15. 23. {Start} key Press to the standard image position. 20. 17. Error indicator (Red) • On: An... to stop a job in Energy Saver mode. You can not make a proof print. Operation switch Press this switch. 19 Speed setting keys Press to make a master. • Off: Normal status 18.
.... 22. {Proof} key Press to adjust the printing speed. See p.57 "Changing the Printing Speed". 19. {Initial position} key Press to reset to start making masters or printing. 24. Note ❒ Same as 15. 23. {Start} key Press to the standard image position. 20. 17. Error indicator (Red) • On: An... to stop a job in Energy Saver mode. You can not make a proof print. Operation switch Press this switch. 19 Speed setting keys Press to make a master. • Off: Normal status 18.
Operating Instructions
Page 34
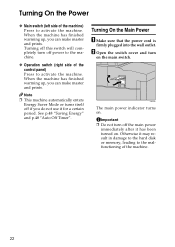
... the main power immediately after it for a certain period. Important ❒ Do not turn on . When the machine has finished warming up , you can make master and prints. B Open the switch cover and turn off if you do not use it has been turned on. When the machine has finished warming...
... the main power immediately after it for a certain period. Important ❒ Do not turn on . When the machine has finished warming up , you can make master and prints. B Open the switch cover and turn off if you do not use it has been turned on. When the machine has finished warming...
Operating Instructions
Page 58
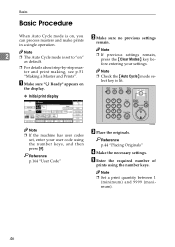
..." D Make the necessary settings. Basics Basic Procedure When Auto Cycle mode is on " as default. ❒ For details about step-by-step master and print making, see p.51 "Making a Master and Prints". E Enter the required number of prints using the number keys, and then press [#]. A Make sure "d Ready" appears on Note ❒... Auto Cycle mode is lit. the display. ❖ Initial print display Note ❒ If the machine has user codes set to "on , you can process masters and make prints in a single operation.
..." D Make the necessary settings. Basics Basic Procedure When Auto Cycle mode is on " as default. ❒ For details about step-by-step master and print making, see p.51 "Making a Master and Prints". E Enter the required number of prints using the number keys, and then press [#]. A Make sure "d Ready" appears on Note ❒... Auto Cycle mode is lit. the display. ❖ Initial print display Note ❒ If the machine has user codes set to "on , you can process masters and make prints in a single operation.


