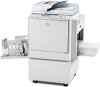
Ricoh Priport DX 4545 Support Question
Ricoh Priport DX 4545 Support Question
Find answers below for this question about Ricoh Priport DX 4545.Need a Ricoh Priport DX 4545 manual? We have 1 online manual for this item!
Question posted by zagtechfoong on September 1st, 2014
Machine Probrem After Master Making.
printing image is shift down more than 20mm after master making,the master is slip down and cause master disposal error.
Current Answers
Related Ricoh Priport DX 4545 Manual Pages
Printer Reference - Page 9

... the Print Image Density See p.25 "Adjusting the Print Image Density".
❖ Making Halftone Prints See p.26 "Tint Mode".
vii
GRZOOM0E
❖ Auto Reducing and Enlarging See p.34 "Auto Reduce/Enlarge".
GRTINT0E
❖ Fine Mode See p.27 "Fine Mode".
❖ Changing the Printing Speed See p.28 "Changing the Printing Speed". What You Can Do with this Machine
Below is...
Printer Reference - Page 12

... wish to check the image
before printing, press the {Auto Cycle} key before pressing the {Master Making} key, in order to its initial condition. See p.18 "When Auto Cycle mode is finished,
press the {Clear Modes/Energy Saver} key.
x G When the print job is off". AQN025S
Your print settings are cleared and the machine returns to disable...
Printer Reference - Page 13

...23 Right or Left...24 Adjusting the Print Image Density 25 Tint Mode ...26 Fine Mode ...27 Changing the Printing Speed 28 Stopping a Multi-print Run 29 Stopping a Multi-print Run to Read This Manual v Manuals for This Machine vi What You Can Do with this Machine vii Making Prints ...ix Machine Exterior ...1 Machine Interior ...2 Options ...3 Control Panel...4
Keys ...4 Indicators...6 Panel...
Printer Reference - Page 17

... before master making. Paper feed tray
Set paper on this tray to adjust the contact pressure of originals in the feeder.
4. Paper feed side plate lock lever
Use to lower the paper feed tray.
12. Lower master tray
Pull out this tray for access to paper thickness.
7. Machine Exterior
AQN002S
1. Front cover
Open for printing...
Printer Reference - Page 20
.../Enlarge".
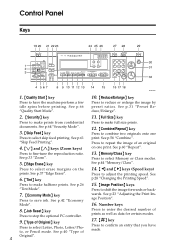
2. {Security} key
11. {Full Size} key
Press to make prints from confidential Press to select skip feed printing. See p.58 "Combine". Press to select erase margins on one
Press to make halftone prints. Press to combine two originals onto one print.
wards. Press to shift the image forwards or back-
7. {Economy Mode} key
Press to adjust the...
Printer Reference - Page 21
See p.79 "User Tools".
21. {Image Density} key
Press to make a master.
32. {Print} key
Press to start printing.
5 See p.43 "Auto Cycle".
30. {Proof} key
Press to make a proof print.
31. {Master Making} key
Press to select the fine image. See p.25 "Adjusting the Print Image Density".
22. {On Line} key
See p.67 "On Line Printing".
23. {Auto On Line} key
See p.68...
Printer Reference - Page 34

H Enter the number of prints with
the number keys.
AQN024S
Printing starts automatically after the trial print. AQN023S
Note ❒ If you have made a wrong en- try, press the {Clear/Stop} key and then enter the number again.
When Auto Cycle mode is on. AQN030S
B Press the {Master Making} key.
Operation
F Lower the exposure glass cover...
Printer Reference - Page 35

...}
key and check the print image. AQN031S
Reference If the image position is finished,
press the {Clear Modes/Energy Sav- AQN032S
19 Standard Printing
B Press the {Master Making} key. See p.23 "Adjusting the Print Image Position".
AQN025S
Your print settings are cleared and the machine returns to its initial condition. C Press the {Print} key. I When the print job is not correct...
Printer Reference - Page 41

...; If you wish to check the image before printing, press the {Auto Cycle} key before pressing the {Master Making} key, in order to disable Auto Cycle mode. A Press the {Image Density} key. AQN024S
Printing starts automatically after the trial print.
Adjusting the Print Image Density
Adjusting the Print Image Density
D You can specify the image density that is selected by default when...
Printer Reference - Page 42

... this function to disable Auto Cycle mode. C Enter the number of prints with
the number keys. Note ❒ If you wish to check the image
before printing, press the {Auto Cycle} key before pressing the {Master Making} key, in order to make halftone prints.
A Press the {Tint} key. D Press the {Master Making} key. AQN024S
Printing starts automatically after the trial...
Printer Reference - Page 43

.... See
p.18 "When Auto Cycle mode is applied. AQN023S
D Press the {Master Making} key.
AQN024S
Printing starts automatically after the trial print.
27
If you wish to check the image
1
before printing, press the {Auto
Cycle} key before pressing the
{Master Making} key, in order to make clear prints.
BQZ024S
B Set your original. Fine Mode
Note
❒ If you select...
Printer Reference - Page 45

AQN024S
AQN032S
29
C Enter the number of prints or
check the completed prints.
AQN035S
B Change the number of prints and
press the {Master Making} key.
Note ❒ To change the number of Prints 1
Print Another Original
and Checking the Completed
A Press the {Clear/Stop} key. Prints
A Press the {Clear/Stop} key. C Press the {Print} key to Changing the Number of...
Printer Reference - Page 48

... number of the correct size. See p.18 "When Auto Cycle mode is off".
Note ❒ If you wish to check the image
before printing, press the {Auto Cycle} key before pressing the {Master Making} key, in order to select
your original. D Set your desired reproduction ratio, and press the {OK} key. AQN023S
32
AQN024S...
Printer Reference - Page 52

AQN024S
Printing starts automatically after the trial print. Operation
E Enter the number of prints with the number keys.
1
AQN023S
F Press the {Master Making} key. Note
❒ If you wish to check the image before printing, press the {Auto Cycle} key before pressing the {Master Making} key, in order to disable Auto Cycle mode. See p.18 "When Auto Cycle mode is off".
36
Printer Reference - Page 54

Note ❒ If you wish to check the image
before printing, press the {Auto Cycle} key before pressing the {Master Making} key, in order to disable Auto Cycle mode. See p.18 "When Auto Cycle mode is off".
38 Operation
E Press the {Master Making} key.
1
AQN024S
Printing starts automatically after the trial print.
Printer Reference - Page 74
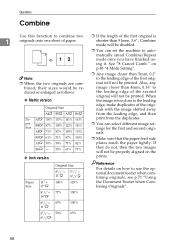
.../2" × 65% 11"L
100%
51/2" × 50% 81/2"L
65%
58 When the image is
1
originals onto one sheet of the originals with the image shifted away from the leading edge, and then print from the duplicates.
❒ You can set the machine to automatically cancel Combine/Repeat mode once you have finished using it. bined...
Printer Reference - Page 82

...
Note ❒ To use this problem, you need to
set from 1 to check the image before printing, press the {Auto Cycle} key before a print run. of
the drum before pressing the {Master Making} key, in order to "On" using the user tools.
See "10 Idlng for a long
1
time, or when you change the number of...
Printer Reference - Page 100
...mode is set to the next Class print job.
To increase the print image density, increase the number of the paper, the machine automatically rotates the
original image by using the Manual Quality Start mode... machine stops after it is turned on to "No", you can specify the number of Q.start
You can restore the density by making
a few idle spins when the power is finished a Class print ...
Printer Reference - Page 143
... and covers softly. • Do not put anything except originals on the machine. • Do not spill liquid on the printed paper.
If this man- In such a case, make a few trial prints to check the image position because the image position of the trial print might cause injury, touch only the parts specified in this manual. • If...
Printer Reference - Page 157

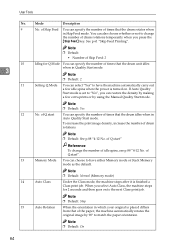
...of Skip Feed, 84 No Orig. {Image Position} keys, 4 Image Rotation, 30 Incomplete Prints, 124 Indicators, 6 Initial Setting, 82...Machine, 132 Margin Eras. Size, 83 Normal Memory Mode, 49 Number keys, 4
O
{OK} key, 5 On Line Printing, 67 Open Cover/Unit indicator (M), 116 Open Cover/Unit indicator (M)
Document Feeder Cover is Open, 116 Front Cover is Displayed, 117 {Master Making} key, 5
Master...
Similar Questions

E00 Appear When Making New Master And Noise From
when making anew master the motor for open the clamper is working and eject the old master? and rota...
when making anew master the motor for open the clamper is working and eject the old master? and rota...
(Posted by gamalmehdar 3 years ago)

Master Feed Error
when making master ,master is not fed to the drum and gets jammed in buffer or under cutter unit . H...
when making master ,master is not fed to the drum and gets jammed in buffer or under cutter unit . H...
(Posted by isaacwunduknol 8 years ago)

I Own A Ricoh Priport Dx 3343. What Does Error Code E-02 Mean?
I would like to understand what error code E-02 means and how it can be fixed so I can use my machin...
I would like to understand what error code E-02 means and how it can be fixed so I can use my machin...
(Posted by mimeventsasy 11 years ago)

Service Handbook For Duplicator Dx 4545
maintenance and reper this duplicator
maintenance and reper this duplicator
(Posted by aitradiahcene 11 years ago)
Service Handbook Duplicator Dx 4545
maintenance and reparation dx 4545
maintenance and reparation dx 4545
(Posted by aitradiahcene 11 years ago)