Printer Reference
Page 3
.... • To avoid hazardous electric shock, do not touch moving parts, open the front cover. Safety During Operation In this manual, the following important symbols are used: R WARNING: Indicates a potentially hazardous situation which , if instructions are not followed, could cause an electric shock or fire. • Disconnect the power plug (by pulling the plug, not the cable) if...
.... • To avoid hazardous electric shock, do not touch moving parts, open the front cover. Safety During Operation In this manual, the following important symbols are used: R WARNING: Indicates a potentially hazardous situation which , if instructions are not followed, could cause an electric shock or fire. • Disconnect the power plug (by pulling the plug, not the cable) if...
Printer Reference
Page 8
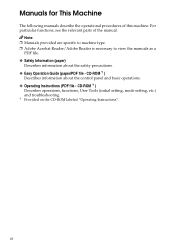
... setting, mode setting, etc.) and troubleshooting. *1 Provided on the CD-ROM labeled "Operating Instructions". Note ❒ Manuals provided are specific to machine type. ❒ Adobe Acrobat Reader/Adobe Reader is necessary to view the manuals as a PDF file. ❖ Safety Information (paper) Describes information about the control panel and basic operations. ❖ Operating Instructions (PDF file - CD-ROM *1 ) Describes information about the safety precautions. ❖ Easy Operation Guide (paper/PDF...
... setting, mode setting, etc.) and troubleshooting. *1 Provided on the CD-ROM labeled "Operating Instructions". Note ❒ Manuals provided are specific to machine type. ❒ Adobe Acrobat Reader/Adobe Reader is necessary to view the manuals as a PDF file. ❖ Safety Information (paper) Describes information about the control panel and basic operations. ❖ Operating Instructions (PDF file - CD-ROM *1 ) Describes information about the safety precautions. ❖ Easy Operation Guide (paper/PDF...

Printer Reference
Page 9
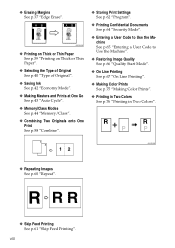
... "Zoom". * Paper feed direction GRPOSI0E ❖ Adjusting the Print Image Density See p.25 "Adjusting the Print Image Density". ❖ Making Halftone Prints See p.26 "Tint Mode". GRZOOM0E ❖ Auto Reducing and Enlarging See p.34 "Auto Reduce/Enlarge". GRTINT0E ❖ Fine Mode See p.27 "Fine Mode". ❖ Changing the Printing Speed See p.28 "Changing the Printing Speed". vii What You Can Do with this Machine Below...
... "Zoom". * Paper feed direction GRPOSI0E ❖ Adjusting the Print Image Density See p.25 "Adjusting the Print Image Density". ❖ Making Halftone Prints See p.26 "Tint Mode". GRZOOM0E ❖ Auto Reducing and Enlarging See p.34 "Auto Reduce/Enlarge". GRTINT0E ❖ Fine Mode See p.27 "Fine Mode". ❖ Changing the Printing Speed See p.28 "Changing the Printing Speed". vii What You Can Do with this Machine Below...
Printer Reference
Page 10
...; Saving Ink See p.42 "Economy Mode". ❖ Making Masters and Prints at One Go See p.43 "Auto Cycle". ❖ Memory/Class Modes See p.44 "Memory/Class". ❖ Combining Two Originals onto One Print See p.58 "Combine". ❖ Storing Print Settings See p.62 "Program". ❖ Printing Confidential Documents See p.64 "Security Mode". ❖ Entering a User Code to Use the Machine See p.65 "Entering a User Code to Use the Machine". ❖...
...; Saving Ink See p.42 "Economy Mode". ❖ Making Masters and Prints at One Go See p.43 "Auto Cycle". ❖ Memory/Class Modes See p.44 "Memory/Class". ❖ Combining Two Originals onto One Print See p.58 "Combine". ❖ Storing Print Settings See p.62 "Program". ❖ Printing Confidential Documents See p.64 "Security Mode". ❖ Entering a User Code to Use the Machine See p.65 "Entering a User Code to Use the Machine". ❖...
Printer Reference
Page 14
... Print Settings 62 Recalling a Program 63 Security Mode ...64 Entering a User Code to Use the Machine 65 Quality Start Mode 66 On Line Printing 67 Auto On Line ...68 2. Optional Functions Optional Document Feeder 69 Originals ...69 Placing Originals in the Document Feeder 70 Using the Document Feeder when Combining Originals 71 Using the Document Feeder in Memory Mode 71 Color Printing Using the Optional Color Drum 74 Changing the Color Drum Unit 74 Making Color Prints 75 Printing...
... Print Settings 62 Recalling a Program 63 Security Mode ...64 Entering a User Code to Use the Machine 65 Quality Start Mode 66 On Line Printing 67 Auto On Line ...68 2. Optional Functions Optional Document Feeder 69 Originals ...69 Placing Originals in the Document Feeder 70 Using the Document Feeder when Combining Originals 71 Using the Document Feeder in Memory Mode 71 Color Printing Using the Optional Color Drum 74 Changing the Color Drum Unit 74 Making Color Prints 75 Printing...
Printer Reference
Page 15
... User Tools Menu 80 1 System ...80 2 Set Operat'n Mode 81 3 Initial Setting...82 4 Mode Setting ...83 5 Admin. Mode ...85 6 Online Paramet's 86 User Tool Menus in the Optional Tape Dispenser 98 5. of Paper (Black Line/Stain 123 Blank Prints or Incomplete Prints 124 xiii 3. Replenishing Supplies Loading Paper on the Front Side of Q.start...88 5-2 Reset Counters 89 4. Troubleshooting Machine Operation Problems 99 Printing Problems 101 Printing Problems When Using Combine Mode 101 x Clearing Misfeeds 102 When "x" lights...
... User Tools Menu 80 1 System ...80 2 Set Operat'n Mode 81 3 Initial Setting...82 4 Mode Setting ...83 5 Admin. Mode ...85 6 Online Paramet's 86 User Tool Menus in the Optional Tape Dispenser 98 5. of Paper (Black Line/Stain 123 Blank Prints or Incomplete Prints 124 xiii 3. Replenishing Supplies Loading Paper on the Front Side of Q.start...88 5-2 Reset Counters 89 4. Troubleshooting Machine Operation Problems 99 Printing Problems 101 Printing Problems When Using Combine Mode 101 x Clearing Misfeeds 102 When "x" lights...
Printer Reference
Page 21
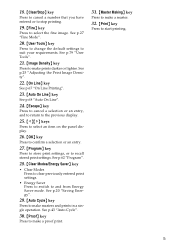
... • Clear Modes Press to clear previously entered print settings. • Energy Saver Press to switch to suit your requirements. See p.27 "Fine Mode". 20. {User Tools} key Press to change the default settings to and from Energy Saver mode. See p.43 "Auto Cycle". 30. {Proof} key Press to make a proof print. 31. {Master Making} key Press to make a master. 32. {Print} key Press to recall stored print settings. See...
... • Clear Modes Press to clear previously entered print settings. • Energy Saver Press to switch to suit your requirements. See p.27 "Fine Mode". 20. {User Tools} key Press to change the default settings to and from Energy Saver mode. See p.43 "Auto Cycle". 30. {Proof} key Press to make a proof print. 31. {Master Making} key Press to make a master. 32. {Print} key Press to recall stored print settings. See...
Printer Reference
Page 22
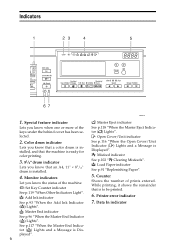
... of prints entered. Color drum indicator Lets you know that a color drum is installed, and that an A4, 11" × 81/2" drum is Displayed". x: Misfeed indicator See p.102 "x Clearing Misfeeds". Data In indicator See p.96 "When the Master End Indicator (C) Lights". u: Set Key Counter indicator See p.119 "When Other Indicators Light". C: Master End indicator See p.116 "When the Open Cover/Unit Indicator (M) Lights and a Message is installed. 4. M: Open Cover/Unit...
... of prints entered. Color drum indicator Lets you know that a color drum is installed, and that an A4, 11" × 81/2" drum is Displayed". x: Misfeed indicator See p.102 "x Clearing Misfeeds". Data In indicator See p.96 "When the Master End Indicator (C) Lights". u: Set Key Counter indicator See p.119 "When Other Indicators Light". C: Master End indicator See p.116 "When the Open Cover/Unit Indicator (M) Lights and a Message is installed. 4. M: Open Cover/Unit...

Printer Reference
Page 28
... lever and adjust the side plates to match the paper size. 12 ZFRY020E ABL024S Operation Printing Preparations 1 Loading Paper D Make sure that the paper feed side plates touch the paper light- A Gently open the paper feed tray. ABL022S B Lift the paper delivery side plates and adjust them to match the paper size. 1 TSLY015E Setting Up the Paper Delivery Tray A Raise the paper delivery tray slight- ly before lowering it down gently. Shift...
... lever and adjust the side plates to match the paper size. 12 ZFRY020E ABL024S Operation Printing Preparations 1 Loading Paper D Make sure that the paper feed side plates touch the paper light- A Gently open the paper feed tray. ABL022S B Lift the paper delivery side plates and adjust them to match the paper size. 1 TSLY015E Setting Up the Paper Delivery Tray A Raise the paper delivery tray slight- ly before lowering it down gently. Shift...

Printer Reference
Page 36
...; you are setting the mode on p.80 "1 System". • you are making master or printing • the machine is printing the sec- To go back into the Energy Saver mode, press the Operation switch. ❖ Auto Off mode The machine turns off . To use it, turn the main switch on the exposure glass or in this mode. To operate the machine, press the Operation switch, or place originals on . • a warning message appears...
...; you are setting the mode on p.80 "1 System". • you are making master or printing • the machine is printing the sec- To go back into the Energy Saver mode, press the Operation switch. ❖ Auto Off mode The machine turns off . To use it, turn the main switch on the exposure glass or in this mode. To operate the machine, press the Operation switch, or place originals on . • a warning message appears...
Printer Reference
Page 38
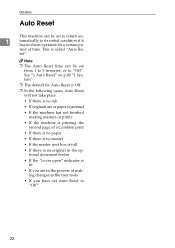
...making masters or prints • If the machine is printing the second page of time. See "1 Auto Reset" on p.80 "1 System". ❒ The default for a certain pe- This is lit • If you are or paper is jammed • If the machine has not finished making changes to the user tools • If you have set Auto Reset...been operated for Auto Reset is Off. ❒ In the following cases, Auto Reset will not take place. • If there is no master • If the master eject box is full • If there is an original in the optional document feeder • If the "cover open" ...
...making masters or prints • If the machine is printing the second page of time. See "1 Auto Reset" on p.80 "1 System". ❒ The default for a certain pe- This is lit • If you are or paper is jammed • If the machine has not finished making changes to the user tools • If you have set Auto Reset...been operated for Auto Reset is Off. ❒ In the following cases, Auto Reset will not take place. • If there is no master • If the master eject box is full • If there is an original in the optional document feeder • If the "cover open" ...

Printer Reference
Page 46
... to make masters in the optional ADF. B4 A4L JISL -- -- ★ ★ -- -- ★ ★ -- -- -- -- A4K ★ B5 JISL -- See "15 Auto Rotation" on p.83 "4 Mode Setting". 30 Note ❒ The following tables list the combinations that can cancel Image Rotation mode with User Tools. Operation Image Rotation When your original setting orientation is different from the paper orientation, 1 the machine automatically...
... to make masters in the optional ADF. B4 A4L JISL -- -- ★ ★ -- -- ★ ★ -- -- -- -- A4K ★ B5 JISL -- See "15 Auto Rotation" on p.83 "4 Mode Setting". 30 Note ❒ The following tables list the combinations that can cancel Image Rotation mode with User Tools. Operation Image Rotation When your original setting orientation is different from the paper orientation, 1 the machine automatically...
Printer Reference
Page 81
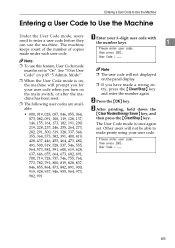
... each user code. Mode". ❒ When the User Code mode is once again set to make prints using your user code. 65 B Press the {OK} key. See "3 Set User Code" on the panel display. ❒ If you for your 3-digit user code with the number keys. 1 keeps count of the number of copies made a wrong entry, press the {Clear/Stop} key and enter the number again. Entering a User Code to Use the Machine Entering a User Code to Use the Machine Under the User Code mode, users...
... each user code. Mode". ❒ When the User Code mode is once again set to make prints using your user code. 65 B Press the {OK} key. See "3 Set User Code" on the panel display. ❒ If you for your 3-digit user code with the number keys. 1 keeps count of the number of copies made a wrong entry, press the {Clear/Stop} key and enter the number again. Entering a User Code to Use the Machine Entering a User Code to Use the Machine Under the User Code mode, users...

Printer Reference
Page 84
... sizes, always set the paper in the L chine automatically switches to turn it receives data from a PC. E Press the {OK} key. 68 BQZ029S B Use the {~}{}} keys to data received from direction. If you are making prints and do not wish to have your print job interrupted by a PC, press the {Auto On Line} key to On Line mode when it off . Operation...
... sizes, always set the paper in the L chine automatically switches to turn it receives data from a PC. E Press the {OK} key. 68 BQZ029S B Use the {~}{}} keys to data received from direction. If you are making prints and do not wish to have your print job interrupted by a PC, press the {Auto On Line} key to On Line mode when it off . Operation...

Printer Reference
Page 95
... {Clear Modes/Energy Saver} key. • Prog./Change:Clss • Prog./Change:Mem. • Prog/Chng:Clss/Yr • No. Reference See p.80 "User Tools Menu". The user tools allow the administrator to customize the default settings of Skip Feed ❒ Changes made to select the desired user tool. of this machine. Reference For the detailed user tool menu, see p.80 "User Tools Menu". Quitting User Tools...
... {Clear Modes/Energy Saver} key. • Prog./Change:Clss • Prog./Change:Mem. • Prog/Chng:Clss/Yr • No. Reference See p.80 "User Tools Menu". The user tools allow the administrator to customize the default settings of Skip Feed ❒ Changes made to select the desired user tool. of this machine. Reference For the detailed user tool menu, see p.80 "User Tools Menu". Quitting User Tools...
Printer Reference
Page 101
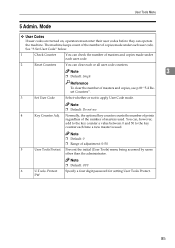
... prints regardless of the number of masters and copies made under each time a new master is used . Note ❒ Default: Do not use 4 Key Counter Adj. Note ❒ Default: 0 ❒ Range of masters and copies, see p.89 "5-2 Reset Counters". 3 Set User Code Select whether or not to the key counter each user code. See "3 Set User Code" below. 1 Check Counter You can clear each or all user code counters. Protect Specify a four digit password for setting User...
... prints regardless of the number of masters and copies made under each time a new master is used . Note ❒ Default: Do not use 4 Key Counter Adj. Note ❒ Default: 0 ❒ Range of masters and copies, see p.89 "5-2 Reset Counters". 3 Set User Code Select whether or not to the key counter each user code. See "3 Set User Code" below. 1 Check Counter You can clear each or all user code counters. Protect Specify a four digit password for setting User...

Printer Reference
Page 117
... the image are not printed. The paper feed side plates are not correct. Printing in the rectly. The originals were fed in a second color is The first color is not printed cor- Printing Problems When Using Combine Mode Problem Cause Prints are blank or parts of different sizes and orientations When using the exposure glass, place the originals face down on p.82 "3 Initial Setting". Printing Problems Printing Problems Problem Cause Action When you...
... the image are not printed. The paper feed side plates are not correct. Printing in the rectly. The originals were fed in a second color is The first color is not printed cor- Printing Problems When Using Combine Mode Problem Cause Prints are blank or parts of different sizes and orientations When using the exposure glass, place the originals face down on p.82 "3 Initial Setting". Printing Problems Printing Problems Problem Cause Action When you...
Printer Reference
Page 143
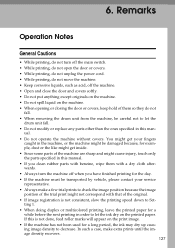
... drum unit fall. • Do not modify or replace any parts other than the ones specified in this is not consistent, slow the printing speed down to Setting 1. • When doing duplex or multicolored printing, leave the printed paper for a while before the next printing in order to let the ink dry on the print image. • If the machine has not been used...
... drum unit fall. • Do not modify or replace any parts other than the ones specified in this is not consistent, slow the printing speed down to Setting 1. • When doing duplex or multicolored printing, leave the printed paper for a while before the next printing in order to let the ink dry on the print image. • If the machine has not been used...

Printer Reference
Page 156
... {Clear Modes/Energy Saver} key, 5 {Clear/Stop} key, 5 Color Making Color Prints, 75 Printing in Two Colors, 76 Color drum indicator, 6 Color Drum Unit, 74 Combination Chart, 134 Combine, 58 Combine/Repeat, 83 {Combine/Repeat} key, 4 Consumables, 139 Control Panel, 1 control panel, 4 Counter, 6 D Data Print, 80 140 Date/Time, 80 DHCP, 86 Display R.Counter, 80 Document Feeder, 69 Cleaning, 133 Misfeed, 102 Specifications, 138 Document feeder, 1 Drum position indicator, 2 Drum Unit Changing the Drum Unit...
... {Clear Modes/Energy Saver} key, 5 {Clear/Stop} key, 5 Color Making Color Prints, 75 Printing in Two Colors, 76 Color drum indicator, 6 Color Drum Unit, 74 Combination Chart, 134 Combine, 58 Combine/Repeat, 83 {Combine/Repeat} key, 4 Consumables, 139 Control Panel, 1 control panel, 4 Counter, 6 D Data Print, 80 140 Date/Time, 80 DHCP, 86 Display R.Counter, 80 Document Feeder, 69 Cleaning, 133 Misfeed, 102 Specifications, 138 Document feeder, 1 Drum position indicator, 2 Drum Unit Changing the Drum Unit...
Printer Reference
Page 158
..., 46 Set Operat'n Mode, 81 Setting Q.Mode, 84 Set User Code, 85 Side tray fine adjusting dial, 1, 24 {Skip Feed} key, 4 Skip Feed Printing, 61 Special feature indicator, 6 Specifications, 135 Speed key, 4 Stack Memory Mode, 50, 73 Standard Printing, 17 Subnet Mask, 86 System, 80 T Tape dispenser, 98 Consumables, 139 Thick paper, 39 Thin paper, 39 {Tint} key, 4 Tint Mode, 26 Troubleshooting, 99 Turn off the power, 16 Turn on the...
..., 46 Set Operat'n Mode, 81 Setting Q.Mode, 84 Set User Code, 85 Side tray fine adjusting dial, 1, 24 {Skip Feed} key, 4 Skip Feed Printing, 61 Special feature indicator, 6 Specifications, 135 Speed key, 4 Stack Memory Mode, 50, 73 Standard Printing, 17 Subnet Mask, 86 System, 80 T Tape dispenser, 98 Consumables, 139 Thick paper, 39 Thin paper, 39 {Tint} key, 4 Tint Mode, 26 Troubleshooting, 99 Turn off the power, 16 Turn on the...


