Ricoh Priport HQ7000 Support Question
Ricoh Priport HQ7000 Support Question
Find answers below for this question about Ricoh Priport HQ7000.Need a Ricoh Priport HQ7000 manual? We have 4 online manuals for this item!
Question posted by algalstyan on December 2nd, 2011
Master Eject Misfeed
The person who posted this question about this Ricoh product did not include a detailed explanation. Please use the "Request More Information" button to the right if more details would help you to answer this question.
Current Answers
Related Ricoh Priport HQ7000 Manual Pages
Operating Instructions - Page 2

... CP6346/LDD280/HQ9000/3590DNP • Type2 (Pixel Density 400 × 400 dpi): CP6334/LDD250/HQ7000/3580DNP
Some illustrations in this manual in this manual.
Trademark PostScript® and Acrobat® are ... consequential damages as above. We disclaim any damage or expense that you use genuine master and ink from the supplier with IEC 60417, this manual are for identification purposes...
Operating Instructions - Page 9
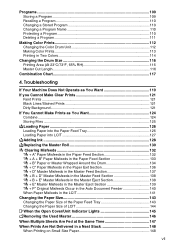
... Section 133 "x + B" Paper or Master Wrapped Around the Drum 134 "x + C" Paper Misfeeds in the Paper Exit Section 136 "x + D" Master Misfeeds in the Master Feed Section 137 "x + B + D" Master Misfeeds in the Master Feed Section 138 "x + B + E" Master Misfeeds in the Master Eject Section 138 "x + E" Master Misfeeds in the Master Eject Section 139 "x + P" Original Misfeeds Occur in the Auto...
Operating Instructions - Page 25
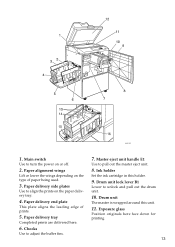
... plate
This plate aligns the leading edge of paper being used.
3. Master eject unit handle E1
Use to turn the power on the paper delivery tray.
4. Drum unit
The master is wrapped around this holder.
9. Main switch
Use to pull out the master eject unit.
8. Exposure glass
Position originals here face down for printing.
13...
Operating Instructions - Page 30
... are completed.
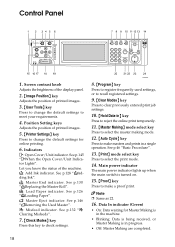
18 Data In indicator (Green)
• On: Data waiting for online printing.
6. See p.130 "CReplacing the Master Roll". k: Master Eject indicator. See p.132 "x Clearing Misfeeds".
7. {Check Modes} key
Press this key to select the print mode.
14. Main power indicator
The main power indicator lights up when the main switch ...
Operating Instructions - Page 68

... Print and Adjustment
Once the master making has been
completed, it is ejected. Note ❒ After completing the master mak-
AJK437S
B Adjust image position using the
{T}, {U}, {V}, and {W} keys.
56
AJK439S Note
❒ You can also use the {Proof} key
arranged in succession.
Note ❒ Press the key continuously to
eject printed pages in the...
Operating Instructions - Page 112

... to use this function.
See p.159 "Security Option". The drum unit and the master eject unit cannot be tak-
3
en out. Note
❒ The selected security mode ... and the drum unit cannot be made.
Place a new original, and then
curity Option setting, the master eject
press the {Start} key.
tions. Disabling "Higher" Security
A Press [Security]. Setting "Normal" Security...
Operating Instructions - Page 113

...when following occurs:
• the present print job finishes
3
• you return the master eject
unit to its original position
after pulling it out
• you close the front door... that shifts to its original position
• a certain period passes, during which neither the master eject unit nor the drum unit was pulled out, following security function cancellation
• you press the...
Operating Instructions - Page 114

... p.167 "Do's and Don'ts".
102 A Check the output and press [Exit]. Misfeeds". See p.134 "When the master is wrongly detected while printing on the reverse side of paper or the face of printed ...use the Double Feed function, select [On] in "Double Feed Warn-
❒ When the misfeeds message is wrapped around the drum".
Printing Functions
Double Feed
When a Double Feed is detected, the...
Operating Instructions - Page 136

...and the proper paper
size is displayed in Combine function. Large solid image wrinkles the master. Check the output."
Combine
Problem
Causes
Prints are blank or parts of Paper".
Print ... down on top. Troubleshooting
If You Cannot Make Prints as You Want
Problem
Causes
Solutions
Misfeeds occur frequently. See
ed.
Parts of different sizes and orientation in the display.
2nd ...
Operating Instructions - Page 144

ters.
• Did you do, your print settings will be cleared.
❒ The master eject unit or the drum unit may be locked if the security mode is active. per type with [Feed Tray Paper
Note
Type]?
❒ After clearing misfeeds, make sure
that all the doors, covers, and units
4
are closed and the...
Operating Instructions - Page 146

...drum lock,
grasp the edge of the master (the
white area) and peel it from the paper
feed tray. "x + B" Paper or Master Wrapped Around the Drum
When the master is wrapped around the drum
A Open the... unit, see p.112 "Changing the Color
Drum Unit".
-To prevent paper misfeeds:
See p.132 ""x + A" Paper Misfeeds in the Paper Feed Section".
B Lower drum unit lock lever (B1). nal position. C Take out...
Operating Instructions - Page 149

... A Pull out the master tray until it
stops. ACY043S
F Position the master roll so that the
edge reaches the interior of the
master holder.
4
AJK304S
C Rotate the spool backward to re-
ACY046S
H Push in the Master Feed Section
E Reset the master roll (1), and then
close the master tray cover (2).
x Clearing Misfeeds
"x + D" Master Misfeeds in the master tray until it
stops...
Operating Instructions - Page 150

... "Changing the Color Drum Unit".
Note
❒ For taking out the drum unit, see
p.112 "Changing the Color Drum Unit".
4
C Take out the drum. Troubleshooting
"x + B + D" Master Misfeeds in the Master Eject Section
A Open the front door. B Lower drum unit lock lever (B1). B Lower drum unit lock lever (B1).
C Take out the drum.
Operating Instructions - Page 151

....
139
B Grasp handle (E1) and pull out
the master eject unit until it stops.
4
C Check where the misfed master
is. Remove the misfed master. G Set the drum unit and close the front door.
-If master misfeeds occur frequently
If the master misfeeds frequently, fragments of the master might be left in the Master Eject Section
A Open the front door. E Pull out...
Operating Instructions - Page 152

...before sliding in step B, open the ADF.
ACY048S
B Open the cover at the bottom of
4
the master tray while holding the
lever and remove the fragments. ZFXH201E
C Close the cover and slide in the ...Note ❒ Make sure that you cannot remove misfed originals as in the master tray.
ZDCY090E
B Pull out the misfed original gen- D Pull the green knob towards you
and remove the ...
Operating Instructions - Page 158

...
handle and turn it clockwise with one hand while holding handle (E1) with soap and water.
❒ Be careful not to empty the master eject unit.
Troubleshooting
kRemoving the Used Master
When k lights, it is time to get any ink on , you
❒ If you cannot remove the used
have to enter the...
Operating Instructions - Page 169

...; [On (Below half)] (When the remaining amount of ldling Rotations: Quality Start
❖ Master/Ink Remaining Volume
When you use .
• Up (Select this setting when standard thickness or thin paper misfeeds at the paper exit section occur frequently.)
Specifies whether you can make the following
[User 2].
B5 JIS, 81/2" × 11...
Operating Instructions - Page 180
... the paper from [Feed Tray Paper Type]. See p.33 "Using the Paper Feed Tray and Delivery Tray"
• When paper misfeeds occur, select the proper paper type from the tray before relocating the machine. If this paper is turned on the exposure glass are...in its original wrapping paper or other protective covering.
• Shadowing may occur.
• Depending on the master.
Operating Instructions - Page 193

... (80 g/m2, 20 lb)
❖ Paper Delivery Tray Capacity: 1,000 sheets (80 g/m2, 20 lb)
❖ Master Eject Unit Capacity:
• A3 drum More than 100 masters
• 11" × 17" drum 90 masters
• A4 drum 140 masters
❖ Dimensions (W × D × H)
Width
Stored
750 mm, 29.5"
Stored with ADF
750 mm, 29.5"
Set...
Operating Instructions - Page 200

... machine, 172 Make-Up, 84 Make-Up printing, 94 Make-Up samples, 96 Master, 186 Master eject indicator, 146
Master eject unit handle E1, 13 Master length, 101 Master Making mode select key, 18 Master making unit, 12 Master misfeeds
in the master eject section, 138, 139 in the master feed section, 137, 138 Mode Setting, 156
N
Normal security, 100 Number keys, 19...
Similar Questions

E00 Appear When Making New Master And Noise From
when making anew master the motor for open the clamper is working and eject the old master? and rota...
when making anew master the motor for open the clamper is working and eject the old master? and rota...
(Posted by gamalmehdar 3 years ago)


Service Manual For Ricoh Hq7000
i need service manual for Ricoh HQ7000, please help me
i need service manual for Ricoh HQ7000, please help me
(Posted by ada08 12 years ago)


Ricoh Jp1230 - Master Doesn't Wrap On Drum, 330,000 Copies
master doesn't wrap on drum, 330,000 copies. Tried different drums, worked fine yesterday.
master doesn't wrap on drum, 330,000 copies. Tried different drums, worked fine yesterday.
(Posted by claudio309 12 years ago)