Operating Instructions
Page 1
Operating Instructions General Settings Guide 1 Connecting the Machine 2 System Settings 3 Copier Features 4 Fax Features 5 Printer Features 6 Scanner Features 7 Registering Addresses and Users for Facsimile/Scanner Functions 8 Other User Tools 9 Appendix Read this machine and keep it handy for future reference. For safe and correct use, be sure to read the Safety Information in "About This Machine" before you use this manual carefully before using the machine.
Operating Instructions General Settings Guide 1 Connecting the Machine 2 System Settings 3 Copier Features 4 Fax Features 5 Printer Features 6 Scanner Features 7 Registering Addresses and Users for Facsimile/Scanner Functions 8 Other User Tools 9 Appendix Read this machine and keep it handy for future reference. For safe and correct use, be sure to read the Safety Information in "About This Machine" before you use this manual carefully before using the machine.

Operating Instructions
Page 2
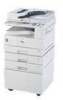
... country you are employed in some countries. For your safety and benefit, read this manual. • Type 1: Type for MP 1600/Aficio MP 1600/IS 2316 • Type 2: Type for MP 2000/Aficio MP 2000/IS 2320 Certain types might be optional. Keep this manual in , certain units may be slightly different from the machine. Check the type...
... country you are employed in some countries. For your safety and benefit, read this manual. • Type 1: Type for MP 1600/Aficio MP 1600/IS 2316 • Type 2: Type for MP 2000/Aficio MP 2000/IS 2320 Certain types might be optional. Keep this manual in , certain units may be slightly different from the machine. Check the type...
Operating Instructions
Page 3
... Explains Copier functions and operations. It also explains the control panel, preparation procedures for using the machine. Also refer to this manual before using the machine, how to enter text, and how to the functions of the machine. It explains security functions that are...Explains Printer functions and operations. ❖ Scanner Reference Explains Scanner functions and operations. i Also refer to read the Safety Information in this manual for explanations on which country you want to do with , or prevent the machine from unauthorized use to replace paper, toner, and other...
... Explains Copier functions and operations. It also explains the control panel, preparation procedures for using the machine. Also refer to this manual before using the machine, how to enter text, and how to the functions of the machine. It explains security functions that are...Explains Printer functions and operations. ❖ Scanner Reference Explains Scanner functions and operations. i Also refer to read the Safety Information in this manual for explanations on which country you want to do with , or prevent the machine from unauthorized use to replace paper, toner, and other...

Operating Instructions
Page 4
..."PostScript3 Supplement" and "UNIX Supplement" include descriptions of functions and settings that might not be available on this machine. This manual covers all models, and includes descriptions of this machine. Images, illustrations, and information about operating systems that might also differ ...slightly from those of functions and settings that are supported might not be available on this machine. ❖ Other manuals • Quick Reference Copy Guide • Quick Reference Fax Guide • Quick Reference Printer Guide • Quick Reference Scanner...
..."PostScript3 Supplement" and "UNIX Supplement" include descriptions of functions and settings that might not be available on this machine. This manual covers all models, and includes descriptions of this machine. Images, illustrations, and information about operating systems that might also differ ...slightly from those of functions and settings that are supported might not be available on this machine. ❖ Other manuals • Quick Reference Copy Guide • Quick Reference Fax Guide • Quick Reference Printer Guide • Quick Reference Scanner...
Operating Instructions
Page 5
TABLE OF CONTENTS Manuals for This Machine i How to a Telephone Line and Telephone 36 Connecting the Telephone Line 36 Selecting the Line Type 36 2. Connecting the Machine Connecting to ... Network Delivery Scanner 25 Settings Required to Use Network TWAIN Scanner 27 Using Utilities to Make Network Settings 29 Connecting the Machine to Read This Manual 1 Symbols ...1 Display Panel...2 Reading the Display and Using Keys 3 Accessing User Tools 4 Changing Default Settings 4 Exiting User Tools ...5 Menu Protect...5 Changing Default Settings Using Web...
TABLE OF CONTENTS Manuals for This Machine i How to a Telephone Line and Telephone 36 Connecting the Telephone Line 36 Selecting the Line Type 36 2. Connecting the Machine Connecting to ... Network Delivery Scanner 25 Settings Required to Use Network TWAIN Scanner 27 Using Utilities to Make Network Settings 29 Connecting the Machine to Read This Manual 1 Symbols ...1 Display Panel...2 Reading the Display and Using Keys 3 Accessing User Tools 4 Changing Default Settings 4 Exiting User Tools ...5 Menu Protect...5 Changing Default Settings Using Web...
Operating Instructions
Page 9
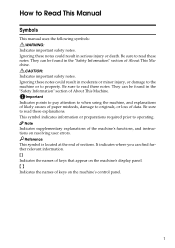
... these notes could result in the "Safety Information" section of About This Machine. This symbol indicates information or preparations required prior to Read This Manual Symbols This manual uses the following symbols: Indicates important safety notes. Indicates important safety notes. Ignoring these notes. How to operating. Be sure to read these notes...
... these notes could result in the "Safety Information" section of About This Machine. This symbol indicates information or preparations required prior to Read This Manual Symbols This manual uses the following symbols: Indicates important safety notes. Indicates important safety notes. Ignoring these notes. How to operating. Be sure to read these notes...
Operating Instructions
Page 11
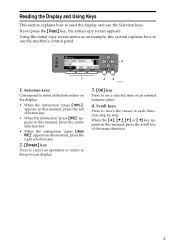
...Reading the Display and Using Keys This section explains how to use the Selection keys. Using the initial copy screen menu as an example, this manual, press the scroll key of the same direction. 3 ARG010S 3. {OK} key Press to move the cursor in each direction, step by step...items at the bottom line on the display. • When the instruction "press {100%}" appears in this manual, press the left selection key. • When the instruction "press {R/E}" appears in this manual, press the centre selection key. • When the instruction "press {Auto R/E}" appears in this section ...
...Reading the Display and Using Keys This section explains how to use the Selection keys. Using the initial copy screen menu as an example, this manual, press the scroll key of the same direction. 3 ARG010S 3. {OK} key Press to move the cursor in each direction, step by step...items at the bottom line on the display. • When the instruction "press {100%}" appears in this manual, press the left selection key. • When the instruction "press {R/E}" appears in this manual, press the centre selection key. • When the instruction "press {Auto R/E}" appears in this section ...

Operating Instructions
Page 38
... used for specifying the setting. • telnet: Can be used for specifying the setting. 30 Connecting the Machine ❖ [Network] → [Machine IPv6 Address] → [Manual Config.
... used for specifying the setting. • telnet: Can be used for specifying the setting. 30 Connecting the Machine ❖ [Network] → [Machine IPv6 Address] → [Manual Config.
Operating Instructions
Page 53
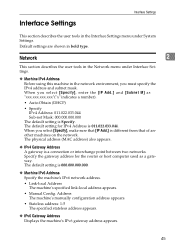
... IPv6 Address Specify the machine's IPv6 network address. • Link-local Address The machine's specified link-local address appears. • Manual Config. The default setting is a connection or interchange point between two networks. Network 2 This section describes the user tools in the Network...Address: 011.022.033.044 Sub-net Mask: 000.000.000.000 The default setting is 011.022.033.044. Address The machine's manually configuration address appears. • Stateless address: 1-5 The specified stateless address appears. ❖ IPv6 Gateway Address Displays the machine's IPv6 ...
... IPv6 Address Specify the machine's IPv6 network address. • Link-local Address The machine's specified link-local address appears. • Manual Config. The default setting is a connection or interchange point between two networks. Network 2 This section describes the user tools in the Network...Address: 011.022.033.044 Sub-net Mask: 000.000.000.000 The default setting is 011.022.033.044. Address The machine's manually configuration address appears. • Stateless address: 1-5 The specified stateless address appears. ❖ IPv6 Gateway Address Displays the machine's IPv6 ...
Operating Instructions
Page 82
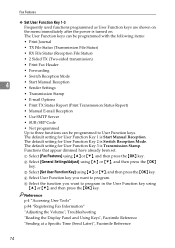
...8226; 2 Sided TX (Two-sided transmission) • Print Fax Header • Forwarding • Switch Reception Mode 4 • Start Manual Reception • Sender Settings • Transmission Stamp • E-mail Options • Print TX Status Report (Print Transmission Status Report) •...10070; Set User Function Key 1-3 Frequently used functions programmed as User Function keys are shown on the menu immediately after the power is Start Manual Reception. The default setting for User Function Key 2 is Transmission Stamp. A Select [Fax Features] using {U} or {T}, and then press...
...8226; 2 Sided TX (Two-sided transmission) • Print Fax Header • Forwarding • Switch Reception Mode 4 • Start Manual Reception • Sender Settings • Transmission Stamp • E-mail Options • Print TX Status Report (Print Transmission Status Report) •...10070; Set User Function Key 1-3 Frequently used functions programmed as User Function keys are shown on the menu immediately after the power is Start Manual Reception. The default setting for User Function Key 2 is Transmission Stamp. A Select [Fax Features] using {U} or {T}, and then press...
Operating Instructions
Page 123
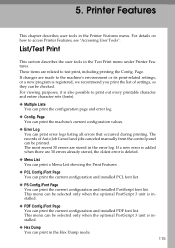
... menu can be selected only when the optional PostScript 3 unit is registered, we recommend you print the list of Auto Job Cancel and jobs canceled manually from the control panel can print in the Printer Features menu. For details on how to test print, including printing the Config. If changes are...
... menu can be selected only when the optional PostScript 3 unit is registered, we recommend you print the list of Auto Job Cancel and jobs canceled manually from the control panel can print in the Printer Features menu. For details on how to test print, including printing the Config. If changes are...
Operating Instructions
Page 137
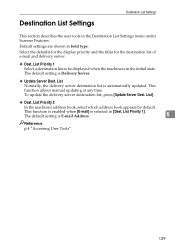
This function allows manual updating at any time. Destination List Settings Destination List Settings This section describes the user tools in bold type. List Priority 2 In the machine's address ...
This function allows manual updating at any time. Destination List Settings Destination List Settings This section describes the user tools in bold type. List Priority 2 In the machine's address ...
Operating Instructions
Page 161
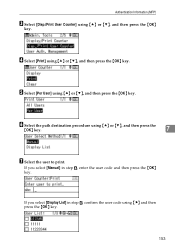
If you select [Manual] in step F, confirm the user code using {V} and then press the {OK} key. 153 If you select [Display List] in step F, enter the user code and then press the {OK} key. D Select [Print] using {U} or {T}, and then press the {OK} key. E Select [Per User] using {U} or {T}, and then press the {OK} key. F Select the path destination procedure using {U} or {T}, and then press the {OK} key. Authentication Information (MFP) C Select [Disp./Print User Counter] using {U} or {T}, and then press the {OK} key. 7 G Select the user to print.
If you select [Manual] in step F, confirm the user code using {V} and then press the {OK} key. 153 If you select [Display List] in step F, enter the user code and then press the {OK} key. D Select [Print] using {U} or {T}, and then press the {OK} key. E Select [Per User] using {U} or {T}, and then press the {OK} key. F Select the path destination procedure using {U} or {T}, and then press the {OK} key. Authentication Information (MFP) C Select [Disp./Print User Counter] using {U} or {T}, and then press the {OK} key. 7 G Select the user to print.
Operating Instructions
Page 165
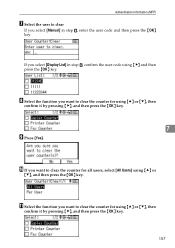
...) G Select the user to clear the counter for using {U} or {T}, then confirm it by pressing {V}, and then press the {OK} key. 157 J If you select [Manual] in step F, confirm the user code using {U} or {T}, then confirm it by pressing {V}, and then press the {OK} key. 7 I Press [Yes]. H Select the function you...
...) G Select the user to clear the counter for using {U} or {T}, then confirm it by pressing {V}, and then press the {OK} key. 157 J If you select [Manual] in step F, confirm the user code using {U} or {T}, then confirm it by pressing {V}, and then press the {OK} key. 7 I Press [Yes]. H Select the function you...

Operating Instructions
Page 200
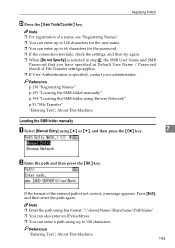
See "Locating the folder manually" and "Locating the folder using Browse Network". X Press the {OK} key. 192 ing {U} or {T}, and then press the {OK} key. U Press [Exit]. 7 V Press the {Escape} key twice. Registering Addresses and Users for Facsimile/Scanner Functions S Select [Manual Entry] or [Browse Network] to check the path is set correctly. T Press [Com.Test] to specify the path entry method us- W Press [End]. To specify a folder, you can either enter the path manually or locate the folder by browsing the network.
See "Locating the folder manually" and "Locating the folder using Browse Network". X Press the {OK} key. 192 ing {U} or {T}, and then press the {OK} key. U Press [Exit]. 7 V Press the {Escape} key twice. Registering Addresses and Users for Facsimile/Scanner Functions S Select [Manual Entry] or [Browse Network] to check the path is set correctly. T Press [Com.Test] to specify the path entry method us- W Press [End]. To specify a folder, you can either enter the path manually or locate the folder by browsing the network.
Operating Instructions
Page 201
... / Password (Send) of the entered path is specified, contact your administrator. Reference p.138 "Registering Names" p.193 "Locating the SMB folder manually" p.194 "Locating the SMB folder using Browse Network" p.51 "File Transfer" "Entering Text", About This Machine Locating the SMB folder... manually A Select [Manual Entry] using up to 128 characters. Note ❒ Enter the path using this format: "\\ServerName\ShareName\PathName". ❒ You can also enter...
... / Password (Send) of the entered path is specified, contact your administrator. Reference p.138 "Registering Names" p.193 "Locating the SMB folder manually" p.194 "Locating the SMB folder using Browse Network" p.51 "File Transfer" "Entering Text", About This Machine Locating the SMB folder... manually A Select [Manual Entry] using up to 128 characters. Note ❒ Enter the path using this format: "\\ServerName\ShareName\PathName". ❒ You can also enter...
Operating Instructions
Page 205
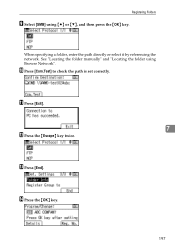
J Press [Com.Test] to check the path is set correctly. K Press [Exit]. 7 L Press the {Escape} key twice. M Press [End]. See "Locating the folder manually" and "Locating the folder using {U} or {T}, and then press the {OK} key. N Press the {OK} key. 197 Registering Folders I Select [SMB] using Browse Network". When specifying a folder, enter the path directly or select it by referencing the network.
J Press [Com.Test] to check the path is set correctly. K Press [Exit]. 7 L Press the {Escape} key twice. M Press [End]. See "Locating the folder manually" and "Locating the folder using {U} or {T}, and then press the {OK} key. N Press the {OK} key. 197 Registering Folders I Select [SMB] using Browse Network". When specifying a folder, enter the path directly or select it by referencing the network.
Operating Instructions
Page 206
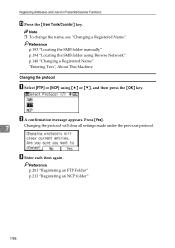
Reference p.193 "Locating the SMB folder manually" p.194 "Locating the SMB folder using Browse Network" p.140 "Changing a Registered Name" "Entering Text", About This Machine Changing the protocol A Select [FTP] or [NCP] using {U} ...
Reference p.193 "Locating the SMB folder manually" p.194 "Locating the SMB folder using Browse Network" p.140 "Changing a Registered Name" "Entering Text", About This Machine Changing the protocol A Select [FTP] or [NCP] using {U} ...
Operating Instructions
Page 214
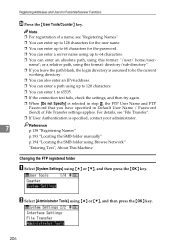
... the settings, and then try again. ❒ When [Do not Specify] is specified, contact your administrator. 7 Reference p.138 "Registering Names" p.193 "Locating the SMB folder manually" p.194 "Locating the SMB folder using Browse Network" "Entering Text", About This Machine Changing the FTP registered folder A Select [System Settings] using {U} or {T}, and then...
... the settings, and then try again. ❒ When [Do not Specify] is specified, contact your administrator. 7 Reference p.138 "Registering Names" p.193 "Locating the SMB folder manually" p.194 "Locating the SMB folder using Browse Network" "Entering Text", About This Machine Changing the FTP registered folder A Select [System Settings] using {U} or {T}, and then...
Operating Instructions
Page 225
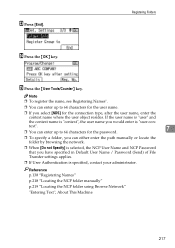
...Send) of File Transfer settings applies. ❒ If User Authentication is "user.con- text". ❒ You can either enter the path manually or locate the folder by browsing the network. ❒ When [Do not Specify] is selected, the NCP User Name and NCP Password ...that you would enter is specified, contact your administrator. Reference p.138 "Registering Names" p.218 "Locating the NCP folder manually" p.219 "Locating the NCP folder using Browse Network" "Entering Text", About This Machine 217 W Press [End]. Registering Folders X Press the {OK...
...Send) of File Transfer settings applies. ❒ If User Authentication is "user.con- text". ❒ You can either enter the path manually or locate the folder by browsing the network. ❒ When [Do not Specify] is selected, the NCP User Name and NCP Password ...that you would enter is specified, contact your administrator. Reference p.138 "Registering Names" p.218 "Locating the NCP folder manually" p.219 "Locating the NCP folder using Browse Network" "Entering Text", About This Machine 217 W Press [End]. Registering Folders X Press the {OK...


