User Guide
Page 6
... Function (macOS 129 Printing on Envelopes...131 Printing Documents Stored in Web Image Monitor 97 5. Print Installing the Printer Driver by E-mail...96 Confirming the Information in the Printer from the Control Panel 134 Printing from the Downloaded File 110 Installing the Printer Driver for Windows 111 If the Machine Cannot Be Found...112 Installing the Printer Driver for Network Connection (macOS 116 Installing the PPD file...116 Registering the Machine in [Print & Scan] or [Printers & Scanners 117 Specifying the Option Settings...120 Basic Procedure for Network Connection...
... Function (macOS 129 Printing on Envelopes...131 Printing Documents Stored in Web Image Monitor 97 5. Print Installing the Printer Driver by E-mail...96 Confirming the Information in the Printer from the Control Panel 134 Printing from the Downloaded File 110 Installing the Printer Driver for Windows 111 If the Machine Cannot Be Found...112 Installing the Printer Driver for Network Connection (macOS 116 Installing the PPD file...116 Registering the Machine in [Print & Scan] or [Printers & Scanners 117 Specifying the Option Settings...120 Basic Procedure for Network Connection...

User Guide
Page 16
... Mode Fusing Unit Off mode and Low Power mode cannot be used at least 10 seconds after the machine has shut down the main power switch while turning off , confirm that the main power indicator on the control panel has turned on the left side of Energy Saving mode: 1. Open the cover of the main power switch on or off. • The fan inside the machine near the vents may damage the hard disk or memory...
... Mode Fusing Unit Off mode and Low Power mode cannot be used at least 10 seconds after the machine has shut down the main power switch while turning off , confirm that the main power indicator on the control panel has turned on the left side of Energy Saving mode: 1. Open the cover of the main power switch on or off. • The fan inside the machine near the vents may damage the hard disk or memory...

User Guide
Page 77
... the originals. • Original Setting: Specify the condition of the originals to copy (1 sided/2 sided (page opening direction)). • Print Side Setting: Select the finish from [Open to Right/Left] or [Open to copy the front and back sides of a two-sided original onto one side of a sheet page by page. • See "Copying Facing Pages of the two-sided copy key on the Copy screen. • See "Others (Copier / Document Server Settings)", User Guide (Full Version). • Use the [Series] function to Top]. 4.
... the originals. • Original Setting: Specify the condition of the originals to copy (1 sided/2 sided (page opening direction)). • Print Side Setting: Select the finish from [Open to Right/Left] or [Open to copy the front and back sides of a two-sided original onto one side of a sheet page by page. • See "Copying Facing Pages of the two-sided copy key on the Copy screen. • See "Others (Copier / Document Server Settings)", User Guide (Full Version). • Use the [Series] function to Top]. 4.

User Guide
Page 93
... check if it is scanned as specified. See "Sending a Fax at the Image Quality Suitable for the Original", User Guide (Full Version). 5. Specify the destination on the exposure glass. On the fax screen, press [Settings] [Original Orientation] to specify the orientation of the machine to Send by Fax on the Home screen. 2. Place the original in [Settings] correctly. 1. Configure the scan settings. Displaying a Preview before Sending a Fax Displaying a Preview before Sending a Fax You can display...
... check if it is scanned as specified. See "Sending a Fax at the Image Quality Suitable for the Original", User Guide (Full Version). 5. Specify the destination on the exposure glass. On the fax screen, press [Settings] [Original Orientation] to specify the orientation of the machine to Send by Fax on the Home screen. 2. Place the original in [Settings] correctly. 1. Configure the scan settings. Displaying a Preview before Sending a Fax Displaying a Preview before Sending a Fax You can display...

User Guide
Page 101
... install the printer driver on as an Administrators group member. • Device Software Manager supports Windows OS only. Select a language, and then click [OK]. 99 Set the CD-ROM in Windows. 5. Installing Device Software Manager from the CD-ROM 1. Print Installing the Printer Driver by Using Device Software Manager Installer Device Software Manager is required to connect the USB cable. If the installer does not start automatically, double-click [Setup.exe] in the root directory of the installer to install the drivers. Device Software Manager helps...
... install the printer driver on as an Administrators group member. • Device Software Manager supports Windows OS only. Select a language, and then click [OK]. 99 Set the CD-ROM in Windows. 5. Installing Device Software Manager from the CD-ROM 1. Print Installing the Printer Driver by Using Device Software Manager Installer Device Software Manager is required to connect the USB cable. If the installer does not start automatically, double-click [Setup.exe] in the root directory of the installer to install the drivers. Device Software Manager helps...

User Guide
Page 104
... Program] or [I accept the agreement] on the desktop screen. • You can update the installed printer driver with Device Software Manager. • See "Updating the Driver (Windows)", User Guide (Full Version). • If the [User Account Control] dialog box appears during the driver installation procedure, click [Yes] or [Continue]. • If the [Windows Security] dialog box appears during the driver installation procedure, click [Install this driver software anyway]. Double-click the downloaded file. 2. The installation of installing Device Software Manager starts...
... Program] or [I accept the agreement] on the desktop screen. • You can update the installed printer driver with Device Software Manager. • See "Updating the Driver (Windows)", User Guide (Full Version). • If the [User Account Control] dialog box appears during the driver installation procedure, click [Yes] or [Continue]. • If the [Windows Security] dialog box appears during the driver installation procedure, click [Install this driver software anyway]. Double-click the downloaded file. 2. The installation of installing Device Software Manager starts...
User Guide
Page 109
... of the printer to install, and whether to use it as the default printer. 10. Printer driver installation starts. 107 When the [Additional port information required] screen is automatically entered. To select from the port list 1. On the [Add port] screen, enter the printer name or IP address of the machine, and then click [Next]. 2. Proceed to Step 9. On the [Add Standard TCP/IP Printer Port Wizard] screen, click [Next]. 4. The port name is displayed, select [RICOH Network Printer C model], and...
... of the printer to install, and whether to use it as the default printer. 10. Printer driver installation starts. 107 When the [Additional port information required] screen is automatically entered. To select from the port list 1. On the [Add port] screen, enter the printer name or IP address of the machine, and then click [Next]. 2. Proceed to Step 9. On the [Add Standard TCP/IP Printer Port Wizard] screen, click [Next]. 4. The port name is displayed, select [RICOH Network Printer C model], and...

User Guide
Page 118
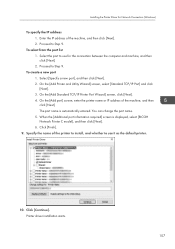
... administrator name and a password (phrase). For details, consult your network administrator. • For the latest information on the corresponding operating system, see the "Readme.htm" file, located on the OS version you are using macOS 10.14 are shown as an example. Installing the PPD file 1. Double-click the package file. Print Installing the Printer Driver for Network Connection (macOS) Install the PPD file (printer driver) under macOS, and then register the machine...
... administrator name and a password (phrase). For details, consult your network administrator. • For the latest information on the corresponding operating system, see the "Readme.htm" file, located on the OS version you are using macOS 10.14 are shown as an example. Installing the PPD file 1. Double-click the package file. Print Installing the Printer Driver for Network Connection (macOS) Install the PPD file (printer driver) under macOS, and then register the machine...
User Guide
Page 123
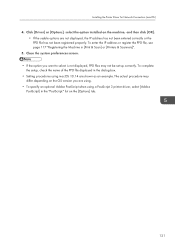
... the setup, check the name of the PPD file displayed in the dialog box. • Setting procedures using a PostScript 3 printer driver, select [Adobe PostScript] in [Print & Scan] or [Printers & Scanners]". 5. Close the system preferences screen. • If the option you are using. • To specify an optional Adobe PostScript when using macOS 10.14 are not displayed, the IP address has not been entered correctly or the PPD file has not...
... the setup, check the name of the PPD file displayed in the dialog box. • Setting procedures using a PostScript 3 printer driver, select [Adobe PostScript] in [Print & Scan] or [Printers & Scanners]". 5. Close the system preferences screen. • If the option you are using. • To specify an optional Adobe PostScript when using macOS 10.14 are not displayed, the IP address has not been entered correctly or the PPD file has not...

User Guide
Page 124
... the printer driver and configure the Document Size, Paper Type, and other settings. In this case, check whether the document was printed. The procedure to display a document varies depending on the [File] menu, select the device to print a document. • Duplex printing is completed. For example in Sleep mode, an error message may appear after the print job is selected as the default setting. You can configure the basic settings just by using the [Basic] tab. 122 Specify the Document Size, Paper Type, Input Tray...
... the printer driver and configure the Document Size, Paper Type, and other settings. In this case, check whether the document was printed. The procedure to display a document varies depending on the [File] menu, select the device to print a document. • Duplex printing is completed. For example in Sleep mode, an error message may appear after the print job is selected as the default setting. You can configure the basic settings just by using the [Basic] tab. 122 Specify the Document Size, Paper Type, Input Tray...

User Guide
Page 126
... are displayed as the default. After completing the configuration, click [OK] to print. • On the [Devices and Printers] screen, right-click the printer icon of the machine, and then click [Printing preferences] to [Image Quality] tabs. The procedure may vary for different versions. 1. Printing a Document in the print server are disabled items. Click the icon to print on the computer, and click [Print] on the [File] menu. 2. 5. Print You can print...
... are displayed as the default. After completing the configuration, click [OK] to print. • On the [Devices and Printers] screen, right-click the printer icon of the machine, and then click [Printing preferences] to [Image Quality] tabs. The procedure may vary for different versions. 1. Printing a Document in the print server are disabled items. Click the icon to print on the computer, and click [Print] on the [File] menu. 2. 5. Print You can print...

User Guide
Page 165
... Print in the Machine", User Guide (Full Version). • Documents stored in the document server are deleted after three days (72 hours) in the factorydefault configuration. Specify the folder to store documents, the document name, and other settings. D0CMPC5067 163 You can store documents scanned by the machine in Document Server You can also store them using the printer driver. 7. Document Server Storing Documents in the document server. On the Home screen, press [Document Server]. 2. On the document server screen, press [To Scanning Screen...
... Print in the Machine", User Guide (Full Version). • Documents stored in the document server are deleted after three days (72 hours) in the factorydefault configuration. Specify the folder to store documents, the document name, and other settings. D0CMPC5067 163 You can store documents scanned by the machine in Document Server You can also store them using the printer driver. 7. Document Server Storing Documents in the document server. On the Home screen, press [Document Server]. 2. On the document server screen, press [To Scanning Screen...

User Guide
Page 166
7. To select a user folder, create it in the factory default configuration or a user folder created by a user to display the folder list screen. • The machine stores the documents with the size and orientation specified for printing the document. 4. Place the original. Place the original in the Copy function. Specify the scanning conditions such as in the same way as color or size. 6. See "Organizing Document Server Using Folders", User Guide (Full Version). • User Name: Specify the user name displayed as...
7. To select a user folder, create it in the factory default configuration or a user folder created by a user to display the folder list screen. • The machine stores the documents with the size and orientation specified for printing the document. 4. Place the original. Place the original in the Copy function. Specify the scanning conditions such as in the same way as color or size. 6. See "Organizing Document Server Using Folders", User Guide (Full Version). • User Name: Specify the user name displayed as...

User Guide
Page 283
.... Check the status of Printed Sheets Using the Classification Code", User Guide (Full Version). Check that does not support the classification code. The job was canceled. The document was used. Request the machine administrator to [Optional] in a printer driver that the machine can communicate with central management server has occurred. The job has been cancelled." When a Message Appears While Using the Printer Function Message Cause Solution and reference "Classification Code is not specified. A printer driver that does not support the machine was printed in Web Image...
.... Check the status of Printed Sheets Using the Classification Code", User Guide (Full Version). Check that does not support the classification code. The job was canceled. The document was used. Request the machine administrator to [Optional] in a printer driver that the machine can communicate with central management server has occurred. The job has been cancelled." When a Message Appears While Using the Printer Function Message Cause Solution and reference "Classification Code is not specified. A printer driver that does not support the machine was printed in Web Image...

User Guide
Page 284
... repairing the machine. Use of the machine, wait for duplex printing. [Paper Size/Paper Type]. Check that the machine can communicate with the machine has failed. page 13 "Turning On and Off the Power" "Data storage error." Check the machine structure." Cannot store." Consult the user administrator. An error such as Test Print, Locked Print, Hold Print, Store Print, or storing the document in for 10 seconds or more after you have an error. 282 Troubleshooting Message Cause Solution and reference "Compressed Data Compressed data Error...
... repairing the machine. Use of the machine, wait for duplex printing. [Paper Size/Paper Type]. Check that the machine can communicate with the machine has failed. page 13 "Turning On and Off the Power" "Data storage error." Check the machine structure." Cannot store." Consult the user administrator. An error such as Test Print, Locked Print, Hold Print, Store Print, or storing the document in for 10 seconds or more after you have an error. 282 Troubleshooting Message Cause Solution and reference "Compressed Data Compressed data Error...
User Guide
Page 292
... Zfold function was canceled. A setting in the address book. "You do not have permission to use the printer function. 10. Messages that was canceled by the auto job cancel function that Appear with Error Codes Check the system configuration list or print settings list. Print the document on the machine was specified and printing was activated. Check the tray, paper orientation and print data orientation settings, and the specified position for Administrator", User Guide (Full Version). The details of available work area is insufficient for processing images...
... Zfold function was canceled. A setting in the address book. "You do not have permission to use the printer function. 10. Messages that was canceled by the auto job cancel function that Appear with Error Codes Check the system configuration list or print settings list. Print the document on the machine was specified and printing was activated. Check the tray, paper orientation and print data orientation settings, and the specified position for Administrator", User Guide (Full Version). The details of available work area is insufficient for processing images...

User Guide
Page 312
...] [Administrator Authentication/User Authentication/App Auth.] [Register/Change/Delete LDAP Server], and then press [Register/Change] and set [Authentication] to use for authentication. 310 Check whether the LDAP authentication settings or LDAP server settings are correctly configured.*4 Check whether the SSL settings are supported on the clock at the KDC (key distribution center) and the clock of the network and the server to a setting other unusable character. Check whether the server name, login user name, password...
...] [Administrator Authentication/User Authentication/App Auth.] [Register/Change/Delete LDAP Server], and then press [Register/Change] and set [Authentication] to use for authentication. 310 Check whether the LDAP authentication settings or LDAP server settings are correctly configured.*4 Check whether the SSL settings are supported on the clock at the KDC (key distribution center) and the clock of the network and the server to a setting other unusable character. Check whether the server name, login user name, password...
User Guide
Page 314
... be adjusted in "Security". Troubleshooting • Check whether "Global Scope" is enabled, create a new rule that has been created. Enter "Realm Name" in upper case. • Configure the setting so that the difference in time between the clocks on KDC and device is set [Authentication] to the user group that allows communication on the machine can be performed using the IP address, check [DNS Configuration] or [WINS Configuration...
... be adjusted in "Security". Troubleshooting • Check whether "Global Scope" is enabled, create a new rule that has been created. Enter "Realm Name" in upper case. • Configure the setting so that the difference in time between the clocks on KDC and device is set [Authentication] to the user group that allows communication on the machine can be performed using the IP address, check [DNS Configuration] or [WINS Configuration...

User Guide
Page 389
... Printer Print Scanner TWAIN Document Server DeskTop Binder Web Document Server Operations for Copying Stapling Sort Operations for Copying Copying Transmission Operation/ Manual Reception Operation Scanning an Original for Memory Transmission Memory Transmission Immediate Transmission Memory Reception Printing Received Data *9 Data Reception Printing Stapling Operations for Scanning Scanning Scanning Operations for Document Server Scanning a Document to Store in Document Server Printing from Document Server Printing from Document Server Sending a Fax from Document Server Printing Mode...
... Printer Print Scanner TWAIN Document Server DeskTop Binder Web Document Server Operations for Copying Stapling Sort Operations for Copying Copying Transmission Operation/ Manual Reception Operation Scanning an Original for Memory Transmission Memory Transmission Immediate Transmission Memory Reception Printing Received Data *9 Data Reception Printing Stapling Operations for Scanning Scanning Scanning Operations for Document Server Scanning a Document to Store in Document Server Printing from Document Server Printing from Document Server Sending a Fax from Document Server Printing Mode...

Mopria Guide
Page 11
..., print the next job. 1. D0C9OA8400 9 To change the settings. 3. Perform the next operation in step 3). After you want to print on the type of copies, paper size, one-sided/twosided printing, etc., tap , and then change the output location, tap , and then select a location from an Android device. • The Mopria Print Service cannot accept multiple jobs at the same time. Printing Printing You can use the Mopria Print Service to open the Mopria Print Service screen (the screen in the Mopria Print Service screen...
..., print the next job. 1. D0C9OA8400 9 To change the settings. 3. Perform the next operation in step 3). After you want to print on the type of copies, paper size, one-sided/twosided printing, etc., tap , and then change the output location, tap , and then select a location from an Android device. • The Mopria Print Service cannot accept multiple jobs at the same time. Printing Printing You can use the Mopria Print Service to open the Mopria Print Service screen (the screen in the Mopria Print Service screen...


