User Guide
Page 4
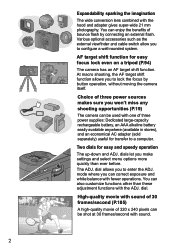
... macro shooting, the AF target shift function allows you make settings and select menu options more quickly than these adjustment functions with the hood and adapter gives super-wide 21 mm photography. Choice of three power sources makes sure you to enter the ADJ. Two dials for easy focus lock even on a tripod (P.94) The camera has an AF target shift function. You can correct exposure and white balance with...
... macro shooting, the AF target shift function allows you make settings and select menu options more quickly than these adjustment functions with the hood and adapter gives super-wide 21 mm photography. Choice of three power sources makes sure you to enter the ADJ. Two dials for easy focus lock even on a tripod (P.94) The camera has an AF target shift function. You can correct exposure and white balance with...
User Guide
Page 7
...-Shot 103 Viewing an S Multi-Shot or M Multi-Shot Still Image in Enlarged Display Mode ........ 104 Shooting/Playing Back Movies 105 Shooting Movies ...105 Playing Back Movies 107 Recording/Playing Back Sound 108 Recording Sound...108 Playing Back Sound 109 Other Functions Available in Playback Mode 110 Playback Setting Menu 110 Using the Playback Menu 110 Showing Photos in Order Automatically (SLIDE SHOW 111 Write-protecting Your Images (PROTECT 112 Using a Printing Service (DPOF 115 Changing the Image Size (RESIZE 118 Copying the Contents of Internal Memory to a Memory Card (COPY...
...-Shot 103 Viewing an S Multi-Shot or M Multi-Shot Still Image in Enlarged Display Mode ........ 104 Shooting/Playing Back Movies 105 Shooting Movies ...105 Playing Back Movies 107 Recording/Playing Back Sound 108 Recording Sound...108 Playing Back Sound 109 Other Functions Available in Playback Mode 110 Playback Setting Menu 110 Using the Playback Menu 110 Showing Photos in Order Automatically (SLIDE SHOW 111 Write-protecting Your Images (PROTECT 112 Using a Printing Service (DPOF 115 Changing the Image Size (RESIZE 118 Copying the Contents of Internal Memory to a Memory Card (COPY...

User Guide
Page 8
... Troubleshooting 180 Troubleshooting the Camera 180 Warning Messages Under Windows XP Service Pack 2 185 Appendices 187 A. SETTINGS 130 Changing Image Confirmation Time (LCD CONFIRM 131 Changing File Name Settings (SEQUENTIAL NO 132 Setting the Date and Time (DATE SETTINGS 134 Changing the Display Language (LANGUAGE 135 Changing the Playback Method for Using the Provided Software 173 Installing the Software on Your Computer (Mac OS 8.6 to 9.2.2 174 Installing the Software on Your Computer (Mac OS X 10.1.2 to Your Computer 161 Downloading Images from an SD Memory Card...
... Troubleshooting 180 Troubleshooting the Camera 180 Warning Messages Under Windows XP Service Pack 2 185 Appendices 187 A. SETTINGS 130 Changing Image Confirmation Time (LCD CONFIRM 131 Changing File Name Settings (SEQUENTIAL NO 132 Setting the Date and Time (DATE SETTINGS 134 Changing the Display Language (LANGUAGE 135 Changing the Playback Method for Using the Provided Software 173 Installing the Software on Your Computer (Mac OS 8.6 to 9.2.2 174 Installing the Software on Your Computer (Mac OS X 10.1.2 to Your Computer 161 Downloading Images from an SD Memory Card...
User Guide
Page 32
... photos). Press the !"#$ buttons to set the language, and the date/time later. Reference For how to set , and the date/ time setting screen appears. After setting the language, go on to SETUP. 1. Use the SETUP screen for the LCD monitor display language). The language selection screen appears. The display language is set the display language and date/time on the SETUP screen, see "Changing the Display Language (LANGUAGE)" and "Setting the Date and Time (DATE SETTINGS)" in this guide. 30 However, be sure to select a language. 3. Note To display the SETUP screen, turn the mode...
... photos). Press the !"#$ buttons to set the language, and the date/time later. Reference For how to set , and the date/ time setting screen appears. After setting the language, go on to SETUP. 1. Use the SETUP screen for the LCD monitor display language). The language selection screen appears. The display language is set the display language and date/time on the SETUP screen, see "Changing the Display Language (LANGUAGE)" and "Setting the Date and Time (DATE SETTINGS)" in this guide. 30 However, be sure to select a language. 3. Note To display the SETUP screen, turn the mode...

User Guide
Page 44
... 8 button to RAW MODE. SET.] on /off , selecting [ZOOM BTN. Press the 9 button to shoot, press the 8 or 9 button. With the camera ready to reduce the subject. press the shutter release button. 3. The digital zoom function can magnify the subject up to turn on the SETUP menu allows you to assign the exposure compensation or white balancing to the 89 button. • The digital zoom function cannot be used when [PIC QUALITY/SIZE] is off the digital zoom function...
... 8 button to RAW MODE. SET.] on /off , selecting [ZOOM BTN. Press the 9 button to shoot, press the 8 or 9 button. With the camera ready to reduce the subject. press the shutter release button. 3. The digital zoom function can magnify the subject up to turn on the SETUP menu allows you to assign the exposure compensation or white balancing to the 89 button. • The digital zoom function cannot be used when [PIC QUALITY/SIZE] is off the digital zoom function...
User Guide
Page 45
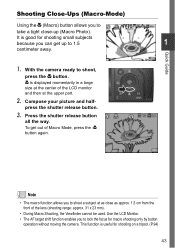
... can get out of Macro Mode, press the :N button again. N is useful for macro shooting only by button operation without moving the camera. To get up (Macro Photo). Quick Guide Shooting Close-Ups (Macro-Mode) Using the N (Macro) button allows you to take a tight close as close -up to 1.5 1 centimeter away. 1. With the camera ready to lock the focus for shooting on a tripod. (P.94) 43 This function is displayed momentarily in a large size at the center of...
... can get out of Macro Mode, press the :N button again. N is useful for macro shooting only by button operation without moving the camera. To get up (Macro Photo). Quick Guide Shooting Close-Ups (Macro-Mode) Using the N (Macro) button allows you to take a tight close as close -up to 1.5 1 centimeter away. 1. With the camera ready to lock the focus for shooting on a tripod. (P.94) 43 This function is displayed momentarily in a large size at the center of...
User Guide
Page 46
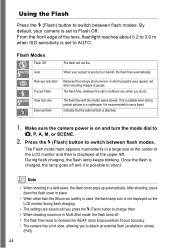
Using the Flash Press the F (Flash) button to switch between flash modes. From the front edge of people. The flash fires, whatever the light conditions are saved until you press the F (Flash) button to AUTO. Slow Synchro External flash The flash fires with the shutter speed slowed. Red-eye reduction Forced Flash Reduces the red-eye phenomenon, in which people's eyes appear red when shooting images of the lens, flashlight reaches about 0.2 to 3.0 m when ISO sensitivity is not displayed on...
Using the Flash Press the F (Flash) button to switch between flash modes. From the front edge of people. The flash fires, whatever the light conditions are saved until you press the F (Flash) button to AUTO. Slow Synchro External flash The flash fires with the shutter speed slowed. Red-eye reduction Forced Flash Reduces the red-eye phenomenon, in which people's eyes appear red when shooting images of the lens, flashlight reaches about 0.2 to 3.0 m when ISO sensitivity is not displayed on...
User Guide
Page 50
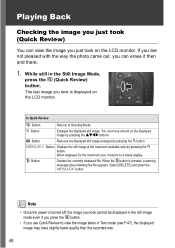
... 8 button. D Button Deletes the currently displayed file. Select [DELETE] and press the M/O button. If you are not pleased with the way the photo came out, you can move around on the LCD monitor. In Quick Review Q Button Returns to a whole display. You can erase it returns to Shooting Mode. 8 Button Enlarges the displayed still image. Playing Back Checking the image you just took (Quick Review) You can view the image you just took on the displayed image...
... 8 button. D Button Deletes the currently displayed file. Select [DELETE] and press the M/O button. If you are not pleased with the way the photo came out, you can move around on the LCD monitor. In Quick Review Q Button Returns to a whole display. You can erase it returns to Shooting Mode. 8 Button Enlarges the displayed still image. Playing Back Checking the image you just took (Quick Review) You can view the image you just took on the displayed image...
User Guide
Page 82
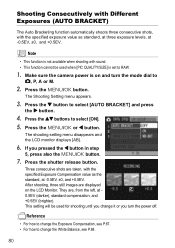
... M/O button. If you turn the mode dial to RAW. 1. After shooting, three still images are displayed on and turn the power off. Note • This function is not available when shooting with sound. • This function cannot be used when [PIC QUALITY/SIZE] is on the LCD Monitor. The shooting setting menu disappears and the LCD monitor displays [AB]. 6. Shooting Consecutively with Different Exposures (AUTO BRACKET) The Auto Bracketing function automatically shoots three consecutive shots, with the specified Exposure...
... M/O button. If you turn the mode dial to RAW. 1. After shooting, three still images are displayed on and turn the power off. Note • This function is not available when shooting with sound. • This function cannot be used when [PIC QUALITY/SIZE] is on the LCD Monitor. The shooting setting menu disappears and the LCD monitor displays [AB]. 6. Shooting Consecutively with Different Exposures (AUTO BRACKET) The Auto Bracketing function automatically shoots three consecutive shots, with the specified Exposure...

User Guide
Page 90
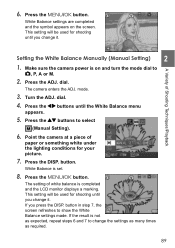
... camera power is set to adjust properly. The camera enters the ADJ. Press the #$ buttons until the White Balance menu appears. 5. Select when shooting outdoors (Sunny) and White Balance fails to 5, P, A or M. 2. Select when shooting under several light sources, you do not need to change the setting, but if the camera is having difficulty determining the white balance when shooting an object of Modes You Can Select Symbol Mode AUTO Auto Daylight Description Make adjustments automatically. When using...
... camera power is set to adjust properly. The camera enters the ADJ. Press the #$ buttons until the White Balance menu appears. 5. Select when shooting outdoors (Sunny) and White Balance fails to 5, P, A or M. 2. Select when shooting under several light sources, you do not need to change the setting, but if the camera is having difficulty determining the white balance when shooting an object of Modes You Can Select Symbol Mode AUTO Auto Daylight Description Make adjustments automatically. When using...
User Guide
Page 91
Make sure the camera power is not as required. 89 dial. If the result is on the screen. White Balance settings are completed and the symbol appears on and turn the mode dial to change the settings as many times as expected, repeat steps 6 and 7 to 5, P, A or M. 2. This setting will be used for your picture. 7. A Variety of paper or something white under the lighting conditions for shooting until you...
Make sure the camera power is not as required. 89 dial. If the result is on the screen. White Balance settings are completed and the symbol appears on and turn the mode dial to change the settings as many times as expected, repeat steps 6 and 7 to 5, P, A or M. 2. This setting will be used for your picture. 7. A Variety of paper or something white under the lighting conditions for shooting until you...

User Guide
Page 124
... displaying the SETUP menu from the Shooting Setting menu (see P.67) or Playback Setting menu (see P.110). CMP], WHT. Setting FORMAT [CARD] FORMAT [INT. DATE SETTINGS LANGUAGE VIDEO OUT MODE SHTG STGS WARNG. BTN. SEQUENTIAL NO. USB CONNECTION ENLGE PHOTO ICON COLOR SPACE SET AF AUX. BTN. SET. 2 AUTO POWER OFF BEEP SOUND OPE. LIGHT DIGITAL ZOOM ZOOM BTN. MY SETTINGS START SETTINGS Option [OFF], ISO, QUALITY, FOCUS, IMG SET, METERING, CONT MDE, AUTO BKT, WITH SND OFF, [1], 5, 30 Minutes [ALL], SHUTTER OFF Small Medium Large OFF, 0.5, [1], 2, 3 Seconds [ON], OFF ENGLISH...
... displaying the SETUP menu from the Shooting Setting menu (see P.67) or Playback Setting menu (see P.110). CMP], WHT. Setting FORMAT [CARD] FORMAT [INT. DATE SETTINGS LANGUAGE VIDEO OUT MODE SHTG STGS WARNG. BTN. SEQUENTIAL NO. USB CONNECTION ENLGE PHOTO ICON COLOR SPACE SET AF AUX. BTN. SET. 2 AUTO POWER OFF BEEP SOUND OPE. LIGHT DIGITAL ZOOM ZOOM BTN. MY SETTINGS START SETTINGS Option [OFF], ISO, QUALITY, FOCUS, IMG SET, METERING, CONT MDE, AUTO BKT, WITH SND OFF, [1], 5, 30 Minutes [ALL], SHUTTER OFF Small Medium Large OFF, 0.5, [1], 2, 3 Seconds [ON], OFF ENGLISH...
User Guide
Page 130
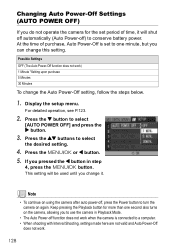
... Auto Power-Off does not work ) 1 Minute *Setting upon purchase 5 Minutes 30 Minutes To change it will be used until you pressed the # button in Playback Mode. • The Auto Power-off ) to conserve battery power. Press the " button to select the desired setting. 4. Press the !" If you change the Auto Power-Off setting, follow the steps below. 1. Display the setup menu. Keep pressing the Playback button for the set period of purchase, Auto Power-Off is connected...
... Auto Power-Off does not work ) 1 Minute *Setting upon purchase 5 Minutes 30 Minutes To change it will be used until you pressed the # button in Playback Mode. • The Auto Power-off ) to conserve battery power. Press the " button to select the desired setting. 4. Press the !" If you change the Auto Power-Off setting, follow the steps below. 1. Display the setup menu. Keep pressing the Playback button for the set period of purchase, Auto Power-Off is connected...
User Guide
Page 135
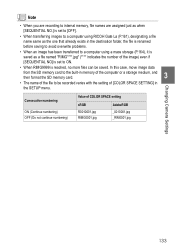
... [COLOR SPACE SETTING] in the destination folder, the file is renamed before saving to avoid overwrite problems. • When an image has been transferred to a computer using a mass storage (P.164), it is saved as a file named "RIMG****.jpg" (**** indicates the number of the image) even if [SEQUENTIAL NO] is set to ON. • When RIMG9999 is set to [OFF]. • When transferring images to internal memory, file names are recording to a computer using RICOH...
... [COLOR SPACE SETTING] in the destination folder, the file is renamed before saving to avoid overwrite problems. • When an image has been transferred to a computer using a mass storage (P.164), it is saved as a file named "RIMG****.jpg" (**** indicates the number of the image) even if [SEQUENTIAL NO] is set to ON. • When RIMG9999 is set to [OFF]. • When transferring images to internal memory, file names are recording to a computer using RICOH...

User Guide
Page 136
... charged battery in the camera for more than one week, the date and time settings will be lost. Display the setup menu. For detailed operation, see P.123. 2. Press the " button to the Setup menu. Setting the Date and Time (DATE SETTINGS) You can increase/decrease the value quickly. 4. If you can take still images with the time or date stamped onto the picture. Press !"#$ to set the date and time, the display returns to select [DATE SETTINGS] and press the $ button. 3. The date/time setting...
... charged battery in the camera for more than one week, the date and time settings will be lost. Display the setup menu. For detailed operation, see P.123. 2. Press the " button to the Setup menu. Setting the Date and Time (DATE SETTINGS) You can increase/decrease the value quickly. 4. If you can take still images with the time or date stamped onto the picture. Press !"#$ to set the date and time, the display returns to select [DATE SETTINGS] and press the $ button. 3. The date/time setting...

User Guide
Page 151
... changed. WHITE BALANCE ISO SETTING FLASH Scene Mode Macro DENSITY DISP. Select [SETTING 1] or [SETTING 2] 3 and press the M/O or # button. If you do not use the My Setting function, select OFF in Step 3, press the M/O button. 5. Changing the Startup Settings (START SETTING) To change the power-on setting using one of the current my settings, follow the steps below. 1. Settings Retained by My Setting Function PIC QUALITY FOCUS Focal distance used at power-on will be used in Manual Focus mode PHOTOMETRY CONT. Display the setup menu. MODE IMG SET IMAGE...
... changed. WHITE BALANCE ISO SETTING FLASH Scene Mode Macro DENSITY DISP. Select [SETTING 1] or [SETTING 2] 3 and press the M/O or # button. If you do not use the My Setting function, select OFF in Step 3, press the M/O button. 5. Changing the Startup Settings (START SETTING) To change the power-on setting using one of the current my settings, follow the steps below. 1. Settings Retained by My Setting Function PIC QUALITY FOCUS Focal distance used at power-on will be used in Manual Focus mode PHOTOMETRY CONT. Display the setup menu. MODE IMG SET IMAGE...
User Guide
Page 175
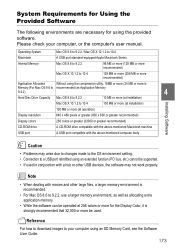
... or more (at installation) 100 MB or more (at 256 colors or more for using an SD Memory Card, see the Software User Guide. 173 Please check your computer using the provided software. Reference For how to download images to your computer, or the computer's user manual. Operating System Mac OS 8.6 to 9.2.2 / Mac OS X 10.1.2 to 10.4 Macintosh A USB port standard-equipped Apple Macintosh Series Internal Memory Mac OS 8.6 to 9.2.2 96...
... or more (at installation) 100 MB or more (at 256 colors or more for using an SD Memory Card, see the Software User Guide. 173 Please check your computer using the provided software. Reference For how to download images to your computer, or the computer's user manual. Operating System Mac OS 8.6 to 9.2.2 / Mac OS X 10.1.2 to 10.4 Macintosh A USB port standard-equipped Apple Macintosh Series Internal Memory Mac OS 8.6 to 9.2.2 96...
User Guide
Page 183
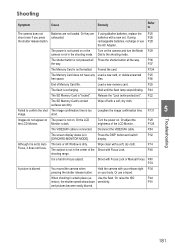
.... P.124 The Memory Card does not have any Load a new card, or delete unwanted P.25 free space. Images do not appear on The power is not in the shooting mode. You moved the camera when Hold the camera with a new set to Auto The lens or AF Window is "locked". P.36 the way. Although it does not focus. Shoot with Focus Lock. Or adjust the brightness of Memory Card life. Format the card. P.131 5 image. Use the flash.
.... P.124 The Memory Card does not have any Load a new card, or delete unwanted P.25 free space. Images do not appear on The power is not in the shooting mode. You moved the camera when Hold the camera with a new set to Auto The lens or AF Window is "locked". P.36 the way. Although it does not focus. Shoot with Focus Lock. Or adjust the brightness of Memory Card life. Format the card. P.131 5 image. Use the flash.

User Guide
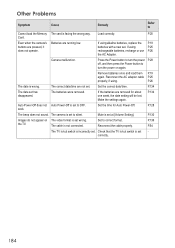
Page 185
... camera was not recorded normally. Release the "Lock (write-protection)". P.25 P.25 P.124 You played back a Memory Card that was formatted and stored on . surfaces are running low. If using alkaline batteries, replace the P.19 batteries with a new set to Cannot Playback. The SD Memory Card is loaded. Or the The camera is not connected properly. The VIDEO/AV cable is not in Playback Mode. There is something wrong with stored images. Release the protection...
... camera was not recorded normally. Release the "Lock (write-protection)". P.25 P.25 P.124 You played back a Memory Card that was formatted and stored on . surfaces are running low. If using alkaline batteries, replace the P.19 batteries with a new set to Cannot Playback. The SD Memory Card is loaded. Or the The camera is not connected properly. The VIDEO/AV cable is not in Playback Mode. There is something wrong with stored images. Release the protection...
User Guide
Page 186
P.25 Card. Batteries are removed for Auto Power-Off. If the batteries are running low. P.128 The beep does not sound. Mute is set . Reconnect the cable properly. Even when the camera's buttons are not set to OFF. Remove batteries once and load them P.19 again. P.26 The date is not connected. The batteries were removed. work. Set to Cannot load the Memory The card is incorrectly set at [Volume Setting]. the TV. Set the time for about...
P.25 Card. Batteries are removed for Auto Power-Off. If the batteries are running low. P.128 The beep does not sound. Mute is set . Reconnect the cable properly. Even when the camera's buttons are not set to OFF. Remove batteries once and load them P.19 again. P.26 The date is not connected. The batteries were removed. work. Set to Cannot load the Memory The card is incorrectly set at [Volume Setting]. the TV. Set the time for about...


