Operating Instructions
Page 17
... Changing a Stored File's User Name, File Name, or Password 133 Searching for Stored Files...133 Printing Stored Files...134 Deleting Stored Files...135 Printing or Deleting Stored Files Using a Web Browser 136 Programs...137 Storing a Program...137 Recalling a Program...138 Changing a Stored Program...138 Changing a Program Name...138 Protecting a Program...139 Deleting a Program...139 Color Printing...140 Changing the Color Drum Unit...140 Making Color Prints...143 Printing...
... Changing a Stored File's User Name, File Name, or Password 133 Searching for Stored Files...133 Printing Stored Files...134 Deleting Stored Files...135 Printing or Deleting Stored Files Using a Web Browser 136 Programs...137 Storing a Program...137 Recalling a Program...138 Changing a Stored Program...138 Changing a Program Name...138 Protecting a Program...139 Deleting a Program...139 Color Printing...140 Changing the Color Drum Unit...140 Making Color Prints...143 Printing...

Operating Instructions
Page 18
Changing the Drum Size...146 Printing Area (At 23 °C/73 °F, 65% RH 146 Master Cut Length...146 5. Troubleshooting If the Machine Does Not Work as Required 175 Indicators...175 When a Message is Displayed...176 If You Cannot Make Clear Prints...179 Faint Prints...179 Black Lines/Stained Prints...179 Dirty Background...179 Printing Problems...182 Combine...183 16 User Tools Accessing User Tools...147 Changing Default Settings...147 Quitting...
Changing the Drum Size...146 Printing Area (At 23 °C/73 °F, 65% RH 146 Master Cut Length...146 5. Troubleshooting If the Machine Does Not Work as Required 175 Indicators...175 When a Message is Displayed...176 If You Cannot Make Clear Prints...179 Faint Prints...179 Black Lines/Stained Prints...179 Dirty Background...179 Printing Problems...182 Combine...183 16 User Tools Accessing User Tools...147 Changing Default Settings...147 Quitting...

Operating Instructions
Page 19
... Your Machine...202 Machine Environment...202 Power Connection...204 Maintaining Your Machine...206 Cleaning the Machine...206 Cleaning the Exposure Glass...206 Cleaning the Exposure Glass Cover...207 Cleaning the Paper Feed Roller (paper feed tray 207 Cleaning the ADF...207 Cleaning the Power Cord Plug...208 Other Functions...209 Inquiry...209 Changing the Display Language...210 Counter/Data Print...211 Displaying the Counter...211 Print the log data and programmed class list 211...
... Your Machine...202 Machine Environment...202 Power Connection...204 Maintaining Your Machine...206 Cleaning the Machine...206 Cleaning the Exposure Glass...206 Cleaning the Exposure Glass Cover...207 Cleaning the Paper Feed Roller (paper feed tray 207 Cleaning the ADF...207 Cleaning the Power Cord Plug...208 Other Functions...209 Inquiry...209 Changing the Display Language...210 Counter/Data Print...211 Displaying the Counter...211 Print the log data and programmed class list 211...
Operating Instructions
Page 28
... selected modes. 21. [Clear/Stop] key • Clear Press to delete a number entered. • Stop Press to make a proof print. See page 59 "Basic Procedure". 13. [Print] mode select key Press to adjust the printing speed. Main power indicator The main power indicator lights up when the main switch is in progress. • Off: Master Making and printing are completed. 17. See page 73 "Changing the Printing Speed...
... selected modes. 21. [Clear/Stop] key • Clear Press to delete a number entered. • Stop Press to make a proof print. See page 59 "Basic Procedure". 13. [Print] mode select key Press to adjust the printing speed. Main power indicator The main power indicator lights up when the main switch is in progress. • Off: Master Making and printing are completed. 17. See page 73 "Changing the Printing Speed...

Operating Instructions
Page 47
... period of the machine) Turning off this switch will completely turn off power to the machine. When the machine has finished warming up, you can make master and prints. AJK144S The main power indicator turns on or off. • This machine automatically enters Energy Saver mode or turns off if it is firmly plugged into the wall outlet. 2. See page 149 "System Settings". Operation switch (right side of...
... period of the machine) Turning off this switch will completely turn off power to the machine. When the machine has finished warming up, you can make master and prints. AJK144S The main power indicator turns on or off. • This machine automatically enters Energy Saver mode or turns off if it is firmly plugged into the wall outlet. 2. See page 149 "System Settings". Operation switch (right side of...

Operating Instructions
Page 49
... or paper are jammed • it is no paper • there is making master or printing • it will not automatically enter the Energy Saver or Auto Off mode in the following job completion. To resume Energy Saver mode, press the Operation switch. For details see page 149 "System Settings". • The machine will enter Energy Saver or Auto Off mode to reduce power...
... or paper are jammed • it is no paper • there is making master or printing • it will not automatically enter the Energy Saver or Auto Off mode in the following job completion. To resume Energy Saver mode, press the Operation switch. For details see page 149 "System Settings". • The machine will enter Energy Saver or Auto Off mode to reduce power...

Operating Instructions
Page 50
... Reset is no ink • originals or paper are jammed • it is making master or printing • it is loading original images into memory • you are setting the mode on the control panel • it at a specified time everyday. Specify the timer setting in the ADF • a cover is open • you are making changes with selecting stored file is set the machine...
... Reset is no ink • originals or paper are jammed • it is making master or printing • it is loading original images into memory • you are setting the mode on the control panel • it at a specified time everyday. Specify the timer setting in the ADF • a cover is open • you are making changes with selecting stored file is set the machine...

Operating Instructions
Page 59
... page 155 "Master Making / Print Settings". 57 Placing Originals (mainly Europe) : The machine automatically rotates the original image by 90° to match the paper orientation. B6 JIS -- -- -- -- -- *1 Place these originals in the ADF. • If you use Zoom mode, custom size originals or paper, the image will not be rotated. • It takes longer than usual to make masters in the...
... page 155 "Master Making / Print Settings". 57 Placing Originals (mainly Europe) : The machine automatically rotates the original image by 90° to match the paper orientation. B6 JIS -- -- -- -- -- *1 Place these originals in the ADF. • If you use Zoom mode, custom size originals or paper, the image will not be rotated. • It takes longer than usual to make masters in the...

Operating Instructions
Page 61
... [#]. 2. Basic Printing This chapter describes the basic procedure for making prints. 3. Make sure " Ready" appears on the display. Set a print quantity between 1 (minimum) and 9999 (maximum). 59 This is lit. Place the originals. 5. Make the necessary settings. 6. CVU042 4. If the machine has user codes set, enter your settings. 3. Make sure no previous settings remain. If previous settings remain, press the [Clear Modes] key before entering your user code using the number keys.
... [#]. 2. Basic Printing This chapter describes the basic procedure for making prints. 3. Make sure " Ready" appears on the display. Set a print quantity between 1 (minimum) and 9999 (maximum). 59 This is lit. Place the originals. 5. Make the necessary settings. 6. CVU042 4. If the machine has user codes set, enter your settings. 3. Make sure no previous settings remain. If previous settings remain, press the [Clear Modes] key before entering your user code using the number keys.
Operating Instructions
Page 125
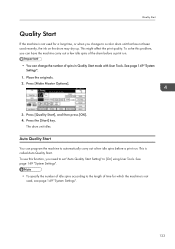
... a print run . The drum unit idles. To solve this function, you change to automatically carry out a few idle spins of the drum before a print run . • You can program the machine to a color drum unit that has not been used , see page 149 "System Settings". 123 Press the [Start] key. Auto Quality Start You can change the number of spins in Quality Start mode with User...
... a print run . The drum unit idles. To solve this function, you change to automatically carry out a few idle spins of the drum before a print run . • You can program the machine to a color drum unit that has not been used , see page 149 "System Settings". 123 Press the [Start] key. Auto Quality Start You can change the number of spins in Quality Start mode with User...
Operating Instructions
Page 155
... operate the machine. For details, see "User Tools Menu (System Settings)", Network Guide. Default: [Off] You can make prints without inserting the key counter. If user codes are turned on , Restricted Access is required to use key operator codes to access the Key Operator Code display. Default: [Off] 153 The machine keeps count of the number of drum rotations, and vice versa. If you can specify whether or not to use User Code mode. User Tools Menu...
... operate the machine. For details, see "User Tools Menu (System Settings)", Network Guide. Default: [Off] You can make prints without inserting the key counter. If user codes are turned on , Restricted Access is required to use key operator codes to access the Key Operator Code display. Default: [Off] 153 The machine keeps count of the number of drum rotations, and vice versa. If you can specify whether or not to use User Code mode. User Tools Menu...

Operating Instructions
Page 179
..., see page 155 "Master Making / Print Settings". Make prints after pressing [Exit] and selecting the paper size again. For details, see page 155 "Master Making / Print Settings". - "Communication error has occurred. Turn the main power switch off then on the exposure glass or in one operation with User Tools. You can change the minimum number of prints that the drum is larger than the selected paper size. The master image previously printed is completely set correctly." Causes Solutions...
..., see page 155 "Master Making / Print Settings". Make prints after pressing [Exit] and selecting the paper size again. For details, see page 155 "Master Making / Print Settings". - "Communication error has occurred. Turn the main power switch off then on the exposure glass or in one operation with User Tools. You can change the minimum number of prints that the drum is larger than the selected paper size. The master image previously printed is completely set correctly." Causes Solutions...
Operating Instructions
Page 181
... time or you use Quality Start mode. If the print density is ingested, induce vomiting by drinking a strong saline solution. Check the sheet of children. • If ink is still too light even if you change the color drum unit, the ink on prints even following the cleaning procedures above, please contact your service representative. See page 207 "Cleaning the ADF". • If black lines or...
... time or you use Quality Start mode. If the print density is ingested, induce vomiting by drinking a strong saline solution. Check the sheet of children. • If ink is still too light even if you change the color drum unit, the ink on prints even following the cleaning procedures above, please contact your service representative. See page 207 "Cleaning the ADF". • If black lines or...

Operating Instructions
Page 182
While pressing the drum lock, turn the drum until you can see page 140 "Changing the Color Drum Unit". 3. Troubleshooting • When removing jammed paper or replacing ink, avoid getting ink on the trailing edge of the master. Pull out the drum unit. Turn off the power. 2. TPEH101E For taking out the drum unit, see the trailing edge of the drum unit. 180 ZBHH210E With a dry soft cloth, remove any ink that has accumulated on your skin, wash the affected area thoroughly with soap and water. 1. 7. ZBHH100E 4. If ink comes into contact with your skin.
While pressing the drum lock, turn the drum until you can see page 140 "Changing the Color Drum Unit". 3. Troubleshooting • When removing jammed paper or replacing ink, avoid getting ink on the trailing edge of the master. Pull out the drum unit. Turn off the power. 2. TPEH101E For taking out the drum unit, see the trailing edge of the drum unit. 180 ZBHH210E With a dry soft cloth, remove any ink that has accumulated on your skin, wash the affected area thoroughly with soap and water. 1. 7. ZBHH100E 4. If ink comes into contact with your skin.

Operating Instructions
Page 184
... mode. • Erase margin is too wide. • Edge margins of the image are not printed. Prints are blank or parts of original are not set some functions. Check the output." Warning" with another drum The 1st print image is printed again. The paper feed side plates are too narrow. Use a soft cloth to clean the sensor, and then place the paper again. 2nd printing with User...
... mode. • Erase margin is too wide. • Edge margins of the image are not printed. Prints are blank or parts of original are not set some functions. Check the output." Warning" with another drum The 1st print image is printed again. The paper feed side plates are too narrow. Use a soft cloth to clean the sensor, and then place the paper again. 2nd printing with User...

Operating Instructions
Page 185
... not printed. Printing Problems Combine Problem Prints are blank or parts of the image are not correct. Solutions The number of scanned pages exceeds the capacity per file. Make sure no important files are stored in the optional ADF. You cannot use originals of same size and orientation. Use originals of different sizes and orientation in User Tools. Original set first. You forgot your password...
... not printed. Printing Problems Combine Problem Prints are blank or parts of the image are not correct. Solutions The number of scanned pages exceeds the capacity per file. Make sure no important files are stored in the optional ADF. You cannot use originals of same size and orientation. Use originals of different sizes and orientation in User Tools. Original set first. You forgot your password...
Operating Instructions
Page 190
... soap and water. • When removing jammed paper or replacing ink, avoid getting ink on your skin. Hot water will set the ink into contact with your service representative if misfeeds occur frequently. • The master eject unit or the drum unit may be locked if the security mode is off. • Do not turn off the main switch when clearing misfeeds. Troubleshooting Clearing Misfeeds This section explains what...
... soap and water. • When removing jammed paper or replacing ink, avoid getting ink on your skin. Hot water will set the ink into contact with your service representative if misfeeds occur frequently. • The master eject unit or the drum unit may be locked if the security mode is off. • Do not turn off the main switch when clearing misfeeds. Troubleshooting Clearing Misfeeds This section explains what...

Operating Instructions
Page 219
... Print Paper Weight: 47.1 - 209.3 g/m2 (12.5 - 55.6 lb.) Print Speed: Paper size of larger than A3, 11×17: 60 - 120 cpm (5 increments) Paper size of A3, 11×17 or less: 60 - 135 cpm (6 increments) First print Time (Master Process Time): 27 seconds or less (A3, 11 × 17 ) 18 seconds or less (A4, 81/2 × 11 ) Color Printing: Drum unit replacement...
... Print Paper Weight: 47.1 - 209.3 g/m2 (12.5 - 55.6 lb.) Print Speed: Paper size of larger than A3, 11×17: 60 - 120 cpm (5 increments) Paper size of A3, 11×17 or less: 60 - 135 cpm (6 increments) First print Time (Master Process Time): 27 seconds or less (A3, 11 × 17 ) 18 seconds or less (A4, 81/2 × 11 ) Color Printing: Drum unit replacement...

Operating Instructions
Page 227
... Changing a file name 132 Changing a password 132 Changing a Program Name 138 Changing a stored file's file name 133 Changing a stored file's password 133 Changing a stored file's user name 133 Changing a Stored Program 138 Changing a user code 163 Changing Default Settings 147 Changing the color drum unit 140 Changing the display language 210 Changing the drum size 146 Changing the paper size 168 Changing the printing speed 73 Checking details of stored files 134 Class mode 89 Class settings 88 Cleaning 206 Clearing misfeeds 188 Clearing...
... Changing a file name 132 Changing a password 132 Changing a Program Name 138 Changing a stored file's file name 133 Changing a stored file's password 133 Changing a stored file's user name 133 Changing a Stored Program 138 Changing a user code 163 Changing Default Settings 147 Changing the color drum unit 140 Changing the display language 210 Changing the drum size 146 Changing the paper size 168 Changing the printing speed 73 Checking details of stored files 134 Class mode 89 Class settings 88 Cleaning 206 Clearing misfeeds 188 Clearing...

Operating Instructions
Page 229
... Separate prints 91 Setting a password 132 Setting up the paper delivery tray 37 Skip Feed 124 Small size paper 187 Storing a program 137 Storing data 130 Storing File 130 Storing files 183 Symbols 9 System Settings 149 T Thick paper 77 To change the stamp position, size, and density 109 Turn off the power 46 Turn on the power 46 Turning off the main power 46 Turning on the main power 45 Twin color press roller printing...
... Separate prints 91 Setting a password 132 Setting up the paper delivery tray 37 Skip Feed 124 Small size paper 187 Storing a program 137 Storing data 130 Storing File 130 Storing files 183 Symbols 9 System Settings 149 T Thick paper 77 To change the stamp position, size, and density 109 Turn off the power 46 Turn on the power 46 Turning off the main power 46 Turning on the main power 45 Twin color press roller printing...


