
Operating Instructions
Page 1
Operating Instructions Maintenance Guide 1 Replacing Consumables and Maintenance Kit 2 Cleaning and Adjusting the Printer 3 Paper and Other Media 4 Troubleshooting 5 Appendix For safe and correct use of this machine, please be sure to read the Safety Information in the Setup Guide before you use it.
Operating Instructions Maintenance Guide 1 Replacing Consumables and Maintenance Kit 2 Cleaning and Adjusting the Printer 3 Paper and Other Media 4 Troubleshooting 5 Appendix For safe and correct use of this machine, please be sure to read the Safety Information in the Setup Guide before you use it.

Operating Instructions
Page 4
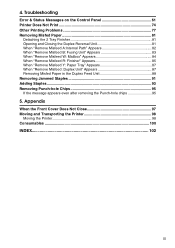
... the paper type 55 Loading Paper in the Bypass Tray 56 ii Cleaning and Adjusting the Printer Cautions to Take When Cleaning 29 Cleaning the Registration Roller 30 Cleaning the DustProof Glass 31 Adjusting the Color Registration 32 Auto Adjust...32 Adjusting the Fuser for Thick Paper 33 Test Sheet Samples 35...
... the paper type 55 Loading Paper in the Bypass Tray 56 ii Cleaning and Adjusting the Printer Cautions to Take When Cleaning 29 Cleaning the Registration Roller 30 Cleaning the DustProof Glass 31 Adjusting the Color Registration 32 Auto Adjust...32 Adjusting the Fuser for Thick Paper 33 Test Sheet Samples 35...
Operating Instructions
Page 5
Troubleshooting Error & Status Messages on the Control Panel 61 Printer Does Not Print 74 Other Printing Problems 77 Removing Misfed Paper 81 Detaching the 2 Tray Finisher 81 Opening and Closing the Duplex Reversal Unit 81 ... If the message appears even after removing the Punch-hole chips 95 5. 4. Appendix When the Front Cover Does Not Close 97 Moving and Transporting the Printer 98 Moving the Printer ...98 Consumables ...100 INDEX...102 iii
Troubleshooting Error & Status Messages on the Control Panel 61 Printer Does Not Print 74 Other Printing Problems 77 Removing Misfed Paper 81 Detaching the 2 Tray Finisher 81 Opening and Closing the Duplex Reversal Unit 81 ... If the message appears even after removing the Punch-hole chips 95 5. 4. Appendix When the Front Cover Does Not Close 97 Moving and Transporting the Printer 98 Moving the Printer ...98 Consumables ...100 INDEX...102 iii

Operating Instructions
Page 8
... and black (K). A Unhook the green hook on paper type, size, contents, and settings. cartridges yourself, dispose according to "Black and White" from the printer driver. Note ❒ The actual number of children. not possible until the black toner If you can print in black and white mode using the... black toner. For details, see p.100 "Toner cartridge". B Remove the toner cartridge for the color you want to four colors, yellow, magenta, cyan, black, appears in the order of the print- place at an authorized dealer ❒ If black toner runs...
... and black (K). A Unhook the green hook on paper type, size, contents, and settings. cartridges yourself, dispose according to "Black and White" from the printer driver. Note ❒ The actual number of children. not possible until the black toner If you can print in black and white mode using the... black toner. For details, see p.100 "Toner cartridge". B Remove the toner cartridge for the color you want to four colors, yellow, magenta, cyan, black, appears in the order of the print- place at an authorized dealer ❒ If black toner runs...

Operating Instructions
Page 11
plex Reversal Unit". ZHXH450J The 2 tray finisher is reattached to the printer. 5 A Hold the handle at the top of the 2 tray finisher firmly using one hand, pull the 2 tray finisher straight out, and let go when it ... Finisher) Detaching the SR770 (2 Tray Finisher) There are times when you may need to detach the 2 tray finisher from the printer. ZHXH350J The 2 tray finisher is detached from the printer to the printer after closing the duplex reversal unit. This section describes how to push it straight back in, and let go when...
plex Reversal Unit". ZHXH450J The 2 tray finisher is reattached to the printer. 5 A Hold the handle at the top of the 2 tray finisher firmly using one hand, pull the 2 tray finisher straight out, and let go when it ... Finisher) Detaching the SR770 (2 Tray Finisher) There are times when you may need to detach the 2 tray finisher from the printer. ZHXH350J The 2 tray finisher is detached from the printer to the printer after closing the duplex reversal unit. This section describes how to push it straight back in, and let go when...

Operating Instructions
Page 12
... to detach the duplex reversal unit. Important ❒ Attach the duplex reversal unit after detaching the 2 tray finisher from the printer. ZDJP204J Important ❒ Open the duplex reversal unit after closing the printer's upper left cover. and leave it in , until it in place. ZDJP205J The duplex reversal unit is opened. This...
... to detach the duplex reversal unit. Important ❒ Attach the duplex reversal unit after detaching the 2 tray finisher from the printer. ZDJP204J Important ❒ Open the duplex reversal unit after closing the printer's upper left cover. and leave it in , until it in place. ZDJP205J The duplex reversal unit is opened. This...

Operating Instructions
Page 13
... the Fuser Oil Unit R CAUTION: D If the external tray is attached to • The fusing unit becomes very the printer, raise it in a burn. • Keep the fuser oil unit away from the printer. After that, in- Replace Fuser Oil Unit (TypeG) ZDJP038J E Slowly pull out the left cover. wait about an...- Reference p.5 "Detaching the SR770 (2 Tray Finisher)" C If the duplex unit is installed, de- oil unit, turn off the power, and then un- A Turn off the printer and move it from flames. Important ❒ Be sure to avoid burns.
... the Fuser Oil Unit R CAUTION: D If the external tray is attached to • The fusing unit becomes very the printer, raise it in a burn. • Keep the fuser oil unit away from the printer. After that, in- Replace Fuser Oil Unit (TypeG) ZDJP038J E Slowly pull out the left cover. wait about an...- Reference p.5 "Detaching the SR770 (2 Tray Finisher)" C If the duplex unit is installed, de- oil unit, turn off the power, and then un- A Turn off the printer and move it from flames. Important ❒ Be sure to avoid burns.

Operating Instructions
Page 15
... horizontal- L Close the upper left cover (A), and then push the part labeled "PUSH" next to the handle at the bottom rear, until it to the printer. Reference p.5 "Detaching the SR770 (2 Tray Finisher)" 9 ZDJH010J N If the duplex unit is installed, reattach it clicks (B). 1 J As shown, hold the fuser oil unit using one.... Replacing the Fuser Oil Unit ❒ After removing the seals, be careful not to let oil from oilsupplying parts, or the seals come into the printer slits, and then lower it to the...
... horizontal- L Close the upper left cover (A), and then push the part labeled "PUSH" next to the handle at the bottom rear, until it to the printer. Reference p.5 "Detaching the SR770 (2 Tray Finisher)" 9 ZDJH010J N If the duplex unit is installed, reattach it clicks (B). 1 J As shown, hold the fuser oil unit using one.... Replacing the Fuser Oil Unit ❒ After removing the seals, be careful not to let oil from oilsupplying parts, or the seals come into the printer slits, and then lower it to the...

Operating Instructions
Page 17
...Lift the inner cover until it clicks into place and holds. ZHXH410J ZHXH470J 11 ed screwdriver. 1 Replace Black PCU (Type F) If "Replace Color PCU (Type A)" appears on the display, replace the black photoconductor unit. plug the power cable. ZHXH430J You cannot remove these two screws. ...ZHXH460J The photoconductor units are attached in the order of the printer, remove the green screwdriver. D Loosen the two screws fastening the inner cover, using the provid- Replacing the Photoconductor Unit ...
...Lift the inner cover until it clicks into place and holds. ZHXH410J ZHXH470J 11 ed screwdriver. 1 Replace Black PCU (Type F) If "Replace Color PCU (Type A)" appears on the display, replace the black photoconductor unit. plug the power cable. ZHXH430J You cannot remove these two screws. ...ZHXH460J The photoconductor units are attached in the order of the printer, remove the green screwdriver. D Loosen the two screws fastening the inner cover, using the provid- Replacing the Photoconductor Unit ...

Operating Instructions
Page 19
... photoconductor unit. D Slowly push the front of the photoconductor unit, slide the unit on the back of the photoconductor unit with the rail inside the printer. C Line up the green arrow at the tip of the front cover. 13 Replacing the Photoconductor Unit E Remove the cover, and then slowly push in...
... photoconductor unit. D Slowly push the front of the photoconductor unit, slide the unit on the back of the photoconductor unit with the rail inside the printer. C Line up the green arrow at the tip of the front cover. 13 Replacing the Photoconductor Unit E Remove the cover, and then slowly push in...

Operating Instructions
Page 20
The following message appears on the left and right. Replacing Consumables and Maintenance Kit J Turn the green lever clockwise. 1 ZHXH420J K Slowly close the front cover by pushing the two areas on the display: Calibrating... The printer starts calibration. Wait until it stops. Important ❒ To avoid malfunction, do not turn on the power. ZDJH041J L Plug in the power cable, and then turn off the power during calibration. 14
The following message appears on the left and right. Replacing Consumables and Maintenance Kit J Turn the green lever clockwise. 1 ZHXH420J K Slowly close the front cover by pushing the two areas on the display: Calibrating... The printer starts calibration. Wait until it stops. Important ❒ To avoid malfunction, do not turn on the power. ZDJH041J L Plug in the power cable, and then turn off the power during calibration. 14

Operating Instructions
Page 21
...the power cable. See p.30 "Cleaning the Registration Roller". ❒ The replacement procedure for all three color (CMY) development units. ZHXH430J You cannot remove these two screws. Replace Color Dev. A Turn off the power, and then un- Unit(TypeB)" appears on the display, replace ...two screws fastening the inner cover, using the provided screwdriver. C Turn the green lever counter- B Slowly open the front cover of the printer, remove the green screwdriver. Unit(TypeD)" appears on the display, replace all four development units. The procedure is attached to the black ...
...the power cable. See p.30 "Cleaning the Registration Roller". ❒ The replacement procedure for all three color (CMY) development units. ZHXH430J You cannot remove these two screws. Replace Color Dev. A Turn off the power, and then un- Unit(TypeB)" appears on the display, replace ...two screws fastening the inner cover, using the provided screwdriver. C Turn the green lever counter- B Slowly open the front cover of the printer, remove the green screwdriver. Unit(TypeD)" appears on the display, replace all four development units. The procedure is attached to the black ...
Operating Instructions
Page 25
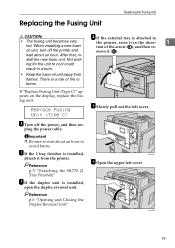
Replacing the Fusing Unit Replacing the Fusing Unit R CAUTION: D If the external tray is attached to • The fusing unit becomes very the printer, raise it (B). oil unit, turn off the power, and then un- stall the new fuser unit. B If the 2 tray finisher is ...installed, detach it from flames. After that, in a burn. • Keep the fuser oil unit away from the printer. Not wait- Reference p.5 "Detaching the SR770 (2 Tray Finisher)" C If the duplex unit is a risk of the arrow (A), and then re- There is installed...
Replacing the Fusing Unit Replacing the Fusing Unit R CAUTION: D If the external tray is attached to • The fusing unit becomes very the printer, raise it (B). oil unit, turn off the power, and then un- stall the new fuser unit. B If the 2 tray finisher is ...installed, detach it from flames. After that, in a burn. • Keep the fuser oil unit away from the printer. Not wait- Reference p.5 "Detaching the SR770 (2 Tray Finisher)" C If the duplex unit is a risk of the arrow (A), and then re- There is installed...

Operating Instructions
Page 27
... (2 Tray Finisher)" S Plug in step D, reattach it to align it . 1 M Hold the fusing unit handle and slowly lower the unit to the printer. ZHXH820J Important ❒ Install the fusing unit so the blue dial is installed, close the duplex reversal unit. Replacing the Fusing Unit Important O Close the... cover (A), ❒ Be careful not to get oil on the and then push the part labeled top metal part of the external tray into the printer slits, and low- ZHXH082J P If you . bottom rear, until it clicks (B). ❒ Insert the fuser oil unit firmly, 1 until it stops...
... (2 Tray Finisher)" S Plug in step D, reattach it to align it . 1 M Hold the fusing unit handle and slowly lower the unit to the printer. ZHXH820J Important ❒ Install the fusing unit so the blue dial is installed, close the duplex reversal unit. Replacing the Fusing Unit Important O Close the... cover (A), ❒ Be careful not to get oil on the and then push the part labeled top metal part of the external tray into the printer slits, and low- ZHXH082J P If you . bottom rear, until it clicks (B). ❒ Insert the fuser oil unit firmly, 1 until it stops...

Operating Instructions
Page 28
... un- plug the power cable. When replacing the black development unit, also replace the dustproof filter. B Push in the grips on both sides of the printer, as shown.
... un- plug the power cable. When replacing the black development unit, also replace the dustproof filter. B Push in the grips on both sides of the printer, as shown.

Operating Instructions
Page 29
... on the power. 23 er, one by one , and put them , dust might scatter. If you shake them into the upper left area of the printer. ZDJH213J B Attach the small filter. to the dustproof filter cover one tached to take out the dustproof filters at- ZDJH216J ZDJH215J Important ❒ Handle the...
... on the power. 23 er, one by one , and put them , dust might scatter. If you shake them into the upper left area of the printer. ZDJH213J B Attach the small filter. to the dustproof filter cover one tached to take out the dustproof filters at- ZDJH216J ZDJH215J Important ❒ Handle the...

Operating Instructions
Page 30
plug the power cable. ZHXH150J R CAUTION: • Keep the waste oil bottle away from inside the printer. D Take the new waste toner bottle out of fire or burns. 24 There is a risk of the bag. ZDJH228J E Slowly remove the used waste toner ...
plug the power cable. ZHXH150J R CAUTION: • Keep the waste oil bottle away from inside the printer. D Take the new waste toner bottle out of fire or burns. 24 There is a risk of the bag. ZDJH228J E Slowly remove the used waste toner ...

Operating Instructions
Page 31
H Insert the new waste toner bottle as shown. Important ❒ Be sure to avoid toner leakage inside the printer. ZHXH600J Important ❒ Be sure to firmly insert the waste toner bottle to handle the bottle carefully so waste toner does not spill. ZHXH160J K Slowly ...
H Insert the new waste toner bottle as shown. Important ❒ Be sure to avoid toner leakage inside the printer. ZHXH600J Important ❒ Be sure to firmly insert the waste toner bottle to handle the bottle carefully so waste toner does not spill. ZHXH160J K Slowly ...

Operating Instructions
Page 34
Replacing Consumables and Maintenance Kit J Hold the new paper feed roller A with its pin towards you are replacing the paper feed rollers of the optional 2000sheet Large Capacity Tray, load the stocks removed in step B into the printer until they stop. Insert the roller onto the front shaft until it clicks into place (B). 1 ZERH090E K Slowly slide all trays back into the tray. 28 Note ❒ If you (A).
Replacing Consumables and Maintenance Kit J Hold the new paper feed roller A with its pin towards you are replacing the paper feed rollers of the optional 2000sheet Large Capacity Tray, load the stocks removed in step B into the printer until they stop. Insert the roller onto the front shaft until it clicks into place (B). 1 ZERH090E K Slowly slide all trays back into the tray. 28 Note ❒ If you (A).

Operating Instructions
Page 35
...as benzine and thinner, or spray insecticide on the printer. ❒ If there is well wrung out. There is a risk of sight. R CAUTION: • When removing misfed paper, do not use a neutral detergent, then wipe over with the laser beam may cause serious eye damage. Cleaning and ...Adjusting the Printer Cautions to Take When Cleaning R WARNING: • Do not remove any modifications to maintain print clarity. If the ...
...as benzine and thinner, or spray insecticide on the printer. ❒ If there is well wrung out. There is a risk of sight. R CAUTION: • When removing misfed paper, do not use a neutral detergent, then wipe over with the laser beam may cause serious eye damage. Cleaning and ...Adjusting the Printer Cautions to Take When Cleaning R WARNING: • Do not remove any modifications to maintain print clarity. If the ...


