
Operating Instructions
Page 4
... Paper in the Bypass Tray 56 ii Cleaning and Adjusting the Printer Cautions to Take When Cleaning 29 Cleaning the Registration Roller 30 Cleaning the DustProof Glass 31 Adjusting the Color Registration 32 Auto Adjust...32 Adjusting the Fuser for Thick Paper...Toner Cartridge 2 Detaching the SR770 (2 Tray Finisher 5 Opening and Closing the Duplex Reversal Unit 6 Replacing the Fuser Oil Unit 7 Replacing the Photoconductor Unit 11 Replacing the Development Unit 15 Replacing the Fusing Unit 19 Replacing the Dustproof Filter 22 Replacing the Waste Toner Bottle 24 Replacing the Paper Feed...
... Paper in the Bypass Tray 56 ii Cleaning and Adjusting the Printer Cautions to Take When Cleaning 29 Cleaning the Registration Roller 30 Cleaning the DustProof Glass 31 Adjusting the Color Registration 32 Auto Adjust...32 Adjusting the Fuser for Thick Paper...Toner Cartridge 2 Detaching the SR770 (2 Tray Finisher 5 Opening and Closing the Duplex Reversal Unit 6 Replacing the Fuser Oil Unit 7 Replacing the Photoconductor Unit 11 Replacing the Development Unit 15 Replacing the Fusing Unit 19 Replacing the Dustproof Filter 22 Replacing the Waste Toner Bottle 24 Replacing the Paper Feed...
Operating Instructions
Page 5
... Error & Status Messages on the Control Panel 61 Printer Does Not Print 74 Other Printing Problems 77 Removing Misfed Paper 81 Detaching the 2 Tray Finisher 81 Opening and Closing the Duplex Reversal Unit 81 When "Remove Misfeed A:Internal Path" Appears 82 When "Remove Misfeed B: Fusing Unit" Appears 83 When "Remove Misfeed W: Mailbox" Appears 84...
... Error & Status Messages on the Control Panel 61 Printer Does Not Print 74 Other Printing Problems 77 Removing Misfed Paper 81 Detaching the 2 Tray Finisher 81 Opening and Closing the Duplex Reversal Unit 81 When "Remove Misfeed A:Internal Path" Appears 82 When "Remove Misfeed B: Fusing Unit" Appears 83 When "Remove Misfeed W: Mailbox" Appears 84...

Operating Instructions
Page 13
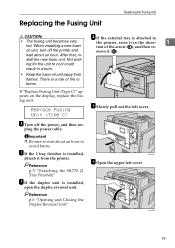
... could result in a burn. • Keep the fuser oil unit away from the printer. tach it in - Replacing the Fuser Oil Unit Replacing the Fuser Oil Unit R CAUTION: D If the external tray is attached to • The fusing unit becomes very the printer, raise it from flames. oil unit, turn off the power, and then un- Not wait...
... could result in a burn. • Keep the fuser oil unit away from the printer. tach it in - Replacing the Fuser Oil Unit Replacing the Fuser Oil Unit R CAUTION: D If the external tray is attached to • The fusing unit becomes very the printer, raise it from flames. oil unit, turn off the power, and then un- Not wait...

Operating Instructions
Page 14
... the bag. Replacing Consumables and Maintenance Kit G I Pull the lever down slightly, and Take the fuser oil unit out of the fusing unit. ZHXHK041J Note ❒ Be sure to avoid oil leakage. 8 Position the fuser oil unit 1 as shown, and then slowly pull seal (A) out. ZHXH033J Important 1 ❒ Do not touch any area other...
... the bag. Replacing Consumables and Maintenance Kit G I Pull the lever down slightly, and Take the fuser oil unit out of the fusing unit. ZHXHK041J Note ❒ Be sure to avoid oil leakage. 8 Position the fuser oil unit 1 as shown, and then slowly pull seal (A) out. ZHXH033J Important 1 ❒ Do not touch any area other...
Operating Instructions
Page 25
...• Keep the fuser oil unit away from the printer. Replace Fusing Unit (Type C) ZDJP038J E Slowly pull out the left cover. Reference p.5 "Detaching the SR770 (2 Tray Finisher)" C If the duplex unit is installed, detach it in - Replacing the Fusing Unit Replacing the Fusing Unit R CAUTION: D If the ... then re- When installing a new fuser tion of fire or burns. stall the new fuser unit. Important ❒ Be sure to • The fusing unit becomes very the printer, raise it from flames. F Open the upper left cover. After that, in the direc-...
...• Keep the fuser oil unit away from the printer. Replace Fusing Unit (Type C) ZDJP038J E Slowly pull out the left cover. Reference p.5 "Detaching the SR770 (2 Tray Finisher)" C If the duplex unit is installed, detach it in - Replacing the Fusing Unit Replacing the Fusing Unit R CAUTION: D If the ... then re- When installing a new fuser tion of fire or burns. stall the new fuser unit. Important ❒ Be sure to • The fusing unit becomes very the printer, raise it from flames. F Open the upper left cover. After that, in the direc-...

Operating Instructions
Page 26
... other than the green felt parts. Important ❒ To avoid getting oil on a level surface. 1 J Pull the fuser oil unit (attached to the fusing unit) out horizontally, and then remove it . H Hold the fusing unit handle as shown, and then insert it horizontally into the part of the bag and put it down on yourself...
... other than the green felt parts. Important ❒ To avoid getting oil on a level surface. 1 J Pull the fuser oil unit (attached to the fusing unit) out horizontally, and then remove it . H Hold the fusing unit handle as shown, and then insert it horizontally into the part of the bag and put it down on yourself...

Operating Instructions
Page 27
... then seal it toward you removed the external tray in the direction of the external tray into the printer slits, and low- Replacing the Fusing Unit Important O Close the upper left cover (A), ❒ Be careful not to get oil on the and then push the part labeled top metal ...part of the fuser oil "PUSH" next to the printer. er it . 1 M Hold the fusing unit handle and slowly lower the unit to the printer. L Put the removed fuser oil unit in the power cable, and then turn the fuser oil unit han- ZHXH070J ZDJH010J Q If the duplex unit is on the front cover side.
... then seal it toward you removed the external tray in the direction of the external tray into the printer slits, and low- Replacing the Fusing Unit Important O Close the upper left cover (A), ❒ Be careful not to get oil on the and then push the part labeled top metal ...part of the fuser oil "PUSH" next to the printer. er it . 1 M Hold the fusing unit handle and slowly lower the unit to the printer. L Put the removed fuser oil unit in the power cable, and then turn the fuser oil unit han- ZHXH070J ZDJH010J Q If the duplex unit is on the front cover side.

Operating Instructions
Page 51
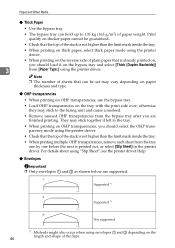
...paper that has already been printed onto by other printers. Paper Feed Unit Type 3800C (500×2) can be stored properly. Paper Feed Unit Type 3800C (500×1) can hold up to 500 sheets. Not taking this precaution may stick to the fusing unit and cause a paper misfeed. ❒ When ...printing on the reverse side of Paper and Other Media ❖ Plain Paper • Tray 1/2 can hold up to the fusing unit and cause misfeeds. ❒ Print quality cannot be set . • When printing on OHP transparencies that have a print side, load them to stick...
...paper that has already been printed onto by other printers. Paper Feed Unit Type 3800C (500×2) can be stored properly. Paper Feed Unit Type 3800C (500×1) can hold up to 500 sheets. Not taking this precaution may stick to the fusing unit and cause a paper misfeed. ❒ When ...printing on the reverse side of Paper and Other Media ❖ Plain Paper • Tray 1/2 can hold up to the fusing unit and cause misfeeds. ❒ Print quality cannot be set . • When printing on OHP transparencies that have a print side, load them to stick...
Operating Instructions
Page 52
...the top of plain paper that is already printed on, you should select the OHP transparency mode using the printer driver. • Check that can hold up to the fusing unit and cause a misfeed. • Remove unused OHP transparencies from the bypass tray after you are supported.... Supported *1 Supported *1 Not supported *1 Misfeeds might also occur when using the printer driver. • When printing on the 46 length...
...the top of plain paper that is already printed on, you should select the OHP transparency mode using the printer driver. • Check that can hold up to the fusing unit and cause a misfeed. • Remove unused OHP transparencies from the bypass tray after you are supported.... Supported *1 Supported *1 Not supported *1 Misfeeds might also occur when using the printer driver. • When printing on the 46 length...

Operating Instructions
Page 69
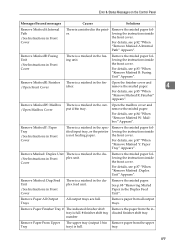
Close the cover for the fusing unit) is open . mailbox tray. er for the 4-bin box is open . cur when the installed ting. WEP key. The job the printer Off, then back On. Add extra RAM. Stored Files The maximum number of stored files has been exceeded during Sample Print...Apply Form Feed from another tray or cancel the job, and then switch your sales or service representative. If the error continues, contact your printer Off, then back On. Exceeded Max. Driver Setting Error (Memo- Exceeded Max. Close Upper Left Cover The upper left cover. Install the ...
Close the cover for the fusing unit) is open . mailbox tray. er for the 4-bin box is open . cur when the installed ting. WEP key. The job the printer Off, then back On. Add extra RAM. Stored Files The maximum number of stored files has been exceeded during Sample Print...Apply Form Feed from another tray or cancel the job, and then switch your sales or service representative. If the error continues, contact your printer Off, then back On. Exceeded Max. Driver Setting Error (Memo- Exceeded Max. Close Upper Left Cover The upper left cover. Install the ...
Operating Instructions
Page 75
...p.87 "When "Remove Misfeed :Duplex Unit" Appears". Open the finisher cover and isher. ified input tray, or the printer lowing the instructions inside the front cover. tray. 69 Remove the misfed paper fol- er. Remove MisfeedB: Fusing Unit /See Instructions in Front Cover There is... a misfeed in the fusing unit. Remove MisfeedW: Mailbox /Open Mailbox Cover There...
...p.87 "When "Remove Misfeed :Duplex Unit" Appears". Open the finisher cover and isher. ified input tray, or the printer lowing the instructions inside the front cover. tray. 69 Remove the misfed paper fol- er. Remove MisfeedB: Fusing Unit /See Instructions in Front Cover There is... a misfeed in the fusing unit. Remove MisfeedW: Mailbox /Open Mailbox Cover There...
Operating Instructions
Page 77
... re-install the duplex paper feed unit. See "SR770 (2 Tray Finisher)", Setup Guide. Replace the fuser oil unit. unit. See p.7 "Replacing the Fuser Oil Unit". Replace Fusing Unit (Type C) It is not set correct- Reset Duplex Unit Correctly The duplex paper feed unit is /are not set correctly, or... Set the finisher correctly. ly, or not set . rectly, or not set . See p.19 "Replacing the Fusing Unit". Unit Correctly /Yellow/Magenta Cyan/Black The indicated development unit(s) is not set correctly or not set . Replace Waste Toner (Type E) It is installed incorrectly, or not the...
... re-install the duplex paper feed unit. See "SR770 (2 Tray Finisher)", Setup Guide. Replace the fuser oil unit. unit. See p.7 "Replacing the Fuser Oil Unit". Replace Fusing Unit (Type C) It is not set correct- Reset Duplex Unit Correctly The duplex paper feed unit is /are not set correctly, or... Set the finisher correctly. ly, or not set . rectly, or not set . See p.19 "Replacing the Fusing Unit". Unit Correctly /Yellow/Magenta Cyan/Black The indicated development unit(s) is not set correctly or not set . Replace Waste Toner (Type E) It is installed incorrectly, or not the...

Operating Instructions
Page 78
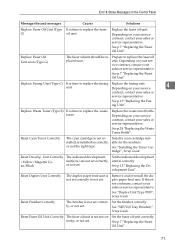
... not set correctly, or not set . Troubleshooting Messages/Second messages Causes Solutions Reset Fusing Unit Correctly There is installed incor- rectly. See "Installing the Toner Cartridge", Setup Guide. Reset Tray Correctly The printer detected, when processing a job through Auto Tray Select, that a paper input tray is /are not set correctly, or not set...
... not set correctly, or not set . Troubleshooting Messages/Second messages Causes Solutions Reset Fusing Unit Correctly There is installed incor- rectly. See "Installing the Toner Cartridge", Setup Guide. Reset Tray Correctly The printer detected, when processing a job through Auto Tray Select, that a paper input tray is /are not set correctly, or not set...

Operating Instructions
Page 89
...very hot. A If the 2 tray finisher is installed, ZHXH010J detach it (B). Reference p.81 "Opening and Closing the Duplex Reversal Unit" C If the output tray is attached to push out the misfed paper, and slowly pull out the paper. ZHXH020J F Turn ... parts labelled "hot surface". Reference E Open the upper left cover for the printer. Touching a "hot surface" could result in the direction of the arrow (A), and then remove it from the printer. Removing Misfed Paper When "Remove Misfeed B: Fusing Unit" Appears D Slowly pull out the upper left cover. 4 p.81 "Detaching ...
...very hot. A If the 2 tray finisher is installed, ZHXH010J detach it (B). Reference p.81 "Opening and Closing the Duplex Reversal Unit" C If the output tray is attached to push out the misfed paper, and slowly pull out the paper. ZHXH020J F Turn ... parts labelled "hot surface". Reference E Open the upper left cover for the printer. Touching a "hot surface" could result in the direction of the arrow (A), and then remove it from the printer. Removing Misfed Paper When "Remove Misfeed B: Fusing Unit" Appears D Slowly pull out the upper left cover. 4 p.81 "Detaching ...
Operating Instructions
Page 107
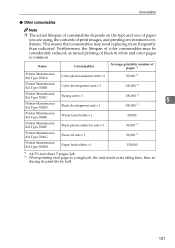
... printable number of pages *1 Printer Maintenance Kit Type 7000A Color photoconductor unit × 3 50,000 *2 Printer Maintenance Kit Type 7000B Color development unit × 3 100,000 *2 Printer Maintenance Kit Type 7000C Fusing unit × 1 100,000 *2 5 Printer Maintenance Kit Type 7000D Black development unit × 1 100,000 *2 Printer Maintenance Kit Type 3800E Waste toner bottle × 1 50,000 Printer Maintenance Kit Type 7000F...
... printable number of pages *1 Printer Maintenance Kit Type 7000A Color photoconductor unit × 3 50,000 *2 Printer Maintenance Kit Type 7000B Color development unit × 3 100,000 *2 Printer Maintenance Kit Type 7000C Fusing unit × 1 100,000 *2 5 Printer Maintenance Kit Type 7000D Black development unit × 1 100,000 *2 Printer Maintenance Kit Type 3800E Waste toner bottle × 1 50,000 Printer Maintenance Kit Type 7000F...

Operating Instructions
Page 108
...Tray Registration, 37 Appendix, 97 B Bypass Tray Custom Size, 58 Paper Type, 59 C Cleaning and Adjusting the Printer, 29 Cleaning the DustProof Glass, 31 Cleaning the Registration Roller, 30 Color Adjustment Checking the Test Sheet, 35 Consumables, 100 D Data In indicator, 75 Detaching the 2 Tray Finisher, 81... Problems, 77 P Paper and Other Media, 39 Paper Size, 39 Plain Paper, 45 Printable Area, 49 Printer Does Not Print, 74 R Remove Misfed Paper Duplex Unit, 87 Finisher, 85 Fusing Unit, 83 Internal Path, 82 Mailbox, 84 Paper Tray, 87 Removing Jammed Staples, 91 Removing Misfed Paper, 81...
...Tray Registration, 37 Appendix, 97 B Bypass Tray Custom Size, 58 Paper Type, 59 C Cleaning and Adjusting the Printer, 29 Cleaning the DustProof Glass, 31 Cleaning the Registration Roller, 30 Color Adjustment Checking the Test Sheet, 35 Consumables, 100 D Data In indicator, 75 Detaching the 2 Tray Finisher, 81... Problems, 77 P Paper and Other Media, 39 Paper Size, 39 Plain Paper, 45 Printable Area, 49 Printer Does Not Print, 74 R Remove Misfed Paper Duplex Unit, 87 Finisher, 85 Fusing Unit, 83 Internal Path, 82 Mailbox, 84 Paper Tray, 87 Removing Jammed Staples, 91 Removing Misfed Paper, 81...


