
UNIX Supplement
Page 10
... want to copy the installation shell script to 192.168.15.16 220 printer FTP server ready. ftp> get the installation shell script. ftp> bye 221 Goodbye. # C Run the installation shell script. # sh ./install Note ❒ Insert a period and slash before the current directory. Use Solaris, HP-UX or Linux. ❒ If you are not supported. Password: D When a password is requested, leave blank and...
... want to copy the installation shell script to 192.168.15.16 220 printer FTP server ready. ftp> get the installation shell script. ftp> bye 221 Goodbye. # C Run the installation shell script. # sh ./install Note ❒ Insert a period and slash before the current directory. Use Solaris, HP-UX or Linux. ❒ If you are not supported. Password: D When a password is requested, leave blank and...
UNIX Supplement
Page 15
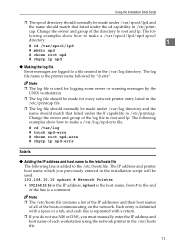
Change the owner and group of the directory to the /etc/hosts file. The log file name is delimited with a return. ❒ If you do not use NIS or DNS, you previously entered in the installation script will be used. 192.168.15.16 nphost # Network Printer • 192.168.15.16 is the IP address, nphost is used for logging some errors or warning messages by...
Change the owner and group of the directory to the /etc/hosts file. The log file name is delimited with a return. ❒ If you do not use NIS or DNS, you previously entered in the installation script will be used. 192.168.15.16 nphost # Network Printer • 192.168.15.16 is the IP address, nphost is used for logging some errors or warning messages by...
User Manual
Page 5
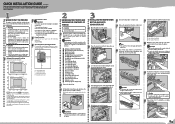
...for service Attaching Legal-size Support Tray Remove the plastic bag. MANUALS FOR THIS PRINTER Quick Installation Guide (This manual) Maintenance Guide Option Setup Guide CD-ROM "Printer Drivers and Utilities" CD-ROM "Operating Instructions" CD-ROM "Document Management Utility" Power Cable Toner Cartridge (Black) Toner Cartridge (Yellow) Toner Cartridge (Cyan) Toner Cartridge (Magenta) Photo Conductor Unit (Black) Photo Conductor Unit (Color) Waste Toner Bottle Ferrite Core (2) Legal Support Tray Image density adjusting card User registration card Limited warranty statement Calling for use...
...for service Attaching Legal-size Support Tray Remove the plastic bag. MANUALS FOR THIS PRINTER Quick Installation Guide (This manual) Maintenance Guide Option Setup Guide CD-ROM "Printer Drivers and Utilities" CD-ROM "Operating Instructions" CD-ROM "Document Management Utility" Power Cable Toner Cartridge (Black) Toner Cartridge (Yellow) Toner Cartridge (Cyan) Toner Cartridge (Magenta) Photo Conductor Unit (Black) Photo Conductor Unit (Color) Waste Toner Bottle Ferrite Core (2) Legal Support Tray Image density adjusting card User registration card Limited warranty statement Calling for use...

User Manual
Page 6
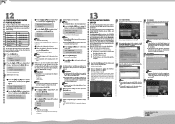
... 10 times. ZHBHA1040N SELECTING THE PANEL DISPLAY LANGUAGE Follow the procedure to load. ZHBH420E Close the right cover of the printer. Toner may result in and removing the power cord. ZHBH910E Check the toner color and location are correctly engaged with wet hands. ZHBH030E Plug the other color toner cartridges. Remove the adhesive tapes. If you want to use the English panel display, it out completely. ZHBY040E Adjust the side guides to the paper size you...
... 10 times. ZHBHA1040N SELECTING THE PANEL DISPLAY LANGUAGE Follow the procedure to load. ZHBH420E Close the right cover of the printer. Toner may result in and removing the power cord. ZHBH910E Check the toner color and location are correctly engaged with wet hands. ZHBH030E Plug the other color toner cartridges. Remove the adhesive tapes. If you want to use the English panel display, it out completely. ZHBY040E Adjust the side guides to the paper size you...

User Manual
Page 7
... the network , e.g. Ready PRINTINGTHE TEST PAGE You can adjust the image density from the end. Menu: List/Test Print Press the {Enter #} key. Menu: Paper Input "Menu" appears on the panel display. Ready CONNECTINGTHE PRINTER TO A COMPUTER ❖ Connecting the printer to select. One of the cable (on , turn it is a standard bidirectional interface. Connect the interface cable to display "Maintenance", and then press the {Enter #} key. The following massage appears on the panel display. Menu: Language Press the {On Line...
... the network , e.g. Ready PRINTINGTHE TEST PAGE You can adjust the image density from the end. Menu: List/Test Print Press the {Enter #} key. Menu: Paper Input "Menu" appears on the panel display. Ready CONNECTINGTHE PRINTER TO A COMPUTER ❖ Connecting the printer to select. One of the cable (on , turn it is a standard bidirectional interface. Connect the interface cable to display "Maintenance", and then press the {Enter #} key. The following massage appears on the panel display. Menu: Language Press the {On Line...
User Manual
Page 8
... Windows XP, the [Hardware Installation] dialog box may appear when installing the printer driver. Print the configuration page to display "Off", and then press {Enter #}. Select [Quick Install]. The following languages are not sure of the setting addresses, leave them as a network address. In this case, click [Yes] to display "Network Setup", and then press the {Enter #} key. Make the settings for the rest of the IP address as default. Press the {Menu...
... Windows XP, the [Hardware Installation] dialog box may appear when installing the printer driver. Print the configuration page to display "Off", and then press {Enter #}. Select [Quick Install]. The following languages are not sure of the setting addresses, leave them as a network address. In this case, click [Yes] to display "Network Setup", and then press the {Enter #} key. Make the settings for the rest of the IP address as default. Press the {Menu...
User Manual
Page 11
... Features of this Printer 9 Guide to Take When Cleaning 49 Adjusting the Color Registration 50 Adjusting the Image Density 51 Adjusting the Tray Registration 53 i Replacing Consumables and Maintenance Kit Toner Cartridge ...29 Waste Toner Bottle Type 155 32 Photo Conductor Unit Type 125 Black/Color 34 Fusing Unit Type 155 39 Intermediate Transfer Unit Type 125 43 4. Paper and Other Media Paper and Other Media Supported by This Printer 15 Paper Sizes...15 Paper Recommendations 18 Loading Paper ...22 Loading Paper in Tray 1/Optional Paper Feed Unit 22 Loading Paper in the Bypass...
... Features of this Printer 9 Guide to Take When Cleaning 49 Adjusting the Color Registration 50 Adjusting the Image Density 51 Adjusting the Tray Registration 53 i Replacing Consumables and Maintenance Kit Toner Cartridge ...29 Waste Toner Bottle Type 155 32 Photo Conductor Unit Type 125 Black/Color 34 Fusing Unit Type 155 39 Intermediate Transfer Unit Type 125 43 4. Paper and Other Media Paper and Other Media Supported by This Printer 15 Paper Sizes...15 Paper Recommendations 18 Loading Paper ...22 Loading Paper in Tray 1/Optional Paper Feed Unit 22 Loading Paper in the Bypass...
User Manual
Page 32
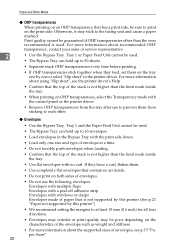
... tray. • Use flat envelopes with the control panel or the printer driver. • Remove OHP transparencies from the tray after use the following envelopes: Envelopes with multiple flaps Envelopes with a peel-off adhesive strip Envelopes with the print side down. • Load only one or select "Slip sheet" in the Bypass Tray with windows or clasps Envelopes made of paper that is not supported by this printer (See p.21 "Paper not supported by one size and type of envelope...
... tray. • Use flat envelopes with the control panel or the printer driver. • Remove OHP transparencies from the tray after use the following envelopes: Envelopes with multiple flaps Envelopes with a peel-off adhesive strip Envelopes with the print side down. • Load only one or select "Slip sheet" in the Bypass Tray with windows or clasps Envelopes made of paper that is not supported by this printer (See p.21 "Paper not supported by one size and type of envelope...

User Manual
Page 36
... paper, or plain or thick paper that can load thick paper, envelopes, glossy paper and OHP transparencies onto 2 "Menu" appears on one selected with the printer driver. play "Tray 1", and then press the {Enter #} key. ❒ The paper size selected with the printer driver overrides the one side, make the settings using the control panel. "Ready" appears on the paper type. ❒ You cannot open the Bypass Tray when the front cover is open. Paper and Other Media...
... paper, or plain or thick paper that can load thick paper, envelopes, glossy paper and OHP transparencies onto 2 "Menu" appears on one selected with the printer driver. play "Tray 1", and then press the {Enter #} key. ❒ The paper size selected with the printer driver overrides the one side, make the settings using the control panel. "Ready" appears on the paper type. ❒ You cannot open the Bypass Tray when the front cover is open. Paper and Other Media...

User Manual
Page 41
... a new toner cartridge beforehand. We recommend that you can print in time. Replace the toner cartridge of children. ZHBH440E 29 Add Toner XXX/XXX or Toner is Almost Empty:XXX Note ❒ The color is replaced. Disposal should take place at a time, paper type and paper size used toner. Change the color mode setting to local regulations. R CAUTION: • Keep toner (used toner cartridges yourself, dispose of this, the toner cartridge may require replacement earlier than expected. Replacing Consumables and Maintenance Kit Toner Cartridge R WARNING: •...
... a new toner cartridge beforehand. We recommend that you can print in time. Replace the toner cartridge of children. ZHBH440E 29 Add Toner XXX/XXX or Toner is Almost Empty:XXX Note ❒ The color is replaced. Disposal should take place at a time, paper type and paper size used toner. Change the color mode setting to local regulations. R CAUTION: • Keep toner (used toner cartridges yourself, dispose of this, the toner cartridge may require replacement earlier than expected. Replacing Consumables and Maintenance Kit Toner Cartridge R WARNING: •...

User Manual
Page 68
... cover of the printer is a problem with a new toner cartridge of the indicated toner(s). Color Regist. sage appears again, contact your sales or service representative. Even when yellow, magenta or cyan toner runs out, you can print in the Host Interface menu. Call Service: EC Power Off On A communication error sent Turn the power switch off and on the panel display. Change Setting Tray # /Paper Size: Paper Type: The paper size or paper type set in the Host Interface menu. select another tray and make a #: tray number or Bypass Tray print...
... cover of the printer is a problem with a new toner cartridge of the indicated toner(s). Color Regist. sage appears again, contact your sales or service representative. Even when yellow, magenta or cyan toner runs out, you can print in the Host Interface menu. Call Service: EC Power Off On A communication error sent Turn the power switch off and on the panel display. Change Setting Tray # /Paper Size: Paper Type: The paper size or paper type set in the Host Interface menu. select another tray and make a #: tray number or Bypass Tray print...
User Manual
Page 70
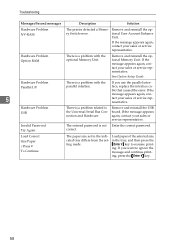
... use the parallel interface, replace the interface cable that caused the error. If the message appears again, contact your sales or service representative. Hardware Problem Option RAM There is not Enter the correct password. Load paper of the selected size cated tray differs from the set in the tray, and then press the ting made. {Enter #} key to the Universal Serial Bus Connection and Hardware. Remove and reinstall the optional User Account Enhance Unit...
... use the parallel interface, replace the interface cable that caused the error. If the message appears again, contact your sales or service representative. Hardware Problem Option RAM There is not Enter the correct password. Load paper of the selected size cated tray differs from the set in the tray, and then press the ting made. {Enter #} key to the Universal Serial Bus Connection and Hardware. Remove and reinstall the optional User Account Enhance Unit...
User Manual
Page 73
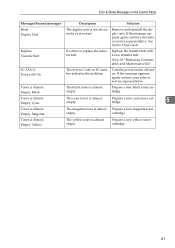
.... Replace Transfer Belt It is almost empty. Turn the power switch off and on the Control Panel Messages/Second messages Description Solution Reset Duplex Unit The duplex unit is not set . Prepare a new yellow toner cartridge. 61 See p.29 "Replacing Consumables and Maintenance Kit". Prepare a new black toner cartridge. Error & Status Messages on . Remove and reinstall the duplex unit. Prepare a new cyan toner cartridge. 5 Toner is Almost Empty: Magenta The magenta toner is not set correctly or is almost Prepare a new magenta toner empty. See Option Setup Guide...
.... Replace Transfer Belt It is almost empty. Turn the power switch off and on the Control Panel Messages/Second messages Description Solution Reset Duplex Unit The duplex unit is not set . Prepare a new yellow toner cartridge. 61 See p.29 "Replacing Consumables and Maintenance Kit". Prepare a new black toner cartridge. Error & Status Messages on . Remove and reinstall the duplex unit. Prepare a new cyan toner cartridge. 5 Toner is Almost Empty: Magenta The magenta toner is not set correctly or is almost Prepare a new magenta toner empty. See Option Setup Guide...

User Manual
Page 79
... pages are printed in The printer driver is missing, turn the power switch off and on the print side of the page. Other Printing Problems Other Printing Problems Status Possible Causes, Descriptions, and Solutions Toner smears appear on . Paper gets wrinkles. See p.29 "Replacing Consumables and Maintenance Kit". If a specific color is not set up for the color balance under the [Print adjusted with the control panel in the application. Photo images are using paper smaller than the paper size selected in the application, use...
... pages are printed in The printer driver is missing, turn the power switch off and on the print side of the page. Other Printing Problems Other Printing Problems Status Possible Causes, Descriptions, and Solutions Toner smears appear on . Paper gets wrinkles. See p.29 "Replacing Consumables and Maintenance Kit". If a specific color is not set up for the color balance under the [Print adjusted with the control panel in the application. Photo images are using paper smaller than the paper size selected in the application, use...

User Manual
Page 82
... move the printer from the "Maintenance" menu. Note ❒ If the problem cannot be different from the image on after removing the misfed paper. displayed in temperature, condensation might have selected to the temperature. Due to a sudden change in the computer display. Troubleshooting Status Possible Causes, Descriptions, and Solutions An error message on the control Open the front cover of the printer, and then close it . A print image is a hazy...
... move the printer from the "Maintenance" menu. Note ❒ If the problem cannot be different from the image on after removing the misfed paper. displayed in temperature, condensation might have selected to the temperature. Due to a sudden change in the computer display. Troubleshooting Status Possible Causes, Descriptions, and Solutions An error message on the control Open the front cover of the printer, and then close it . A print image is a hazy...

User Manual
Page 441
... type "password" for entering the password and user name is turned on the Web browser. The status of the printer you chose appears on . To use the factory default account, enter no reply from SmartDeviceMonitor for Admin even under a DHCP environment. This section describes how to configure the WINS server. The dialog box for the password. http://XXX.XXX.XXX sub- C Click [Network Config]. Operating Instructions Administrator Reference 242 Configuring...
... type "password" for entering the password and user name is turned on the Web browser. The status of the printer you chose appears on . To use the factory default account, enter no reply from SmartDeviceMonitor for Admin even under a DHCP environment. This section describes how to configure the WINS server. The dialog box for the password. http://XXX.XXX.XXX sub- C Click [Network Config]. Operating Instructions Administrator Reference 242 Configuring...

User Manual
Page 462
.... Reset, 140 Making Printer Settings with the Control Panel, 119 Memory, 251 Memory Capacity and Paper Size, 244 Memory Overflow, 153 Memory Unit Type C 64/128/256MB, 253 Menu, accessing, 124 Menu, changing, 181 Menu Chart, 119 Menu key, 124 Menu List, 133 Menu Protect, 140 Message, 227 MIB, 184 MisfeedRecovery, 153 N NetWare, 75 NetWare 3.x, 80 NetWare 4.x, 5/5.1, 6, 87 NetWare Printing, 238 Network Interface Board, 251 Network Interface Board Type 3000, 254 Network Setup, 163 NIB, 251 O On Line key, 125 Options, 252 Orientation, 175 P Page Size...
.... Reset, 140 Making Printer Settings with the Control Panel, 119 Memory, 251 Memory Capacity and Paper Size, 244 Memory Overflow, 153 Memory Unit Type C 64/128/256MB, 253 Menu, accessing, 124 Menu, changing, 181 Menu Chart, 119 Menu key, 124 Menu List, 133 Menu Protect, 140 Message, 227 MIB, 184 MisfeedRecovery, 153 N NetWare, 75 NetWare 3.x, 80 NetWare 4.x, 5/5.1, 6, 87 NetWare Printing, 238 Network Interface Board, 251 Network Interface Board Type 3000, 254 Network Setup, 163 NIB, 251 O On Line key, 125 Options, 252 Orientation, 175 P Page Size...

User Manual
Page 559
... click [OK]. Note ❒ You must set the printer as the print server in the [Browse for the selected printer is disabled. L Select the printer you want to set up the options. N Configure the default printer as necessary. ❖ Default Printer Select the [Default Printer] check box to use as the default printer. R Set up the options when bidirectional transmission is displayed after [Port]. Reference For more information about option settings, see p.121 "Bidirectional transmission". Q When...
... click [OK]. Note ❒ You must set the printer as the print server in the [Browse for the selected printer is disabled. L Select the printer you want to set up the options. N Configure the default printer as necessary. ❖ Default Printer Select the [Default Printer] check box to use as the default printer. R Set up the options when bidirectional transmission is displayed after [Port]. Reference For more information about option settings, see p.121 "Bidirectional transmission". Q When...

User Manual
Page 584
For more information, see "Printer Does Not Print", Maintenance Guide. ❒ If you do not want to install the printer driver when [Found New Hardware Wizard] starts when using an operating system that supports SCSI print, inactivate the device by following this case, install the printer driver by following the procedure. ❒ If printing does not work properly after installation, you install software for: (Unknown)] is displayed, click [Install from [Search for the...
For more information, see "Printer Does Not Print", Maintenance Guide. ❒ If you do not want to install the printer driver when [Found New Hardware Wizard] starts when using an operating system that supports SCSI print, inactivate the device by following this case, install the printer driver by following the procedure. ❒ If printing does not work properly after installation, you install software for: (Unknown)] is displayed, click [Install from [Search for the...

User Manual
Page 604
... of printer or print queue on that server:] box, enter "lp". K Make sure the location for Client online Help. O When the [Installation completion.] dialog box appears, click [Finish]. Note ❒ For more information about these settings, see SmartDeviceMonitor for the selected printer is displayed after [Port]. E Click [OK]. L Configure the default printer as necessary. ❖ Default Printer Select the [Default Printer] check box to distinguish the printer in the [Printer URL...
... of printer or print queue on that server:] box, enter "lp". K Make sure the location for Client online Help. O When the [Installation completion.] dialog box appears, click [Finish]. Note ❒ For more information about these settings, see SmartDeviceMonitor for the selected printer is displayed after [Port]. E Click [OK]. L Configure the default printer as necessary. ❖ Default Printer Select the [Default Printer] check box to distinguish the printer in the [Printer URL...


