User Guide
Page 6
...permanent eye damage. • Do not put your hands when loading paper. 6 This machine contains a laser beam generator and direct exposure to avoid cutting your hands inside of this printer becomes very hot. Do not touch parts labelled "v" (indicating a hot surface). • The fusing section... • The inside the printer when the input tray is removed. After installing the memory unit, be sure to close the memory unit cover, and then turn on . Handling the Machine's Interior R WARNING: • Do not attempt any maintenance or troubleshooting other than that mentioned in ...
...permanent eye damage. • Do not put your hands when loading paper. 6 This machine contains a laser beam generator and direct exposure to avoid cutting your hands inside of this printer becomes very hot. Do not touch parts labelled "v" (indicating a hot surface). • The fusing section... • The inside the printer when the input tray is removed. After installing the memory unit, be sure to close the memory unit cover, and then turn on . Handling the Machine's Interior R WARNING: • Do not attempt any maintenance or troubleshooting other than that mentioned in ...
User Guide
Page 15
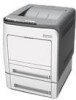
Operating Instructions Hardware Guide 1 Guide to read "Safety Information" before using the machine. For safe and correct use this manual carefully before you use , be sure to the Printer 2 Installing the Printer and Options 3 Connecting the Printer 4 Configuration 5 Paper and Other Media 6 Replacing Consumables 7 Cleaning the Printer 8 Troubleshooting 9 Removing Misfed Paper 10 Appendix Read this machine and keep it handy for future reference.
Operating Instructions Hardware Guide 1 Guide to read "Safety Information" before using the machine. For safe and correct use this manual carefully before you use , be sure to the Printer 2 Installing the Printer and Options 3 Connecting the Printer 4 Configuration 5 Paper and Other Media 6 Replacing Consumables 7 Cleaning the Printer 8 Troubleshooting 9 Removing Misfed Paper 10 Appendix Read this machine and keep it handy for future reference.
User Guide
Page 25
...Kit 92 7. Cleaning the Printer Cautions to a Computer via USB Cable 114 Other Printing Problems 117 Additional Troubleshooting 124 9. Troubleshooting Error & Status Messages on the Control Panel 109 Panel Indicator 112 Printer Does Not Print 113 When the Printer is Jammed 125 When "Remove... Misfeed Bypass Tray" Appears 132 When "Remove Misfeed Paper Exit" Appears 133 10.Appendix Moving and Transporting the Printer 135 Moving the Printer 136 Consumables ...137 Print Cartridge ...137 Waste Toner Bottle 138 Intermediate Transfer Unit 138 Maintenance Kit ...138 Specifications......
...Kit 92 7. Cleaning the Printer Cautions to a Computer via USB Cable 114 Other Printing Problems 117 Additional Troubleshooting 124 9. Troubleshooting Error & Status Messages on the Control Panel 109 Panel Indicator 112 Printer Does Not Print 113 When the Printer is Jammed 125 When "Remove... Misfeed Bypass Tray" Appears 132 When "Remove Misfeed Paper Exit" Appears 133 10.Appendix Moving and Transporting the Printer 135 Moving the Printer 136 Consumables ...137 Print Cartridge ...137 Waste Toner Bottle 138 Intermediate Transfer Unit 138 Maintenance Kit ...138 Specifications......
User Guide
Page 125
... detergent, and then wipe over with a soft, wet cloth that mentioned in this printer becomes very hot. R CAUTION: • The inside the machine. 99 Clean the printer periodically to laser beams can cause permanent eye damage. Clean away any maintenance or troubleshooting other small metallic objects to Take When Cleaning R WARNING: • Do not...
... detergent, and then wipe over with a soft, wet cloth that mentioned in this printer becomes very hot. R CAUTION: • The inside the machine. 99 Clean the printer periodically to laser beams can cause permanent eye damage. Clean away any maintenance or troubleshooting other small metallic objects to Take When Cleaning R WARNING: • Do not...
User Guide
Page 135
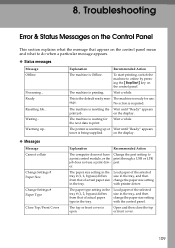
...in the tray # (1, 2, bypass) differs from that of actual paper type in the tray. The top or front cover is the default ready mes- Troubleshooting Error & Status Messages on the control panel. Load paper of the selected size in the tray, and then change the paper size setting with... printer driver. Change the port setting to online by pressing the {Stop/Start} key on the Control Panel This section explains what the message that...
...in the tray # (1, 2, bypass) differs from that of actual paper type in the tray. The top or front cover is the default ready mes- Troubleshooting Error & Status Messages on the control panel. Load paper of the selected size in the tray, and then change the paper size setting with... printer driver. Change the port setting to online by pressing the {Stop/Start} key on the Control Panel This section explains what the message that...

User Guide
Page 136
... Tray 1. pass) is a paper jam in Tray 2. Load Paper: # or Stop/Start The printer detected that the actual paper type and size are not the same as the paper tray # (1, 2, bypass) size setting and the paper type settings. Troubleshooting Message Explanation Recommended Action Controller FW download failed Controller FW could not be...
... Tray 1. pass) is a paper jam in Tray 2. Load Paper: # or Stop/Start The printer detected that the actual paper type and size are not the same as the paper tray # (1, 2, bypass) size setting and the paper type settings. Troubleshooting Message Explanation Recommended Action Controller FW download failed Controller FW could not be...

User Guide
Page 138
The Ready indicator is flashing. Cause The printer cannot be used normally. The Ready indicator is lit. The printer is lit. Check the error on the control panel. Indicator patterns The Alert indicator is ready for use. 8 112 The printer is receiving print data or preparing to users about its conditions. Troubleshooting Panel Indicator The following table explains the meaning of the various indicator patterns that the printer alerts to print.
The Ready indicator is flashing. Cause The printer cannot be used normally. The Ready indicator is lit. The printer is lit. Check the error on the control panel. Indicator patterns The Alert indicator is ready for use. 8 112 The printer is receiving print data or preparing to users about its conditions. Troubleshooting Panel Indicator The following table explains the meaning of the various indicator patterns that the printer alerts to print.

User Guide
Page 140
... Server 2003/2003 R2 A Access the [Printers and Faxes] window from [Start] on the taskbar. D Check the [Print to the following port(s).] box to confirm that the correct port is not correct, reinstall the driver. Troubleshooting When the Printer is Directly Connected to a Computer via USB... Cable Windows When the printer is directly connected via a USB cable to a computer but the Ready indicator does not flash...
... Server 2003/2003 R2 A Access the [Printers and Faxes] window from [Start] on the taskbar. D Check the [Print to the following port(s).] box to confirm that the correct port is not correct, reinstall the driver. Troubleshooting When the Printer is Directly Connected to a Computer via USB... Cable Windows When the printer is directly connected via a USB cable to a computer but the Ready indicator does not flash...

User Guide
Page 142
If it is displayed on the browser. B Click [More Info]. B Double click [Printer Setup Utility]. C Click [Add]. The printer browser stars. Confirm the printer is not, reinstall the driver. 8 116 Using the printer browser A In the menu bar, click [Go], select [Application], and then select [Utilities]. C Under [Contents], for [Hardware], Select [USB]. Troubleshooting Using [About This Mac] A Click Apple Menu, and then select [About This Mac].
If it is displayed on the browser. B Click [More Info]. B Double click [Printer Setup Utility]. C Click [Add]. The printer browser stars. Confirm the printer is not, reinstall the driver. 8 116 Using the printer browser A In the menu bar, click [Go], select [Application], and then select [Utilities]. C Under [Contents], for [Hardware], Select [USB]. Troubleshooting Using [About This Mac] A Click Apple Menu, and then select [About This Mac].
User Guide
Page 144
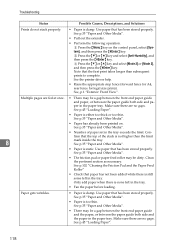
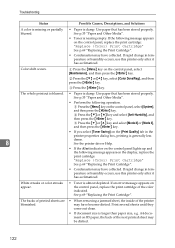
Press the {T} or {U} key and select [Anti-Humidity], and then press the {#Enter} key. See the printer driver help. • Raise the appropriate stop fence (forward fence for A4, rear fence for legal size prints). See p.35 "Paper and Other Media". •... the stack is damp. Con- Use paper that the first print takes longer than the limit 8 mark inside the tray. Multiple pages are no gaps. Troubleshooting Status Possible Causes, Descriptions, and Solutions Prints do not stack properly. • Paper is not higher than subsequent prints to complete. See p.35 "Paper ...
Press the {T} or {U} key and select [Anti-Humidity], and then press the {#Enter} key. See the printer driver help. • Raise the appropriate stop fence (forward fence for A4, rear fence for legal size prints). See p.35 "Paper and Other Media". •... the stack is damp. Con- Use paper that the first print takes longer than the limit 8 mark inside the tray. Multiple pages are no gaps. Troubleshooting Status Possible Causes, Descriptions, and Solutions Prints do not stack properly. • Paper is not higher than subsequent prints to complete. See p.35 "Paper ...
User Guide
Page 146
...; The data is different from the Energy Saver mode, the printer has to process, so simply wait when print- If you are printed. Troubleshooting Status Possible Causes, Descriptions, and Solutions After replacing a color print car- Select "Recycled Paper" in areas of sol- See the printer driver Help. A printed image is so large or complex...
...; The data is different from the Energy Saver mode, the printer has to process, so simply wait when print- If you are printed. Troubleshooting Status Possible Causes, Descriptions, and Solutions After replacing a color print car- Select "Recycled Paper" in areas of sol- See the printer driver Help. A printed image is so large or complex...
User Guide
Page 148
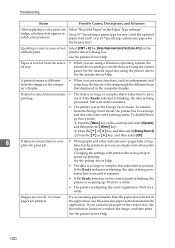
...empty. Press the {T} or {U} key and select [Anti-Humidity], and then press the {#Enter} key. If rapid change in the printer properties dialog box, printing is damp. The backs of printed sheets are blemished. • When removing a jammed sheet, the inside of the...{Menu} key on the control panel, select [Maintenance], and then press the {#Enter} key. Press the {T} or {U} key, select [Color Dens/Reg], and then press the {#Enter} key. Troubleshooting Status Possible Causes, Descriptions, and Solutions A color is missing or partially blurred. • Paper is generally less 8 dense.
...empty. Press the {T} or {U} key and select [Anti-Humidity], and then press the {#Enter} key. If rapid change in the printer properties dialog box, printing is damp. The backs of printed sheets are blemished. • When removing a jammed sheet, the inside of the...{Menu} key on the control panel, select [Maintenance], and then press the {#Enter} key. Press the {T} or {U} key, select [Color Dens/Reg], and then press the {#Enter} key. Troubleshooting Status Possible Causes, Descriptions, and Solutions A color is missing or partially blurred. • Paper is generally less 8 dense.
User Guide
Page 150
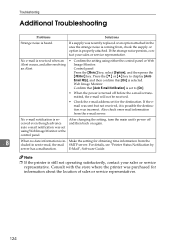
...but not received, it is heard. Make the setting for obtaining time information from the e-mail server. Troubleshooting Additional Troubleshooting Problems Solutions Strange noise is possible the destination was incorrect. Web Image Monitor Confirm that [On] is... properly attached. No e-mail notification is still not operating satisfactorily, contact your sales or service representative. Consult with the store where the printer...
...but not received, it is heard. Make the setting for obtaining time information from the e-mail server. Troubleshooting Additional Troubleshooting Problems Solutions Strange noise is possible the destination was incorrect. Web Image Monitor Confirm that [On] is... properly attached. No e-mail notification is still not operating satisfactorily, contact your sales or service representative. Consult with the store where the printer...
User Guide
Page 169
...A Additional troubleshooting, 124 Alert indicator, 4 Attaching Memory Unit Type F, 17 Attaching Paper Feed Unit TK1010, 15 B Bypass tray, 1 C Cable cover, 2 CAUTION label, i Cleaning the friction pad, 102 Cleaning the paper feed roller, 102 Cleaning the paper tray, 105 Cleaning the printer, 99 ..., 1 Fusing unit, 3, 92, 138 H How to read this manual, v I Inside, 3 Installing options, 15 Installing the operating instructions, vii Installing the printer, 5 Intermediate transfer unit, 3, 81, 138 IP address, 25 J Job reset key, 4 L LED lamps, 22 Loading envelopes, 60 Loading Legal size paper,...
...A Additional troubleshooting, 124 Alert indicator, 4 Attaching Memory Unit Type F, 17 Attaching Paper Feed Unit TK1010, 15 B Bypass tray, 1 C Cable cover, 2 CAUTION label, i Cleaning the friction pad, 102 Cleaning the paper feed roller, 102 Cleaning the paper tray, 105 Cleaning the printer, 99 ..., 1 Fusing unit, 3, 92, 138 H How to read this manual, v I Inside, 3 Installing options, 15 Installing the operating instructions, vii Installing the printer, 5 Intermediate transfer unit, 3, 81, 138 IP address, 25 J Job reset key, 4 L LED lamps, 22 Loading envelopes, 60 Loading Legal size paper,...
User Guide
Page 170
... not supported, 42 Paper recommendations, 37 Paper type, 38 Power socket, 2 Power switch, 1 Print area, 43 Print cartridge, 3, 69, 137 Printer does not print, 113 Printing configuration page, 14 Printing test page, 14 R Ready indicator, 4 Rear cover, 2 Rear view, 2 Registration roller,...Symbols, v T Test printing, 14 Toner density sensor, 100 Top cover, 1 Top cover open lever, 1 Transcription roller, 3, 92, 138 Transfer unit, 3 Tray 1, 1 Troubleshooting, 109, 112, 113, 117 Types of paper, 38 U USB connection, 23, 114 USB host interface, 2 USB port, 2, 23 W WARNING label, i Waste toner bottle...
... not supported, 42 Paper recommendations, 37 Paper type, 38 Power socket, 2 Power switch, 1 Print area, 43 Print cartridge, 3, 69, 137 Printer does not print, 113 Printing configuration page, 14 Printing test page, 14 R Ready indicator, 4 Rear cover, 2 Rear view, 2 Registration roller,...Symbols, v T Test printing, 14 Toner density sensor, 100 Top cover, 1 Top cover open lever, 1 Transcription roller, 3, 92, 138 Transfer unit, 3 Tray 1, 1 Troubleshooting, 109, 112, 113, 117 Types of paper, 38 U USB connection, 23, 114 USB host interface, 2 USB port, 2, 23 W WARNING label, i Waste toner bottle...

User Guide
Page 180
...Printer 7 Installing the Printer Driver Using USB 8 Installing the PCL Printer Driver 8 Installing the PostScript 3 Printer Driver (Windows 2000 9 Installing the PostScript 3 Printer Driver (Windows XP and Windows Server 2003/2003 R2 10 Installing the PostScript 3 Printer Driver (Windows Vista and Windows Server 2008 12 Troubleshooting... USB 13 If a Message Appears during Installation 14 Making Option Settings for the Printer 15 Conditions for Bidirectional Communication 15 If...
...Printer 7 Installing the Printer Driver Using USB 8 Installing the PCL Printer Driver 8 Installing the PostScript 3 Printer Driver (Windows 2000 9 Installing the PostScript 3 Printer Driver (Windows XP and Windows Server 2003/2003 R2 10 Installing the PostScript 3 Printer Driver (Windows Vista and Windows Server 2008 12 Troubleshooting... USB 13 If a Message Appears during Installation 14 Making Option Settings for the Printer 15 Conditions for Bidirectional Communication 15 If...

User Guide
Page 197
Open Windows' Device Manager, and then, tings. Turn off the power of the printer, reconnect 1 the USB cable, and then turn it on again. Take care not to accidentally remove required devices. For details, see Windows Help. 13 Windows has already configured the USB set- under [Universal Serial Bus controllers] or [USB Controller], remove any conflicting devices. Conflicting devices have a [!] or [?] icon by them. Installing the Printer Driver Using USB Troubleshooting USB Problem Solutions The printer is not recognized automatically.
Open Windows' Device Manager, and then, tings. Turn off the power of the printer, reconnect 1 the USB cable, and then turn it on again. Take care not to accidentally remove required devices. For details, see Windows Help. 13 Windows has already configured the USB set- under [Universal Serial Bus controllers] or [USB Controller], remove any conflicting devices. Conflicting devices have a [!] or [?] icon by them. Installing the Printer Driver Using USB Troubleshooting USB Problem Solutions The printer is not recognized automatically.
User Guide
Page 303
... 22 Print server, 7, 89 PS 3, 25 PS Configuration/Font Page, 77, 108 PS Menu, 63 R Registration, 50, 80, 111 Resolution, 35 S Service call, 82 Shared printer, 7 Smart Organizing Monitor, 74, 106 SMTP, 72, 81, 111 SMTP authentication, 83 SNMP, 72, 81, 84, 111 Software and utilities, 113 Sort, 32 Standard TCP..., 80, 111 T TCP/IP, 72, 81, 96, 111 Test Page, 51, 77, 108, 111 Top Page, 66 Trademarks, 1 Tray Priority, 70 Tray registration, 51, 80 Troubleshooting, 41 U UDP, 84 USB connection, 1, 2, 8, 96 USB connection problem, 13 User mode, 67, 78, 109 User Tools tab, 76, 77, 78, 107, 108, 109 W ...
... 22 Print server, 7, 89 PS 3, 25 PS Configuration/Font Page, 77, 108 PS Menu, 63 R Registration, 50, 80, 111 Resolution, 35 S Service call, 82 Shared printer, 7 Smart Organizing Monitor, 74, 106 SMTP, 72, 81, 111 SMTP authentication, 83 SNMP, 72, 81, 84, 111 Software and utilities, 113 Sort, 32 Standard TCP..., 80, 111 T TCP/IP, 72, 81, 96, 111 Test Page, 51, 77, 108, 111 Top Page, 66 Trademarks, 1 Tray Priority, 70 Tray registration, 51, 80 Troubleshooting, 41 U UDP, 84 USB connection, 1, 2, 8, 96 USB connection problem, 13 User mode, 67, 78, 109 User Tools tab, 76, 77, 78, 107, 108, 109 W ...

