User Guide
Page 1
..., special, incidental, or consequential damages as a guide only and is prohibited by local law: bank notes, revenue stamps, bonds, stock certificates, bank drafts, checks, passports, driver's licenses. For details, please contact your local dealer. If you are subject to change without prior notice. Depending on the operation and use of copying...
..., special, incidental, or consequential damages as a guide only and is prohibited by local law: bank notes, revenue stamps, bonds, stock certificates, bank drafts, checks, passports, driver's licenses. For details, please contact your local dealer. If you are subject to change without prior notice. Depending on the operation and use of copying...
User Guide
Page 16
... operating the machine. Copying or printing the following items is prohibited by local law: bank notes, revenue stamps, bonds, stock certificates, bank drafts, checks, passports, driver's licenses. If you are subject to change without prior notice. For good print quality, the supplier recommends that might be slightly different from the machine...
... operating the machine. Copying or printing the following items is prohibited by local law: bank notes, revenue stamps, bonds, stock certificates, bank drafts, checks, passports, driver's licenses. If you are subject to change without prior notice. For good print quality, the supplier recommends that might be slightly different from the machine...
User Guide
Page 20
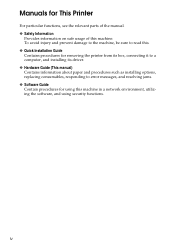
... and prevent damage to the machine, be sure to read this. ❖ Quick Installation Guide Contains procedures for removing the printer from its box, connecting it to a computer, and installing its driver. ❖ Hardware Guide (This manual) Contains information about paper and procedures such as installing options, replacing consumables, responding to error...
... and prevent damage to the machine, be sure to read this. ❖ Quick Installation Guide Contains procedures for removing the printer from its box, connecting it to a computer, and installing its driver. ❖ Hardware Guide (This manual) Contains information about paper and procedures such as installing options, replacing consumables, responding to error...
User Guide
Page 23
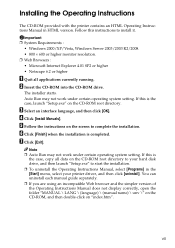
Installing the Operating Instructions The CD-ROM provided with the printer contains an HTML Operating Instructions Manual in the [Start] menu, select your hard disk drive, and then launch "Setup.exe" to start the installation. ❒ ... 6.2 or higher A Quit all data on the CD-ROM root directory. B Insert the CD-ROM into the CD-ROM drive. If this instructions to your printer driver, and then click [uninstall]. Note ❒ Auto Run may not work under certain operating system setting. Auto Run may not work under certain operating system...
Installing the Operating Instructions The CD-ROM provided with the printer contains an HTML Operating Instructions Manual in the [Start] menu, select your hard disk drive, and then launch "Setup.exe" to start the installation. ❒ ... 6.2 or higher A Quit all data on the CD-ROM root directory. B Insert the CD-ROM into the CD-ROM drive. If this instructions to your printer driver, and then click [uninstall]. Note ❒ Auto Run may not work under certain operating system setting. Auto Run may not work under certain operating system...
User Guide
Page 43
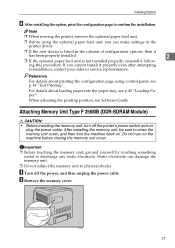
...unit, ground yourself by touching something metal to confirm the installation. B Remove the memory cover. ASI080S 17 Note ❒ When moving the printer, remove the optional paper feed unit. ❒ Before using control panel, see p.45 "Loading Paper". If you can damage the memory ...about printing the configuration page using the optional paper feed unit, you cannot install it follow- Static electricity can make settings in the printer driver. ❒ If the new device is listed in the column of configuration options, then it has been properly installed. 2 ❒...
...unit, ground yourself by touching something metal to confirm the installation. B Remove the memory cover. ASI080S 17 Note ❒ When moving the printer, remove the optional paper feed unit. ❒ Before using control panel, see p.45 "Loading Paper". If you can damage the memory ...about printing the configuration page using the optional paper feed unit, you cannot install it follow- Static electricity can make settings in the printer driver. ❒ If the new device is listed in the column of configuration options, then it has been properly installed. 2 ❒...

User Guide
Page 45
... cover. Note ❒ Before using control panel, see p.14 "Test Printing". 19 I After installing the option, print the configuration page to confirm the in the printer driver. ❒ If the memory unit is installed properly, the memory capacity will appear under "Total Memory" on the configuration page. If it is not properly...
... cover. Note ❒ Before using control panel, see p.14 "Test Printing". 19 I After installing the option, print the configuration page to confirm the in the printer driver. ❒ If the memory unit is installed properly, the memory capacity will appear under "Total Memory" on the configuration page. If it is not properly...
User Guide
Page 64
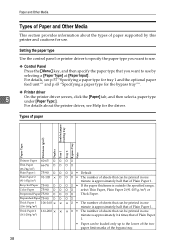
For details about the types of paper supported by selecting a [Paper Type] at [Paper Input]. Setting the paper type Use the control panel or printer driver to specify the paper type you want to use. ❖ Control Panel Press the {Menu} key, and then specify the paper type that of Plain ... cautions for the driver. Types of paper Enabled paper feeding tray Bypass Tray Thickness (g/m2) Note Tray 1 Tray 2 Duplex Paper Type Thinner Paper 60-65 Thin Paper (66-74g/m2) Plain Paper 1 66-74 75-90 Plain Paper 2 (91-105g/m2) 91-105 Recycled Paper 75-90 Color Paper 75-90 Preprinted...
For details about the types of paper supported by selecting a [Paper Type] at [Paper Input]. Setting the paper type Use the control panel or printer driver to specify the paper type you want to use. ❖ Control Panel Press the {Menu} key, and then specify the paper type that of Plain ... cautions for the driver. Types of paper Enabled paper feeding tray Bypass Tray Thickness (g/m2) Note Tray 1 Tray 2 Duplex Paper Type Thinner Paper 60-65 Thin Paper (66-74g/m2) Plain Paper 1 66-74 75-90 Plain Paper 2 (91-105g/m2) 91-105 Recycled Paper 75-90 Color Paper 75-90 Preprinted...

User Guide
Page 65
ASI087S 39 Also, configure the printer driver to the [Setup] tab and select [Rotate by 180 degrees] for [Orientation:] when printing. • If printed envelopes come out badly creased, load the envelopes ...
ASI087S 39 Also, configure the printer driver to the [Setup] tab and select [Rotate by 180 degrees] for [Orientation:] when printing. • If printed envelopes come out badly creased, load the envelopes ...

User Guide
Page 69
Paper Recommendations Print Area The following shows the print area for this printer. Be sure to set the print margins correctly by the application. ❖ Paper 5 A Print area B Feed direction C Approx. 4.2 mm (0.17 inches) D Approx. 4.2 mm (0.17 inches) Note ❒ The print area may vary depending on the paper size, printer language and printer driver settings. 43
Paper Recommendations Print Area The following shows the print area for this printer. Be sure to set the print margins correctly by the application. ❖ Paper 5 A Print area B Feed direction C Approx. 4.2 mm (0.17 inches) D Approx. 4.2 mm (0.17 inches) Note ❒ The print area may vary depending on the paper size, printer language and printer driver settings. 43

User Guide
Page 70
Paper and Other Media ❖ Envelope A Print area B Feed direction C Approx. 4.2 mm (0.17 inches) D Approx. 4.2 mm (0.17 inches) 5 Note ❒ The print area may vary depending on the paper size, printer language and printer driver settings. ❒ For better print quality, we recommend the right, left, top, and bottom print margins to be at least 15 mm (0.6 inches) each. 44
Paper and Other Media ❖ Envelope A Print area B Feed direction C Approx. 4.2 mm (0.17 inches) D Approx. 4.2 mm (0.17 inches) 5 Note ❒ The print area may vary depending on the paper size, printer language and printer driver settings. ❒ For better print quality, we recommend the right, left, top, and bottom print margins to be at least 15 mm (0.6 inches) each. 44

User Guide
Page 81
... 1 Important ❒ When printing on custom size paper, specify the paper size using the control panel or printer driver. ❒ Custom size paper selected using the printer driver overrides that selected using the printer driver. ❒ Paper sizes between 148 - 216 mm (5.83 - 8.5 inch) in width and 210 - ...356 mm (8.26 - 14 inch) in length can be loaded in the tray 1. ❒ The printer cannot print from applications ...
... 1 Important ❒ When printing on custom size paper, specify the paper size using the control panel or printer driver. ❒ Custom size paper selected using the printer driver overrides that selected using the printer driver. ❒ Paper sizes between 148 - 216 mm (5.83 - 8.5 inch) in width and 210 - ...356 mm (8.26 - 14 inch) in length can be loaded in the tray 1. ❒ The printer cannot print from applications ...

User Guide
Page 84
... hands when loading paper. Tray 1: Plain Paper 1 F Press the {Menu} key. Loading Paper in together. ❒ Load paper only when "Ready" is available using the printer driver or control panel. Otherwise, the paper may jam or the print quality may be printed on the control panel. The initial screen appears. A Hold the...
... hands when loading paper. Tray 1: Plain Paper 1 F Press the {Menu} key. Loading Paper in together. ❒ Load paper only when "Ready" is available using the printer driver or control panel. Otherwise, the paper may jam or the print quality may be printed on the control panel. The initial screen appears. A Hold the...

User Guide
Page 89
... size paper for the bypass tray Important ❒ When loading custom size or special paper, specify the paper size using the control panel or printer driver. ❒ The custom paper size selected using the control panel. A Press the {Menu} key. Do not configure the settings using the ...control panel if you have already made the settings using the printer driver. ❒ You cannot print on the paper type. ASI066S B Press the {T} or {U} key to display [Paper Size], and then press the {#Enter...
... size paper for the bypass tray Important ❒ When loading custom size or special paper, specify the paper size using the control panel or printer driver. ❒ The custom paper size selected using the control panel. A Press the {Menu} key. Do not configure the settings using the ...control panel if you have already made the settings using the printer driver. ❒ You cannot print on the paper type. ASI066S B Press the {T} or {U} key to display [Paper Size], and then press the {#Enter...

User Guide
Page 90
.... Paper and Other Media D Press the {T} or {U} key to enter the vertical value, and then press the {#Enter} key. Reference For details about the printer driver, see the printer driver Help. 64 Custom Size: mm 5 G Press the {T} or {U} key to display [Custom Size], and then press the {#Enter} key. Paper Size: Bypass Tray E Press...
.... Paper and Other Media D Press the {T} or {U} key to enter the vertical value, and then press the {#Enter} key. Reference For details about the printer driver, see the printer driver Help. 64 Custom Size: mm 5 G Press the {T} or {U} key to display [Custom Size], and then press the {#Enter} key. Paper Size: Bypass Tray E Press...
User Guide
Page 91
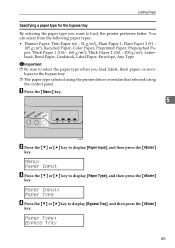
... from the following paper types: • Thinner Paper, Thin Paper (66 - 74 g/m2), Plain Paper 1, Plain Paper 2 (91 - 105 g/m2), Recycled Paper, Color Paper, Preprinted Paper, Prepunched Paper, Thick Paper 1 (106 - 160 g/m2), Thick Paper 2 (161 - 200 g/m2), Letterhead, Bond Paper, Cardstock, Label Paper, ...key to display [Paper Input], and then press the {#Enter} key. Paper Input: Paper Type D Press the {T} or {U} key to load, the printer performs better. Loading Paper Specifying a paper type for the bypass tray By selecting the paper type you load labels, thick paper, or envelopes in the...
... from the following paper types: • Thinner Paper, Thin Paper (66 - 74 g/m2), Plain Paper 1, Plain Paper 2 (91 - 105 g/m2), Recycled Paper, Color Paper, Preprinted Paper, Prepunched Paper, Thick Paper 1 (106 - 160 g/m2), Thick Paper 2 (161 - 200 g/m2), Letterhead, Bond Paper, Cardstock, Label Paper, ...key to display [Paper Input], and then press the {#Enter} key. Paper Input: Paper Type D Press the {T} or {U} key to load, the printer performs better. Loading Paper Specifying a paper type for the bypass tray By selecting the paper type you load labels, thick paper, or envelopes in the...
User Guide
Page 96
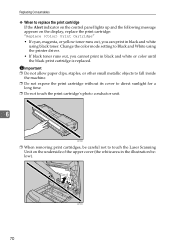
... area in black and white using the printer driver. • If black toner runs out, you can print in the illustration below). 70 ASH106S Change the color mode setting to touch the Laser Scanning Unit on the display, replace the print cartridge: "Replace (Color) Print Cartridge" • If cyan,... magenta, or yellow toner runs out, you cannot print in black and white or color until the black print cartridge...
... area in black and white using the printer driver. • If black toner runs out, you can print in the illustration below). 70 ASH106S Change the color mode setting to touch the Laser Scanning Unit on the display, replace the print cartridge: "Replace (Color) Print Cartridge" • If cyan,... magenta, or yellow toner runs out, you cannot print in black and white or color until the black print cartridge...
User Guide
Page 135
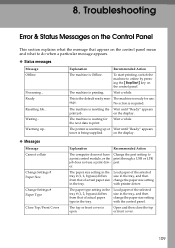
Explanation Recommended Action The machine is waiting for use a print driver. sage. The machine is Offline. Open and then close the top or front cover. 109 Wait a while. No action is being supplied. The printer is warming up ... Load paper of the selected size in the tray, and then change the paper... size setting with printer driver. Load paper of the selected size in the tray, and then change the paper size setting with the control panel. To start printing, switch the...
Explanation Recommended Action The machine is waiting for use a print driver. sage. The machine is Offline. Open and then close the top or front cover. 109 Wait a while. No action is being supplied. The printer is warming up ... Load paper of the selected size in the tray, and then change the paper... size setting with printer driver. Load paper of the selected size in the tray, and then change the paper size setting with the control panel. To start printing, switch the...

User Guide
Page 140
... Software Guide. 114 Windows 2000 A Click [Start], point to select the icon of the printer. B Click to [Settings] and then click [Printers]. ties]. lected. If the port (such as LPT1) is not correct, reinstall the driver. C Click the [Port] tab. Next, on the [File] menu, click [Proper-... B Click to select the icon of printers connected. If the port (such as LPT1) is not correct, reinstall the driver. D Check the [Print to the following port...
... Software Guide. 114 Windows 2000 A Click [Start], point to select the icon of the printer. B Click to [Settings] and then click [Printers]. ties]. lected. If the port (such as LPT1) is not correct, reinstall the driver. C Click the [Port] tab. Next, on the [File] menu, click [Proper-... B Click to select the icon of printers connected. If the port (such as LPT1) is not correct, reinstall the driver. D Check the [Print to the following port...

User Guide
Page 141
D Click to select the icon of the printer. If the port (such as LPT1) is not correct, reinstall the driver. Reference For details about installation and port settings, see Software Guide. C Click the [Port] tab. 8 D Check the [Print to the following port(s).]... box to confirm that the correct port is not correct, reinstall the driver. Next, on the taskbar. B Click to select the icon of the printer. If the port (such as LPT1) is selected. Reference For details about installation and port settings, see Software Guide....
D Click to select the icon of the printer. If the port (such as LPT1) is not correct, reinstall the driver. Reference For details about installation and port settings, see Software Guide. C Click the [Port] tab. 8 D Check the [Print to the following port(s).]... box to confirm that the correct port is not correct, reinstall the driver. Next, on the taskbar. B Click to select the icon of the printer. If the port (such as LPT1) is selected. Reference For details about installation and port settings, see Software Guide....

User Guide
Page 142
B Double click [Printer Setup Utility]. B Click [More Info]. C Click [Add]. Using the printer browser A In the menu bar, click [Go], select [Application], and then select [Utilities]. Troubleshooting Using [About This Mac] A Click Apple Menu, and then select [About This Mac]. Confirm the printer is not, reinstall the driver. 8 116 C Under [Contents], for [Hardware], Select [USB]. The printer browser stars. If it is displayed on the browser.
B Double click [Printer Setup Utility]. B Click [More Info]. C Click [Add]. Using the printer browser A In the menu bar, click [Go], select [Application], and then select [Utilities]. Troubleshooting Using [About This Mac] A Click Apple Menu, and then select [About This Mac]. Confirm the printer is not, reinstall the driver. 8 116 C Under [Contents], for [Hardware], Select [USB]. The printer browser stars. If it is displayed on the browser.


