
Hardware Guide
Page 1
For safe and correct use this manual carefully before you use , be sure to the Printer 2 Setting Up 3 Connecting the Printer Cables 4 Configuration 5 Paper and Other Media 6 Replacing Consumables 7 Cleaning and Adjusting the Printer 8 Troubleshooting 9 Removing Misfed Paper 10 Appendix Read this machine and keep it handy for future reference. Operating Instructions Hardware Guide 1 Guide to read "Safety Information" before using the machine.
For safe and correct use this manual carefully before you use , be sure to the Printer 2 Setting Up 3 Connecting the Printer Cables 4 Configuration 5 Paper and Other Media 6 Replacing Consumables 7 Cleaning and Adjusting the Printer 8 Troubleshooting 9 Removing Misfed Paper 10 Appendix Read this machine and keep it handy for future reference. Operating Instructions Hardware Guide 1 Guide to read "Safety Information" before using the machine.

Hardware Guide
Page 3
...8226; Using Server Certificates • Using SSL • Changing Administrator User Names and Passwords For details, see "Setting Up the Printer", Security Guide. Important ❒ Media differ according to this manual when configuring the machine's security and authentication settings. To prevent damage.... ❖ Safety Information Provides information on safe usage of the machine, data tampering, and information leakage. Manuals for This Printer Refer to error messages, and resolving jams. ❖ Software Guide Contains procedures for using this machine in , HTML versions of...
...8226; Using Server Certificates • Using SSL • Changing Administrator User Names and Passwords For details, see "Setting Up the Printer", Security Guide. Important ❒ Media differ according to this manual when configuring the machine's security and authentication settings. To prevent damage.... ❖ Safety Information Provides information on safe usage of the machine, data tampering, and information leakage. Manuals for This Printer Refer to error messages, and resolving jams. ❖ Software Guide Contains procedures for using this machine in , HTML versions of...
Hardware Guide
Page 5
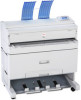
Note ❒ Check the label on the rear of measure: metric and inch. BAL006S ❒ Dimensions in this manual, model-specific information is indicated by the following marks: Indicates information that is specific to the 220 to 240 V model. If your printer is the 220 to 240 V model, refer to the metric units. If your printer is the 120 V model, refer to the inch units. iii Model-Specific Information In this manual are given in two units of the printer to identify the model. Indicates information that is specific to the 120 V model.
Note ❒ Check the label on the rear of measure: metric and inch. BAL006S ❒ Dimensions in this manual, model-specific information is indicated by the following marks: Indicates information that is specific to the 220 to 240 V model. If your printer is the 220 to 240 V model, refer to the metric units. If your printer is the 120 V model, refer to the inch units. iii Model-Specific Information In this manual are given in two units of the printer to identify the model. Indicates information that is specific to the 120 V model.
Hardware Guide
Page 6
...Exit]. E Follow the instructions on "index.htm". F Click [Finish] when the installation is completed. Installing the Operating Instructions The CD-ROM "Manuals" provided with this printer driver, and then click [Uninstall]. Important ❒ System Requirements : • Windows 95/98/Me, Windows 2000/XP, Windows Server 2003 or Windows NT4.0. •... starts. Select the appropriate version for your operating environment. ❒ To uninstall the Operating Instructions, select [Programs] in the [Start] menu, select this printer contains HTML version Operating Instructions.
...Exit]. E Follow the instructions on "index.htm". F Click [Finish] when the installation is completed. Installing the Operating Instructions The CD-ROM "Manuals" provided with this printer driver, and then click [Uninstall]. Important ❒ System Requirements : • Windows 95/98/Me, Windows 2000/XP, Windows Server 2003 or Windows NT4.0. •... starts. Select the appropriate version for your operating environment. ❒ To uninstall the Operating Instructions, select [Programs] in the [Start] menu, select this printer contains HTML version Operating Instructions.
Hardware Guide
Page 7
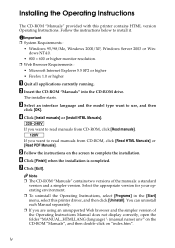
...ii Names of Major Options ii Model-Specific Information iii Installing the Operating Instructions iv 1. TABLE OF CONTENTS Manuals for This Printer i How to the Printer 15 Installing the Toner Cartridge 16 Loading Paper ...20 Loading the Paper Roll into Tray 1 and 2 21 Loading Cut... Tray 3 24 Turning On the Power 26 Anti-humidity Heater Switch 28 Selecting the Display Language 29 Test Printing ...31 3. Guide to the Printer Exterior: Front View 1 Exterior: Rear View 3 Interior...5 Control Panel...6 Display Panel...7 Displays and Key Operations 8 Options ...10 External Options...10...
...ii Names of Major Options ii Model-Specific Information iii Installing the Operating Instructions iv 1. TABLE OF CONTENTS Manuals for This Printer i How to the Printer 15 Installing the Toner Cartridge 16 Loading Paper ...20 Loading the Paper Roll into Tray 1 and 2 21 Loading Cut... Tray 3 24 Turning On the Power 26 Anti-humidity Heater Switch 28 Selecting the Display Language 29 Test Printing ...31 3. Guide to the Printer Exterior: Front View 1 Exterior: Rear View 3 Interior...5 Control Panel...6 Display Panel...7 Displays and Key Operations 8 Options ...10 External Options...10...

Hardware Guide
Page 8
... WPA/WPA2 60 Installing a Site Certificate 61 Installing Device Certificate 62 Setting Items of Paper and Other Media 68 Paper Not Supported by This Printer 70 Handling Paper ...71 Print Area ...72 Loading Paper ...73 Loading the Paper Roll into Tray 1 and 2 74 Loading Cut Paper into... Tray 3 81 Loading Paper in the Bypass Tray 88 6. Cleaning and Adjusting the Printer Maintaining Your Printer 101 Cleaning the Main Unit 102 Adjusting Paper Thickness 103 Adjusting the Fine Ratio 105 Adjusting the Folding Width 107 Adjusting the Margin Fold...
... WPA/WPA2 60 Installing a Site Certificate 61 Installing Device Certificate 62 Setting Items of Paper and Other Media 68 Paper Not Supported by This Printer 70 Handling Paper ...71 Print Area ...72 Loading Paper ...73 Loading the Paper Roll into Tray 1 and 2 74 Loading Cut Paper into... Tray 3 81 Loading Paper in the Bypass Tray 88 6. Cleaning and Adjusting the Printer Maintaining Your Printer 101 Cleaning the Main Unit 102 Adjusting Paper Thickness 103 Adjusting the Fine Ratio 105 Adjusting the Folding Width 107 Adjusting the Margin Fold...

Hardware Guide
Page 9
... Misfeed Message (B 129 Paper Misfeed Message (C 129 Paper Misfeed Message (N 130 Paper Misfeed Message (V 131 10.Appendix Moving and Transporting the Printer 133 Disposal ...134 Consumables ...135 Toner Cartridge ...135 Specifications for the Main Unit 136 Specifications for Options 139 Paper Cassette Type 240 139 IEEE...Ethernet Board Type A 140 INDEX...141 vii 8. Troubleshooting Error and Status Messages Appears on the Control Panel 111 Panel Tones...113 Printer Does Not Print 114 Checking the Port Connection 116 Other Printing Problems 117 Additional Troubleshooting 122 9.
... Misfeed Message (B 129 Paper Misfeed Message (C 129 Paper Misfeed Message (N 130 Paper Misfeed Message (V 131 10.Appendix Moving and Transporting the Printer 133 Disposal ...134 Consumables ...135 Toner Cartridge ...135 Specifications for the Main Unit 136 Specifications for Options 139 Paper Cassette Type 240 139 IEEE...Ethernet Board Type A 140 INDEX...141 vii 8. Troubleshooting Error and Status Messages Appears on the Control Panel 111 Panel Tones...113 Printer Does Not Print 114 Checking the Port Connection 116 Other Printing Problems 117 Additional Troubleshooting 122 9.
Hardware Guide
Page 11
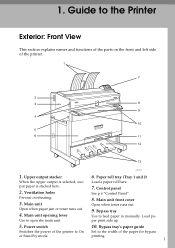
...manually. printing. 1 Main unit Open when paper jam or toner runs out. 4. Control panel See p.6 "Control Panel". 8. Guide to the width of the printer. BAL007S 1. Ventilation holes Prevent overheating. 3. Bypass tray Use to open the main unit. Paper roll tray (Tray 1 and 2) When the upper output is ... switch 10. Load paper print side up. 5. Upper output stacker 6. Bypass tray's paper guide Switches the power of the printer to On Set to the Printer Exterior: Front View This section explains names and functions of the parts on the front and left side of the paper for ...
...manually. printing. 1 Main unit Open when paper jam or toner runs out. 4. Control panel See p.6 "Control Panel". 8. Guide to the width of the printer. BAL007S 1. Ventilation holes Prevent overheating. 3. Bypass tray Use to open the main unit. Paper roll tray (Tray 1 and 2) When the upper output is ... switch 10. Load paper print side up. 5. Upper output stacker 6. Bypass tray's paper guide Switches the power of the printer to On Set to the Printer Exterior: Front View This section explains names and functions of the parts on the front and left side of the paper for ...

Hardware Guide
Page 12
Lower output stacker 1 When the lower output is selected, output paper is selected. Guide to insert rolled paper. 12. Note ❒ Do not pull out the lower output auxiliary guide when lower output is stacked here. Cut paper tray (Tray 3, optional) Load cut paper here. 13. Otherwise, output paper may not be stacked properly. 2 Lower output auxiliary guide Pull this out to the Printer 11.
Lower output stacker 1 When the lower output is selected, output paper is selected. Guide to insert rolled paper. 12. Note ❒ Do not pull out the lower output auxiliary guide when lower output is stacked here. Cut paper tray (Tray 3, optional) Load cut paper here. 13. Otherwise, output paper may not be stacked properly. 2 Lower output auxiliary guide Pull this out to the Printer 11.

Hardware Guide
Page 13
... facing the user. BAL008S 5. Exterior: Rear View Exterior: Rear View This section explains names and functions of the parts on the rear side of the printer. 1 1. Vents Prevent overheating. 3.
... facing the user. BAL008S 5. Exterior: Rear View Exterior: Rear View This section explains names and functions of the parts on the rear side of the printer. 1 1. Vents Prevent overheating. 3.

Hardware Guide
Page 14
USB port Plug a USB cable into this port to connect the printer directly to a computer port. network. 1 10. Reference p.10 "Options" p.28 "Anti-humidity Heater Switch" 4 Folding finisher port (optional) Plug a network (Ethernet) cable into this Plug the folding finisher cable into this port to connect the printer to a host computer. Ethernet port 11. Note ❒ Use the lower output guides if A0K or A1K sheets are being delivered to the Printer 9. Guide to the lower output exit.
USB port Plug a USB cable into this port to connect the printer directly to a computer port. network. 1 10. Reference p.10 "Options" p.28 "Anti-humidity Heater Switch" 4 Folding finisher port (optional) Plug a network (Ethernet) cable into this Plug the folding finisher cable into this port to connect the printer to a host computer. Ethernet port 11. Note ❒ Use the lower output guides if A0K or A1K sheets are being delivered to the Printer 9. Guide to the lower output exit.
Hardware Guide
Page 15
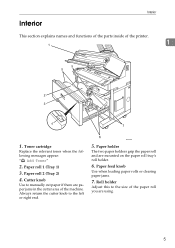
Roll holder Adjust this to the size of the paper roll you are paper jams in the cutter area of the printer. 1 1. Toner cartridge Replace the relevant toner when the following messages appear: "D Add Toner" 2. Cutter knob Use to the left or right end. Paper feed knob ...
Roll holder Adjust this to the size of the paper roll you are paper jams in the cutter area of the printer. 1 1. Toner cartridge Replace the relevant toner when the following messages appear: "D Add Toner" 2. Cutter knob Use to the left or right end. Paper feed knob ...
Hardware Guide
Page 16
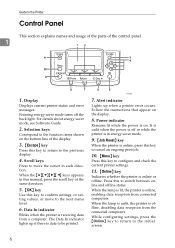
...} key to return to switch between online and offline status. Entering energy saver mode turns off or while the printer is in energy saver mode. 9. {Job Reset} key When the printer is online, press this key to cancel an ongoing print job. 10. {Menu} key Press this key to...same direction. 5. {OK} key Use this key to configure and check the current printer settings. 11. {Online} key Indicates whether the printer is offline, disabling data reception from connected computers. Data In indicator Blinks when the printer is on. BAL048S 7. Press this to the initial screen. 6 When the lamp is...
...} key to return to switch between online and offline status. Entering energy saver mode turns off or while the printer is in energy saver mode. 9. {Job Reset} key When the printer is online, press this key to cancel an ongoing print job. 10. {Menu} key Press this key to...same direction. 5. {OK} key Use this key to configure and check the current printer settings. 11. {Online} key Indicates whether the printer is offline, disabling data reception from connected computers. Data In indicator Blinks when the printer is on. BAL048S 7. Press this to the initial screen. 6 When the lamp is...
Hardware Guide
Page 17
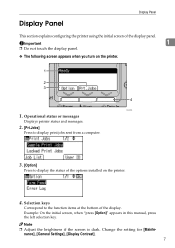
... the display panel. ❖ The following screen appears when you turn on the printer. 4. Display Panel Display Panel This section explains configuring the printer using the initial screen of the options installed on the printer. Operational status or messages Displays printer status and messages. 2. [Prt.Jobs] Press to display print jobs sent from a computer...
... the display panel. ❖ The following screen appears when you turn on the printer. 4. Display Panel Display Panel This section explains configuring the printer using the initial screen of the options installed on the printer. Operational status or messages Displays printer status and messages. 2. [Prt.Jobs] Press to display print jobs sent from a computer...

Hardware Guide
Page 18
... paper size, use the scroll keys to a selected directory, press the {OK} key. ❖ Entering the custom paper size, IPv4 Address, etc. Guide to the Printer Displays and Key Operations When the messages and menus described below appear, follow the procedures 1 explained here. ❖ Printing Displays the name of the display...
... paper size, use the scroll keys to a selected directory, press the {OK} key. ❖ Entering the custom paper size, IPv4 Address, etc. Guide to the Printer Displays and Key Operations When the messages and menus described below appear, follow the procedures 1 explained here. ❖ Printing Displays the name of the display...

Hardware Guide
Page 19
Press the {OK} key to resume printing from the selected tray. 1 9 match error occurs. Display Panel ❖ When an error message appears If the settings made for the job conflict with the printer's settings, a data mis- To resolve this error, press [JobReset] to pause printing, then press [Change], and then select the tray to begin printing from .
Press the {OK} key to resume printing from the selected tray. 1 9 match error occurs. Display Panel ❖ When an error message appears If the settings made for the job conflict with the printer's settings, a data mis- To resolve this error, press [JobReset] to pause printing, then press [Change], and then select the tray to begin printing from .
Hardware Guide
Page 20
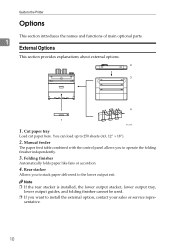
.... ❒ If you to operate the folding finisher independently. 3. Manual feeder The paper feed table combined with the control panel allows you want to the Printer Options This section introduces the names and functions of main optional parts. 1 External Options This section provides explanations about external options. Rear stacker Allows you...
.... ❒ If you to operate the folding finisher independently. 3. Manual feeder The paper feed table combined with the control panel allows you want to the Printer Options This section introduces the names and functions of main optional parts. 1 External Options This section provides explanations about external options. Rear stacker Allows you...

Hardware Guide
Page 21
Note ❒ Remove the machine's Ethernet and USB ports before connecting the Gigabit ethernet board. ❒ If you to install the optional interface unit, contact your sales or service representative. Reference p.33 "Connecting the Printer Cables" p.39 "Configuration" 11 Options Internal Options This section provides explanations about internal options. • IEEE 802.11b interface unit 1 Allows you to install the wireless LAN interface. • Gigabit ethernet board Allows you want to communicate with 1000BASE-T.
Note ❒ Remove the machine's Ethernet and USB ports before connecting the Gigabit ethernet board. ❒ If you to install the optional interface unit, contact your sales or service representative. Reference p.33 "Connecting the Printer Cables" p.39 "Configuration" 11 Options Internal Options This section provides explanations about internal options. • IEEE 802.11b interface unit 1 Allows you to install the wireless LAN interface. • Gigabit ethernet board Allows you want to communicate with 1000BASE-T.

Hardware Guide
Page 22
Guide to the Printer 1 12
Guide to the Printer 1 12

Hardware Guide
Page 23
... Connection". See p.49 "IEEE 802.11b (Wireless LAN) Configuration". The test print shows only if the printer is working properly. Setting Up Printer Setup Procedures Follow the steps explained below to set as the default language. The precautions on your machine's... anti-humidity heater are provided. English is properly established. 2. See "Installing the Printer Driver", Software Guide. 13 See p.16 "Installing the Toner Cartridge". Where to confirm the printer is functioning correctly. Installing the toner cartridge T Loading Paper T Turning the Power ...
... Connection". See p.49 "IEEE 802.11b (Wireless LAN) Configuration". The test print shows only if the printer is working properly. Setting Up Printer Setup Procedures Follow the steps explained below to set as the default language. The precautions on your machine's... anti-humidity heater are provided. English is properly established. 2. See "Installing the Printer Driver", Software Guide. 13 See p.16 "Installing the Toner Cartridge". Where to confirm the printer is functioning correctly. Installing the toner cartridge T Loading Paper T Turning the Power ...


